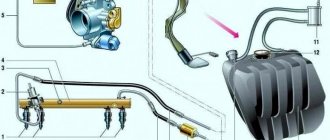
On any car, and the Lada Kalina is no exception, there are two on-board power sources - the battery and the generator. The battery is needed to start the engine, but can also be used to provide electricity to consumers when the power unit is not working.
If the engine is running, the generator supplies electricity to the network, and it also charges the battery as needed. Today we will look at a situation where the battery is not charging, which may indicate a whole bunch of malfunctions of varying degrees of severity.
Description of the procedure for replacing the timing belt VAZ 2110, (2112) 16 valves
Former flagship of the Russian automobile industry VAZ 2110 with a 1.5 16 valve engine.
Scheduled replacement of the timing belt 30,000 km after the last replacement. The autopsy showed that if they had not changed it today, then tomorrow there would have been more work for our mechanic. In general, we recommend that all customers check the condition of the belt at least once every 5,000, or once a year. But knowing the quality of our spare parts, more often is better. On this engine, if the belt breaks, almost all the valves bend. The article is also relevant for the VAZ 2112)) We look, remember and don’t let it get to that point.
The patient became five millimeters narrower and generally looked very bad. We send him to the honor board.
And here is the hero of the occasion himself.
We remove the absorber and power steering reservoir so that they do not interfere in the future.
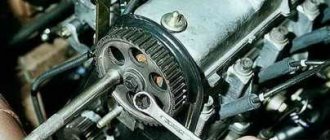
We loosen the bolt by seventeen, the tension roller of the service belt and remove the last one. It will not be possible to remove it completely because the engine mount is in the way. If the belt requires replacement, you will have to unscrew the engine mount.
Remove the tension roller. We unscrew the bolts securing the upper protective cover; they are hexagonal.
Remove the right wheel, plastic mudguard and drain the antifreeze.
We see the crankshaft pulley. Using its bolt, clockwise, rotate the crankshaft until the marks on the camshaft pulleys and the timing belt protective cover match.
Markings on the left exhaust camshaft. The mark on the protective cover is highlighted in red.
Likewise for the intake camshaft. He's on the right. Its pulley has an inner ring for the phase sensor, so it is very difficult to mix up the pulleys.
Remove the crankshaft pulley. Let's lock the crankshaft with the help of a friend. We put him in the car and force him to turn on fifth gear and press the brake all the way. And at this time, with a slight movement of your hand, unscrew the crankshaft pulley bolt. Remove it and the lower protective cover.
We see that the mark on the sprockets and the slot on the ebb of the crankshaft cover coincide.
Loosen the seventeen bolts of the tension and idler pulleys and remove the timing belt. Then the videos themselves. We change them anyway.
We lock and unscrew the camshaft pulleys and remove them. Remember that the right camshaft has a pulley with an inner ring for the phase sensor. The picture should look like this.
We unscrew everything that holds the protective plastic cover and remove the latter. Unscrew the three bolts holding the pump. They are hexagonal.
The pump for a sixteen valve engine is slightly different from the usual for an eight valve engine. It has a small threaded ear for attaching the protective casing.
Lubricate the gasket with a thin layer of sealant and put the pump in place. Tighten the fastening bolts. We put the protective cover in place. We make sure that he sits in his place, otherwise he will rub the belt. If everything is in order, tighten everything that holds it and install the camshaft pulleys and new rollers.
We check that the marks on the camshafts and crankshaft match. We install a new timing belt. If there are no directional arrows, put it so that the inscription is read from left to right.
Actions when charging disappears
The generator on a Kalina with air conditioning has more power than on cars without an air conditioning system. The design and faults are the same. What to do if charging is lost? Don't panic and check immediately:
- Voltage regulator. The easiest and most expensive way is to replace it with a known good one. But you can also apply voltage of 12 V and 15 V to check operation. Regardless of whether the regulator is mechanical or electrical, it will behave the same. In the first case, voltage will be supplied to the excitation winding, but in the second - not.
- Alternator slip rings and brushes. You can use a simple lamp probe to check the contacts. The length of the brushes must be more than 5 mm, otherwise they should be replaced.
- The integrity of the field winding can be checked with a tester. Moreover, there is no need to remove the generator, just crawl up to the slip rings and check the resistance between them. Please note that they should not short to ground.
- The condition of the stator winding and diode bridge can be assessed only after dismantling the generator.
Tuning and sports camshafts
If there is a need to do engine tuning, but there is no clear definition of which camshaft to install, you should consult with the experts. In addition, you need to familiarize yourself with the basic information.
As a rule, the camshaft can be low or high:
- The advantage of the first option is an increase in torque at the “lower” levels, due to this it becomes possible to sharply accelerate without engaging a lower gear. At medium speeds, such camshafts are no better than serial products, while at high speeds they are even worse.
- in the second option, the opposite picture is observed; here we mean high rises, which increase engine power, while high torque goes towards high speeds. A significant drawback lies in the failures at the “lower” levels. The better the performance of the overhead camshaft, the stronger this effect.
As a rule, tuning camshafts have a lift of up to 11 millimeters. If this figure is higher, then the camshaft will be called sports. Despite this statement, there are exceptions.
VAZ and GAZ specialists answer
VAZ and GAZ specialists answer
1. There is not a word in the VAZ 2110 service book that the injectors need to be washed periodically. However, the service center, referring to certain VAZ instructions, recommends doing this after 20–30 thousand km. Who to believe?
The factory instructions do not provide for cleaning the injectors. Similar work may be required if a decrease in fuel flow through the injectors is detected. The most likely reason for this is the use of low-quality gasoline.
2. Why, when adjusting the gaps on a VAZ 2110 engine, does the camshaft, after aligning the marks, still need to be turned in the same direction (clockwise) by about three teeth? Why don't they measure the clearance with the cam in a vertical position?
The text of the Repair Manual for the VAZ 2110 does not indicate the direction of turning, which is incorrect. It is desirable to turn it counterclockwise - in this case, the back of the cam of a constant radius is more reliably oriented towards the center of the adjusting washer compared to the position of the aligned marks. The step-by-step algorithm for adjusting valve clearances described in the Manual is designed for a person with minimal experience. In general, the valve clearance can be measured at any position of the camshaft, if the back of the cam with a constant radius is located opposite the center of the washer. The middle of the back of the cam is preferred, when its top is as far away from the washer as possible.
3. How to distinguish a timing cover with an antiphon from a regular one? Are these produced?
The cylinder head cover made of antiphon material is equipped with engines of 1.45 and 1.6 liters of “classic” cars equipped with an ECM, as well as 1.7-liter engines with an ECM on all-wheel drive VAZ 21214 and VAZ 2123. You can distinguish such a cover according to the following characteristics:
— a dull sound when tapping on the lid;
— when examining the edges of the cover from below, two layers of metal are visible, and the layer of plastic separating them is thin and practically invisible. In addition, engine covers VAZ 2104, 21067 and 2123 are distinguished by a threaded oil filler neck.
4. When repairing engines 2108, 2110, I more than once encountered axial play of the camshaft of 0.7 mm or even more. Does the plant regulate this value?
The tolerance for camshaft axial play for new engines of the 21081, 2108, 21083, 2110, 2111, 21114 family ranges from 0.15 to 0.53 mm. Since the interface “camshaft housing - camshaft - housing of auxiliary units”, which determines the axial clearance, wears out slightly, the repair documentation does not specify a maximum permissible value for it. Excessive play can be considered when an extraneous knock is heard, irregular but loud. Typically, the threshold for knocking is a play of 0.8–1.0 mm.
1. Should the release bearing rotate when the Volga engine is running?
Since 1979, Volga cars have been equipped with a backlash-free clutch release drive using a radial release bearing. This was done to reduce travel and pedal effort. When the engine is running, the release bearing, regardless of the position of the clutch pedal, rotates at the same speed as the crankshaft. This design is used on GAZ vehicles with ZMZ-402, 406, 405 engines.
Malfunctions of the VAZ 2107 camshaft, their symptoms and causes
Considering that the timing shaft is subject to constant dynamic and temperature loads, it cannot last forever. It is difficult even for a specialist to determine that this particular unit has failed without detailed diagnostics and troubleshooting. There may be only two signs of its malfunction: a decrease in power and a quiet knocking sound, which manifests itself mainly under load.
The main camshaft faults include:
- wear of the working bodies of the cams;
- wear of the surfaces of the bearing journals;
- deformation of the entire part;
- shaft fracture.
Wear of cams and journals
Wear is a natural occurrence for a constantly rotating part, but in some cases it can be excessive and premature. This leads to:
- insufficient oil pressure in the system, as a result of which lubricant does not flow to loaded areas or is supplied in smaller quantities;
- low-quality motor oil or one that does not meet established requirements;
- defect in the production of the shaft or its “bed”.
If the cams wear out, the engine power is noticeably reduced, since they, being worn out, cannot provide either the appropriate phase width or the required lift of the intake valve.
Deformation
Camshaft deformation occurs as a result of severe overheating caused by malfunctions of the lubrication or cooling systems. At the initial stage, this malfunction may manifest itself in the form of a characteristic knocking sound. If you suspect such a breakdown, further operation of the car is not recommended, as it can damage the entire gas distribution mechanism of the engine.
Fracture
A camshaft fracture may be a consequence of its deformation, as well as poor timing. In the event of this malfunction, engine operation stops. In parallel with this problem, others arise: destruction of the shaft “bed”, bending of valves, guides, damage to parts of the piston group.
Eliminate camshaft knock (axial runout) with your own hands
Many people already know that the VAZ 2111 injection engines have the following disease: “Axial runout of the camshaft.” This disease does not progress and does not cause damage to other timing components, but it manifests itself in the form of an unpleasant camshaft knock. It just so happened that the developers of the 2111 engine missed this point.
Where carburetor engines used to have a fuel pump and distributor, injection engines have a regular plug into which the camshaft rests. The camshaft axial play set by the manufacturer should not exceed 0.15-0.20mm. Over time, as the camshaft pastel wears out, the axial play increases, and a distinct knock begins to be heard from under the valve cover. Of course, you can continue to drive with this knock and not worry, but not every car enthusiast will be pleased.
I am sure that almost any auto repair shop will tell you: “Either ignore this knock, or change the entire head!” But there is one simple and absolutely free way to eliminate this annoying knocking noise by placing a washer between the camshaft and its side cover! Below is a detailed description and photo report of the work done.
Checking the camshaft axial play.
Remove the timing belt cover and start the engine. Then, with the engine running, press the handle of a screwdriver into the camshaft gear bolt. If the knock disappears when pressed, the reason is: Axial runout of the camshaft.
"Check Engine" - the show of intuition begins
Many Kalinovites, when the check signal comes on, begin to panic and immediately go to a car service center. But not everything is as bad as it seems at first glance, and the reason may lie on the surface. So, let's look at why the check engine light is on on the Lada Kalina and the reasons for the mysterious effect:
- Failure of one of the power unit sensors.
- Throttle.
- Injectors.
- Fuel pump and filter.
- Air filter.
- Spark plugs and high-voltage wires.
- Petrol.
- ECU.
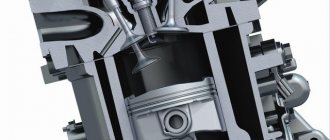
Camshaft
Replacing the camshaft VAZ 2110
The camshaft is located on top of the cylinder head and is connected by a timing chain or belt to the crankshaft sprocket and pulley. The main problems requiring repair or replacement of the camshaft include an increased risk of wear, scratches on the bearing journals of the mechanism, as well as frequent scuffing or deflection (deformation). In addition, a decrease in pressure in the engine lubrication system should be noted. The cause of this problem may be significant wear of the camshaft journals, or damage to the camshaft bearings in the cylinder head. In the second case, a complete replacement of the cylinder head is required, since the sockets are located directly in the cylinder head body. A distinct knocking sound of the valves may be observed, provided that the hydraulic compensators are working (see Replacing hydraulic compensators - how to do it correctly) and the clearances in the valve drive are increased. Causes may include worn camshaft lobes, poor quality engine oil, or a non-functioning or clogged oil filter.
Camshaft
The camshaft is located on top of the cylinder head and is connected by a timing chain or belt to the crankshaft sprocket and pulley. The main problems requiring repair or replacement of the camshaft include an increased risk of wear, scratches on the bearing journals of the mechanism, as well as frequent scoring or deflection (deformation). In addition, it should be noted that the pressure in the engine lubrication system decreases. The cause of this problem may be significant wear of the camshaft journals, or damage to the camshaft bearings in the cylinder head. In the second case, a complete replacement of the cylinder head is required, since the sockets are located directly in the cylinder head body. A distinct knocking sound of the valves may be observed, provided that the hydraulic compensators are working (see Replacing hydraulic compensators - how to do it correctly) and the clearances in the valve drive are increased. Causes may include worn camshaft lobes, poor quality engine oil, or a non-functioning or clogged oil filter.
Note! Such malfunctions can lead to loss of power and interruptions in engine operation.
In frequent cases, the camshaft is changed during the tuning process of the car. In this case, most craftsmen, instead of a standard camshaft, install a sports one with completely different indicators, intake/exhaust phases and other cams. Using such a mechanism, you can increase the power or efficiency of the engine. When the camshaft wears to its maximum limit, a faint knocking sound may be heard in the head area, these are the first signs of a malfunction.
Note! When changing the gas camshaft, not only the mechanism itself is replaced, but also its case. Therefore, it is not recommended to buy the shaft and the pencil case separately, as the sizes may not match.
In some situations, you can get by with shaft restoration. During the restoration process, the journals are ground using a grinding machine, repair bushings are installed on the seats, or argon is welded onto them with further grooving. Based on practice, it should be noted that such products will not work for a long time.
Note! An important cause of camshaft failure is wear of the cam profile
Who is the engine knocking on?
A strange knock may call you on the road, but it does not come from the engine compartment of the car. If there is something knocking there, then it is probably the engine, which means it is in some kind of trouble. This can be confirmed by the indicator signal about a slight decrease in oil pressure in a heated internal combustion engine running in idle mode.
It happens that the engine does not make any suspicious knocks, but the oil pressure has still decreased. Then you need to step on the gas and listen to the operation of the internal combustion engine. A signal of a problem with the unit will be a noise reminiscent of a hammer hitting cast iron.
Sometimes knocking in the engine occurs at idle, and at higher speeds it subsides completely or becomes barely perceptible. Usually this scenario is not too dangerous - it’s another matter if pressing the gas increases the volume of the knock. Be that as it may, it is still better to find out where this “music” comes from.
The internal combustion engine, like other car components, gradually wears out, and sometimes something breaks. For example, a power plant idling may knock due to:
The engine, which has an automatic transmission, sometimes knocks due to deformations in the flywheel. The same element in an engine operating with a manual transmission is quite massive. Therefore, it is unlikely to burst.
Knowledgeable car enthusiasts can try to independently identify and eliminate the cause of a particular knock. For those who are not eager to understand the details or simply do not want to take risks in order not to completely finish off the power plant of the car, it is better to resort to the services of a car service.
Step-by-step guide to changing the camshaft on a VAZ 2110
- The camshaft is installed at the end of the compression stroke of the fourth cylinder.
- Using a size 13 wrench, the chain tensioner is released, then when the mounting rests on the tensioner shoe, you need to tighten the tensioner rod, after which it is fixed using the chain tensioner nut.
Note! If the process cannot be completed, you need to completely dismantle the tensioner.
- Using a flat-head screwdriver, carefully bend the lock washer of the camshaft sprocket mounting bolt.
- Fourth gear is activated, in this case the camshaft is fixed. This way it won't turn.
- The sprocket mounting bolts can only be unscrewed with a 17th key.
- The camshaft “bed” is disassembled by unscrewing 9 nuts with a 17th key.
- Now you can safely dismantle the camshaft along with the “bed”, removing it from the mounting pins.
- Using the 10th key, unscrew the two bolts for fastening the thrust flange; such measures allow you to easily remove the flange.
- To prevent the springs from pressing, you need to lift the cam, which is also dismantled.
- At the final stage, the camshaft is removed from the “bed”.
- The cam spring is removed.
Disassembly is completely completed, now all that remains is to replace the camshaft and reassemble all the parts in the reverse order of disassembly.
Note! Tightening of the fastening nuts “bed” must be carried out in strict accordance with the diagram.
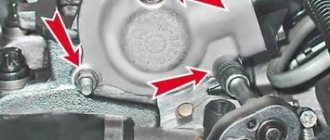
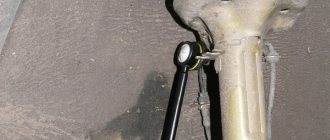
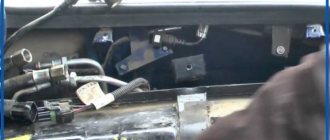
How to dismantle the generator
Now we need to tell you how to remove the generator. To do this, proceed according to the following principle:
- Disconnect the battery.
- Disconnect all wires going to the generator.
- Pre-treat threaded connections with penetrating lubricant such as WD-40.
- Unscrew the nut from the top mounting of the generator. The bracket can also be removed.
- Unscrew the nut from the lower mounting bolt. Hold the bolt head from turning.
- Remove the Kalina generator belt from the roller. There is no need to perform any manipulations with the air conditioner and power steering.
- Remove the generator from its seat.
What to do
Drivers had to deal with the fact that occasionally after the start an incomprehensible knocking sound began to appear, but when accelerating and warming up the engine it disappeared. As we have already figured out, most likely the camshaft on the engine has failed.
Now another question. What to do in such a situation? If the camshaft starts knocking, you should be prepared to spend a considerable amount of money. But this is not a 100% probability, since sometimes hydraulic compensators begin to knock, or knocking noises are made by worn gears and bearings. Not all situations solve the problem by replacing the entire camshaft. If you suspect a knocking noise from this unit, it is better to immediately go for diagnostics. Due diligence can help you find out where the source of the problem is and what needs to be done about it.
It’s definitely not worth delaying diagnostics. If the compensators fail, and the problem was in them, then the chain reaction will lead to the breakdown of the shaft itself. And these are completely different expenses. So it would definitely be a good idea to check the hydraulic compensators.
As you can see, delaying the check is definitely not in your interests.
Main Generator Components
In general, a generator is a converter that creates electrical energy from mechanical energy. On all cars, the design and operating principle of these devices are similar. The design consists of the following components:
- The stator winding, a thick copper wire is used for it, since it is with its help that voltage is generated.
- The rotor winding is excitation. Without it, it is impossible for current to appear in the stator winding. In order for any potential difference to appear in the frame, the presence of two components is necessary - rotation and a magnetic field. Thanks to the generator belt on the Kalina, the rotor rotates. It is its winding that fulfills these two conditions - a magnetic field is created around it, and it rotates around its axis.
- The rotor is equipped with slip rings, to which voltage is supplied using a brush assembly.
- A pulley mounted on the rotor allows rotation to be transmitted from the crankshaft via the generator belt on the Kalina.
- A mechanical or electronic voltage regulator changes the voltage on the rotor winding. Due to this, the generator produces a stable voltage.
- The block of semiconductors (valves) mentioned earlier is necessary to convert three-phase alternating voltage into unipolar direct voltage.
- Covers with bearings are designed for rotor alignment and normal operation of the unit.
- The capacitor allows you to get rid of residual alternating current after rectification.
The camshaft device on the “ten”
Typically, domestic manufacturers use cast iron as materials for the manufacture of camshafts. A cast part with five supports is manufactured. At the end of the shaft there is an eccentric to drive the fuel pump. To make the cams and seals last longer, they are bleached. To avoid movement of the camshaft axis, the designers came up with a flange.
It is secured between the cylinders and the housing of the auxiliary units. Using a toothed belt, the pump shaft and pulley are driven to cool the liquid. The tension is controlled using a roller. Its inner part rotates relative to the pin located on the belt.
To adjust the tension, you need to use a special key and set the ignition position to the marks. To measure the amount of air that enters the engine, there is a special VAZ 2110 camshaft sensor (DPRV). It can fail only when moisture enters the engine along with the air.
https://youtube.com/watch?v=CuOAi0WKn-M
At low speeds, the DPRV can give inaccurate readings that are 15-25% higher. At the same time, the usual rhythm of engine operation changes. The powertrain begins to perform poorly at idle, stalls abruptly when load is added, and may even fail to start. At the same time, fuel consumption increases sharply.
The manufacturer provides a device on the sensor for some sensitive elements. They are installed where air enters. These elements conduct a temperature analysis of the incoming air, and if it does not meet the standards, they heat it to the desired state. The signal is a DC voltage. It can range from 1 to 5 V.
When the engine is running, air first hits the sensor located in front of the resistor, and then the one behind it. The second sensor maintains its temperature. Thanks to the signals from both sensors, it is possible to construct a curve and track the duration of the opening of the injectors.
Tuning and sports camshafts
Replacing the camshaft in a VAZ 2110 with a sports one
If there is a need to do engine tuning, but there is no clear definition of which camshaft to install, you should consult with the experts. In addition, you need to familiarize yourself with the basic information.
Sports camshaft
As a rule, the camshaft can be low or high:
- The advantage of the first option is an increase in torque at the “lower” levels, due to this it becomes possible to sharply accelerate without engaging a lower gear. At medium speeds, such camshafts are no better than serial products, while at high speeds they are even worse.
- in the second option, the opposite picture is observed; here we mean high rises, which increase engine power, while high torque goes towards high speeds. A significant drawback lies in the failures at the “lower” levels. The better the performance of the overhead camshaft, the stronger this effect.
https://youtube.com/watch?v=mVhKFl9yj5U
Camshaft tuning scheme
As a rule, tuning camshafts have a lift of up to 11 millimeters. If this figure is higher, then the camshaft will be called sports. Despite this statement, there are exceptions.
Camshaft tuning
Often, car enthusiasts prefer tuning shafts, since sports cars are almost never used in city conditions. They are characterized by a small dip at the “bottoms”, as well as unstable high idle speeds. Greater efficiency can be observed only at maximum speed, and this is unacceptable in normal urban conditions.
Any repair of the car will be undertaken by the service station technicians, but there is no need to spend money on such services, since today, with the help of videos and photos, it is possible to do everything yourself. If the process of replacing the camshaft is being performed for the first time, step-by-step instructions will definitely help. Since the price of repairs at a car service center is now high, most car owners try to repair the car themselves, using advice and recommendations. It may take longer to replace a part this way, but you can save a lot of money.
Approximate cost of replacement at a car service center
As you can see, replacing the camshaft is done with your own hands, in a home garage. You don't need any special equipment. On the other hand, this is an intervention in the engine design, which, if unsuccessful, can damage the power unit. One of the signs of malfunction is that after replacing the camshaft, the engine begins to trip. Therefore, in order to avoid major repairs and large expenses, many car owners trust the procedure to car services.
The price of replacing a camshaft starts at approximately 4,000 rubles. If you only need to replace the oil seal, the service station will charge the same amount. Replacing the shaft sensor costs 500 rubles. Replacing the timing chain of a passenger car equipped with a 4-cylinder engine is usually estimated at 6-7 thousand rubles. On SUVs and crossovers, this procedure costs more - 10-11 thousand rubles.
The camshaft is most often installed in the upper part of the cylinder head, but there are also systems with a lower location. The latter option is found mainly on old cars or cars with weak engines. The upper location of the element, on the contrary, is the calling card of powerful internal combustion engines with high operating speeds.
Symptoms of camshaft play
There are several types of noise that cause camshaft failure (see Replacing a VAZ 2110 camshaft and all about it). In order to determine camshaft play on a VAZ 2110, you need to know the following causes and symptoms:
The camshaft flange needs to be checked. It may come into contact with the cylinder heads or housings, creating sound. The same sound is produced by increased camshaft play. Under normal conditions, the camshaft size is 0.15 - 0.53 millimeters. A specific sound occurs at levels of 0.8 - 1.0 millimeters. If you listen closely, the noise can be heard on the side of the plug.
- The sound of the surfaces of the journals touching the surfaces of the cylinder head supports.
- A specific sound from the contact of the surface of the journals with the surface of the cylinder head supports due to a violation of the cylindricality of the supports.
Generator operating principle
To visually visualize the operation of the installation, use the generator connection diagram. The second component of the installation is a voltage regulator, which is included in the power circuit of the rotor winding. The instrument panel contains a charge control lamp that:
- Lights up when the ignition is turned on and there is a breakdown in the generator set.
- Does not light up in normal mode and when there is a proper charge level.
A relay with normally closed contacts is used to power this lamp. Therefore, when the ignition is turned on, it lights up. Further, as soon as you start the engine, the generator begins to generate voltage. The relay winding is connected to the rotor power circuit; when voltage appears, the contacts switch - they open and the lamp goes out.
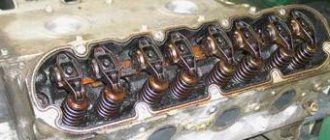
Removing the camshaft
Camshaft VAZ 2110 8 valves
This way you can determine the value of the noise, check its location, and draw up an accurate action plan for replacing equipment. It is necessary to repair those parts that are damaged. Since the camshaft play must be eliminated, this part must first be removed from the car engine. To carry out this work, you must follow the rules that will help in case of breakdown:
- The rear timing belt cover is removed.
- The cylinder head cover suffers the same fate.
- Since the work is very specific, the oil pressure sensor may be damaged. It needs to be disconnected or at least the wires disconnected.
- Using a socket wrench with the number “8” it is necessary to unscrew the 20 bolts that secure the camshaft bearing housing.
- The camshaft bearing housing is removed.
- Specific plugs are installed on the technological holes. There are two of them here. They must be removed from their locations.
- The exhaust camshaft is dismantled.
- The camshaft for the intake valves is disconnected.
- The seals must be removed from each shaft.
- After removing the oil seals, you must carefully examine each journal and cam of the mechanism. It should not have cracks, scratches or other visible damage.
Assembly and installation is a specific matter
Camshaft VAZ 2110 16 valves
It is slightly unusual to install this mechanism in the previous position. While most car parts and mechanisms can be installed in the reverse order of disassembly, camshafts require a special approach to assembly:
- The first step is to completely lubricate all parts of the camshaft with machine oil.
- The camshafts, after the lubrication process, are carefully placed in the cylinder head.
- 1006014 – exhaust camshaft.
- 1006015 – intake camshaft.
Also, the exhaust valve shaft has a special belt.
Do not apply a lot of this sealant on the planes of the bearing housing. If it is too much, clogging of the oil channels may occur.
- A thin layer of sealant is applied to the cylinder heads, bearing housing (lower part), near the spark plug channels.
- The cylinder head is being installed. The keyways should be positioned upward.
- The bearing housing is being installed on the cylinder head. The bolts are gradually tightened. It is necessary to tighten each several turns. The fastening bolts, after the surfaces of the mechanisms come into contact, must be tightened two at a time (each bolt located opposite each other must be tightened simultaneously and gradually).
Camshaft and cylinder head
- Camshaft seals are installed. The removed plugs are returned to their place.
- Some parts are lubricated with clean engine oil (spark plug channels, rubber O-rings).
- Subsequent assembly is similar to disassembly, but in reverse order.
To eliminate camshaft play, the part can be bored. If it is possible to purchase new parts, this method would be an excellent option. The cost of shafts may vary depending on the place of sale and seller’s markups. It should be noted that if you do not have the skills to work with turning equipment, you need to contact specialists from the service station. Watching the corresponding video and photo materials will help you work with your own hands. The main thing is to do everything as required by the instructions. If you do everything yourself, the cost of the issue will be low, because you only have to buy consumables without paying for repair services.
We make a washer.
For the material for the washer, I took a piece of galvanized sheet about 0.5mm thick and secured it to a piece of MDF panel with four self-tapping screws (so it wouldn’t fidget).
I drew 2 circles with a marker (inner diameter 25mm, outer 35mm) and hollowed out the inner diameter with a chisel.
I cut out the outer diameter with metal scissors, and I ended up with a curve like this, with the washer blank all covered in burrs:
I processed the inner diameter of the washer with a round file, and sharpened the sharp corners on the outer one: