Car headlights are the backbone of outdoor lighting. With their proper quality, the driver feels confident at any time of the day. Over time, the headlights lose their luster, become cloudy, become covered with a dense layer of dust, etc. The headlights should not be left in this condition, but it is also inappropriate to change them; the optimal solution is to polish the glass of the car's headlights. Most car enthusiasts polish their headlights with their own hands at home; the procedure is simple and practically inexpensive.
Polishing plastic headlights before and after
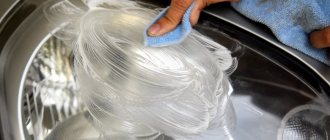
Polishing headlights with your own hands at home
There are many arguments in favor of polishing:
- risk of accidents due to insufficient lighting. In poor lighting, the driver may notice an obstacle late, which will disrupt his course and lead to an accident.
- dispersion disturbance. The problem may be due to improper dispersion of the flow, then the light enters the eyes and blinds oncoming drivers. This problem is a common cause of various accidents;
- improvement of decorative qualities. Even minor problems with car headlight lenses lead to a deterioration in appearance. It is impossible to create an attractive look with cloudy headlights.
You can fix these problems yourself by polishing your headlights. You can manually polish almost any material without the need for professional equipment. In order to save money, the procedure is most often carried out by the owner himself.
Cause of cloudiness
A decrease in the intensity of illumination provided by car headlights is due to the negative impact of the following factors:
- mechanical damage to glass in the form of scratches, cracks, chips that occur when stones fall from under the wheels, impacts from bush branches while driving;
- contamination by dust, splashes from puddles;
- yellowing characteristic of polycarbonate headlights as a result of prolonged exposure to direct sunlight;
- loss of shine due to freezing ice;
- cloudiness after using chemical cleansers.
When the first signs of damage appear, polishing should be carried out using available means.
The main causes of dim headlights and how to eliminate them
Do-it-yourself polishing of glass headlights is mainly carried out due to tarnishing of the material, due to the main reasons:
- gradual yellowing of the lenses. Over time, conventional headlights lose their initial transparency and turn yellow;
- layering of dirt and dust. If contamination remains for a long time, it eats tightly into the material and is no longer washed off with detergents;
- ingress of gravel and sand when driving. During the movement, stones always fly, which, when they hit the headlights, violate their integrity and create scratches of varying depths;
- improper care. Not all cleaning agents are suitable for headlight surfaces. Low quality raw materials can destroy the material.
The main causes of dim headlights
It is best to periodically clean the headlights using polish to remove dirt. A natural question arises: “How to polish glass headlights?” There is nothing complicated here, just follow 3 basic steps:
- Eliminate contamination and prepare everything necessary.
- Perform grinding.
- Polish the material.
Polishing the headlight glass under the lens with your own hands is an effective, high-quality and simple method of restoring the original appearance. The method is based on the use of special cleaning materials sold in most automobile stores.
Polishing is
Many motorists may have noticed that over time, standard headlights begin to produce less light when turned on.
Sooner or later, a time comes when methods such as adjusting headlights or replacing them with new ones do not help. The headlights still shine too dimly. Headlights tend to scratch, become cloudy and dim. Because of this, after a while, car enthusiasts are forced to think about buying new optics, the prices of which are quite steep. By periodically polishing your headlights, you can improve their efficiency by up to 30%, significantly increasing the strength and quality of light. This is a rather labor-intensive method that will take some time and effort, but you can do it without anyone’s help, on your own.
There is also an alternative option. There are kits for deep cleaning of headlights on sale. They allow you to do without polishing. In a few minutes you can restore the transparency of the headlight, as well as eliminate microcracks and scratches. If polishing looks like too complicated a process, it makes sense to use this method. This will be easier and simpler, but most likely more expensive.
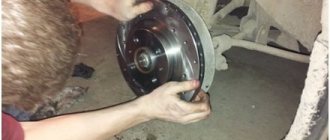
At home it is quite possible to restore the transparency of the headlights. You will need a certain number of tools, but if you wish, you can make do with improvised means, however, in this case, success is not guaranteed. You might just be wasting your time. It is also advisable to protect the rubber seals before polishing, as they may be exposed to abrasives and other substances that are used to restore the clarity of the headlights.
It is also necessary to remove dust and dirt from the headlights. They must first be washed and wiped with a dry cloth. Alternatively, you can use a vinegar solution for cleaning, which will give a slightly better effect. They can be polished without dismantling; they need to be removed only if you need to clean the headlights from the inside. In other cases, you just need to cover the areas near the headlights with construction tape to protect the car's paint from harmful substances that can harm the appearance of the car.
Features of polishing plastic headlights
There are 2 main options for polishing headlights at home. Both methods are effective:
- Selecting a characteristic chemical composition will help reduce time. The route is suitable for people with limited time.
- Use wet sanding material with high ductility. The substance gets into the damaged areas and clogs the cracks to create an ideal plane. Recommended for use when headlights are in poor condition. With this method you can achieve better results.
Polishing plastic headlights before and after
For high-quality processing of plastic headlight options, the following conditions must be met:
- The surface is first thoroughly cleaned of contamination. Chances are that no further polishing will be required;
- During operation, the tool must move in the vertical and horizontal directions. Circular movements will worsen the condition of the material;
- an attractive appearance is largely ensured by the finishing polish, which is applied with a dry flannel cloth;
- If there is severe damage, additional work may be required to restore the plastic.
Preparatory work
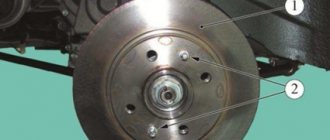
Before polishing the headlights yourself, you need to protect the adjacent parts of the car body. Insulating the perimeter of the radiator grille, the front edges of the wings, the hood and the top of the bumper will protect them from mechanical damage during the polishing process. Masking tape is used as a protective agent.
If sealing rubber is inserted on the body elements, it is also covered with several layers of tape.
The safest way is to remove the headlights and polish them away from the car. This option is especially effective for internal treatment of instrument surfaces. The further progress of work depends on the selected polishing agent.
What do you need to polish your headlights yourself?
Polishing headlights at home will require a minimum amount of materials and tools:
- washing liquid;
- grinder, in extreme cases you will have to replace it with a drill or apply the composition manually. For a drill, you will have to buy attachments with different grain sizes. For headlights, it is better to use brand options 600-4000;
- polishing agent – applied after sanding. The choice of products is huge, but it is better to buy proven brands;
- polishing kit - useful if you don’t have additional equipment. The kit includes moisture-resistant sandpaper, latex gloves, napkins (with fleece or microfiber) and chemical polish;
- masking tape, paper may be required;
- Be sure to use moisture-resistant materials for cleaning.
Headlight polishing machine
The first priority is to wash the headlights. You can use the usual products used to clean windows at home or monitor wipes. After completing the procedure, you need to wait for the moisture to dry and cover the body elements around the perimeter with tape.
When using an electric tool, you need to take a wheel with a grit of 600. After 2-3 minutes, a wheel with a higher grade is installed - about 1000, then 2000, and at the end - 4000. The duration of the procedure depends on the time it takes to acquire a matte and completely homogeneous appearance.
Some tips:
- if carbon fiber is used as the basis for the headlights, exercise extreme caution so that the material does not overheat;
- do not press the power tool or use high speeds;
- Periodically cool the surface with liquid.
Materials and tools
For high-quality polishing of car headlights you will need:
- Bucket with clean water;
- Scissors;
- Rags - 2 pcs.;
- Toothpaste;
- Masking tape;
- Polishing paste;
- Foam sponge;
- Coarse-grained skin (from 1500 to 2000).
Paste and other headlight polishing products
Let's look at how to polish headlight glass with your own hands. We will need a fleece or microfiber cloth. There are hobbyists who use regular wipes, but the glass will be coated with fiber. Polish is applied to a rag; you should choose a non-abrasive product or one with fine grains.
Farecla Total for headlight polishing
Recommended pastes:
- Farecla Total;
- Menzerna IP2000;
- Farecla G10 Liquid.
Grinding headlight glass under the lens requires following similar rules as during the cleaning process. If circular scratches appear, it will be more difficult to clean them.
After completing the main stage, it is worth moving on to the finishing layer. Now you will need polishing with special means that can leave a protective film. DeltaKits, Menzerna FF3000, etc. are popular.
Abrasive pastes
These materials belong to the category of polishing mixtures. There are different types of pastes on the market, differing in composition and method of application. Each of them has general requirements - good abrasive properties, capable of smoothing the sanded surfaces of car headlight housings.
- When choosing polishing mixtures, you should carefully familiarize yourself with the features of the selected pastes by studying the instructions on the packaging.
- In general, polishing headlights without using a grinding machine takes 1–1.5 hours.
How to polish glass headlights at home?
Method No. 1. Polishing headlights using an abrasive substance
When processing plastic and glass surfaces, it is worth dividing the work into 4 main stages:
- Damage investigation. It is preferable to use optical instruments on both sides of the material. After the inspection, the headlight is cleaned and dried. If the damage is deep, restoration work or complete replacement may be required.
- Carefully clean the lens from the outside with a handy cleaning agent.
- Safety first. We must not forget about safety precautions, and it is also important to avoid the use of abrasives for grinding plastic and its derivatives, as well as glass and rubber.
- Final sanding. The special composition of the wax will help to polish lighting fixtures with high quality. When you go to the store, you should buy a paste or sealant; the product will be useful for restoring lenses.
Polishing headlights with an abrasive
Method No. 2. Polishing headlights with sandpaper at home
Using special substances, you can easily polish by hand with a sufficient level of quality. Initially, you need to prepare sandpaper, cleaning solution and masking tape. When the preparatory stage is completed, it’s time to move on to work:
- Create body protection. To avoid damaging the enamel of the body elements during the grouting process, you need to cover the adjacent areas with mounting tape. You should not use tape as it can damage the paint and cause debris to stick.
- Glass cleaning. A cleaner is applied to the material; it is needed to remove contamination. The substance is rubbed on top with napkins or a rag. It is important to ensure sufficient purity of the matter.
- Polishing. Initially, the polish is applied with a standard sponge. You should fold the paper for maximum hand comfort. Now you need to treat the headlight with a coarse product with minimal marking. The paper is wetted in water all the time, this prevents overheating. Each new sheet is used in a perpendicular direction to the previous one.
- Cleaning. Before each stage of changing the grain size of the material, it is necessary to clean it with a soap solution. Before moving on to another marking, the sandpaper should be washed and dried with a rag.
- Application of polish. You can proceed to the stage only after obtaining satisfactory results. Pre-purchased polish should be rubbed over the headlight with any sponge. To increase efficiency, you should let the polish soak into the sponge. The composition is distributed throughout the headlamp.
- Inspection of the work. If you manage to sand the base of the glass correctly, they will look no worse than new.
Polishing headlights with sandpaper at home
Method 3. Polishing headlights yourself with a grinding machine
At your discretion, you can use a grinding machine. The processing process is similar to the previous method, the only difference is the abandonment of sandpaper in favor of a grinder. The machine should be used exclusively at low speeds. It is recommended to apply circles of modification 1000, then 2000 and at the final stage – 4000. All circles are processed for 2-4 minutes.
Method 4. Polishing plastic headlights with toothpaste
Many toothpastes are made with silica, small grains and baking soda. The listed substances are abrasive and may well be suitable for polishing headlights.
Procedure steps:
- Cleaning from pollution.
- Protect adjacent paintwork from abrasive substances.
- Paste is applied to the sponge; it must be used to treat the surface using circular movements.
- The duration of rubbing is about 5 minutes, during which time the scratches will be eliminated. Upon completion of the procedure, your appearance should improve significantly.
- You should wash off the remaining paste and wipe with a towel.
- Polishing to create a glossy effect.
Polishing plastic headlights with toothpaste
Polishing procedure
When updating headlights without using power tools, use coarse sandpaper soaked in water. It is necessary to strictly adhere to the recommendations of specialists. Once the optical instruments are removed, polishing can begin.
Algorithm of actions:
- The headlight is washed with shampoo and rinsed in a bucket of clean water.
- Next, rough sanding should be done using coarse sandpaper. If the plastic has serious defects, a 600 grit abrasive is used for processing. To remove deep damage, a 1000 grit abrasive is used.
- During the work, intermediate grinding is carried out, combining it with final polishing, periodically wetting the surface of the headlights. The sandpaper grit is gradually reduced, finishing with 2000 sandpaper.
- Final sanding is done with a polishing agent applied to a cloth. Next, polish the headlight until it shines.
On a note! “As a result of the work carried out, the caps take on their original appearance. But experienced motorists know that the polishing effect can be secured with varnish. Thus, the surfaces of plastic headlights will acquire an additional degree of protection. It is not recommended to varnish glassware.”
Recommendations
Based on the information listed, you can perform the polishing procedure with maximum quality for any headlight, including fog lights. Finally, a few recommendations:
- It is better to choose a polish after cleaning and assessing the condition of the headlight;
- before purchasing materials, you need to finally decide on the method of carrying out the work;
- a power tool will polish the headlight faster and better;
- Polishing should be carried out at least once every 2 years.
If you take proper care of your car, it will serve for a long time and will retain sufficient ability to transmit headlight light throughout the entire period of operation.
Why do the headlights shine worse?
If you purchased a new car, then the headlights will please you for several years. When the car is used. The problem may arise from the very beginning. And often it involves maintaining the vehicle. If the car was kept in a dirty place, it is not surprising that the headlights became in such a state. But even with ideal care, sooner or later they will begin to fade.
How to increase the service life? Take care of them all the time, wipe them and check their condition. Even cars with modern systems, lens optics and xenon are falling into disrepair. Time does not spare anyone, you can only delay the inevitable. There are several main reasons that adversely affect headlights:
- The plastic glass begins to become cloudy. The problem almost always lies in prolonged exposure to sunlight. If you do not park the car in the garage, and it is located on the street. The sun's rays make plastic glass cloudy within a few years. If you live in a warm region, then even a year is enough.
- Dampness and moisture. If you keep your car in a garage with high humidity or live in a region where there is a lot of rain. Dampness and moisture have a very detrimental effect on headlights. The result is the same as with the sun's rays.
- Dust. Another dangerous enemy of any headlights, which negatively affects their condition. Dust is everywhere, so this factor is simply impossible to avoid. Enterprises use special products that create a small film on your headlights. It protects them from dust and other aggressive environments. But it cannot guarantee security all the time; sooner or later, its influence will weaken.
Which headlight varnish to choose?
Today on the market there are many special varnishes for headlights from well-known manufacturers, but all of them, as a rule, are single-component. Unlike conventional two-component body varnishes (when the finished material is obtained by mixing varnish and hardener), one-component acrylic varnishes are less resistant to the environment, alkalis and solvents, which means the protection will be less reliable. Our opinion on this matter is that any, even the simplest two-component acrylic varnish will be much more reliable than a one-component headlight varnish from any reputable manufacturer. However, headlight varnish will likely last for several years and will also allow for quality pre-sale preparation. It is aerosol varnish for headlights that is mainly used by car enthusiasts, and of course, largely due to the convenience and ease of use.
Also, please note: car headlight varnish comes in different types - transparent and with a tinted effect. It is acceptable to use light tint for the rear lights, while tinting the headlights is not recommended, as this can greatly affect their clarity and efficiency at night.
How to make car headlights more transparent
If the plastic has darkened in places, become cloudy and dull, it is first recommended to conduct a full inspection of the headlight. Determining the degree of contamination and the level of damage will help determine the nature and scope of restoration work.
Do-it-yourself headlight polishing
If the plastic is not damaged, but the car is very dirty, washing with a special substance for washing glass will be enough. For minor damage, use toothpaste, preferably with a whitening effect, or “GOI No. 1”. They are applied after preliminary washing. The paste is a slightly abrasive substance with the ability to level the surface.
If more serious problems with optics are detected - relatively deep scratches, chips, many small cracks, etc. - the driver has two ways to solve the problem:
- take the car to a service center, where the procedure will be performed by specialists. Advantage - high quality of work, sometimes a guarantee;
- Polish the plastic coating yourself. There are many effective ways to polish headlights. Each of them will help you save money.
Before carrying out polishing yourself, you should prepare for the work:
- identify the presence and complexity of defects;
- choose the right polish for optics;
- determine the order of work.
Preventive measures
It is best to prevent damage to the headlights, but to periodically carry out preventative wiping, which will increase transparency and remove minor imperfections on the surface.
To carry out such work, it is not necessary to contact a service center; you can do everything yourself.
The essence of preventive maintenance is that the headlight is effortlessly wiped with clean rags using non-abrasive and finely abrasive products.
As abrasive materials, you can use both special pastes (for example, GOI No. 1), creams, and improvised means (toothpaste does an excellent job).
Using this simple method will always keep your car's optical devices in excellent condition.
Everything is very simple - apply the product to a soft rag and polish the headlight with versatile movements (circular, linear).