Despite the fact that the model has long been discontinued, there are plenty of original spare parts on the car market. In addition to factory parts, a number of components manufactured by foreign companies are available for sale. Obviously, the price of domestic brake system elements will be cheaper than their foreign counterpart.
Brake pads must be replaced if the limiting friction lining thickness of 2.0 mm is reached. Below this norm, there is a high probability of deformation and splitting of the lining into pieces. Elements of the brake system must be immediately replaced if engine, transmission oil or antifreeze gets on the surface.
The process of replacing pads is not complicated; every driver can do it, even without experience in servicing equipment.
Substitutes
| vendor code | Price, rub.) | vendor code | Price, rub.) |
| 0026400 TRW | 570 | 41062 | TRW |
| GDB140M ABS | 650 | ADB0281 | ABS |
| 98271307 Allied Nippon | 750 | Delphi 65139 | 780 |
| LP92/S | 800 | Delphi 0065139 | 780 |
| 98271307 Allied Nippon | 750 | Delphi 65139 | 780 |
| 98271307 Allied Nippon | 750 | Delphi 65139 | 780 |
| Allied Nippon | 65139 |
What rear brake pads can be installed on a VAZ 2106
The original rear brake pads are 3.5mm thick. With use, the friction lining wears out and is erased. When the thickness reaches 1.5 mm, the part must be replaced. Further operation of the machine is unsafe.
The process of replacing rear pads is as simple as replacing the front ones. Unless a handbrake cable is added, which should be removed. It is not necessary to have any special experience or skills. Please resort to the help of service station workers if you identify a large-scale breakdown that requires prompt intervention from professionals.
Brake pads VAZ 2107
The basis of the safety of any car is the braking system, in which the main component is the brake pads. Let’s talk about the purpose of the pads, their types, malfunctions and replacement on the VAZ “Seven” in more detail.
What are they used for?
Today, almost all cars use the same braking systems based on the friction force. The basis of this system is special friction mechanisms located on each wheel. The friction elements in them are brake pads and brake discs or drums. The car is stopped by the action of the brake pads on the drum or disc using a hydraulic drive.
What are there
On the seventh model Zhiguli, the brake pads have a design difference, since there are disc brakes in front and drum brakes in the rear.
Front
The front brake mechanism of the car is equipped with pads with catalog numbers 2101–3501090. The part has dimensions:
- length 83.9 mm;
- height - 60.5 mm;
- thickness - 15.5 mm.
The front brake elements on all classic Zhiguli cars are installed the same. The manufacturer and supplier of original front brake pads for the VAZ conveyor is JSC TIIR.
TIIR brake pads are supplied to the AvtoVAZ assembly line
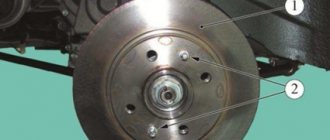
The design of the front brake mechanism is quite simple and consists of the following elements:
- brake disk;
- caliper;
- two working cylinders;
- two pads.
Design of the front brake mechanism of the VAZ 2107: 1 - guide pin; 2 - block; 3 — cylinder (internal); 4 — pad pressure spring; 5 — tube for the brake mechanism; 6 — caliper; 7 - fittings; 8 — tube of working cylinders; 9 — outer cylinder; 10 — disc brake; 11 — casing
The condition of the pads must be periodically monitored to ensure that the thickness of the linings is at least 2 mm. If the friction material is thinner, the pads need to be replaced.
Rear
For drum brakes, pads with article number 2101–3502090 and the following dimensions are used:
- diameter - 250 mm;
- width - 51 mm.
The original product is produced by AvtoVAZ OJSC. As with the front ones, the rear pads are suitable for any classic Zhiguli model.
Products from AvtoVAZ OJSC are used as original rear brake elements.
The rear axle braking mechanism has a simple drum design that works to expand. It consists of the following elements:
- drum;
- brake slave cylinder;
- pads;
- parking brake lever.
Design of the rear brake mechanism of the VAZ 2107: 1 - handbrake cable; 2 — parking brake spacer lever; 3 — rack support cup; 4 - block; 5 - cylinder; 6 — tension block spring (upper); 7 — expansion bar; 8 — tension spring (lower)
Which ones are better
There is no need to skimp when choosing braking elements. In addition, it must be taken into account that the design of the “seven” brake mechanism does not have any modern systems that increase the level of safety. Therefore, you should buy the products in question in accordance with the following indicators:
- the optimal friction coefficient according to GOST is 0.35–0.45;
- minimal impact on brake disc wear;
- long service life of linings;
- absence of extraneous sounds during braking.
If we consider brake pad manufacturers, then for active driving preference should be given to ATE, Ferodo. For a more relaxed driving style, when overheating and high loads on the braking system are not expected, you can purchase Allied Nippon, Finwhale, "TIIR". When purchasing a brake element, attention should be paid to the composition from which the friction lining is made. If the pad is made using large metal shavings, which is noticeable by characteristic inclusions, the brake disc will wear out much faster, while characteristic indentations will remain on it.
The best option would be those pads that are made from high-tech compounds that prevent rapid wear of the brake disc.
For active driving, it is recommended to install Ferodo front brake pads
Substitutes
| vendor code | Price, rub.) | vendor code | Price, rub.) |
| Delphi 65140 | 850 | Finwhale 23593 | 800 |
| LS1219/S | 850 | VR311 | 800 |
| Bosch 17888 | 950 | TRW 26401 | 800 |
| 986487217 | 850 | GS8164 | 850 |
| HZTS 79927 | 800 | 2101-3502090 | 800 |
| Start 63275 | 800 | 21010-3502092 | 850 |
| MASTER SPORT 2103-3502093 | 850 | 030137-02332 | 800 |
The lists are presented for informational purposes. Before purchasing, be sure to consult with a specialist from a service center or auto store to determine the compatibility of the catalog article with the make/model of your car.
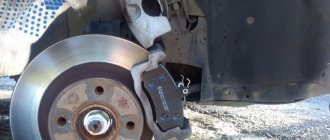
Replacing front pads on a VAZ 2107
Replacing the front disc pads of a VAZ 2107 is carried out according to the instructions given below.
- Jack up the car.
- Remove the wheel.
- Treat the brake mechanism with penetrating lubricant.
- Clean the cotter pins from dirt.
- Using pliers or a thin screwdriver, remove the pair of cotter pins holding the pad rods.
- Using a screwdriver, press out the pad rods. If they do not come out, then the assembly must be generously watered with a penetrating lubricant, for example, WD-40. Light tapping on the screwdriver is allowed to make it easier to squeeze out the rods. In this case, their complete dismantling is not required, since it will only be enough to release the pads.
- Remove the spring clips that are used to hold the brake pads and prevent them from rattling.
- Move the pads from their seat. Worn consumables usually slip out easily. If jammed, it is recommended to pry them off with a screwdriver. As a last resort, a penetrating lubricant should be used.
- Remove the pads.
- Inspect the brake cylinder boots. If there are signs of rubber aging or damage, the seals should be replaced.
- Check the brake fluid level in the reservoir. Pump out the slurry to the middle position.
- Press both pistons as far as possible using a spacer and a lever, which can be used as a crowbar, pry bar, or spatula. If they are not separated, then inserting a new block will be very difficult.
- Install the pads in their seat.
- Reassemble everything in the reverse order of removal.
- Check the operation of the brake system.
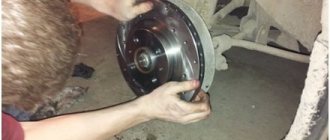
How to independently replace the front and rear pads on a VAZ 2106
Preparatory stage: a set of automotive tools, rags, new pads, liquid to remove layers of rust and corrosion.
Sequencing:
- Place the machine on a level platform. The option with an inspection hole or road overpass is excluded due to inefficiency;
- We jack up the front wheel with a hydraulic jack, remove it, having previously installed the wheel chocks;
- Use pliers to remove the guide pins. Please pay attention to the pressure springs; they may fly out during the work;
- Using a flat-tip screwdriver, press the slave cylinder into its original position. We widen the gaps to remove the brake pads;
- We remove worn pads, carry out preventive maintenance on the brake caliper, and clean it from rust and deposits. If necessary, use a liquid like WD-40;
- Replace with new pads, assemble the structure in reverse order.
Subject to the above recommendations and the purchase of original spare parts, the service life of the brake system elements is 20 - 25 thousand km. mileage A moderate driving style and average ambient temperatures will increase the service life by 5 - 7 thousand km.
Brake pad problems
The parts of the braking system in question have to be changed not only when they wear out, but also when malfunctions occur that are associated with the use of low-quality consumables or too active driving. The following characteristic signs indicate problems with the pads:
- creaking, grinding and other extraneous sounds when braking;
- car skidding when pressing the brake pedal;
- to operate the pedal you have to exert more or less force than usual;
- beating of the pedal when braking;
- after releasing the pedal, it does not return to its original position;
- the presence of black dust on the rims.
Extraneous sounds
Modern brake pads are equipped with special indicators that indicate wear of these car parts. The indicator is a metal strip that is attached below the friction lining. When most of the material is worn out, but the pad is still able to decelerate, a characteristic grinding or whistling sound appears when the brake pedal is applied. If the pads are not equipped with such indicators, the presence of extraneous sounds indicates obvious wear of the elements in the brake mechanism and the need to replace them.
Pad wear can manifest itself in different ways, and one of the signs is extraneous sounds when braking.
Skid
If the car skids to one side when braking, then the likely cause is wear on one of the pads. The car can skid until it turns around, even on a dry surface. In addition to the pads, skidding can occur due to scuffing or deformation of the brake discs.
Video: why the car pulls to the side when braking
Some time ago I was faced with a situation where the car began to pull to the side when braking. It didn't take long to find the reason for this behavior. After a quick inspection of the car's underside, it was discovered that one of the rear brake wheel cylinders was leaking. This caused brake fluid to get on the working surface of the pad and drum, as a result of which the mechanism was unable to perform its function. The problem was resolved by replacing the cylinder and bleeding the brakes. If you encounter a similar situation, I recommend replacing the entire cylinder rather than installing a repair kit, since the quality of rubber products today leaves much to be desired.
Increase or decrease pedal effort
If the pedal has to be pressed unusually hard or lightly, the problem may be caused by worn or dirty pads. If everything is in order with them, then you should check the integrity of the entire brake system for fluid leaks.
Vibration
If there is vibration when you press the brake pedal, then a possible reason is that dirt has gotten between the brake disc and the pads, or a crack or chips have appeared on the latter. As a result, parts are subject to premature wear. However, you should be aware that a similar phenomenon is also possible due to problems with the hub or hydraulic cylinders of the brake system.
The pedal goes down
Sometimes it happens that the brake pedal does not move back after being pressed. This indicates that the pads are “stuck” to the disc. This phenomenon can be observed at sub-zero temperatures when moisture gets on the pads. In addition, air may enter the braking system, which requires inspection and subsequent repair or bleeding of the brakes.
Plaque on discs
Plaque on wheel rims is black dust, which indicates wear on the pads. If the dust contains metal particles, then not only the pads are erased, but also the brake disc itself. If such a situation arises, you should not delay inspecting the brake mechanism, as well as replacing failed parts.
The appearance of black deposits on wheels can be caused by active driving or natural wear of the pads.
One day I noticed that the front wheel rims were covered with black dust, and it was not road dust. It is no longer known what brake pads were installed at that time, but after replacing them with factory ones from AvtoVAZ, the situation remained unchanged. Therefore, I came to the conclusion that the appearance of black dust is a normal phenomenon, indicating natural wear of the pads.
Sequence of actions when replacing rear pads
Preparatory stage: a set of automotive tools, rags, liquid for removing deposits, a new parking brake cable, graphite-based lubricant.
- We install the car on the inspection hole, fix the front wheels with wheel chocks, remove the rear wheel;
- Underneath the bottom, we unscrew (loosen) the handbrake cable for the convenience of carrying out maintenance work;
- Gently tap the drum guide bolts with a hammer. During operation and installation/disassembly, the bolts stick and are difficult to unscrew. If tapping does not help, spray with liquid to remove deposits, wait 10 minutes, then start unscrewing;
- After removing the drum cover, pay attention to the position of the parking brake lever. If it is not located near the lever, it means it is jammed and must be replaced. If you ignore this signal, it will be problematic to install the drum in its normal position;
- Remove the upper pressure spring, press the strut support, and turn it until it completely coincides with the slot. Remove the two cups and the spring from the stand;
- Disconnect the cable shank from the handbrake lever. We clean the disc from dirt, deposits, and rust;
- We carry out troubleshooting of the brake cylinder and seals. If there are signs of wear, leakage, or deformation, replace it with a new repair kit;
- We remove the parking brake lever from the old pads, take out the cotter pin and washer;
- Please note that the left and right levers are different and not interchangeable. Next, you need to install a spacer bar and move the pads apart. When installed correctly, the lugs are vertical;
- We start a new cable, fix it in the eye;
- We install new pads and assemble the structure in reverse order. If you have any difficulties with installation, it is better to watch the video presented in this manual.
The final stage: adjusting and tensioning the handbrake lever. In accordance with the requirements of the instruction manual, the handbrake should clamp the pads already at 5–6 clicks. Exceeding the norm indicates weakening, and decreasing indicates excessive tension.
Brake pad material
The requirements for the material from which brake pads are made are extremely contradictory, and both the service life and the efficiency of the finished product largely depend on a successful compromise between the properties:
- Heat resistance: When braking hard, enormous kinetic energy is converted into heat. The brake pad should not change its properties when heated and transfer heat as quickly as possible to the substrate and then to the brake mechanism. Low-quality products, when the surface overheats, seem to “glaze over” - the working plane becomes covered with a hard and slippery crust, due to which the braking efficiency is significantly reduced. To combat this, sports cars and motorcycles use perforated brake discs, which clean the surface of the pads (but also accelerate their wear). Conventional cars have smooth surface brake discs, and glazing of the pads is much more dangerous for them.
- Durability: the pad should not crack or wear out quickly. Typically, the block material is reinforced with copper or brass shavings, less often with steel; polymer materials are also used. Reinforcement makes the pad stronger and increases thermal conductivity, but at the same time it increases disc wear.
Advice. The most preferred pads are those with polymer reinforcement, since they wear out the discs the least, followed by those with shavings made of non-ferrous metals.
- Abrasive action: friction of the pad against the brake disc is necessary for the brakes to work, but at the same time it leads to abrasion of the disc itself. Here you have to look for a compromise: you can’t reduce friction too much, but frequent replacement of disks won’t make the car owner happy.