Climate system Vesta "Lux"
Operating manual for Lada Vesta - Climate system “Lux” (with air conditioning, with automatic climate control) on Vesta
The control of heating, ventilation and air conditioning of the Lux version of the system is somewhat different from the control of the Comfort system.
The control functions of rotary handles 9 and 17, push-button switches 18 and 19 are similar to those in the “Comfort” version.
Features of the air conditioning system
Turning on the air conditioner is possible only when the power unit is running, but the outside air temperature should not be lower than 5 ° C, and the fan must be turned on (regardless of the speed). In this case, at least one of the air deflectors, indicated in the diagram by numbers 5 and 6, must be opened. Otherwise, the evaporator may freeze and the air supply may stop. In addition, drops of condensation may appear under the machine.
To avoid catching a cold, it is strongly recommended not to direct the flow of cold air onto the body. And if the air humidity is high, you should not direct the air at the windshield, as this can cause fogging.
As for the operation of the air conditioning system, its operation increases fuel consumption, because the operation of the air conditioner drive requires part of the engine power. In addition, when driving with a trailer or traveling in mountainous areas, the air conditioner can turn itself off to prevent overheating of the power unit.
To turn off the Lada Vesta air conditioner, just press key 18 and the system will stop working and the icon will go out.
Both Vesta and Xray, as well as other AvtoVAZ models, are equipped with air conditioning or climate control, depending on the configuration. Many people confuse these concepts, or for some they are the same thing. But the truth is a little different than some people think.
Air conditioning is a system capable of supplying cold air to a car. The structure of the air conditioner: compressor, radiator with freon, temperature sensor.
Climate control is a whole system for controlling the air temperature in the cabin. In addition to the fact that it can cool the temperature (a conventional air conditioner), it can also maintain a constantly set temperature by regulating air flows, the speed of the stove fan, and the direction of air flows.
In other words, an air conditioner is a refrigerator that can only cool, while climate control is a whole system that can constantly maintain a set temperature.
The difference between Vesta and Xray from other AvtoVAZ models lies in a different control unit for the heater, air conditioning and air ducts.
On the Lada Vesta, climate control is installed only in the Luxury configuration.
A little about the nuances of Vesta’s climate system:
- The central air duct nozzles have a small “operating range” of inclination
- The temperature is adjusted in increments of 1 degree, and not 0.5 degrees, as on foreign cars (i.e. you won’t be able to set the temperature to 19.5)
- You can hear the operation of the compressor, the moment it turns on/off.
In general, the climate control on the Lada Vesta works well and does not cause any problems.
How to install climate control instead of air conditioning on Lada vesta
Currently, the climate control option is only available in the Luxe and Exclusive trim levels. Simpler versions of Lada Vesta (Comfort and Classic Start) are equipped with air conditioning. Did you know that you can replace your air conditioner with climate control yourself? Let's figure out how to do this and what is needed for this.
The main differences between the “air conditioning” and “climate control” options:
- On a car with climate control, the air conditioning is turned on via the CAN bus (with the “air conditioning” option - through a separate wire going to the ECU);
- On a car with climate control, the heated windows and mirrors are activated via the CAN bus;
- On a car with climate control, there are two additional temperature sensors: interior temperature and evaporator temperature;
- On a climate-controlled vehicle, the temperature and servo dampers are controlled by a separate controller.
Attention! After installing the climate control, you will need to “register” it in the CBKE or modify the climate control unit (solder a piece of wire, see photo below), otherwise the glass heating will not work. This happens due to different types of signals. A simple air conditioner uses analog control, while climate control uses digital control via a CAN bus.
Required:
- Interior temperature sensor (article 277200005R);
- Air temperature sensor (evaporator), Valeo N100468L (277230128R);
- Climate control panel (8450007074);
- Automatic climate control controller (8450008027). Its firmware (adaptation) will be required. In this case, the controller was purchased as a disassembled unit, so no adaptation was required;
- Connectors, 2 pcs. 40 pins each (AMP 1379671), 1 pc. for 12 pins (1898005460AS), from TE Connectivity and the pins themselves (or buy a ready-made wiring harness).
Operating modes of climate control on the Lada Vesta
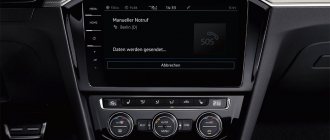
The climate control system on a Lada Vesta Luxury vehicle maintains a comfortable atmosphere in the cabin by turning on automatic or manual modes. In addition to the standard set of functions, vesta with climate control has additional switching options: fan - legs; on the windshield - feet
Attention! The Lada Vesta climate control installation provides the max defrost function, which includes an intensive windshield heating mode. When you press the max button, the air flow is concentrated towards the windshield
Manual
Manual climate control is equipped with the simplest functions:
ventilation directed towards the feet; blowing the interior glass and feet. The Classic and Comfort configurations have identical manual controls:
the air conditioner is activated by the temperature dial key; The influx of outside air or the activation of the recirculation mode is provided by the regulator key, which determines the intensity of the airflow. In the Comfort package, the rotary switches are equipped with light indication.
Auto
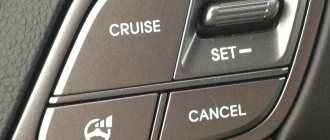
The climate control system turns on automatic mode when you press the auto button. It creates comfortable conditions and ensures optimal fuel consumption. Using the rotary disk, the owner just needs to set the desired air temperature. The set temperature will appear on the display. Automatic mode supports the specified:
air flow speed; cabin temperature; dislocation of air flows through appropriate deflectors. Depending on external conditions, the Lada Vesta climate system will automatically turn on the recirculation and air conditioning functions
Attention! Long-term use of recirculation is not recommended, as it leads to glass fogging and an unpleasant odor. Lack of fresh air flow into the cabin can cause the driver to lose consciousness
The current configuration is heat-cold in manual mode
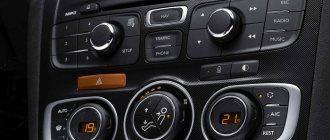
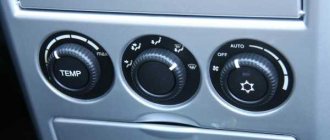
On models currently being produced, even in the “sophisticated” modification of the Lada Vesta, the driver must manually switch the heating or cooling modes. This is manual climate control. To maintain the desired temperature, a complex consisting of a “stove”, an air conditioner and a fan is used. The mode control panel is located on the center console just above the gearshift lever.
The panel interface on currently produced Vesta cars is clear and easy to master in a few steps. The left handle (vernier) regulates the temperature of the air supplied to the cabin. Switching from heater to air conditioner is done by simply pressing this vernier. By turning the right knob you can change the fan modes. When you press it, air recirculation is turned on or it switches to natural air flow.
Vesta Salon
A multimedia system with a rear view camera and dynamic lines is installed throughout the cabin in the luxury configuration. They show everything well.
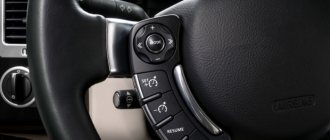
The “luxury” has full power accessories, heated mirrors with a folding function, and power windows. There is a USB charger and a climate control unit. Everything is perceived intuitively simply. I really like that the radio and cruise control controls are located on the multifunction steering wheel. Heated windshield and seats. Moreover, the seats have three-stage temperature adjustment.
The glove compartment is large with a cooling function. Expensive versions of Vesta have heated rear seats, as well as a rear armrest. The interior, of course, is not made of premium materials. It is in the same class as all cars like Lada Vesta. The materials do not cause rejection, the plastic is hard. But you won’t have to lie or sleep on it.
The interior decoration is quite modern and bright, giving comfort. All keys are located in their places. The first time you get into this car, you can simply drive it intuitively. Among the pleasant little things are the mirrors on the visors and the eyeglass case on the left. The side handrails are made with a microlift.
Inspection of the Lada Vesta on a lift
In the front part there is a 0.8 mm steel protective screen with zinc coating, attached in 12 places.
There is a technological hole for draining oil. Front suspension on L-shaped arms. In earlier years, Vesta had problems with the suspension, namely, the stabilizer bushings creaked, and the strut joints quickly failed. The engine mounts also creaked. These problems have now been resolved.
The steering rack is mounted on a rigid subframe. Due to this, Vesta has good taxiing. At one time, there were often complaints about problems with an additional muffler, namely with a corrugated insert that burst and tore. The exhaust started to sound loud. The entire muffler was covered by the warranty and was replaced as an assembly.
The rear suspension has separate mounting points for the shock absorber and springs.
This design provides more comfortable work due to the fact that shocks and impacts from road unevenness are distributed more evenly throughout the body. The rear brakes are drum brakes with a long service life (110-120 thousand km).
This was a review of the Lada Vesta car, one of the most affordable Classic Start trim levels. Write what you think about this car and its configuration.
Air conditioners
Air Conditioning Compressors and Piping
Air conditioner for VAZ 2110-2170, Bogdan August V16
Power steering diversion kit for installing air conditioner August for Lada Priora, VAZ 2110-2112
Electronic thermostat Bogdan 09-000201-00 12V
Evaporator with housing assembly for VAZ 2110-2170 Bogdan August
Thermostatic valve TRV for Bogdan
Air conditioner radiator fan August VAZ 2110-2170, Bogdan
Condenser with receiver assembly August VAZ 2110-2170 Bogdan
Power steering tensioner bracket Bogdan
Generator bracket Bogdan
Pillow bracket Bogdan
Air conditioning pipeline for VAZ 2110-2170 Bogdan 05-100100-00
Liquid air conditioner pipeline for VAZ 2110-2170 Bogdan 05-100200-00
Air conditioner suction pipeline for VAZ 2110-2170 Bogdan 05-100300-00
Set of brackets for power steering pump and tension pulley for Lada Priora, VAZ 2110
The VAZ air conditioner consists of a receiver and an evaporator. The set of air conditioners for VAZ cars includes all the necessary pipes and fastening mechanisms. For almost every air conditioner you can buy all the parts separately from us.
Theoretically, you can repair a broken air conditioner yourself. However, after repairs it is necessary to charge the air conditioner with freon. It is impossible to do this at home, without special equipment. Therefore, we recommend buying a VAZ air conditioner, or its components, in our store.
To avoid damage during delivery, delivery of air conditioners is carried out only by transport companies. We do not send air conditioners by Russian Post.
After installing an air conditioner on your VAZ car, it is also necessary to maintain it on time. With timely purging of radiators and replacement of filters, the service life of the air conditioner is significantly increased.
Didn't find the product you were looking for.
Good afternoon I ordered a set of side mirrors (painted) with heating, electric drive and a moving turn signal for Lada Kalina 1. Delivery by SDEK in 3 days (smooth work)! They even included fasteners, the quality is good. When it gets a little warmer, I'll install it. Thank you very much! I ordered for the first time, I will continue to make purchases here.
Alexey 02/17/2020 07:27
The cabin filter adapter has arrived. The parcel took 10 days to the Perm region. I'm happy with the order, everything came together. Thank you!
Sergey 02/11/2020 16:02
Driving with air conditioning
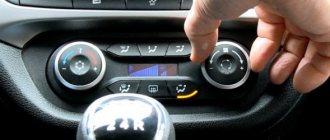
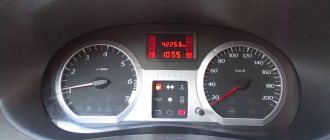
To ensure that traveling with air conditioning leaves the most favorable impressions, you need to properly configure the system. First, you need to adjust the power, which requires turning the knob, marked number 17 in the diagram. When turned clockwise, the air flow increases, and when rotated counterclockwise, it decreases. When turning the regulator, clicks are tactilely felt, although there is no limitation in the circle.
To evaluate the power of the adjustment, just look at the display marked with the number 10. A scale (column type) is displayed in its right corner. If all the bars are lit, it means the fan is running at full power and further rotation of the dial will do nothing. Reducing and turning off the fan is done by turning the dial counterclockwise until all the bars on the screen go dark.
Keys 11, 12, 13, 14, 15 and 16 indicate the operating mode of the Lada Vesta air conditioner. When pressed, the corresponding mode button will light up, while all others will go out.
To adjust the supply air temperature, use the knob marked 9. Clockwise rotation increases the supply air temperature, and counterclockwise turns it down. As in the previous case, clicks are tactilely felt during rotation, but there is also no limiter. The air temperature is reflected on the display, but on its left side, also in the form of a column-type scale - if they all light up, then the maximum temperature is set. By turning the handle back, when all the scale bars go out, the minimum temperature is set.
It is worth remembering that when the air conditioning is turned off, the temperature in the cabin cannot be lower than the outside temperature. In order to cool the interior of the Lada Vesta to a temperature lower than that of the outside air, it is necessary to turn on the air conditioner by pressing the key marked with the number 18. The operation of the air conditioner will be reflected by the key icon lighting up and a gradual decrease in air humidity in the cabin.
Configuration of the new climate control unit
Previously, we told you how else you can retrofit simpler configurations of the Lada Vesta, for example:
- activate dynamic lines of the rear view camera;
- install fog lights;
- install an armrest from Lada Vesta SW;
- install a lockable gas tank flap;
- and other..
Keywords: air conditioner Lada Vesta | Lada Vesta torpedo
0 0 0 0 0 0
Share on social networks:
Differences in Lada Vesta installations
Creating a comfortable temperature inside Vesta is carried out through the operation of the heating and ventilation complex, and the adjustment process is carried out on the corresponding control unit located on the center console. Regarding the control of the system in the Classic and Comfort versions, it is identical, with the only difference being that in the more “advanced” modification, switches equipped with light indicators are located in the rotary disks.
The simplest control unit in the Classic version of the Lada Vesta. has only basic functions.
The first button, located in the Vesta temperature dial, is responsible for activating the air conditioner, while the second, located in the blower intensity regulator, allows you to select one of 2 operating modes - “recirculation” or supply air.
In the Comfort package, there is a button to turn on the air conditioning and a button to activate the recirculation mode.
Equipping Vesta with climate control in the Luxury version is visually reflected in the appearance of a new key in the control unit - the AUTO button, which makes it possible to switch from manual to automatic mode. When AUTO mode is activated, the indicator light on the button lights up in orange. In this operating mode, the electronics, when setting the distribution of air flows through the deflectors, as well as the blowing intensity, is guided by several factors:
— outside air temperature;
— temperature in Vesta’s cabin.
Auto
When you press the AUTO key, the control unit independently not only supplies the desired air temperature to the Lada’s interior, but also controls:
- Air flow speed with the value displayed on the display;
- Distributes air flows through certain deflectors;
- Controls the temperature of the supplied air;
- Depending on the environment, it switches on recirculation and air conditioning modes.
You should know that you cannot use a closed air intake damper for a long time, as in this case the windows will fog up and an unpleasant odor will appear in the cabin, and the driver may experience oxygen starvation, which will lead to an emergency.
The right way
Finally, they gave me some good advice: check the tube between the canister valve and the intake manifold. In fact, a large vacuum is created in the starting system. If there is air leaks in the tubes, the fuel mixture will become lean. As a result, the engine will jerk.
I checked the fitting of this tube at the entrance to the manifold - it was loose.
At the second end of the hose, the same thing happens - the fitting moves and is not seated tightly.
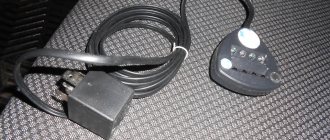
The adsorber itself, which is made in the form of a white fungus (visible below in the photo), sucks air from the atmosphere. Due to the vacuum in the intake manifold, gasoline vapors are sucked into the intake system through the canister ventilation valve.
There is a green rubber ring installed in the fitting. It should seal the connection well. To check the quality of the seal, we had to conduct an experiment.
Version of Vesta before the latest upgrade in 2016
Until September 2016, none of the Lada Vesta trim levels received climate control, which is especially annoying for the luxury version. The comfortable atmosphere inside the cabin had to be maintained manually. In the basic classic model, this had to be done, armed only with the functions of heating and ventilation, and the comfort and luxury trim levels could already boast of the presence of an additional interior cooling system.
The power supply in Vesta is visually similar in both cases: an information display plus a block of control buttons with hint icons. The option with air conditioning is supplemented with only a few functions, which are reflected on the control panel. But in any case, the menu is quite simple and can be mastered in minutes even by a beginner.
The Lada Vesta air conditioner offers the following features.
- Adjusting the intensity of the supplied air.
- Air temperature adjustment.
- Selecting the area to be blown (face, legs, windshield or side windows, etc.), and with multiple selections, the information panel display displays this fact by illuminating the corresponding buttons.
- The bright backlight of the information display does its job perfectly and displays the enabled operating modes even on the brightest sunny day.
By adjusting the intensity of the airflow and the temperature of the supplied air, you can, in general, recreate “manual climate control”. However, the air conditioner could not solve all the needs in the Lada Vesta. Vesta's owners wanted a smarter approach.
There was no doubt that this idea would come to life. However, the release date of this addition remained unknown for a long time.
Disadvantages identified during operation
Despite the fact that the car with an air conditioning system entered the market quite recently, some comments have already appeared in the work. Having systematized reviews of the Lada Vesta with climate control, we can highlight the following main disadvantages:
- The central vents have a limited range of adjustment;
- Turning on the air conditioner is accompanied by an incomprehensible crunching and rustling sound;
- The system is not very efficient in summer; it supplies cool air, but it is desirable to have cold air;
- The installation step should be 0.5 0 C, but now there is a step of 10 0 C, which is not enough to ensure comfortable conditions;
- The dampers crunch when switching them;
- The feet are blown not into the shoe area, but slightly higher, which is bad in severe frosts;
- It is inconvenient to turn on the heated windshield, rear windows and side mirrors with one switch.
- When turned on in severe frosts, uneven heating occurs; the rear one warms up much earlier than the front one. This defect can be eliminated by reprogramming the on-board computer. In Lada Vesta, when the MAX function is turned on, increased airflow is installed not only on the windshield, but also on the air conditioner. The default is the maximum temperature of the latter.
Lada Vesta is a representative of passenger cars produced by AvtoVAZ OJSC, and its comfort is determined by the ability to maintain optimal temperature conditions in the cabin. The climate control on the Lada Vesta is also responsible for heating the windshield.
Salon
The door trim is single-texture black. At the bottom there is a spacious pocket that can accommodate a standard 1.5 liter plastic bottle.
Next comes a niche for the speaker of the multimedia system. On more expensive trim levels, the door insert is covered with fabric or eco-leather. Here it is ordinary plastic. Next is the driver's door module: 2 power windows, joystick for adjusting the exterior mirrors. The equipment is the lowest, but the windows and mirrors are electric.
The seats are not combined with dark gray fabric upholstery.
There is no seat lift and no lumbar support. The backrest tilt is adjusted using a lever. This mechanism is more convenient than classic twisters.
Although they provide more precise adjustment of the backrest angle. There is no armrest on the center console. The steering wheel is the simplest without buttons, the trim is unpainted in a black base color.
The steering column is adjustable not only for tilt, but also for reach. This is a useful adjustment that allows you to choose the most comfortable driving position. This configuration, like the more expensive ones, has electric power steering.
There is a standard immobilizer and central locking. Supplied with 2 keys. Moreover, the branded Westovsky key fob with a switching tip is available for all trim levels. The second key is simple without a fob.
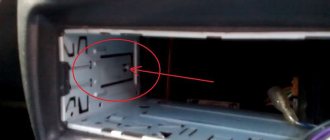
Any version of Vesta has 2 frontal airbags: in the steering wheel and instrument panel. At the top of the center console there is an insert for a single-din radio, although a 2-din one can be installed if desired. Audio preparation is provided. Above is a niche for small items. Below is the central locking button, disabling directional stability. The system automatically turns on at speeds above 50 km per hour.
Below is a heater control module with buttons for air flow, turning on the heated rear window and exterior mirrors, two regulators with buttons (air conditioning, interior recirculation). The small display shows the temperature and intensity of airflow. The block looks simple and clear, it is easy to operate.
At the bottom of the console there are 2 cup holders, a rubberized shelf for storing small items, and a 12-volt outlet. Instead of a USB output there is a plug.
There is no heating for the front seats, so instead of buttons there are 2 plastic plugs. The gear shift knob is single-textured black.
The glove box is spacious, its volume is 14 liters, there is a lampshade and a stand. There is a closable hole in the side wall that allows you to cool drinks using the air conditioner. Useful thing in the summer.
A diode lighting lamp is installed in the ceiling lining, combined with the Era Glonass unit.
There are also 3 handrails with a microlift installed in the ceiling, except for the driver's seat. Sun visors do not have mirrors.
Installation
Procedure:
1. Place the interior temperature sensor into the trim behind the mirror (temporarily located under the headliner for now).
2. Install the evaporator temperature sensor instead of the plug (marked with yellow and white paint in the photo). We make the hole using a drill and a file.
3. Install the automatic climate control controller on the same bracket as the ERA-GLONASS unit.
4. Install a new climate control panel (instead of the old one).
Make the connection according to the diagram presented below.
Important Notes
- The air conditioner will turn on only when the engine is running, the interior fan is turned on at any speed and when the outside air temperature is not lower than minus 5 ° C
- When the air conditioner is running, drops of water may appear under the bottom of the car - this removes condensed moisture from the air.
- When the button is pressed, at least one of the central or side nozzles must be open, otherwise the air conditioner evaporator may freeze and cut off the air supply to the cabin.
- It is recommended to direct the air from the ventilation nozzles slightly upward. Do not block the windshield and side window blower nozzles on the instrument panel, as well as the footwell blower nozzles of the front and rear rows of seats with various objects.
- When the car is moving, the heater/air conditioning fan should always be turned on, at least at 2nd speed, to create excess pressure in the cabin in order to prevent dust and dirt from entering through leaks in the body, as well as to avoid fogging up the windows.
- When washing a car, do not turn on the climate system fan.
- When using the air conditioner in conditions of high air humidity and outside temperature from minus 3 ° C to plus 5 ° C, it is recommended to turn on the air conditioner fan at least at speed 3 to avoid freezing of the cooler.
- Do not direct cooled air onto the windshield when the outside air humidity is high! This may cause the glass to fog up or freeze and impair your vision.
- It is not recommended to direct the flow of cooled air onto the face and open areas of the body - this can lead to hypothermia and illness.
- When the air conditioner is operating, the specific fuel consumption increases, because Additional power from the engine is required to drive the compressor.
- Driving in mountainous areas or in difficult road conditions with a trailer may cause the air conditioning compressor to be switched off to prevent engine overheating. In this case, the air entering the cabin will not be cooled. To turn off the air conditioner, press the “air conditioner” button again, the indicator light will go out.
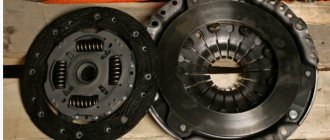
Valve and evaporator design features
The evaporator is located in the air conditioner unit and is presented in the form of aluminum tubes with fins. The latter elements improve heat transfer. When the cabin fan turns on, air masses blow through the evaporator tubes. The air, cooling, flows into the cabin. At the bottom of the evaporator there is a tray and a drainage hole, which is designed to remove excess moisture from the interior of the Lada Kalina. Therefore, this hole must be free.
Another equally important element of the air conditioning system is the thermostatic valve, which is located in the evaporator housing. The refrigerant, passing through the hole, reduces the pressure and begins to boil. The valve body has a control element that changes the flow area of the hole taking into account:
If during the repair or replacement of parts of the air conditioning system at least 1 unit was opened, the receiver must be replaced with a new one. Otherwise, when charging the system, the refrigerant will not be drained. Acids can form inside the air conditioner, destroying parts of the main device.
Pipelines are used to combine all elements of the system into a single circuit. They are made of aluminum alloys. The manufacturer Kalina recommends protecting metal sections of pipelines from kinks and dents. Otherwise, the performance of the air conditioning system will be reduced. Moving parts in certain areas have synthetic inserts.
In those places where the pipeline is connected, an O-ring is installed. When repairing an air conditioner in the event of disconnection of sections of pipelines, the O-rings are replaced with new parts. If the pipeline connection is presented in the form of a thread, it is tightened to a certain point. It must be taken into account that excessive or weak tightening can lead to deformation of the sealed areas and leakage of refrigerant.
About recycling
Recirculation is turned on using handle No. 3 (Granta, Kalina) or by pressing the arrow button in a circle No. 19 (Vesta, XRAY).
- To speed up the heating or cooling of the interior after parking the car, you can turn on the recirculation mode for a short time; after reaching a comfortable temperature or when the windows fog up, you must turn on the supply of fresh air.
- Prolonged use of the recirculation mode may cause the driver to become drowsy or drowsy and result in loss of control. Use recirculation mode only when necessary. It is recommended to preferentially use the supply air mode.
- You cannot sleep in a car with recirculation mode on. This could result in serious injury or death due to reduced oxygen levels in the vehicle interior.
How to use
Recommendations for choosing the operating mode of the air conditioner
:
- During the warm season, it is recommended to direct air to the adjustable central and side nozzles on the instrument panel for better ventilation of the cabin. Set the airflow to medium or high to effectively remove excess heat from the interior. Set the minimum temperature of the incoming air, adjust the temperature if necessary.
- To eliminate fogging of windows, for example in damp weather, it is necessary to direct warm air onto the car windows. Press the or button. Set the air flow speed to medium or maximum to effectively blow the car windows. Set the maximum supply air temperature, adjust the air temperature if necessary. The air supplied to the windows must be warmer than the outside air.
Recommendations for choosing the climate control operating mode:
- To automatically maintain thermal comfort in the cabin, you must turn on the “AUTO” mode. Use the handle to set a comfortable air temperature in the cabin.
- The information display displays the set value of the comfortable air temperature in the cabin. This value is conditional and it will not always be equal to the air temperature in the cabin. The control system automatically regulates the temperature, flow rate and air distribution in the cabin depending not only on the set comfort value, but also on the outside temperature, solar radiation intensity, driving mode and other factors.
- When you press any of the air flow distribution buttons (window, face, legs), the air flow is distributed in accordance with the selected directions. In this case, the control indicator on the “AUTO” button goes out, but the automatic mode is maintained, as evidenced by the absence of the fan symbol and its speed scale on the information indicator;
- When turning on automatic climate control, it is recommended to first set the information display to a value of 22 degrees comfortable temperature (the nominal value approved by most users), regardless of the surrounding conditions or the state of the vehicle (moving, parking). The system works in such a way as to quickly achieve a given level of thermal comfort and subsequently maintain it at a constant level.
- If, with the automatic mode turned on, being in the car for a long time (with the engine running, in motion or parked), you feel excessive heat or cold, change the set value of the comfortable temperature up or down, respectively. Use a small adjustment (±1 degree) to find the most comfortable value for you. It is not recommended to change the value of the set comfortable temperature too often, because the system requires a certain time to reach a given level of thermal comfort.
- If in the “AUTO” mode you set the minimum (LO) or maximum (HI) temperature value on the information display, the control of the air temperature in the cabin will stop and air will be supplied at the minimum or maximum possible temperature. To return to the automatic thermal comfort mode, set the digital temperature value on the information display.
- The minimum (LO) or maximum (HI) temperature mode will not cool or warm up the interior faster after the vehicle is parked. Always use the nominal comfort temperature of 22 degrees to achieve maximum comfort in the cabin as quickly as possible, including after the vehicle has been parked.
“Defrost MAX” mode (on Vesta, XRAY)
— the air conditioning is forcibly turned on (if conditions permit), electric heating of the windshield and rear windows and side rear-view mirrors. The entire air flow is directed to the blower nozzles of the windshield and front side windows, and the maximum speed and air temperature are set.
How to solve the problem when the heater blows cold air from the passenger side
The stove blows warm air into the car interior no matter how sub-zero the temperature outside the window is. Its task is to provide comfort to all passengers in the vehicle. However, the stove, like any other automotive component, can fail. What to do in a situation when the heater on the passenger side does not heat? Do not be disappointed in advance; a similar problem occurs on cars of various brands. Note that this malfunction can occur either two years after purchasing a new car or two weeks after its purchase. Don’t get excited and immediately change the valves (in most cases, they have nothing to do with it). So, let's figure out what is the cause of the problem.
Why is this happening?
Undoubtedly, the most common reason for this is problems with the dampers. However, there are also problems with the radiator. As a rule, it is secured with several brackets, bolts and other fasteners in a free compartment. With frequent movement on poor road surfaces, the quality of the fastenings deteriorates, and accordingly, the components of the heating system begin to move in the pits in different directions.
As practice shows, these small movements are enough for a cold air flow to start flowing instead of the warm air supplied from the passenger seat (from the right air duct). This happens due to the formation of a gap between the casing wall and the end of the radiator. As a result, air enters the cabin, bypassing this component.
How to solve a problem
In many cases, this problem is solved by replacing the radiator (it was clogged with sediment due to dilution of antifreeze with plain water - sometimes dealerships do this). If the problem lies in the radiator, you need to pull it out, then cover the area where it is located with foam rubber so that in the future it does not move in different directions.
Other Possible Causes
It is possible that the system is sucking in air, which causes an air lock to form in the heating radiator after a certain time. This can also cause cold air to come in from the passenger side. Sedimentation (after mixing different types of coolants). Note that sediment remains even after purging the system. In this case, there are two ways out of this situation: remove and rinse the radiator thoroughly or replace it completely.
Checking heating efficiency
_x000D_
_x000D_
We start the engine and warm it up to operating temperature. We check that the inlet and outlet pipes of the heater radiator are heated and have approximately the same temperature. If the pipes have different temperatures, then it is possible:
_x000D_
- _x000D_
- low coolant level in the expansion tank (which antifreeze is better)
_x000D_
An air lock has appeared in the engine cooling system (air can be released through a special valve)
_x000D_
Heater radiator clogged (replace)
_x000D_
_x000D_
_x000D_
We install the temperature regulator on the stove control unit all the way to the red zone. We make sure that the temperature of the air leaving the panel deflectors begins to rise. If it blows cold, it means:
_x000D_
- _x000D_
- the damper drive is faulty (the damper does not open, preventing air from passing through the heater radiator)
_x000D_
The heater control unit is faulty (how to remove)
_x000D_
_x000D_
Standard heater radiator
The antifreeze circulation circle between the heater radiator and the cooling system radiator is common, as a result of which dirt and debris penetrate into the heater. The quality of heating decreases. You can restore high-quality airflow by flushing the heating system.
The heater radiator is the same in design as the radiator of the Lada cooling system, only smaller. They have a common antifreeze range. Dirt from the expansion tank may also end up in the small interior assembly. Unfortunately, the radiator cannot be repaired. Need a replacement. When we come closer to the question, it turns out that the standard unit does not have a serial number. There is only a code - UT-00006936, according to which they can sell you another spare part. Therefore, before purchasing, check with the seller for information.