01/26/2022 17,098 VAZ 2110
Author: Ivan Baranov
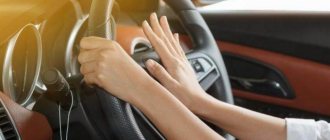
Every car must have a working horn. Thanks to the horn, the driver can prevent an emergency situation on the road and avoid a possible collision. But it often happens that the horn refuses to work. For what reasons does the sound signal on the VAZ 2110 not work and how to fix this problem - read below.
[Hide]
Possible malfunctions: signs and causes
There are several signs of a malfunctioning sound signal on a VAZ 2110 or 2112:
- The sound signal has disappeared. The driver presses the steering wheel or the corresponding button located on it, but there is no beep.
- The beep appears and disappears. When the driver presses the steering wheel, the signal may start to work, but then immediately disappears.
There may be several reasons why the horn refuses to function:
- One of the most common reasons is the failure of a safety device. In this case, the integrity of the horn itself will not be compromised, which greatly simplifies the repair procedure.
- Failure of the horn itself. If after replacing the safety device the sound does not appear, you can try to check the functionality of the horn by dismantling it and directly connecting it to the battery. If the device is working, then when connected to the battery it will begin to emit a corresponding signal.
- The reason may also be a short circuit in the vehicle's on-board network.
- Another cause of the problem may be worn out clamping contacts located on the steering column. This problem often occurs in the cars of our compatriots. In any case, the clamping contacts wear out over time due to use; this cannot be prevented. As an option, you can try to increase the service life of the contacts; to do this, they need to be treated with graphite lubricant from time to time.
- Worn slip ring on the steering wheel. As stated above, there is no escape from wear and tear, so sooner or later every car owner will face such a problem. As in the previous case, you can try to increase the service life of the slip ring by applying graphite lubricant to it.
- Oxidation of contacts on the steering wheel. With prolonged use, deposits will begin to accumulate on the internal contacts, which makes it impossible to transmit the impulse to activate the horn.
Replacing the standard signal of a VAZ-2109 with a signal from a Volga
To begin directly installing new signals, you will need:
- sound devices from “Volga” with a “mass” installed on the body;
- relay 90.3747 with mounting;
- relay block;
- female type terminals;
- heat-shrink tubing;
- stranded wire, with a cross section of 2.5 mm. sq.;
- fuse block;
- 20 A fuse;
- metal corner.
Video review of installing a signal on a VAZ-2109:
Methods for troubleshooting
If the horn circuit is broken and the horn stops working, then there are several options for solving the problem:
- First you need to diagnose the safety device. If this part is burnt out, then you just need to replace it with a new one; the device is located in the mounting block. The replacement process will not take much time; any car enthusiast can cope with this task. If replacing the fuse gave results, but after some time the horn stopped working again, then most likely the reason lies in voltage surges in the on-board network. Overload contributes to accelerated burnout of the fuse element, so you will have to look for the source of the load and solve the problem. To do this, use a multimeter or seek help from an electrician.
- If the horn itself malfunctions, the device must be replaced. If diagnostics by direct connection to the battery do not produce results, then most likely the reason lies in the device itself, which needs to be changed.
- Short circuit. To diagnose, you will need a multimeter and a little experience. Using a tester, you can find a short circuit, but if you have never encountered such a problem before, it is better to seek help from specialists.
- If the clamping contacts or slip ring are worn out, then the failed elements must be replaced. It is not a fact that you will be able to buy new contacts or a ring, so most likely you will have to change the horn assembly.
- Another reason why the horn does not work is oxidation of the internal contacts. Over time, as mentioned above, dirt and deposits accumulate on them, which leads to the obstruction of sound. You can try to disassemble the steering wheel of the car, then clean the internal contacts and assemble the steering wheel (the author of the video is the channel Alexander Amochkin Kolomna AAK).
If you are faced with the problem of a non-working horn, then you will probably be wondering how to replace it:
- First of all, you need to remove the steering wheel. To do this, remove the trim and unscrew the bolts that secure the steering wheel.
- After the steering wheel is removed, you can clean the contact tracks, perhaps this will help solve the problem. Make sure that the wire contacts in the column are as clean as possible .
- Unscrew the two screws located under the plastic cover. After dismantling the cover, you will be able to see the contact plate; there is a possibility that the problem lies there. Clean the contacts and check the signal functionality. If the horn does not work, then using a 24mm wrench you will need to unscrew the nut, but you do not need to unscrew it all the way.
- Next, the steering wheel itself must be pulled towards you; this will require some effort. You can try to move the wheel by tapping it from different sides. When you feel that the steering wheel has given way, the nut is unscrewed completely.
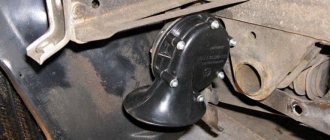
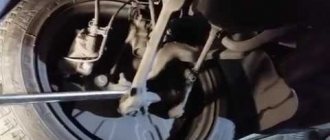
- After dismantling the steering wheel, we proceed to removing the horn. There is a module located under the grille of the radiator unit; it must be removed; to do this, unscrew the nut to 13 and disconnect the connector.
- Install a new one, replace the steering wheel and check the operation of the horn.
Photo gallery “Removing the steering wheel and replacing the horn”
Is a Volga horn good?
Is it possible to use a signal from the Volga in the “ten”, how to install it and how to connect it yourself? In the VAZ 2110 it is allowed to install a Volga horn, and the latter can be either old or new model. There is no particular difference between these details, except that the tonality will be slightly different. And, of course, the cost. But keep in mind that installation by simply replacing the device will not work.
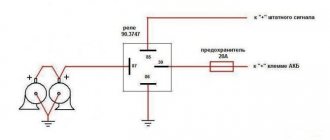
The bottom line is that two cables are connected to the standard device - one with a negative output, which comes from the button on the steering wheel, and the other with a positive one. The latter is permanently connected; it also powers the ventilation device of the radiator unit. But in Volga devices, only one cable is used - positive, since the mass in this case is supplied through the body, that is, from the attachment to the vehicle body. In addition, you must also take into account that both systems use different current consumers - the standard options require no more than 5 amperes, while the Volga ones require 8 amperes each. The result is 16 amperes (video author - Master Bruce).
Accordingly, to correctly connect a product from Volga to a VAZ 2110, you will need a four-pin relay; you have several options for installing it:
- in the vehicle interior, in the mounting block with fuses;
- in the engine compartment, but in this case, please note that the relay should be securely insulated to prevent moisture from entering.
Signal installation procedure
Whenever working on a vehicle's electrical systems, you must first turn off the power. To do this, remove the terminal leading to the car body from the battery.
To easily access the location of the signal on the VAZ-2109, you need to remove the radiator grille. We unscrew the factory signal together with the grille mounting rail. We also remove the ground wire coming from the signal.
In advance of starting work, it is worth preparing mounts for new signals . You can buy the metal corner needed for these purposes at any hardware store. The location of the signal from the Volga will be the same as that of the “native” signal. Apply marks to the corner in the same way as you will install it. Next, saw off along the marked line and drill holes for attaching new signals. To extend the life of a metal corner, it should be coated with paint or any other protective coating. Then take the new signals and fix them on the prepared corner. The bolt included in the kit has two purposes: as a fixing element and as a “mass”. In order for it to perform the “ground” function, it is necessary to ensure its direct connection to the metal corner. A castle washer works well for these purposes.
Your next action will be to set the signal. Place the new part in its intended location and secure it by tightening the bolt using a castle washer. This way you will provide the contact necessary for the signal to work. As a rule, the bolts used to attach Volgov signals are longer and pry off the radiator. To avoid this, place the washers so that the corner with the attached signals moves further away.
Remember that the corner must be in contact with the car body.
Next, proceed to connecting and adjusting the wiring. Below is a diagram of connecting Volgov signals.
You may also be interested in: Throttle learning
Crimp the ends of the wires with suitable terminals, and then insulate the joints with heat shrink tubing.
The relay for connecting the signal can be installed on the back of the radiator frame.
Fix the wire coming from pin 86 at the place where the relay is attached to the body using a castle washer. This type of connection guarantees contact. Before fastening, install a lug with a fastening eye on the wire.
Pull the wire from the fuse to the positive terminal on the battery. In fact, this step is the final step in connecting the Volga signal to the VAZ-2109 and 2108. All you have to do is install the radiator grille in its place and enjoy the new sound emanating from your car. By the way, the outgoing sound can be customized. You need to twist a special bolt on the signal housing and the sound will change its tone. Also, do not forget to lubricate the mounting points and connections with a special anti-corrosion coating.
The feasibility of self-repair
So does it make sense to repair the horn yourself? If we take into account the recommendations described above, then the repair is advisable only if the car owner is as careful as possible when performing it. After all, during the repair work, there is a high probability that an inexperienced car enthusiast will damage the wiring in the unit or connect the contacts incorrectly. Therefore, if you have never encountered a repair procedure before, it is better to entrust this matter to specialists or simply replace the horn assembly.
Loading …