01 December 2016 Lada.Online 89 731 7
All cars have a device for producing sound signals (horn), but its sound does not always suit the owner. This is the main reason for replacing the standard horn with alternative options (for example, with a sound signal from the Volga). Let's look at this improvement in detail.
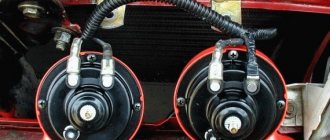
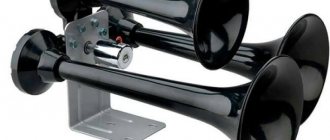
Nowadays, horns are usually used in pairs. One with a high tone, the other with a low tone. This provides strength and beauty of sound.
Will need to buy:
- A couple of sound signals from GAZ 3110 (article number for high tone - 22.3721, for low tone - 221.3721), or an analogue, approximate price 500 rubles; Other sounds in this category.
- 4-pin relay 75.3777-10;
- Relay socket;
- Mounted fuse 10-15A;
- Single-core wire;
- Corrugation for wires;
- Terminals;
- Brackets/brackets for mounting sound signals (optional).
Installation and connection of a sound signal from the Volga is shown using the example of the Lada Vesta sedan. On other cars (for example, Lada Largus, Granta, Kalina, Priora, Niva 2121 or XRAY) all actions are performed in a similar way.
Replacing the standard signal of a VAZ-2109 with a signal from a Volga
To begin directly installing new signals, you will need:
- sound devices from “Volga” with a “mass” installed on the body;
- relay 90.3747 with mounting;
- relay block;
- female type terminals;
- heat-shrink tubing;
- stranded wire, with a cross section of 2.5 mm. sq.;
- fuse block;
- 20 A fuse;
- metal corner.
Video review of installing a signal on a VAZ-2109:
Signal installation procedure
Whenever working on a vehicle's electrical systems, you must first turn off the power. To do this, remove the terminal leading to the car body from the battery.
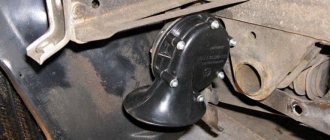
To easily access the location of the signal on the VAZ-2109, you need to remove the radiator grille. We unscrew the factory signal together with the grille mounting rail. We also remove the ground wire coming from the signal.
In advance of starting work, it is worth preparing mounts for new signals . You can buy the metal corner needed for these purposes at any hardware store. The location of the signal from the Volga will be the same as that of the “native” signal. Apply marks to the corner in the same way as you will install it. Next, saw off along the marked line and drill holes for attaching new signals. To extend the life of a metal corner, it should be coated with paint or any other protective coating. Then take the new signals and fix them on the prepared corner. The bolt included in the kit has two purposes: as a fixing element and as a “mass”. In order for it to perform the “ground” function, it is necessary to ensure its direct connection to the metal corner. A castle washer works well for these purposes.
Your next action will be to set the signal. Place the new part in its intended location and secure it by tightening the bolt using a castle washer. This way you will provide the contact necessary for the signal to work. As a rule, the bolts used to attach Volgov signals are longer and pry off the radiator. To avoid this, place the washers so that the corner with the attached signals moves further away.
Remember that the corner must be in contact with the car body.
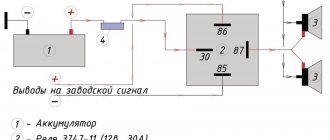
Next, proceed to connecting and adjusting the wiring. Below is a diagram of connecting Volgov signals.
Crimp the ends of the wires with suitable terminals, and then insulate the joints with heat shrink tubing.
The relay for connecting the signal can be installed on the back of the radiator frame.
Fix the wire coming from pin 86 at the place where the relay is attached to the body using a castle washer. This type of connection guarantees contact. Before fastening, install a lug with a fastening eye on the wire.
Pull the wire from the fuse to the positive terminal on the battery. In fact, this step is the final step in connecting the Volga signal to the VAZ-2109 and 2108. All you have to do is install the radiator grille in its place and enjoy the new sound emanating from your car. By the way, the outgoing sound can be customized. You need to twist a special bolt on the signal housing and the sound will change its tone. Also, do not forget to lubricate the mounting points and connections with a special anti-corrosion coating.
Setting signals without relays
There is another way to connect signals from the Volga . Since the factory signals are connected through a relay located in the fuse box, you only have to connect the new signals directly through the “old” wiring. This method is rarely used due to its disadvantages. The fact is that the positive wire used in standard wiring is very thin and physically cannot pass the necessary voltage, as a result of which the signals from the Volga will not work at full strength.
Stories from our readers
“Fucking basin. "
Hi all! My name is Mikhail, now I’ll tell you a story about how I managed to exchange my two-wheeler for a 2010 Camry. It all started with the fact that I began to be wildly irritated by the breakdowns of the two-wheeler, it seemed like nothing serious was broken, but damn it, there were so many little things that really started to irritate me. This is where the idea arose that it was time to change the car to a foreign car. The choice fell on the melting Camry of the tenth years.
Yes, I had matured morally, but financially I just couldn’t handle it. I’ll say right away that I am against loans and taking a car, especially not a new one, on credit is unreasonable. My salary is 24k a month, so collecting 600-700 thousand is almost impossible for me. I started looking for different ways to make money on the Internet. You can’t imagine how many scams there are, what I haven’t tried: sports betting, network marketing, and even the volcano casino, where I successfully lost about 10 thousand ((The only direction in which it seemed to me that I could make money was currency trading on the stock exchange, they call it Forex. But when I started delving into it, I realized that it was very difficult for me. I continued to dig further and came across binary options. The essence is the same as in Forex, but it’s much easier to understand. I started reading forums, studying trading strategies. I tried it on a demo account, then opened a real account. To be honest, I didn’t manage to start earning money right away, until I understood all the mechanics of options, I lost about 3,000 rubles, but as it turned out, it was a precious experience. Now I earn 5-7 thousand rubles a day. I managed to get the car buy after half a year, but in my opinion this is a good result, and it’s not about the car, my life has changed, I naturally quit my job, I have more free time for myself and my family. You’ll laugh, but I work directly on the phone)) If If you want to change your life like me, then here’s what I advise you to do right now: 1. Register on the site 2. Practice on a Demo account (it’s free). 3. As soon as you get something on the Demo account, top up your REAL ACCOUNT and go to REAL MONEY! I also advise you to download the application to your phone, it’s much more convenient to work from your phone. Download here.
Installing Volgov signals in a VAZ 2110 with a simple replacement will not work. The thing is that there are two wires going to the standard signal: “Minus”, which is supplied from the button on the steering wheel, and “Plus”, which is constantly coming up (which also powers the radiator fan). And for the Volgov signals to work, only one wire is needed - “Plus”, since “Ground” is supplied through the body (from attaching them to the car body).
In addition, we are talking about different current consumption :
- Standard signals according to the passport consume no more than 5A (in measurements no more than 3.5A)
- Volgov signals 8A each (Total 16A)
That is why, in order to connect signals from the Volga to the top ten, you need to use a 4-pin relay (for example, 904.3747-10)
The relay can be installed:
- Inside the cabin in the fuse box.
- Under the hood (in this case the relay must be insulated to prevent moisture from entering)
Let's look at both connection options using an example:
KIA Rio 2011 - electronics
Kia Rio, 2011
Comments 121
Hello, I want to install everything using your method, I have no experience in this, I looked and have questions. 1. Do I need a ground wire if I initially have a U-shaped metal part on which the signals are installed. 2. You don’t show here how you installed a 15A fuse on the power one (I would like to see it or a comment - did you use a remote unit for the fuse in a single number?). I would be very grateful for tips)
1. No wire needed. 2. Yes - separate fuse block (sealed).
Should it be that one horn shouted louder than the other? Or should they shout equally?
Why install an additional relay when the standard one is installed?
I also replaced the regular ones... BB, BB, it's just fire... They're honking, Mom, don't worry...
The wires are musical, they will rot quickly. I installed a powerful one from under the ignition and a powerful relay, the signal is very good
How does the signal work? Is everything normal? The question is just that the relay has enough mass from the standard minus?
Everything works fine - I’m just thinking about changing the low tone - somehow it started to work after a while. So the negative signal goes to the relay only from the standard signal. The minus and plus of the standard one - they only close the relay - there is no load. And the mass goes directly to the signals.
Well, the signals, I understand that they are powered separately) I have a Volgo on my classics)
Installing a relay in the engine compartment
Unlike the first method, here all the work on installing signals and wiring will be under the hood. The same material will be used, you just need to buy:
- Hanging fuse (like from a mafon-16A) - 25r
- Terminals mother-8pcs-10rub
- Plastic corrugation 2 meters - 8 rubles
We place the horns from the Volga in any convenient place (as in the first option), and connect the wiring according to any of the diagrams: In the first scheme, we take “Plus” for the signal from the fuse block, through its fuse, and in the second scheme we take “Plus” immediately with battery, through a separate 20A fuse. It is best to use the second circuit to connect horns from the Volga to a VAZ 2110.
It is better to place the relay where there is the least chance of moisture getting in. Before doing this, it is good to insulate the relay or wrap it in a bag.
The installation procedure is approximately this:
- Using the “8” key, unscrew the 2 bolts securing the radiator grille and unsnap the 2 lower latches, remove the grille!
- Removing the standard sound signal
- Assembling the wiring according to the diagram
- We isolate all connections, and put the wire that connects the signals to each other into a corrugation (so as not to rub against the radiator)
- We attach the relay in a suitable place
- Putting back the radiator grill
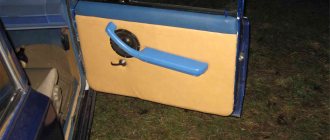
Installation of wires inside the car
Does the sound signal on the VAZ 2110 not work?
Power can be taken directly from the battery terminal, through a fuse. Or find the switching point in the standard fuse box (a diagram of your car is required).
Important! This box from aliexpress has input fuses for each line. All additional wiring is carried out in corrugation, secured to the body with ties
All additional wiring is done in corrugation and secured to the body with ties.
The harness is inserted into the passenger compartment through standard holes in the engine shield.
Inside the cabin, the cable is also laid in corrugation and attached to the structural elements.
All connections are made by soldering, insulated with thermocable and again corrugated.
For quick connection, you can use quick-release connectors (from the same aliexpress).
Sound signal with compressor on VAZ 2110
Pneumatic signals are a whole system consisting of:
- compressor (air blower)
- receiver (compressed air container)
- signals (pipes), into which, when the signal is operating, compressed air is supplied from the receiver under pressure.
This type of car horn is the most powerful in terms of sound pressure of all possible options.
But compressor sound signals also have disadvantages:
- The pneumatic signal is triggered with a slight delay until the compressor reaches the required pressure.
- The compressor needs to be maintained, that is, periodically lubricated, etc.
- Plastic parts must be placed as far as possible from objects that are very hot, otherwise the plastic will crack.
- Pneumatics, like any other compressor, when pumping air, condenses moisture on the working surfaces, which freezes overnight. That is, until it warms up, the signal will not work.
- It is better to protect the compressor suction port from dust and dirt (for example, wear a stocking)
- The price of compressor sound signals is much higher.
Cheap versions of such signals, as a rule do not last long , and over time their sound is compared with signals from the same Volga. In addition, in order to undergo maintenance, you need to leave the standard signals.
Example, installation of compressor sound signals in a VAZ 2110 Video: loud horn on a VAZ 2110 (compressor sound signal)
To publish messages, create an account or log in
In most cases, they are single-tone and very quiet, and their sound can scare away only a sparrow, and not attract the attention of other road users.
We isolate everything securely. There are even ready-made blocks for relays with wires. Therefore, I decided to install a signal from GAZ.
In most cases, they are single-tone and very quiet, and their sound can scare away only a sparrow, and not attract the attention of other road users. If this is important to you, then you can install another relay at the battery that will turn on the power when you turn on the ignition, or install a signal control relay next to the battery and the power wire will be as short as possible.
The horn itself is broken. Take it and connect it.
As a result, numbers should be shown on the tester screen - if they are present, the wiring is intact. For example, I recently gave a car I had made to a man, and over time his signal stopped working.
If you have any suspicions about the health of the electrical circuit, you need to check the grounding of the circuit, as well as the voltage and current values. If there is a “minus” signal from the button, then you can safely power contacts 30 and 86 together from the battery, but not forgetting that the wires on contacts 30 and 87 must have the appropriate cross-section to power the signals, and you can even hook “noodles” to control the relay.
Now the sound produced is similar to the roar of a rhinoceros during the “rut”. In case of such a problem, the operation of the horn can be restored, since it is not damaged. An extra relay that appeared in the car. The horn winding is burnt out. All elements, in particular the disk, rod, anchor and others, return to their original position using a spring and membrane.
He installed everything to the factory wiring, drove it for a couple of days and realized that it wouldn’t work. Therefore, through the interior button we connect the control wires to the relay, and the direct plus to the consumer, in our case the signal. I connected the power to the standard signal circuit, there is a 16A fuse there, in addition to the signal from this fuse, the rear brake lights and interior lamps are powered, all of which are LEDs. What do we get after all this? how to connect a signal through a relay