How to install
Model 2107 has 2 locations suitable for mounting a 1DIN head unit.
The radio can be installed in a standard place on the center console; it is also possible to install equipment instead of the central vents. The first installation option requires trimming the mounting socket to the required size. The second option reduces heating of the player body by the hot interior heater, providing comfortable control of functions. But at the same time, ventilation deteriorates and there is a risk of heating the head unit by direct sunlight.
On the VAZ-2106, the only place for installation is the center console, which needs to be cut to the standard 1DIN size. The head unit is attached using a metal shaft, which is located in the instrument panel. The shaft fixation scheme is the same for VAZ-2106 and 2107 - using bent tongues.
It is possible to install 2DIN standard equipment, which is located in the glove box.
To fix the device, a housing must be manufactured; control is carried out using a remote wired remote control or via radio. It is possible to install the head equipment in the front passenger's feet, but such a scheme is rarely used due to the risk of damaging the radio.
Installation of good budget acoustics (speakers, radio) in VAZ 2107, 2106, 2101
Car audio, installation of good budget car acoustics - speakers (speakers), head unit (radio tape recorder) in the classic VAZ 2106.
Without a good sound system, tuning a VAZ 2106 is like a sandwich without butter. The first thing I advise you to do is soundproofing (soundproofing). Even a non-professional one significantly reduces the noise inside the car, therefore the quality of car sound improves. At the same time, spray all creaking joints of parts with liquid silicone. I did this right away - the squeaks and various rattles are very annoying...
{loadposition user20}
Next, but equally important: think carefully about whether you can do everything yourself - your hands should grow at least two to three centimeters from your butt (not closer!) Budget option - 4 columns: 2 in the front doors (plus 2 beepers on top - included or not) and 2 ovals in the rear parcel shelf. In the front doors: 10 cm (4 inches), 13 cm (5.25 inches), 16 cm (6.5 inches) Rear shelf - ovals 15 * 23 cm (6 * 9 inches) In principle, you can choose it yourself - the seller will advise depending on your wallet, but there are two rules:
- Sound quality is only as good as the weakest link. Therefore, it is worth buying a head unit (radio tape recorder), speakers (speakers), etc. same price range. There is no point in buying an expensive head unit (radio tape recorder) and cheap speakers.
- It is better to take all devices from one manufacturer. They are usually played well and suit each other best.
I won’t recommend a specific brand - no one pays me for advertising radio tape recorders. Buy in a store - there is no ice on the market... A normal system can be found for 6-8 kilo rubles. Installation location of the front speakers in the VAZ 2106. Remove the door trim, having previously purchased fasteners (some will break). There are three places where it is easiest to install the speakers:
1 2 3
1. I haven’t tried it, although it is possible.
2. by 10, 13 cm. Any one can stand up without any problems, I set it to 16cm - it’s difficult to stand up, it’s a tight fit. I had to saw off a little bit from the bottom rim of the speaker. That is, you must first try on the diameter of the magnet and the height of the speaker. You can bend the iron of the door a little, then it will definitely fit.
In terms of sound quality, the stage is very low, there is no bass at all, when getting out of the car we hit the speaker with our foot.
3. (with glass 07.05 it will not work) After installing the ESP, a problem arose - during installation the speaker (2) rested against the ESP rail. I had to look for another place. After much testing, I found an unexpected place - under the door handle (3). 10 cm, 13 cm will fit without problems, 16 cm fits tightly (in the picture without protection). In order for the hand to fit into the handle, the speaker protection must be flatter, so I removed the ring (in the picture below right), leaving only the left grille with the plastic.
The auto audio has become much better (the stage has risen). Why bother, the sound has become cooler!!! Bass appeared, and if you lowered your head, it was a complete blast. Before cutting a hole, we carefully try it on, placing the speaker on the door where the hole should be (if you’re not sure, you haven’t drunk, measure seven times and cut once, bad luck...). Included with the speakers is a round piece with its dimensions (speakers), which we cut out of a piece of paper, apply to the fiberboard door (trimming) and cut a hole. I knocked out the perimeter with a chisel and hammer.
moving speaker:
Included with the speakers are iron figurines. So, we screw the speaker not to the plywood, but to them. We put four around the perimeter, attach the speaker and screw it on (as in the picture) so that the self-tapping screw fits into the hole on the back of the thing.
Tweeters (tweeters)
Install it as high as possible (photos coming soon).
Rear shelf
I bought the back shelf at the store. The material of the rear shelf is plywood, preferably not narrower than 8 mm (otherwise it will rattle).
Heavy. The rear speakers should preferably be turned towards the interior (the sound is much better). It’s not difficult to do it yourself, I just didn’t have time. FAQ is available on the Internet. The most budget option is to cut 8-10 mm plywood to the size of the old shelf, cut holes, fit it like a VAZ 2106 door, and you're done.
speakers facing the interior
So, to remove the rear parcel shelf on a VAZ 2106 you need to remove the back of the rear sofa. The arrow shows an iron petal, bending which the rear backrest is removed (there are two of them, on the right and on the left). You need to stick your hand in there and bend them back.
We remove the rear shelf and find out (I don’t know about everyone), but in the place where the speakers should be there is an iron partition (. Here you can’t do without an angle grinder... Cover everything with rags (so as not to spoil it with scale) and cut out the partition so that the speakers can stand up There is no other way(.
Wiring and connection
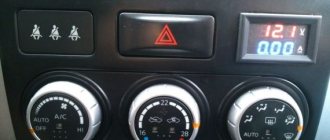
The connection diagram is clearly described in all instructions. Power is supplied to the car radio via two wires: a plus (+) yellow and red wire, one to the generator, the other to the battery, and a minus (-). I took and wound the red and yellow together and connected it to the positive side of the fuse box (the hazard warning light, I think). Cm.
drawing. That is, the radio will always work, even with the key removed. You can also connect it to the positive of the cigarette lighter (the red wire is not the yellow one!). Minus - to the minus of the cigarette lighter (black wire). The rest is according to the instructions.
{loadposition user20}
Insulate everything carefully, (it is better to use heat shrink) use heat shrink. It took me 2 rolls of electrical tape. We hide all the wiring under the casing. We do the wiring to the door speakers like this: we either push it through the existing channel, or we drill a new one, the edges of which are primed and painted (as a last resort, coat it with lithol).
The auto audio turned out to be quite good, at the budget level.
Step-by-step installation instructions.
— First of all, you need to prepare a set of tools, and of course the radio itself, before moving on to its specific installation.
— Next, you need to make room for the newest radio. For this purpose, it is necessary to remove the standard console and all elements that interfere. It is necessary to prepare a screwdriver to remove what remains to make accessible fasteners for our client.
— When the place for the new radio is ready, you need to make a mock-up of the frame. For this purpose, of course, you need to take cardboard, where you need to draw the appearance of the frame for the radio. It is necessary to accurately measure the size so that it matches the prepared space for the device.
Installing the front speakers
First of all, we install the front speakers. Then, when connecting the radio, you will not have to get confused in the wires installed by an illiterate radio technician. Most often, buyers of used cars encounter such cases. Identical black wires with careless twists and minimal insulation need to be ringed and labeled. It is much easier to replace unreliable electrical wiring with cables of the desired cross-section and color.
Speaker wires of different colors are used for the left and right speakers. The color of the wire is selected according to the pinout of the car radio manufacturer. In radio engineering, pinout is the color, letter, and digital designation of outputs and cables. When installing more powerful speakers (100 - 150 watts), take into account their mounting depth, which should not interfere with the movement of the glass. To extend the speaker, spacer rings are used.
To install the speakers, you need to disassemble the front door and remove the window lift mechanisms.
The bottom of the door is usually used to install speakers. Holes for the diffuser are cut in the door panel.
Spacer rings are attached to the door frame, into which the speakers are installed. The wires for connecting the speakers to the head unit are pulled into the technological holes in the door. After assembling the door, additional work can be done.
A grill (decorative and protective grille) is installed on the speaker, the door card is covered with vinyl or leatherette. Without additional door cavity soundproofing, the speakers may sound muffled or resonate. For sound insulation, the outer metal is glued with a vibration-insulating material that dampens metal vibrations (for example, “Bimast”). The internal surfaces of the frame and stiffeners are covered with noise-absorbing “Spleen”.
How to connect a VAZ 2110 car radio with your own hands
Installing a radio in a VAZ
Today you can find almost any speaker head unit on the market. Different prices, different needs and finally, a car radio is purchased. Almost every one of them today is equipped with a radio receiver and is capable of reading discs of any format. And if the choice of a head unit is not a problem for many, then installing a VAZ or other car radio becomes a real problem. In our article we will look at how car radios are connected. Installation on a VAZ 2107 or another model should be easy and quick if you study everything that is presented below.
How to properly install and connect the radio in a VAZ-2107 (2106) car
The standard sound system in the VAZ-2107 car has long been outdated. In order to enjoy high-quality sound, you should consider installing new equipment. Installation of the VAZ-2107 radio can be carried out with a minimum set of tools.
Installing the head unit
All modern power units use a standard ISO connector (International Unified Electrical Engineering Standard) to connect power cables and speaker wires.
After installing the car radio housing in the selected location, all cables must be secured into a rectangular block suitable for this connector. The letter markings of the car radio outputs are different; you need to look for them in the equipment manufacturer’s instructions. If your existing wiring uses a different type of connector, purchase an ISO connector adapter.
Expanding the sound system with speakers on the rear sound shelf
The extended connection diagram for the VAZ 2107 radio provides for the installation of front speakers and rear acoustics. The front speakers create frontal sound, the speakers from the passenger compartment are responsible for the lower frequencies and surround sound. At the rear, multi-way speaker systems use woofers or oval full-range speakers.
From an acoustics point of view, the best place to install ovals or compact subwoofers in the 7's cabin is the rear parcel shelf of the car. The standard rear shelf of the VAZ 2107 for mounting equipment is not strong enough. If you simply cut holes in it for speakers, the plastic will vibrate and distort sound waves.
To reconstruct the shelf, additional fasteners (corners) are used along the sides of the body. The shelf is reinforced with an additional frame, soundproofed, and covered with carpet (a special sound-absorbing and decorative material).
The acoustic wires are pulled under the interior flooring along the sides of the car.
Installing the front speakers
Mark and cut out a hole for the speaker. We screw the coaxial rings to the metal part of the door, having previously drilled the holes. Place the fastening rings so that they do not subsequently interfere with the fastening of the speaker.
How to connect a radio to a VAZ 2107
What could be better than an advanced car? It only improved even more. In most cases, modifications to improve the consumer properties of a car, motorists begin with installing or improving acoustics. Speaking about the usual model, connecting an acoustic system does not present any particular difficulties for independent implementation.
Car audio system
It's a rare driver without music in the cabin. Depending on the owner’s preferences, the system can be simple or spiral. Advanced speakers. a separate topic worthy of a multi-letter continuation. The degree of sophistication of acoustics is limited only by the car enthusiast's handbag and his personal awareness of coolness. In this article we will talk about what it is and how the most common music is installed in the VAZ interior.
It doesn’t matter what kind of acoustics, including for cars, consists of a main acoustic device (MA) and speakers. In a simple case, a radio and a pair of speakers perform these functions. The current default radio combines a music player with digital media. disks or flash drives and radio. It also has a built-in amplifier.
The main radio, provided by the manufacturer, is located on the panel above the cab heater fan switch. Before first use, the hole created for installation is closed with a plastic plug.
Features of car radio communication
The standard wiring diagram is the same for all car models and radios. But there are a number of aspects that need to be taken into account.
- The wiring of Russian cars is designed to connect a device with a mechanical search for radio stations, this can cause certain difficulties if you are going to connect a modern model;
- In most VAZ models, the branch for connecting the control unit comes from the ignition key: when the key is turned on, there is a short-term power cut, which leads to a reset of the parameters if the model does not provide uninterrupted operation. power supply systems;
- Before you begin, the user must decide whether the fact that music can only be listened to when the engine is on, or hunting so that you can use the radio and dock.
Connecting the radio
How to connect and configure the radio
- installation of the device case;
- electrical connection;
- installation and connection of speakers.
You'll likely still need to connect an antenna.
To install the radio housing, you first need to install the metal frame. The frame is secured in the socket using numerous tabs that need to be bent around the perimeter. The radio is jammed. To remove it, special keys are installed.
Make sure the battery is disconnected before using the electrical connection. When assembling an electrical circuit, the main thing is not to mix the wires, but to connect according to the markings. You can see the fundamental in the photo. Of course, this is not a royal question. read the instructions. But, nevertheless, carefully read the manufacturer’s recommendations on the top of the case or in your passport before you begin installing the PG.
Typically, electrical wires are marked as follows:
- wire marked “12V”, yellow. power, plus, comes from the battery;
This wire connects to the radio's permanent power supply, which stores the settings memory.
- wire marked “GND”, black. “minus” connected to the car body;
- Marking ACC, red wire. is also responsible for power, but goes through the ignition switch.
If you connect your device this way, you will only be able to listen to music when the engine is on. This circuit was developed by manufacturers to save battery power. The easiest way to access the radio, regardless of engine, is to connect directly.
If you twist the yellow and red wires together and connect the radio directly to the battery, the radio may completely drain the old battery if parked for a long time.
Radio VAZ classic
Hiding the radio in the glove compartment of a VAZ 2101: preparation and purchase
It's time to tidy up the salon. I have long outlined a program to get rid of music. Or rather, not from the music, but from its detrimental effect on the original appearance of the interior. The main goal is to hide it out of sight; I don’t want to completely give up audio. Those who follow the BZ should remember that I have already redone the rear parcel shelf - the speakers are not visible. The next step is moving the head unit to the glove compartment (say “NO” to the 2107 beard!). To do this, I bought 4 mounting angles, which should directly secure the radio to the glove compartment tray.
Since the antenna cord would not reach the right place, I bought an extension cord. It is as much as 4 meters, I couldn’t find anything less. Let's go, no problem.
Well, for a long time I was haunted by the old JVC KD G-227 mafon. He does his job, no questions asked. But the obsession was to replace it with a new device, more functional. It will be the JVC KD-R531, I bought it today.
A miniature car flash drive for 8 hectares, purchased long ago, has been waiting in the wings for a long time.
I'll do the installation next weekend.
Hiding the radio in the glove compartment of a VAZ 2101: installation
We continue to get rid of the “07” beard and drag the radio into the glove compartment. First of all, I removed the old radio and pulled out the beard itself. She will be ritually burned.
Let's goodbye!
Then he took hold of the glove compartment. For some reason I used to think that its bottom was metal. It turned out to be plastic. It is very easy to remove - it is held on by several self-tapping screws (one was missing for some reason). For convenience, I also removed a small side wall.
What was disappointing was the insulation sticking out from above. I remember how my dad pulled it out so that the inspector could check the license plates during the re-registration of the car. We will fight this later, today there was a different goal.
We take out a fresh JVC KD-R531 from the box and see that its body has a bunch of mounting holes with threads of different diameters. Just what we need. We attach pre-purchased corners to the body on the sides and back. It turned out like this:
Actually, now you can screw it all to the bottom of the glove compartment. I advise you to take a small indent from the left edge, because... It will be easier to put the side wall back.
The next step is to extend the wiring harness. There's nothing complicated here. The main thing is to have the necessary supplies. I found a couple of 10-meter rolls of mounting wire of a suitable cross-section in my stash. We insulate everything thoroughly, install the antenna extension cord and enjoy the sound of the new radio, as well as its move to a new permanent place of residence.
Now the interior has been transformed, and another step has been taken towards the original appearance. Foreign plastic is not an eyesore. If anyone has any questions about the procedure, please write - I’m always happy to help. Although, there is nothing complicated here anyway. A Soviet receiver is now asking to be installed in the salon in the standard socket. If anyone has it, you can get it with arms and legs for a reasonable price. Not necessarily a worker, just for props.
Finally, I made a video of how it all looks and plays:
Pioneer DEH-3910MP car radio repair: solving the problem with VAZ 2107 disc ejection
Surely many people are familiar with this problem with car radios with, let’s say, disc output. Those. When you press “Ejekt” the disc comes out partially or not at all. And you have to press the removed disk with something, for example, another disk. My car radio is no exception. It’s clear that you can just go out and buy a better radio, with a USB port, a “blue tooth” and other bells and whistles. Personally, I somehow didn’t really want to change a completely working radio because of such a small thing, again, what to do with it later. And any “hardware” is closer to me than car audio. Get to the point. I bring to your attention a short report on how to fix the described problem using the example of a Pioneer DEH-3910MP car radio (or rather, a CD receiver). I even took everything apart again especially for this purpose. We remove the radio and take it home. It is better to remove the disk before doing this.
How to install a radio in a Zhiguli.
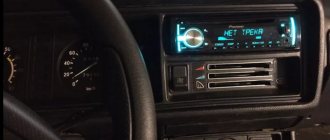
It is no secret that AvtoVAZ in Tolyatti still gives the future owner of the VAZ 2107 car complete freedom of action, covering the place for installing the radio in the “beard” or the center console with a plug. Connecting the radio yourself is a matter of honor for an amateur. Installation here is safer in terms of theft, since the radio is not conspicuous to anyone and is located low. In addition, it is easier to install the device - no re-arrangement of electrical and internal space is required. The only significant “minus”, even two, is the rather strong heating of the audio system when the heating is on. At high temperatures, the radio does not work for long. There is also the inconvenience of pulling out the audio disc due to the fact that the gear shift lever is in the way. But since disks are already becoming a thing of the past, giving way to “flash drives,” this is not a very significant drawback, unlike the first.
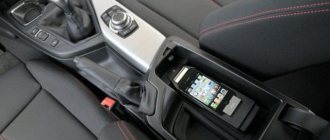
Shown here is a homemade installation on a “seat” under the radio instead of elongated and removed air ducts. This homemade configuration has the following advantages: no heating (after all, the air ducts are removed), and ease of control of the device. Disadvantages are: changes in design, strong heating in direct sunlight, and the risk of theft. In addition, if you put it on top, the interior ventilation works worse, and this is an important argument against. Selling such a VAZ 2107 will most likely be more difficult. Therefore, before you connect a radio with such a serious modification, think carefully.
Either way, you need a radio. If you are just a fan of listening to “Autoradio”, then you can install “Aiwa”. If you want to get professional car audio, then think about purchasing a full-fledged audio system to connect a serious system, such as Pioneer. But at the same time, remember that you need to start working with proper complete soundproofing of the interior, purchasing a subwoofer, amplifier and other expensive things.
In addition, if your radio does not have a USB input, then know that you are purchasing and intend to install a very cheap and old model.
After this, you need to purchase speakers, at least four: a classic installation contains two front and two rear, with a power of about 200 Watts. It is not worth purchasing higher power speakers for the VAZ 2107.
The installation requires high-quality wiring, which you will have to buy yourself; in total you will need about 10 meters - 7 for the rear and 3 for the front speakers. When purchasing, it is better to take a wire with 4 cores so that the speakers can be connected “from one wire.”
By the way, the standard color of the wires on the power supply is as follows:
When installing the radio in its original location, be sure to read the instructions. It should have a diagram of how to connect the speakers, indicating the “plus” and “minus”. Remember that the “minus” is the mass, that is, the car body, and in this capacity you can consider a well-cleaned bolt in contact with the body. It works as a contact.
Of course, before you begin, you need to remove the negative terminal from the battery.
Then we connect the speakers: we hide the wiring harnesses in the cabin and route them to the speakers.
Shown above is the wiring of four-wire wires to the acoustic shelf for the rear speakers.
Video - installing a radio in a VAZ-2107
How to install a radio
in Zhiguli.
It is no secret that AvtoVAZ in Tolyatti still gives the future owner of a VAZ car 2107
complete freedom of action, covering the place for installing the radio in the “beard” or the center console with a plug.
Connecting the radio yourself is a matter of honor for an amateur.
Installation here is less dangerous in terms of theft, because the radio tape recorder is not visible to anyone and is located rather low. In addition, it is easier to install the device - no re-arrangement of electrical and internal space is required. The only significant “minus”, even two, is that the audio system warms up quite strongly when the heating is on. At high temperatures, the radio does not work for long. There is also the inconvenience of pulling out the audio disc due to the fact that the gear shift lever is in the way. But since disks are already becoming a thing of the past, giving way to “flash drives,” this is not a very significant drawback, unlike the first. Some prefer an unusual place for it: to place it where the VAZ 2107 upper air ducts. Like this:
Shown here is a homemade installation on a “seat” under the radio instead of elongated and removed air ducts. This homemade configuration has the following advantages: no heating (after all, the air ducts are removed), and ease of control of the device. Disadvantages are: changes in design, strong heating in direct sunlight, and the risk of theft. In addition, if you put it on top, the interior ventilation works worse, and this is an important argument against. Selling such a VAZ 2107 will most likely be more difficult. Therefore, before connecting the radio
With such a major remodel, think carefully.
Connection diagrams for a radio with a subwoofer and/or a sound amplifier
Connection diagrams for VAZ - Lada car radios of various models. Connection diagrams for the radio from the ignition switch, from the alarm and from the button
In this article we will look at methods and diagrams for connecting car radios to VAZ, Lada cars, the following models: VAZ 2101, 2102, 2103, 2104, 2105, 2106, 2107, 2108, 2109, 21099, 2110, 2111, 2112, 2113, 2114 , 2115, Priora, Kalina, Niva, you can find connection diagrams for newer models at the very beginning of the article devoted to connecting radios to cars of various brands. So, the diagrams:
Standard radio connection diagram for VAZ 2101, 2102, 2103, 2104, 2105, 2106, 2107, Niva
Wiring diagram for a VAZ radio from the ignition switch using a relay
Wiring diagram for a VAZ radio from the ignition switch using a relay (Option 2)
Wiring diagram for a VAZ radio from the ignition switch using a relay (Option 3)
Wiring diagram for a VAZ radio from a button using a relay
Wiring diagram for a VAZ radio from an alarm system using a relay
Connection diagram for radio for VAZ 2107 with injector
Radio connection diagram for VAZ 2109, 2109, 21099
Connection diagram for radio for VAZ 2109, 2109, 21099. Pinout of contacts (for all VAZ models)
Connection diagram for a VAZ radio in which: the PG (head unit, radio) is turned on only when the ignition is turned on, when the ignition is turned off, the PG continues to work, when the alarm is armed, the PG turns off
Radio connection diagram for VAZ 2110, 2111, 2112, 2113, 2114, 2115
Radio connection diagram for Lada Kalina, Priora (and Largus)
Radio connection diagram for Lada Kalina, Priora (and Largus). Pinout
Description of correct connection, wire meanings
A very useful video that discusses in detail the correct connection of the radio, which allows you to avoid loss of battery energy in the inactive mode of the radio, and also provides a visual overview of the connection diagrams from the ignition switch
A video from which you will learn about the purpose of each of the wires, as well as about the correct connection of the radio (additional information to the video above)
Video - examples of connecting radio tape recorders in a VAZ
Video of connecting the radio for VAZ 2101, 2102, 2103, 2104, 2105, 2106, 2107
Video of connecting the radio for VAZ 2107 injector, 2108, 2109, 21099, 2110, 2111, 2112, 2113, 2114, 2115
Video of installation and connection of a 2 DIN radio for Lada Priora
How to connect
The correct connection of the radio on the VAZ-2107 and any other car is carried out through the contact group of the ignition switch. In this case, when the key is removed, the power supply to the equipment is stopped; only the memory unit is powered, which is supplied from the battery.
On carburetor cars it is necessary to modify the contact group:
- Disassemble the plastic steering column cover.
- Remove the connector from the ignition switch and unscrew the 2 mounting screws.
- Remove the lock from the column by squeezing the lock with a thin object (with the key inserted and turned to position 0).
- Remove the contact group that needs to be modified by soldering an additional element.
- Assemble the lock and install the parts in their original places.
A lock modified in this way receives the ACC position instead of 0, which is used to operate the head unit in the parking lot. An additional fuse is introduced into the connection circuit of the tape recorder to protect the circuits from overload. Connection with speaker cables is made through an adapter.
Speakers
The 2107 car has standard installation locations for front speakers, located in the corners of the instrument panel. When installing speakers in door panels, it is necessary to cut holes in the parts; diffusers and loudspeaker magnets are placed in standard recesses available on the inner metal part of the door. It is necessary to correctly route the speaker cables; for this, a special adapter sleeve is used, placed between the end of the door and the stand. The element protects the tourniquet from creases and damage.
For improved music playback, a pair of rear speakers are installed, which are located on the shelf behind the back of the rear seat. To install the parts, trimming of the metal panel is required; the cables are routed under the floor covering.
You can connect the radio on the VAZ-2106 only to the speakers located in the front doors and on the rear parcel shelf. There is no space in the instrument panel for installing speakers (except for the central oval-shaped loudspeaker, which was mounted in the console during the Soviet era).
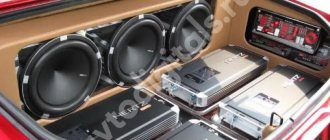
Subwoofer
The low-frequency speaker on the VAZ-2107 is installed in the trunk. For connection in the car, separate speaker cables are used, connected to the head unit or additional amplifier. When using an active device connected to the on-board network, a protective fuse must be placed in the power circuit.
Antenna
The antenna on a VAZ-2106 or 2107 is installed on the roof or trunk lid; it is possible to use an active type device mounted on the windshield. The unit is connected to the car radio in a VAZ-2107 or 2106 using a standard plug or adapter.
Speaker Installation
To install acoustics in a car, you will need a set of tools. We recommend having a Force kit for this. Tuning a car with it becomes much easier, since, firstly, their package includes the most necessary tools for work, and secondly, the quality of the tools from this company has already been tested by time. The price for this tool is more than reasonable; this set is ideal for just such work. Moreover, if you own a domestic car, such as a VAZ 2107 or VAZ 2106, it is simply vital for you to have such a tool at hand.
Tweeters
Tweeters (also called tweeters) are best installed as high as possible. This could be the top of the door trim or the front roof pillars. The further you are from the main speakers, the more noticeable the quad effect will be. The passenger tweeter should be directed to the driver's seat, and the driver's tweeter to the passenger seat. Recently popular two-component systems, or rather their buffers, are best placed not in the panel itself, but in the doors or on the rear shelves. And their tweeters, again, are ahead and further away. Those tweeters that do not require filters and are purchased separately can be installed in parallel with the rear or front speakers, it’s a matter of taste. Their power varies: from loud high-frequency support to a thin squeak.
Subwoofer location
It is not recommended to connect all other speakers in parallel. If you are eager to add a couple more, then it’s better to add them to the existing ones. Connoisseurs of loud music are recommended to install subwoofers and amplifiers using special kits that contain terminals, fuses, wires, etc. You can buy such a kit in almost any store for tuning audio systems. By the way, the location of subwoofers and their installation in the trunk is not the same for all VAZ cars. It is important to take into account the body shape (hatchback, sedan, station wagon).
If you want to go further in tuning your car and you are already interested in metallic paint for your car or you want to look at and try on new wheels on your car, we are definitely on the same path. Our resource contains a lot of necessary information to improve and refine your car. Read, learn a lot of new things and share your experience with other car enthusiasts. All together we can make the world of car tuning a little simpler, and the quality level of new projects will rise to a new level every year.
Installation
Installing a car radio on a VAZ 2107
We will begin our story with the simplest way to install a car radio. This approach is completely justified, because it is impossible to learn complex installation options right away and you need to start from the simple. Before purchasing expensive equipment, you should decide on the choice of installer. If you intend to carry out such an operation on your own, then you need to know many secrets. On the contrary, an inexpensive device is very easy to connect and there is no need to spend money on the services of a specialist. So, what does a typical speaker system consist of? Of course, the main role here is occupied by the car radio, the installation of which we will do. But don’t forget about the four standard speakers that come included. You will need to connect wires from the head unit to them.
Note. All speaker components are installed only in places designated in advance by the automaker. This is done not only for the sake of simplicity, but also to avoid short circuits.
Connecting wires
Let's move on to the connecting wires. Almost all sets of speaker systems are now equipped with similar wires. But these wires are not for installation, but for testing. That is, they are included in the kit, so that during the purchase you have something to test the speakers with, and not use them in the car. The cross section usually does not exceed 0.25 - 0.5 millimeters. This is not enough to pass all the power supplied to the radio.
Such wires should be used only when the power of the installed speaker is low and the sound quality does not matter. That is, they will be used as auxiliary acoustics. To make high-quality tuning of the audio system of a car like our classic, you need to think about a set of good connecting wires. We select the wire cross-section based on the rated power values of the speakers.
Cable cross-section
Connecting speakers to amplifiers or to the head unit and laying connecting wires is undoubtedly a labor-intensive process, but not as impossible as installing an automatic transmission on a VAZ 2107 so that you have to contact a car service. You can do it yourself; you will need a little diligence and attentiveness. For speakers 16 inches or larger, you must use special speaker wires to get high-quality sound. These are wires that use oxygen-free copper and are directional. Their cross section is from 4 mm, depending on the power of the radio and the audio system as a whole.
Set of wires for connecting acoustics
For true lovers of high-quality acoustics, we recommend installing directional wires, because every curl of a copper bundle matters for an ideal sound. Usually, in addition to the name, such wires also contain arrows that indicate the desired direction for installation from the head unit to the consumers. In fact, installing a radio and tuning acoustics is done according to the same principles for other cars, be it a VAZ2106 or a foreign car. It is carried out in a similar way, so the material from this article is applicable to other cars of our and foreign production.
Insulating material
The wires must be equipped with a high-quality insulating layer, and silicone would be best (it does not crack in our severe frosts). They must match the power of the audio system. Wires should be laid away from power wiring and other consumers. We don’t need the extra length, it’s both interference and waste of materials. Therefore, we lay them at the optimal possible distance. The process of laying them through the cabin must be closed. The wires should not be touched by feet or chafed by various loads in the trunk. So try to arrange them as neatly as possible.
For example, if you are tuning the audio system of a VAZ 21063 car, the wires must be laid in a special protective corrugation not only in the door pillars, but also in the doors themselves. This is done so that the large loop goes behind the counter, and not in the door itself. If you bought oval speakers for installation in the rear of the car, place them on the rear parcel shelf so that the sound waves spread from them diagonally across the car, the left one to the passenger, and the right wave, respectively, to the driver.
Installing a double din car radio
Modern 2DIN size standard radios are equipped with a larger display and touch controls. They are similar to 1DIN car radios in width and installation depth. Better functionality is achieved by increasing the height of the housing by 2 times (up to 100 mm).
The two-din radio tape recorder does not fit into the VAZ 2107 car in its regular place. The installation of a large housing under the center console is hampered by the gear lever. It is also impossible to install a 2DIN car radio in place of the air ducts. At the top, the edge of the “dashboard” does not allow expanding the niche of the air ducts. To expand the niche downwards, you need to remove the stove controls. Much easier than a complex reconstruction of the dashboard would be to install a double-din radio in the glove box of the car. There is enough space in the glove compartment to install a double-din radio, which can be supplemented with a separate amplifier. The main difficulties of this method are the design of fasteners for the installation section. Under them you need to install damping pads that absorb vibrations of the plastic.
What you need to know
Before installation, the car owner must decide on the type of radio tape recorder chosen. There are many models available on the market for the 1Din standard size (you may need an adapter frame for a 1 din car radio) at prices ranging from 1,000 rubles to 40,000 in the upper range. And for those who do not dare to install it themselves, you should contact a specialized service, where the installation cost will cost up to 5,000 rubles.
There is a special socket on the front panel of the car for installing a radio, and the manufacturer ran the audio system wires throughout the cabin. Of course, the owner can choose a different place to install the audio system and even expand it to fit a 2Din standard size, but this procedure involves many alterations in the ventilation and heating system and carries more disadvantages than advantages.
How to check the connection
To check that the cables are connected correctly, turn off the ignition and measure the leakage current, which should not exceed 30 mA. An additional test will be to turn on the equipment in high volume mode, and the components should not turn off spontaneously.
- How to connect Mystery radio
- Connecting the Ford Focus 2 radio
- Connecting a VAZ 2109 radio
- How to connect a radio to a battery
- What kind of oil to fill in VAZ 2107
How to check the chassis on the "seven"
Self-checking the chassis of a VAZ is a relatively simple and quick procedure. No special tools are required, but you need to drive the car onto an overpass or pit.
Checking the chassis involves a visual inspection, so you will need to take care of good quality lighting
During the inspection, it is necessary to carefully examine all suspension components, paying special attention to:
- the condition of all rubber elements - they should not be dry or cracked;
- the condition of the shock absorbers - there should be no traces of oil leakage;
- integrity of springs and levers;
- presence/absence of play in ball joints.
Any oil leaks and cracks indicate that the element will soon fail.
This check is quite enough to find the problematic part in the chassis of the car.
Video: chassis diagnostics
The chassis of the VAZ 2107 has a fairly simple structure. An important fact can be considered the ability to independently identify chassis faults and ease of diagnosis.
Connecting the radio to the VAZ 2107 power supply
The standard connection of the VAZ 2107 radio through the ignition switch is inconvenient because the radio and player can only be listened to when the engine is on. The designers chose this connection scheme for reasons of increasing battery life. To connect a new car radio in the same way, you can use the standard wiring. But keep in mind that with such a connection, advanced power units, such as Pioneer, KENWOOD, Alpine, Hertz, can reset new settings when the engine is started. Indeed, a more logical connection of the radio directly to the VAZ 2107 battery can drain a worn-out battery. Most often this happens when the driver forgets to turn off the quiet music at night. To avoid this drawback, a manual power switch button is embedded into the yellow power wire from the battery. The standard fuse for the VAZ 2107 radio is not provided in the block of protective devices. To install protection in a reserve location in the fuse box, you need to rebuild the electrical circuit. It's easier to buy a power cable that has a fuse built into it. For normal protection of the radio from strong inrush currents and short circuits, a 20-amp blade fuse is sufficient. To expand the acoustic system, move the installation location, and install complex power units, an acoustic tuning enthusiast must master the skills of an auto mechanic, radio technician, or electrician. If you do not have confidence in your abilities, it is better to turn to car acoustics professionals.
Choosing a location for the car radio
The standard connection of the VAZ 2107 radio is provided by the factory in an inconvenient place. The factory niche, closed with a plastic plug, is located at the very bottom of the center console.
This place is inconvenient for three reasons:
- when the stove is operating, the radio tape recorder overheats, which reduces its operating time;
- the gearbox selector interferes with working with SD and DVD drives (this drawback is not critical when using flash drives and compact storage media);
- You cannot install radios of larger sizes or with retractable screens in the standard niche.
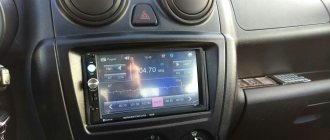
If you want to avoid these troubles, you have no other choice but to install the radio in the VAZ 2107 in place of the two central air ducts.
In principle, this method does not affect the operation of the heating system, since the mass of warm air will pass through the side and bottom air ducts.
Before moving the radio up to the VAZ 2107, you need to remove the air ducts and do a number of preparatory work.
When installing a car radio in place of the air ducts, difficult work for a novice amateur will include making sealed plugs for the air ducts, carefully cutting out plastic partitions and shaped protrusions on the dashboard. Under the installation frame of the car radio, you need to make and secure brackets (bars - inserts). To close the gaps between the dashboard and the car radio body, you need to buy and fit a factory adapter frame.
Even more difficult is the independent production of original decorative cladding made of wood or fiberglass. Installing the radio in the air duct slot makes it easier to control the receiver and view the display.
Connecting the Radio to the Ignition Switch of a VAZ 2107
22 May
Self-assembly of acoustic equipment is a common method of modifying Russian and foreign cars. At the same time, the user needs to know how to connect the radio to the ignition, since incorrect switching will lead to accelerated battery discharge and damage to the vehicle's on-board network. If a new player is installed instead of the standard one, it is recommended to keep the factory connection diagram.
What you need
To connect you will need a set of materials:
- a piece of copper cable;
- soldering iron and lead-tin solder;
- insulating tape on a fabric or polyvinyl chloride basis; heat-shrinkable tubing can be used;
- a set of tools for removing the steering column cover;
- test device.
Connection instructions
Connecting the radio via the ignition switch allows the main unit to operate when the key is turned to the ACC police or ignition activation position. After removing the key from the power lock, the amplifier is automatically turned off, only maintaining battery voltage to preserve the radio memory.
The radio receiver connectors have 2 cables equipped with yellow and red insulating coating. The yellow cord goes directly to the battery or cell where the positive force remains. A separate fuse is inserted into the circuit to protect the equipment from short circuits and fire.
- Error Code 8 on Niva Chevrolet
- 1 Transfer VAZ 2110 crashes Reasons
- How to register the key for Skoda Fabia
The red cord is output to the group of contacts of the ignition system lock.
The user can connect the car radio through the ignition on a VAZ-2107 with an injection engine according to the following scheme:
- Run a cable from the ignition switch that connects the ACC plug and the red power cable to the radio.
- Route the yellow cable to the battery using standard channels in the engine compartment. The cable is laid parallel to standard packages; it is necessary to protect the product from contact with hot exhaust system components or moving elements.
- The negative power cable, equipped with a black protective layer, is connected to the car body or output to the battery. You can use the negative output of the cigarette lighter, which is located next to the main unit's mounting socket.
- Connect the display backlight and buttons to the positive side outputs. When you turn on the external lighting, the backlight on the radio turns on automatically, the intensity is adjusted with a regular knob.
- Test your device. Ensure that there is no leakage current when the equipment is turned off by connecting the test device to a power source. Standby current. 10 mA.
Logbook VAZ 21074 (2006)
Hi all! Last fall, one unpleasant incident occurred - in a hurry, I forgot to turn off the radio panel, leaving it in the AUX IN position, since I usually use it instead of a pause. The radio is an old Alpine with a DVD drive.
At that time, there was still an old battery that did not hold a charge well and required regular recharging; as a result, in the evening the starter was unable to crank the engine, so I had to “light it.” After this incident, I decided to check the current leakage and the radio connection itself, since it had already been received with the car.
In the same position of the socket on the alarm, the leakage current was as much as 0.7 A, which is an order of magnitude greater than the permissible values - they write differently everywhere, but if we take the largest range, then the permissible leakage current is only 0.015-0.070 A or 15-70 mA .
I decided to remove the radio and look at the connection - as expected, the red and yellow power wires are twisted together and through the green they go to the battery, also, the ground wire goes through the twist to the negative terminal, it turns out that the chip was simply cut off and all the wires are connected with twists. Apparently, this is also why, when starting the car, the radio constantly turned off for 1-2 seconds.
I found a factory wiring diagram for the Alpine radio, which, in principle, applies to all others.
The yellow wire, as I understand it, is responsible for memory, settings and general power, and is connected directly to the battery. And the red one is responsible for managing this power, that is, for turning on the panel, and it is connected from the ignition, that is, not directly. Apparently, in order not to bother, the previous owner simply twisted them together.
I decided to check how much actually “leaks” through just one radio. I connected the multimeter to the twist gap of the yellow and red wires to the battery:
1. With the socket removed - practically no consumption.
2. With it inserted, but not turned on - already an order of magnitude higher than normal.
3. In the mode in which the panel was left, even more came out. Thus, in the 10 hours that the car was parked, up to 5-7 A could be drained from the battery, which was no longer enough to start.
4. With the radio turned off via the button - within normal limits, but still a bit much.
Now we turn off the red one and leave only the yellow one, as it should be when the ignition is turned off - the radio now does not turn on and the leakage is minimal.
Therefore, I decided to run the red wire according to the factory circuit and protect myself from repeating this situation with discharge, especially since it would not be very good for a new battery.
At first, I thought about connecting to the free INT output on the ignition switch, but it turns out that it has a constant + there, but there is no ACC mode, like on foreign cars.
I didn’t want to cut the adjacent wire on which the variable + appears, much less disassemble and modify the contact group. Therefore, after rummaging on the Internet, I found out that the mounting block has free contacts that can be connected to and they are already protected by fuses.
At first I wanted to connect to plug Ш13-6 from the passenger compartment, but it was already occupied, so I had to route the red wire through the engine panel and connect to plug Ш10-8.
The second plug on the left is black when looking at the block, although for some reason it appears under brown in some diagrams. I soldered a “mother” terminal with a tendril to the wire so that it would stay in the chip.
The remaining contacts were also soldered and insulated with heat shrink.
There was no need to pull the yellow and black ones, since the cross-section of the ones already standing was sufficient; it is recommended to install the power and mass sections with a cross-section of 2.5-4 mm.
I ran the yellow (green) wire from the battery through a 10 A fuse, temporarily wrapped it with electrical tape, while special chips for the fuses are coming from China. It turns out that now both power wires are protected, not counting the fuse in the radio itself. Also, I replaced and soldered the round terminals to the battery.
I assembled everything in place, hooked up a multimeter to the battery - the total leakage is only 0.02 A, with or without the socket inserted. And the radio stopped turning off when starting the car.
However, with this connection there is a small drawback - in order to listen to music, you must turn on the ignition, which on top of everything else results in quite a lot of consumption on the injector. It was possible, of course, to simply put a button in the gap of the red wire, but, after all, you could forget to turn it off. So, I left it like that for now, maybe I’ll come up with something later.
Let's do the math:
Wire 1m - 30r
Clamps, heat shrink - 20 rub.
Fuse 10A - 10p
Total - 60 rub.
Subscribe! Good luck on the roads!