HELPFUL ADVICE It is more convenient to remove an empty tank while working on a lift, overpass or inspection ditch.
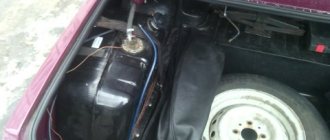
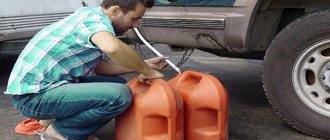
 To remove residual fuel after disconnecting the connecting hose of the filling pipe from the tank connection (see point 7 below and pump out the fuel through the opened hole in the tank.
 You will need: keys “10”, TORX T20 and T30, socket head “13”, pliers with thin jaws, a screwdriver with a flat blade. 1. Reduce the pressure in the power system (see section 5 “Reducing pressure in the power system”). 2. Disconnect the wire from the negative terminal of the battery.
5. Remove the air outlet tube from the holder on the filler pipe. 8. Move the filler pipe to the side and remove the pipe neck from the seal of its manhole cover. 9. Remove the rear suspension cross member (see “Removing and installing the rear suspension cross member”) and remove the filler pipe.
NOTE Removal of the rear suspension cross member is necessary because with the cross member installed, the filler pipe cannot be passed through the gap between the cross member and the body.
Source
diadya-fedor 12 Nov 2006
In the fall, garbage appeared - when refueling, gasoline splashed out every once in a while.
That is, we put the gun in the tank, put the bracket on and oops - after a few seconds the gun clicks, and half a glass of foamed gasoline splashes out of the neck. Now this disgrace has become constant and occurs several times per refueling. As a temporary measure, you have to fill it with “the smallest stroke”, pressing the trigger so that it just starts to flow in a thin stream, and then the cutoff is triggered once every 10 seconds. If you press harder, the infection splashes out again. By searching on the Internet, I found out that judging by the symptoms, the tank ventilation is to blame, as I understand it, it was dirty somewhere along the hose running parallel to the filling hose of the neck. Accordingly, the idea arose to remove the neck and clean all those tricky holes there. And here the question arises - how to remove it correctly? I looked from under the bottom of the car, lying under it - my first thought was that I needed to remove the rear wheel and get it out of the arch. Is there a better way? I didn't find anything clear about this in the manual. And in general, has anyone here already treated such a problem as mine and can give me some advice? Look, it's not bent, it's broken where the tank ventilation hose is. Should I touch the tank neck? find an air hole in it and use a hard, blunt wire to poke around there. Good luck!
Uncle Tom 13 Nov 2006
In the fall, garbage appeared - when refueling, gasoline splashed out every once in a while. That is, we put the gun in the tank, put the bracket on and oops - after a few seconds the gun clicks, and half a glass of foamed gasoline splashes out of the neck. Now this disgrace has become constant and occurs several times per refueling. As a temporary measure, you have to fill it with “the smallest stroke”, pressing the trigger so that it just starts to flow in a thin stream, and then the cutoff is triggered once every 10 seconds. If you press harder, the infection splashes out again. By searching on the Internet, I found out that judging by the symptoms, the tank ventilation is to blame, as I understand it, it was dirty somewhere along the hose running parallel to the filling hose of the neck. Accordingly, the idea arose to remove the neck and clean all those tricky holes there. And here the question arises - how to remove it correctly? I looked from under the bottom of the car, lying under it - my first thought was that I needed to remove the rear wheel and get it out of the arch. Is there a better way? I didn't find anything clear about this in the manual. And in general, has anyone here already treated such a problem as mine and can give me some advice?
There was exactly the same situation this summer. The whole trick I had was that at one of the gas stations a craftsman simply pushed an external safety valve into me with a pistol. a plastic piece of garbage with a metal cap that the gun itself bends back. is right in plain sight. If you can’t see it, then it’s possible that someone pushed it deep down into you. For me, it finally went down 30 cm and stood across! But it was not visible visually the first time. you insert the gun and after a few seconds the gun snaps open and gasoline spills onto the road. Look, maybe it will help? And be sure to check the ventilation.
Reasons for failure
You may need to replace the filler neck for the following reasons:
Peter Tiger 13 Nov 2006
In the fall, garbage appeared - when refueling, gasoline splashed out every once in a while. That is, we put the gun in the tank, put the bracket on and oops - after a few seconds the gun clicks, and half a glass of foamed gasoline splashes out of the neck. Now this disgrace has become constant and occurs several times per refueling. As a temporary measure, you have to fill it with “the smallest stroke”, pressing the trigger so that it just starts to flow in a thin stream, and then the cutoff is triggered once every 10 seconds. If you press harder, the infection splashes out again. By searching on the Internet, I found out that judging by the symptoms, the tank ventilation is to blame, as I understand it, it was dirty somewhere along the hose running parallel to the filling hose of the neck. Accordingly, the idea arose to remove the neck and clean all those tricky holes there. And here the question arises - how to remove it correctly? I looked from under the bottom of the car, lying under it - my first thought was that I needed to remove the rear wheel and get it out of the arch. Is there a better way? I didn't find anything clear about this in the manual. And in general, has anyone here already treated such a problem as mine and can give me some advice?
Symptoms of failure
The main symptom that may require you to replace your fuel filler neck is a fuel leak. You can find out about this by simply looking under the car or examining the condition of the fuel pipe on the lift. It is also possible that, due to a loose lid, the failure warning lamp is activated, which informs the self-diagnosis system of a leak in the fuel evaporation recovery system.
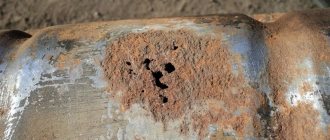
The smell of gasoline in the car interior may also indicate a malfunction of the neck. However, the most unpleasant symptom is water in the tank, which enters the system due to corrosion. In this case, the procedure for replacing the filler neck must be carried out as soon as possible - otherwise you may have problems with the fuel pump and filter.
Typically, replacing the fuel filler neck is done on a lift and requires wheel removal. Depending on the brand of car, this process can take from 30 to 60 minutes. At the same time as this procedure, we recommend that you check and replace the fuel pump, which may be damaged due to water and dirt entering the system.
amotsarack Nov 13, 2006
This is what I looked at first. Actually, that’s what the question was, there’s nothing to replace it with, namely how to remove it. As for the valve, I have a plastic plug with a mesh, and it seems to be successfully bent to the side with a gun. When I refueled for the first time in a newly purchased car, at first I decided that it was some kind of tricky filter, I didn’t insert the gun all the way and started to fill it. How it hit me In general, there is a feeling that when refueling, the air displaced from the tank simply does not have time to escape. I can’t say anything about the condition of the tank’s ventilation, because the plug on the neck is kind of left-handed, similar to a Zhiguli oil plug, and I’m not sure about its complete tightness. But no effects of suction or, on the contrary, the release of vapors when opening are observed. Now, if I somehow buy an original plug, then I’ll find out. Okay, I’ll get a piece of thick wire somewhere and try to find a hole in the air hose. By the way, does anyone remember this hole before the mesh or after?
Arrangement of elements
| Replacing the filler neck | * | * |
| Pos. | Spare part no. | Name |
| A | — | Option 110 |
| B | — | Option 90 |
| 1 | — | Fuel system radiator |
| 2 | — | Fuel filter |
| 3 | — | Fuel tank |
Login
Removing and installing the fuel tank filler neck
Fuel tank filler neck design
1 — Main hose for filler neck 2 — Clamp 3 — Clamp 4 — Sealing gasket 5 — Mounting flange 6 — Cover
Tightening force of threaded connections, Nm
5. Unscrew the mounting screws and remove the sealing flange.
10. Remove the filler neck protector.
11. Remove the bolts of the brackets securing the evaporator tube to the filler neck.
12. Remove the bolts securing the filler neck bracket to the body.
1. Without closing the access door, install the fuel plate (A) with the rubber seal (C) and insert the filler neck into the intake hole on the inside of the wheel arch. Align the neck, install the cup (B) (see also) and tighten the mounting screws.
If the edges of the seal are bent inwards, straighten them using a screwdriver.
2. Place the main hose on the lower section of the filler neck tube (the overlap should be about 35 ÷ 40 mm) and secure it firmly with a clamp.
Make sure that the clamps do not touch the ventilation hose and the rear suspension beam!
3. Proceeding in a similar manner, install the ventilation hose (the overlap when fitting the hose onto the tube should be 25 ÷ 30 mm). 4. Tighten the bolts securing the filler neck support bracket to the body with a force of 7.4 Nm. 5. Tighten the evaporator hose bolts. 6. Further installation is carried out in the reverse order of dismantling the components. Make sure that the filler neck elements do not come into contact with the suspension elements.
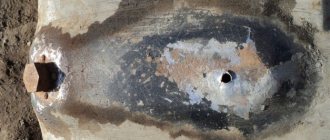
Fuel level sensor
The fuel level indicator sensor is located inside the fuel tank. The sensor assembly assembly is accessed through an opening in the top of the tank. The block flange is fixed in working position and sealed using a steel retaining ring.
The fuel sensor assembly includes a top cover flange that contains an electrical connector for connecting the sensor and two steel fuel line connections.
The flange is sealed by a rubber seal installed between the flange and the retaining ring housing.
The top cover is attached to the swirl chamber assembly using two spring-loaded steel struts. Springs securely fix the vortex chamber at the bottom of the tank.
The vortex chamber ends with a cavity in which the fuel level indicator sensor is located.
Replacing the filler neck (gas tank pipe)
In my practice, there were many cases when, when removing the gas tank on a VAZ 2110, I had to cut off the hose or even the filler neck, since everything was stuck so tightly that it was simply impossible to do otherwise. If for some reason you have damaged the gas tank filler pipe, then the article below will show you the process of replacing this part with a new one.
Tools you will need to complete this job:
- Phillips screwdriver
- Head for 8 mm, 10 and 13 mm
- Ratchet handles
- Extension Cords
- Penetrating lubricant
- Flat blade screwdriver
If the lid does not close
There is also the opposite problem, when the gas tank flap does not close, dangles, or simply does not fit tightly. To find out the reason, you need to inspect the cover and its fastenings. The hatch is supported by guides that can bend or break, making it impossible to close the door. For repairs, you need to remove the cover, this must be done carefully so that the latch tabs come out of the seat. Depending on whether the fasteners are broken, the spring has flown out (lost or simply moved out of the correct position), the nut has become loose, etc., you need to take the necessary measures. It may be enough to simply position the hatch correctly after removal or tighten the nut, but it may also be necessary to replace the spring or drive cable. To do this, you will have to lift the trim in the cabin from the side of the tank to clarify the situation and, if necessary, replace the element.
Removing and installing the tank filler neck on a VAZ 2110
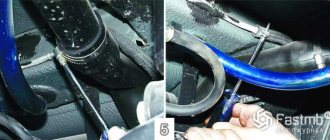
So, the first thing you need to do is remove the rear right wheel and first jack up the car to make it easier to carry out all the repairs. After this, unscrew the clamp bolt that secures the hose and pipe.
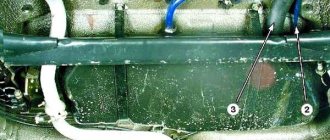
Now we go up a little higher and unscrew the neck fastening nut using a 13 mm wrench. This is clearly shown in the photo below.
And another clamp is located above. There you will need a key for 10.
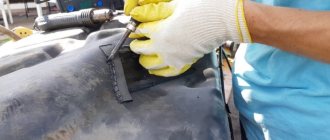
And remove the clamp, putting it aside so as not to lose it. Next, open the gas tank flap and remove the rubber casing.
And now you can carefully move the filling pipe down to bring it to a more convenient position.
And now all that remains is to disconnect the hose from the top of the pipe, which is shown in the photo. We loosen the clamp that tightens this thin hose.
And after trying a little, we remove the hose from the tube:
Now the neck is almost completely freed, and all that remains is to disconnect it from the hose from below, the clamp of which we unscrewed at the very beginning.
After which we remove it without any problems. The end result is shown in the photo below.
The price of a new neck (filler pipe) of a gas tank on a VAZ 2110 is about 1000 rubles, but the same version can be bought at a disassembly site for half the price. Installation occurs in reverse order.
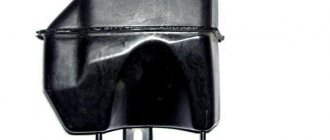
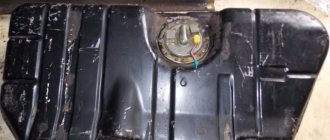
Fuel tank
The fuel tank is located at the bottom of the vehicle, between the chassis side members.
The support is attached to the chassis with six screws. When the mount is attached to the chassis, the tank is protected by foam pads adjacent to the chassis center cross member. Additional protection is provided by a protective cover, which is installed in the front right corner of the tank.
The fuel tank is made of HDPE. The fuel tank is a sealed unit with the only possible access to the inside through a hole in the fuel pump module flange located at the top of the tank.
The reflective metal coating is attached to the tank with two threaded rivets and serves to protect the tank from heat generated in the exhaust system.
Gas tank flap: the secrets of the iron door
Why is the gas tank flap on the left on some cars, on the right on others, and why do we even look for it?
One of my colleague Konstantin Vasiliev’s publications about the “secret” buttons and functions of the car ended with useful advice. If you don’t know or have forgotten which side your fuel tank flap is on, you just need to look at the instrument panel: in most cars, next to the gas pump icon, there is an arrow that tells you where the tank opens. I was surprised that many people really don’t know about this “secret”. Okay, but what do you do if you need to refuel, you forgot where the gas tank flap is, you can’t get out of the car, and there’s no arrow? I will give an elementary answer to this question at the end of the article. And the riddle itself made me think about such a seemingly prosaic thing as a gas tank flap. In particular, about why on some cars it is on the left, on others on the right, and why we are looking for it in the first place, and Kostya Vasiliev gives advice.
Who's fumbling with his right hand?
It’s hard to believe, but neither motorists nor representatives of car companies often know the exact answer to this question. But how many versions there are! There are both funny and serious ones.
Let's laugh first. Some dreamers argue that the left or right location of the fuel tank neck (and, of course, its hatch) depends on which hand the designer is better at - right or left. Or who he cares more about, right-handers or left-handers. This, of course, is complete nonsense. Although I wonder how many modern car designers are left-handed. Or maybe there will be ambidexters who can use both hands equally? Also a topic for publication... Okay, stop joking. Enough for now.
strong air flow from the neck to fill the engine with oil! (topic closed)
Nissan Almera 2001 mileage 126000. Good afternoon everyone! Today, with the engine warm and running, I unscrewed the filler cap to fill the oil, after which I placed my palm over the neck, as a result of which I felt a strong flow of air, which causes oil to splash out. IS THIS NOT A NORMAL PHENOMENON. I tried using the search engine, but it didn't help me.
12/14/19 – reply | quote | #
Greetings! My name is Mikhail, sorry for being off topic, I want to express my gratitude to you and your site. Thanks to you, I was able to remove the scratches my wife caused in the parking lot on my own.
It all started when my wife passed her license and began to often take my car to get to the nearest shopping center. There were no signs of trouble, but one day she said with tears in her eyes that she had rubbed herself against a pole in the parking lot. I still don’t understand how it was necessary to manage to do this, but with women everything is possible, you understand)) The scratch was deep enough, but there was no money or time to bother with painting. That's why I simply ignored the scratch. A week ago I came across Artem Shevchenko’s blog, who in his article told how to get rid of scratches in 10 minutes. At first I didn’t believe it, but I decided to try it anyway and didn’t regret it at all. The method worked 100%, there was not a trace left of the scratch, and nothing was visible at all from any angle. In general, I’ll keep the intrigue, for those who want to quickly get rid of scratches, come and read the article on Theme’s blog, I guarantee you won’t regret it.