The operation of the lubrication system of an internal combustion engine is possible only if all its structural elements are in good working order and coordinated action. Failure of at least one of its parts will inevitably lead to problems in the power unit.
In this article we will talk about what an oil pump pressure reducing valve is and what its functions are. We will also look at the operating principle of this lubrication system unit and tell you how to properly repair and adjust it.
Why do you need an oil pump pressure reducing valve?
As you know, oil is supplied to moving engine parts under a certain pressure created by a running pump. Without this, the lubricant would simply flow into the crankcase, exposing the elements of the crank and gas distribution mechanisms to increased friction and overheating. But too high a pressure is also dangerous for the engine. Gaskets, seals, seals are not able to withstand exceeding its normal values. Because of this, oil begins to ooze from under them, and can also enter the power and cooling system of the power unit.
It is to reduce the lubricant pressure in the system that the oil pump pressure reducing valve is designed. The word “reduction” itself is often used in mechanical engineering, denoting a reduction, reduction, or weakening of something. In our case, this refers to oil pressure.
Where is he located?
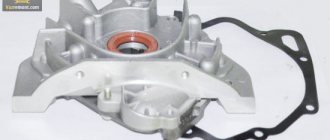
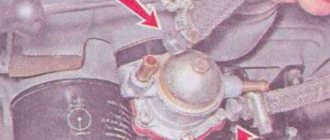
The oil pump pressure reducing valve is most often located on the cover of this device, which is located in the lower front part of the engine block behind the generator drive pulley. Sometimes it can also be installed on the oil filter housing.
There are two types of valves: built-in and detachable. In the first case, the oil pump and pressure relief valve are a single structure that cannot be disassembled. In the second, the pressure control mechanism is removed from the pump using a tool and can be repaired separately.
DIY replacement
And so, if you have enough skills and free time, you can replace the Priora oil pump yourself, while saving money. To do this you will need a tool such as:
• Set of wrenches; • Set of heads; • Tools necessary for measuring gaps; • flat screwdriver.
If all the necessary parts and tools are prepared, you can begin replacing the oil pump:
1. First of all, disconnect the cable from the negative terminal of the battery; 2. Then drain the engine oil; 3. Then you need to remove the timing belt from the timing drive; 4. Disconnect the connector from the crankshaft position sensor; 5. Using screwdrivers, remove the pulley from it and remove the key from the groove; 6. After which you need to remove the oil sump; 7. Then, using a key of eight, turn the bolts of the oil receiver and remove it; 8. Remove 6 bolts from the oil pump to the cylinder block, use a screwdriver to move it, and remove the oil pump from the VAZ 2170 Priora; 9. Clean the cylinder block and pump housing from the old gasket; 10. Before replacing, fill the cavity of the oil pump with lubricant for better suction of oil from the crankcase during startup; 11. Install the oil pump and all the removed parts on the Lada Priora VAZ 2170 car, also in the reverse order; 12. And upon completion, adjust the tension of the timing belt and generator drive, after which you can fill the engine with oil.
Operating principle of pressure reducing valve
The oil pressure in the system can depend on several factors, but the main one is the number of crankshaft revolutions. In other words, the harder we press the gas pedal, the faster the oil pump gears rotate. And the faster the gears rotate, the greater the volume of oil the pump captures from the crankcase, and the higher its pressure at the outlet.
When the pressure reaches a certain value, the serviceable valve opens slightly, allowing oil to pass into the reserve channel, through which the lubricant flows back into the crankcase.
The operation of the oil pump pressure reducing valve is as follows. The piston or metal ball is pressed against the inlet of the housing by a spring, which, in turn, is supported by a thrust screw. The oil, under the influence of increasing pressure, begins to put pressure on the surface of the valve, pushing it inside the body and compressing the spring. Thus, a hole opens, through which the lubricant goes into the reserve channel.
When the pressure decreases, its value is no longer sufficient to keep the valve in the open position, and the ball or piston, under the influence of a spring, again closes the inlet hole. As you can see, the scheme is quite simple and reliable, however, it sometimes fails.
Reducing valve malfunctions
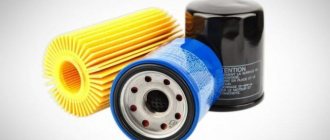
The pressure reducing valve, oil pump and oil filter are the main elements of the lubrication system, but if the latter, due to the peculiarities of its design, almost never breaks, but only becomes clogged, then the first two parts can fail quite often. The reason for this is usually the use of low-quality oil, lubricant that does not correspond to the type of engine and its operating conditions, as well as untimely replacement. In this case, particles of dirt, metal shavings or combustion products contained in the lubricant settle on the working surfaces of the valve, which, in fact, leads to its clogging and jamming.
Also, the cause of the malfunction can be a spring if it has stretched over time or, conversely, has compressed, bent, or burst.
It is immediately necessary to point out that repairing the oil pump pressure reducing valve is only possible if it has a collapsible design. For non-separable models, the entire pump cover will need to be replaced.
A valve is considered faulty if it is unable to maintain the required pressure in the system, and when its mechanism does not operate when the pressure reaches its maximum value. In the first case, it will not be difficult to determine the breakdown - a warning lamp on the car’s instrument panel will notify you about this. But you can only find out about the increase in pressure by oil leaks on the engine.
At what pressure should the pressure reducing valve operate?
But how can you understand that the pressure has increased or, conversely, decreased? And what should it even be like? The optimal oil pressure in the system can be found by looking at the owner's manual. It will be different for different brands and models of cars. For example, the pressure reducing valve of the Tavria oil pump operates at 0.55 MPa. Approximately the same indicators are relevant for most Lada cars.
You can measure oil pressure by connecting a special liquid pressure gauge to the system into the pressure sensor mounting socket. Before this, the engine must be warmed up to operating temperature. All measurements are made with the engine running.
Why does the breakdown occur?
Most often it all starts with a late oil change. For this reason, solid deposits appear in the engine, which over time fall off the walls and, when entering the pump, destroy it.
And it doesn’t matter what kind of filter you have, because any filter is after the pump
All this leads to a decrease in oil pressure, which subsequently leads to wear of other parts. And then the likelihood that replacing one pump can be done is very small
Therefore, it is very important to monitor the oil level and change the oil pump on time!
As follows from the purpose, improper operation of the oil pump leads to the fact that the oil does not circulate sufficiently throughout all engine systems. If the pump is not replaced in a timely manner, this leads to the so-called “oil starvation”. The consequences of this phenomenon are different and can be very dangerous. So, insufficient oil leads to:
• Excessive wear of units and components; • Penetration of mechanical wear products into the oil; • Reduced oil pressure in the system; • Overheating of parts; • Ingress of solid particles into various units and their jamming.
Useful tips
Finally, here are some useful tips that may help you avoid problems with the oil pump pressure reducing valve or make it possible to identify its malfunction in time:
- Fill the engine only with high-quality motor oil of the appropriate type and viscosity grade. Lubrication requirements can be found in the vehicle manufacturer's recommendations.
- Never mix different brands of oils, even if they are of the same class.
- Change the oil and oil filter in a timely manner. The regulations for this procedure are also indicated in the car owner's manual.
- Do not allow dirt, moisture, or process fluids to enter the lubrication system.
- Monitor oil pressure. When the corresponding warning light on the device turns on, do not hesitate to go for diagnostics.
- Pay attention to the operating temperature of the engine. Overheating can cause coolant to enter the lubrication system.
- If you decide to replace or adjust the oil pump pressure relief valve without the necessary skills and tools, it is better to use the services of specialists.
Without a working lubrication system, no car will last long. Its most important element is the oil pump, which provides full pressure in the system. However, it also does not last forever, and in case of failure it must be replaced. You can solve the problem even without contacting the service, but you will have to spend a lot of time. Today we’ll talk about why the oil pump fails on a Priora and how to change it if it fails.
Purpose
The purpose of the oil pump is to circulate oil through all engine components to lubricate them evenly and increase their service life. It is driven by an internal combustion engine (internal combustion engine) and is structurally divided into two different types, based on the principle of coupling with the crankshaft. In our case, it connects directly to the crankshaft, that is, it rotates with it. This is the operating scheme of the unit for front-wheel drive VAZ cars. Cars with all-wheel drive, as well as classics, have a more complex system installed. There, the drive contains additional links: an intermediate shaft, a timing chain (gas distribution mechanism), and toothed gears, through which torque is transmitted from the crankshaft to this device.
Common faults
- Most often, the pump of the VAZ 2112 and other VAZ models with front-wheel drive leaks through the seal, which has to be changed.
- The oil receiver also often fails, especially if you use low-quality oil, or missed replacing it in a timely manner, or the oil does not meet specifications (too thick).
- Too liquid simply will not be pumped and the pressure sensor will immediately light up.
- In this case, the oil receiver mesh becomes clogged, the circulation of oil through the engine becomes difficult, causes oil starvation, and as a result, the service life of the engine is significantly reduced.
- This includes a malfunction of the pressure reducing (bypass) valve: either it is stuck in the open position, and then the oil pressure drops. Either it does not bypass, and then the oil will squeeze out through the oil seal
What oil to fill and at what frequency?
The manufacturer recommends changing the engine oil after 10 thousand kilometers, however, it is recommended to shorten this period if possible, and at the same time change the oil filter. You should only buy oil from well-known companies and, when choosing it, beware of counterfeits . The ideal option is to pour oil recommended by the manufacturer and not be fooled by cheapness or high cost (expensive does not mean high quality).
Recommendations for choosing spare parts
- The oil pump usually does not cause car owners much trouble, since it has a service life of at least 120 thousand kilometers. However, no one is immune from breakdowns
- If suddenly you still need to replace the oil pump on a VAZ 2112, it is better to take original spare parts and not save
- Among the well-known suppliers of parts for VAZ cars, the official one is the Tolyatti Automobile Assemblies Plant (TZA for short).
- It also produces oil pumps for the VAZ 2112
- This is one of four varieties of such units in the VAZ line, which fits all front-wheel drive fuel-injected cars
Helpful advice: To avoid serious consequences for the car and major engine repairs, it is important to monitor the indicators on the dashboard. If the oil pressure lamp flashes at idle speed, and replacing it does not solve the problem, the lamp lights up again - this means there is a breakdown. When the warning light suddenly comes on and the performance of your car’s engine is alarming, it is recommended to turn off the ignition and call a tow truck to a repair station. This will save money on subsequent engine repairs (continuing to drive the car under its own power in such a situation, you risk serious damage to the engine).
- Typically, removing the oil pump on any car occurs when disassembling the engine.
- Only if necessary, this work is carried out on the car without removing the engine from it.
- Before starting this procedure, first drive the car into the inspection hole.
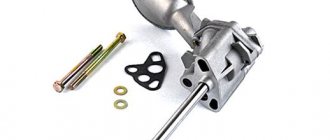
- And immediately purchase everything you need to carry out a full replacement, as shown in Photo No. 2.
Photo No. 2, everything you need to replace the pump
- 1 - oil pump
- 2 – pan gasket
- 3 - pump gasket
- 4 - sealing ring
- 5 - sensor mounting bracket
Attention: The pumps of the VAZ 2108-1011010 and 2111, 2112-1011010 engines are almost the same, with the exception of point No. 5 - the sensor mounting bracket is different, do not miss this point!
Tip: It is recommended to install only a factory-produced gasket under the pump, since a non-standard gasket may have a thickness that does not meet the specifications and cause problems with the operation of the pump.
Necessary tool
- A set of wrenches (open-end - spanner preferably)
- Socket set and ratchet
- Two strong flathead screwdrivers
- Hexagon set
Typical breakdowns
There are only two main oil pump malfunctions. In one case, repair is possible, but in another it is much easier to remove the part, throw it away and install a new one.
Typical problems are:
- clogging of the oil receiver. In this case, it is necessary to drain the liquid from the crankcase, remove the pan, oil receiver and rinse them completely;
- mechanical damage to the pump or any of its components. The valve responsible for maintaining pressure in the system especially often fails. In this case, repair is impractical; it is better to replace it.
An alarm signal is a drop in oil pressure. In this case, it is recommended to temporarily stop operating the vehicle and thoroughly diagnose the entire system.
How to replace the pump
Replacing a part will require you to spend a lot of time, so set aside a few free hours, say, on a weekend. The work consists of several main stages. Let's look at the procedure step by step.
- Basic procedures: disconnecting the negative battery, draining the oil.
- Removing the timing belt.
- Disconnecting the wiring harness from the crankshaft position sensor, removing the pulley.
- Removing the key and removing the protection.
- Twisting the fasteners and removing the clutch housing cover.
- Removing the crankcase.
- Removing the crankcase gasket.
- Removing the oil receiver.
- Twisting the oil pump fasteners.
That's all, actually. Assembly work is carried out in reverse order. During the work, try to replace consumables. First of all, we are talking about the crankcase gasket. Install the new part and seal it, having first cleaned the mating surface of dirt and old sealant. At the same time, you can clean the oil receiver. For this you will need white spirit. If the part cannot be cleaned, it will have to be replaced.
This must be done, as there is a risk of ignition of the lubricant. The next element to be inspected and replaced is the oil receiver seal. If the ring breaks or loses its elasticity, you need to install a new part.
The oil pump plays a vital role in the engine lubrication system of any car. Even short-term operation of a car with a faulty pump will lead to failure of the power unit. Therefore, any car owner should know the main signs of oil pump failure and take appropriate measures in a timely manner.
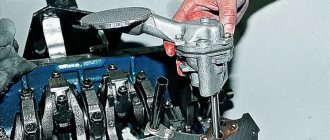
How to properly disassemble the oil pump on a Priora
The pump removed from the vehicle (detailed removal instructions here) is subject to initial inspection. It is necessary to identify faulty parts and, if possible, replace them. First, let's disassemble the device and find out what it consists of. To do this, you will need a 5-point hex key. Below are the corresponding instructions from Auto-VAZ.
We unscrew all the bolts around the perimeter of the oil pump, with the help of which the body is pressed against the cover. The photo below shows their location.
After this, separate the housing from the oil pump cover.
Next, we visually inspect all the parts, namely the gears of the product (driven and driven). The external ideal appearance does not mean that they are suitable for use. That is why we move on to the second part of the section - determining the suitability of the oil pump and its components.
Functions, structure and location of the VAZ 2110–12 oil pump
The engine lubrication system is designed to timely supply engine oil to the moving and hottest elements of the power unit. Oil is supplied from the sump and circulates through special channels inside the block and cylinder head. The oil pump ensures forced circulation of the lubricant.
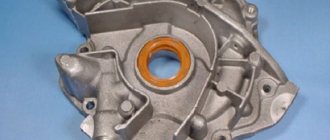
Location of the oil pump on the VAZ 2110–12
On the VAZ 2110–12, the oil pump is located in the lower right corner of the cylinder block under the crankshaft gear, which drives the gas distribution mechanism.
The oil pump is located in the lower right corner of the engine under the crankshaft gear
This applies to both eight and sixteen valve engines. The pump housing is also the side cover of the power unit.
Oil pump device
The design of the oil pump is very simple and includes the following elements:
- housing with lid;
- driving and driven gears;
- pressure reducing valve with spring;
- oil receiver
The oil pump has a simple design based on two gears
Operating principle of the oil pump
The pump is driven by the crankshaft through the drive gear. The latter rotates the driven gear, creating a reduced pressure at the input of the device and increased pressure at the output. Thus, oil from the crankcase flows through the oil receiver tube into the pump, and from it into the engine oil line. When the pressure inside the pump begins to exceed the permissible value, a spring-loaded pressure relief valve drains excess oil back into the sump.
Instructions for verification
So:
- First, check the serviceability of the electrical circuit going from the sensor to the instrument panel
. Throw the wire going from the sensor to the engine to ground, the light will go out if the circuit is working properly. - The second reason could be the oil filter. Such a breakdown is determined by unscrewing the oil pressure sensor. It should be moistened with oil; a dry sensor means that the filter is clogged or its valve is stuck.
- When it does not work, open the pan and check the oil receiver itself and the condition of its rubber sealing ring.
- After these checks, one reason remains - a breakdown of the unit itself.
For your information:
- The engine of the VAZ 2110 model is equipped with a combined lubrication system. On machines of this model there is a gear oil pump, which is located at the front end of the cylinder block.
- Special gears with trochoidal internal gearing reduce mechanical losses during rotation.
- The oil pump itself is equipped with a fully in-line, non-separable filter. With bypass and anti-drainage valves. This device ensures good oil circulation and lubrication through all components of the internal combustion engine (ICE).
- It works by rotating the crankshaft. The connection method to the crankshaft is direct, which is typical for all VAZ cars with front-wheel drive.
- On all-wheel drive and classic models, the system is supplemented with special transmission parts: a timing chain, an intermediate shaft, and a set of gears that transmit torque from the crankshaft.
- The service life of this pump is from 120 thousand km, it works properly when the engine has already undergone a major overhaul. However, during operation, breakdowns are not excluded.
If replacement is still required, it is better for you to choose the VAZ 2110 oil pump from among reliable manufacturers.
Tools
- Set of spanner wrenches
- Ratchet socket set
- A pair of flathead screwdrivers
Operating procedure
So:
- Disconnect the negative cable from the battery terminal.
- Drain the oil from the engine (through the drain plug in the oil pan).
- We take out the camshaft drive belt.
Warning: After removing the timing belt (timing belt), do not try to turn the crankshaft or camshaft, the pistons may bend the valves. Then the price of repairs will increase significantly, as will the volume of work performed.
- Now remove the oil sump.
- On engines with a fuel injection system, disconnect the block with wiring from the sensor that counts crankshaft revolutions.
- Using two screwdrivers, remove the pulley from the crankshaft.
- If the key does not fit tightly in the crankshaft groove, take it out so that it does not get lost.
- We unscrew the bolts securing the oil receiver (there are three bolts, there are flat washers under the bolts) and remove the oil receiver.
- We clean the oil receiver mesh from dirt and wash it with white spirit. When the mesh cannot be washed or is damaged, we replace the oil receiver.
- We replace the lost elasticity or torn sealing ring of the oil receiver.
- We unscrew the bolts securing the oil pump to the cylinder block (there are six of them) and remove the pump along with the gasket. Be careful - there are flat washers under the bolts.
Helpful Hint: Every time you remove the pump, replace the old gasket with a new one. It is recommended to install only a factory-made gasket; a non-standard gasket has a different thickness and will cause problems with the operation of the oil pump.
- We turn the pump drive gear to ensure correct installation on the crankshaft: the protrusions on the gear should coincide with the flats on the crankshaft.
- Before installing the pump in place, lubricate the lip of the oil seal.
- When putting the pump in place, carefully tuck the working edge of its oil seal onto the crankshaft journal using a wooden stick.
- Only after this do we tighten the bolts securing the pump.
- Then install all the parts back in reverse order.
- Adjust the tension of the camshaft drive belt.
For VAZ 2110, replacement of the oil pump is completed. Remains in the engine. We also recommend watching a video on replacing the oil pump.
Helpful advice: When installing a repaired or new oil pump, we recommend replacing the oil filter at the same time.
Troubleshooting
Direct connection of the pump to the crankshaft avoids damage associated with its drive. This, however, does not exclude the possibility of other malfunctions.
Pump malfunctions and their symptoms
The main malfunctions of the VAZ 2110–12 oil pump include:
- clogging of the oil receiver mesh;
- damage to the device body;
- wear of gear seats in the housing and cover;
- wear of the drive or driven gear;
- damage to the pressure reducing valve;
- deformation or damage to the valve spring.
A constantly burning warning light in the form of an oil can indicates a drop in pressure in the lubrication system to a critical level
Signs of oil pump failure may include:
- critical oil pressure warning light on the dashboard;
- engine overheating;
- high-frequency knocking (clattering) at the pump location.
The design of the VAZ 2110–12 engine does not provide for the installation of an oil pressure sensor. Like most modern cars, representatives of the tenth family are equipped only with an emergency (critically low) pressure sensor. When the pressure in the system drops, a warning light in the form of a red oil can lights up on the instrument panel. However, this lamp can also light up in the event of other malfunctions (failure of the sensor, break in its electrical circuit, oil leak, etc.).
Engine overheating also cannot be attributed only to symptoms of a faulty oil pump. It usually occurs due to problems in the cooling system.
As for the knocking coming from the oil pump, not everything is clear here either. Sometimes, when gears or housing elements wear out, the device may produce a high-frequency knocking sound. As a rule, it is associated with the formation of play between the gears and the housing (cover) and is most clearly audible at idle. However, similar sounds can also be produced by worn bearings (tension or guide rollers, pumps, crankshafts).
How to determine that the oil pump is faulty
The process of replacing the oil pump on a VAZ 2110-12 is quite simple and does not involve the use of any special tools. However, to do this you need to buy a new pump and spend some time. Therefore, before replacing the device, you should make sure that it is the one that is faulty. This can be done using the following algorithm.
Oil level measurement
First you need to measure the oil level in the engine and check its consistency. This is done with a special probe. It is advisable to remember when the oil and filter were changed. If the car has traveled more than 10 thousand km since the last replacement, it is better to replace them immediately. Then you should apply a drop of oil to your thumb and rub it with your index finger. If the oil turns out to be too dark, liquid and quickly absorbed, it needs to be replaced.
If the lubricant level on the dipstick is below o, add oil and start the engine. Next, you need to see if the warning light on the dashboard comes on. You should also check whether the power unit is overheating. At the same time, the engine is inspected for oil leaks. If you previously heard a knocking sound from the pump, you should listen to see if it disappeared after adding oil.
One of the reasons for the drop in oil pressure in the system may be its low level
Checking the sensor electrical circuit
If the listed symptoms do not disappear, you should do the following:
- Stop the engine and let it cool.
- Disconnect the wire from the emergency oil pressure sensor. On sixteen-valve engines it is located on the left side at the end of the camshaft bearing housing, on eight-valve engines it is located on the right on the rear side of the cylinder head.
- Turn on the ignition without starting the engine.
- In the engine compartment, short the wire going to the sensor to vehicle ground. If the warning light goes out, everything is fine with the sensor circuit.
To check the sensor circuit, it is enough to short-circuit the wire going to it to ground with the ignition on
Sensor diagnostics
To diagnose the sensor, you need to unscrew it with a 21 key and inspect its working part, which goes into the cylinder head. There should be traces of engine oil on it, indicating normal lubricant circulation in the system. If the working part is dry, the oil pump is most likely faulty.
The sensor itself is usually checked by replacing it with a known good one. After this, it is checked whether the warning light is on and how the engine behaves.
Checking oil pressure
If after checking and replacing the sensor the symptoms do not disappear, you need to measure the oil pressure using a special pressure gauge. This pressure gauge has a metal tip with a thread that is screwed into the sensor socket. Then the engine starts and warms up. If the pressure gauge shows a pressure greater than 0.6 bar (60 kPa) at idle, the oil pump is working. If the pressure is lower, the pump should be replaced.
The oil pressure at idle speed must be at least 0.6 bar (60 kPa)
Checking the oil pump on the stand
In a car service center, the oil pump is checked on a special stand. This implies:
- determination of pump performance;
- measuring oil pressure at the pump outlet;
- measuring the pressure at which the pressure reducing valve opens.
In this case, special oil is used, the temperature of which should be exactly 20 0 C. The performance of the VAZ 2110–12 pump at a crankshaft speed of 6000 rpm must be at least 35 l/min, and the pressure reducing valve must open when the pressure inside the pump increases to 0 .55–0.75 MPa.
troubleshooting
Don't rush to conclusions and blame the pump for everything. It is necessary to organize a full check to make sure what caused the signal to appear on the dashboard.
| Check area | Your actions |
| Checking the electrical circuit | You need to check the functionality of the electrical circuit that goes from the sensor to the instrument panel. The wire that goes from the regulator to the engine must be connected to ground. If the circuit is working properly, the lamp will go out. |
| Checking the oil filter | Just unscrew the oil pressure sensor. If it is soaked in lubricant, everything is fine. If it is dry, then the filter is clogged or the filter valve is stuck. |
| Checking internal elements | You will need to replace the filter if there is a problem with it. Next, the pan is opened and the condition of the oil receiver and rubber seals are inspected. |
If the measures taken did not produce results, the lamp still does not go out, then the pump is the culprit in the current situation.
Useful information
Let's talk a little about the principles of the design and operation of the oil pump. This can help you during the repair process.
- Domestic “tens” use a combined lubrication system.
- The design of the car provides for the presence of a gear oil pump. It is installed on the front end of the cylinder block.
- Special gears with trochoidal internal gearing help reduce mechanical losses during rotation.
- The pump is equipped with a full-flow filter with a non-separable design. It contains an anti-drip and bypass valve.
- This design guarantees efficient circulation of lubricant throughout all engine components.
- The pump operates by rotating the crankshaft. The connection is direct.
- The operating life of the pump is about 120 thousand kilometers.
Location
Not everyone knows where to look for this oil filter. It is not located in a visible place, so you will have to try hard to gain access to the device.
The MN is located directly inside the engine oil sump. To get to it, the oil must be drained from the engine.
Please note that if your engine uses high-quality oil that was only recently filled, use a clean container when draining it so that you can then refill the same substance. If the oil is old, replacing the pump is an excellent reason to change the lubricant.
The main reasons for oil pump failure
The service life of the VAZ 2110–12 oil pump regulated by the manufacturer is 150–200 thousand km. This, however, does not mean that the pump will not last longer or fail much earlier. The main reasons why it may stop functioning normally are:
- spent resource;
- untimely replacement of the oil filter, as a result of which metal particles (friction products) enter the system, acting on the pump parts as an abrasive, and the filter mesh of the oil receiver becomes clogged;
- use of oil whose characteristics do not meet the requirements of the car manufacturer.
Oil pump replacement and repair
The oil pump of VAZ 2110–12 cars is replaced in an inspection pit or overpass. In extreme cases, you can use a jack. To work you will need the following tools:
- wheel wrench;
- keys for 10, 13, 17;
- hexagon socket wrenches 5 and 8;
- large slotted screwdriver;
- special key for tension rollers (to adjust the timing belt tension);
- clean, dry container to drain the oil.
Removing the oil pump
The procedure for dismantling the oil pump on a VAZ 2110–2112 is as follows:
- Remove the timing drive casing, having first unscrewed the mounting bolts on it with a 10mm wrench (on an eight-valve engine - 3 bolts, on a sixteen-valve engine - 6).
To remove the timing case, you need to unscrew 6 bolts
To loosen the alternator belt, you need to unscrew the bolt with a 13 mm wrench.
To remove the pulley, you need to unscrew the bolt with a 17 mm wrench
The marks on the camshaft gears must match the marks on the rear timing cover
Before removing the timing belt, make sure that the marks on the pulley and on the pump cover match
To loosen the timing belt, you need to unscrew the bolts securing the tension and guide rollers
When removing the crankshaft timing belt, be careful not to lose the key.
To make the oil drain faster, unscrew the filler neck.
To remove the pan, you need to unscrew the 16 bolts securing it with a 10mm wrench.
If the gasket is deformed or damaged, it must be replaced
The oil receiver is secured with three bolts to the main bearing cap and the oil pump.
To remove the oil pump, you need to unscrew 6 bolts with a 10mm wrench
When installing the oil pump, assembly is performed in reverse order.
Oil pump repair
Practice shows that in most cases it is better and easier to replace the pump as an assembly. If the device malfunction is not critical, you can try to repair it. Before this, the pump should be disassembled and the reason why it failed should be determined.
Pump disassembly
The procedure for disassembling the pump is as follows:
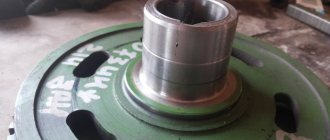
- Using thin pliers, remove the crankshaft oil seal from its seat. If it shows signs of damage, it will need to be replaced.
The crankshaft oil seal is removed using thin pliers
To disassemble the pump you will need a 5mm hex key.
The drive gear is located in the cover, and the driven gear is located in the housing
The valve plug is unscrewed with an 8mm hex key
The pressure reducing valve is pressed by a spring
Assessing the condition of oil pump elements
In order to understand whether the pump can be repaired, it is necessary to inspect all its elements and assess the degree of wear in the following order:
- Inspect the internal surfaces of the pump housing and cover. There should be no burrs, roughness or dents on them.
- Using a caliper, measure the diameter of the driven gear seat in the pump housing. It should not exceed 75.1 mm.
If the diameter of the seat is greater than 75.1 mm, the housing must be replaced
The segment thickness must be at least 3.4 mm
The thickness of the driven and driving gears should not be less than 7.42 and 7.45 mm
When free, the spring should have a length of 55.72 mm, when compressed - 31.7 mm
Oil pump installation
- 1. Before installing a newly purchased VAZ 2112 or 2110 oil pump, be sure to lubricate its pressure reducing valve and gears. Also, when replacing, use only a new oil seal;
- 2. Install the oil pump, place the timing belt on the tension rollers, and align it according to the marks. Next, the plastic protection is installed.;
- 3. Put on the wheel;
- 4. Install the oil intake on the oil pump VAZ 2112, 2110;
- 5. Thoroughly degrease the crankcase and apply sealant;
- 6. Install a new gasket, then apply sealant again;
- 7. Degrease the block, install the crankcase in its place. The task will be simplified if you first screw a few bolts in different places and then tighten the rest;
- 8. The flywheel protection is installed, followed by the crankcase protection (if available);
- 9. Fill with high-quality oil and start the VAZ 2110, 2112 engine.
Repair of pump VAZ 2112, other models
You can also repair the VAZ 2110 oil pump with your own hands, which consists of disassembling this product, visual inspection to identify worn parts, followed by replacement. But it is the best option only if there are spare parts or another serviceable unit. In all other situations, it would be more practical to purchase a new product for the VAZ 2110, 2112.
The VAZ 2110 engine has a combined lubrication system. On cars of this model there is a gear oil pump located at the end of the cylinder block.
Gears with trochoidal internal gearing reduce mechanical losses during rotation.
The VAZ 2110 oil pump is equipped with a full-flow non-separable filter, with anti-drainage and bypass valves. This device ensures the circulation of engine oil and lubrication of all internal combustion engine components.
It works due to the movement of the crankshaft. Based on the method of connection to the crankshaft, it is possible to distinguish units that are driven by connecting directly to it, which is typical for all VAZ vehicles with front-wheel drive.
On classic and all-wheel drive models, this communication system is supplemented by special links, an intermediate shaft, a timing chain, and a set of toothed gears, which transmit torque from the crankshaft.
The service life of this device is from 120 thousand km; it can work properly when the engine has already been overhauled. However, breakdowns are possible.
If, after starting the engine, the control light in the form of an oil can remains on, there are various possible causes of the breakdown:
- First, check the circuit from the sensor to the instrument panel. If the wire from the sensor is connected to ground, the light will go out if the circuit is working properly.
- The reason may be the filter. You can determine such a breakdown by unscrewing the pressure sensor. It must be wetted with oil; a dry sensor indicates that the filter is clogged or its valve is stuck.
- If replacing the filter did not yield anything, open the pan, check the oil receiver and the integrity of its sealing ring.
- After all the checks, we can only assume that the reason is wear or breakdown of the unit itself.
If you need to replace the VAZ 2110 oil pump, it is better to choose a manufacturer from reliable companies. The list of offers can be viewed in our catalog, or you can leave a purchase request in the appropriate section.
To identify the malfunction, the removed device must be disassembled. Perhaps the reason is clogging, or the pressure relief valve is stuck, etc. We fix the VAZ 2110 oil pump in a vice, unscrew the screws on the cover, take out the housing and gears. Having unscrewed the pressure reducing valve plug, we take out the spring with the valve, then press out the self-clamping crankshaft oil seal.
All parts must be thoroughly washed with gasoline, dried, checked for compliance with the diameter of the driven gear socket, the axial clearances of the drive and driven gears, and measure the width of the segment on the body. If there are no scratches on the working surfaces of the case, and the wear limits of the gears are not exceeded, the device will still serve.
Continuing the repair of the VAZ 2110 oil pump, we lubricate the housing and gears, the O-ring of the oil receiver tube, and the pressure reducing valve piston with engine oil. We install a new crankshaft oil seal and put everything back together.
| 1. Oil pump. Sucks engine oil through the suction filter and suction pipe from the oil pan 2. Longitudinal oil passage to the oil filter 5. Main oil passage To the support areas 6. Oil jets. Engine oil is injected from below for cooling towards the piston bases 7. Pressure line to chain tensioner 8. Check blocking valve 9. Chain tensioner 10. Gas outlet hole in cylinder head gasket 14. Oil jet for control chain | 15. Discharge pipe to the cylinder head 17. Oil throttle. Inner diameter 4 mm 22. Oil channel. For lubrication of 12 disc tappets on the exhaust side 23. Oil channel. To lubricate the 12 intake side poppet tappets 27. Camshaft adjuster 30. Hydraulic tappet tappet a. Oil channel from oil pump to oil cooler b. Oil channel from the oil filter to the supporting surfaces c. Drain hole in the oil pan |
The oil pressure reducing valve is located in the channel between the suction chamber and the compression chamber of the oil pump.
If the oil pressure is above 5 bar, the valve opens and some of the oil can flow back into the pump suction chamber. If the oil pressure is too low when the oil level is normal, check the valve.
Removal
| EXECUTION ORDER | ||
| Installation DIESEL ENGINE The oil pressure reducing valve is located in the connecting channel between the compression and suction chambers of the oil pump. If the pressure exceeds 5 bar, the valve opens and some of the oil flows into the suction chamber. The valve should be checked if its pressure is too low at normal oil level. Removal
|