The VAZ 2107 oil pump is designed to create pressure in the lubrication channels of an internal combustion engine. Thanks to it, oil flows to all moving parts of the engine: crankshaft, camshaft and other parts. If the pump malfunctions, the lubrication of the sliding bearings and internal combustion engine parts will stop and they will quickly fail. Therefore, if there are any signs of malfunction, the oil pump should be replaced or repaired immediately.
Important points
There are a couple of nuances that you definitely need to remember when changing the oil pump:
- Before installing a new oil pump, you need to remove the plastic oil seal from it and generously lubricate its inner edge with engine oil. This will make it much easier to install the pump on the crankshaft;
- When the pump is completely seated on the shaft, do not immediately tighten the mounting bolts. First you need to tuck the edge of the above plastic seal inside. This should be done using a pointed stick or pencil. It is strictly not recommended to thread the oil seal with a flat screwdriver or a knife: it breaks very easily, and it is almost impossible to find it on sale.
Replacing the oil pump on VAZ 2114 and VAZ 2115 cars is a task that seems impossible only at first glance. Upon closer examination, it turns out that you can cope with it on your own, saving a significant amount on the services of a qualified auto mechanic.
Home →
Maintenance and Repair → Engine →
Purpose and types of automobile oil pumps
The purpose of the oil pump is to create the necessary pressure in the engine lubrication system. Under high pressure, oil flows through special channels to all rubbing parts of the engine, intensively reducing their friction against each other, thereby preventing premature wear.
Oil pump for VAZ car, adjustable, with pressure reducing valve
Advantages of adjustable rotary oil pumps
Almost all modern VAZ cars (starting from VAZ 2114 and higher) are equipped with adjustable rotary-type oil pumps.
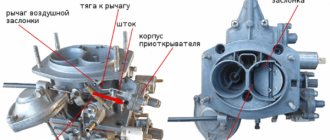
Main design elements of the VAZ adjustable rotary oil pump
Here are the main advantages of these devices:
- When using an adjustable oil pump, engine power increases by 30%. This occurs due to a decrease in the power factor taken from the motor by third-party devices;
- with an adjustable oil pump, the oil has to be changed less frequently, since the crankshaft speed decreases, which means the number of revolutions decreases;
- The adjustable oil pump practically does not foam the oil. The problem that is relevant for unregulated gear pumps has been successfully solved in rotary pumps.
Stages of replacing lubricant VAZ 2107
Checking and replacing the main brake cylinder of a VAZ 2106
On classic Lada cars or the more familiar Zhiguli, a convenient drainage of used oil from the engine is provided. The oil filter is also easily accessible and can be reached from the engine compartment.
During the production of the VAZ 2107, a large number of modifications were produced, which were equipped with various engines. Experienced drivers note good maintainability, unpretentiousness in maintenance, as well as consumables.
Before starting to replace the lubricant, precautions should be taken. It should be noted that the drained waste will be at a high temperature. Since the replacement is carried out on a warm engine
Since the replacement is carried out on a warm engine.
Draining waste fluid
Before starting the draining procedure, you should prepare tools, empty containers, as well as new liquids for subsequent filling. If additional protection is installed under the engine, it can also be removed for convenience.
Next, we perform the procedure for draining the liquid from the VAZ 2107:
- We lift the hood, under it we find the filler neck on the engine and unscrew the plug (Fig. 1).
To unscrew the filter element, it is advisable to have a special puller. If it is not available, you can try to unscrew the filter using improvised means. In this case, you can use, for example, an old alternator belt, a regular belt, a bicycle chain or a simple screwdriver.
Using this method, you can drain the maximum amount of used oil, after which you can proceed to further actions. The main thing is not to forget, everything that we unscrewed must be put back in place.
Flushing the lubrication system
Flushing the engine on a VAZ 2107 should be carried out only in exceptional cases, which include:
- Purchasing a used car when you cannot know about the quality, as well as the regularity of lubricant replacements.
- During operation, the service replacement interval was repeatedly exceeded.
- Engine operation with constant frequent overheating, which contributes to coking and other deposits.
- In cases of switching to another type, for example from synthetics to semi-synthetics.
There are several types of flushes for the VAZ 2107 engine:
- Five- or seven-minute, capable of cleaning even the most difficult deposits. They must be used very carefully and strictly follow the instructions printed on the packaging. It is recommended to use them only when absolutely necessary. Since there is a high probability of causing premature wear of the sealing seals. And also clog the oil channels with particles of washed away carbon deposits.
- Special compounds that are added to the oil several hundred kilometers before the expected change. They are more gentle, but there is also a possibility of clogging of the oil channels.
- Flushing oil is the most gentle method of cleaning the engine from the inside. This composition is poured after draining the waste, the engine runs for 15-20 minutes, after which the liquid with deposits is drained. The absence of aggressive additives in the wash composition gently cleans the engine, but is not able to remove heavy contaminants.
- Regular oil that you are going to use when changing. This method is not so popular due to its high price.
Installing a filter, filling in new engine fluid
If the VAZ 2107 lubrication system is sealed and does not require repair work to eliminate leaks, you can proceed to adding fresh engine oil. In addition to the oil itself, we may need a new drain plug, its part number 14325301. As well as the original oil filter 2101-1012005.
When everything is ready, let's move on to the bay:
- Replace the drain plug and replace it with a new one if necessary.
- We tighten and put the oil filter in place. Pre-lubricate the rubber sealing ring with fresh oil.
- Pour new oil into the filler neck.
- We check the level on the dipstick; it should be between the MIN and MAX marks.
- We start the engine, let it run for 10-15 seconds, then turn it off.
- After 5 minutes, check the level with a dipstick and top up if necessary.
On a hot engine
As the oil temperature drops, its viscosity rises. This is good for efficient pump operation. To obtain adequate measurement results, it is best to measure pressure on a warm engine. Since the oil heats up much more slowly than the coolant, the engine is allowed to run a little longer after reaching operating temperatures.
In the lubrication system of a working engine with a working pump, the pressure should be in the range of 3.5-4.5 kgf per square centimeter at a crankshaft speed of 5600. If the measurement values differ from the nominal value, then the engine will experience a lack of lubrication in some modes.
Repair
Engine water pump: device, repair
If you have the desire and time, you can repair the unit, because this is not a VAZ pump, which cannot be restored. There is nothing complicated in such work. For repairs you need a small number of tools:
- wrenches 10 (open-end, box, socket);
- ruler;
- set of probes (flat);
- vice.
Replacing the drive gear in this vehicle unit
Disconnect the inlet pipe from the pump housing. To do this, clamp it in a vice, after which you get rid of three bolts. Two of them are the same in length, and the third is slightly smaller. Remember its location so that you can put it in the right place when assembling. Next, remove the intake pipe, and with it the washer of the oil pump pressure reducing valve. After this, the spring is removed, and then the pressure reducing valve itself is dismantled.
Now start working on the oil pump. Remove the cover and remove the drive gear along with the shaft. After this, you need to remove the driven gear. Wash the removed gears in solvent or kerosene and dry them. Inspect the parts for damage and take several measurements. The maximum gap between the axle and the driven gear can be 0.1 mm.
Reinstall both gears and check the gap between their teeth. Only 0.25 mm is acceptable. Check the clearance between the housing and the outer diameter of each gear. The maximum value is 0.25 mm. Between the top of the gears and the plane of the cover - no more than 0.2 mm. Turn the pump by hand, the gears should move smoothly, without the slightest jamming. If all parameters are normal, you can continue the repair. If any gaps are larger than required, replace the unit.
The main condition is that there should be no defects on the surface of the pressure reducing valve. Like the accelerator pump, the valve will not function properly if damaged. Also check to see if there are any deposits on the surface, as this could cause jamming. There are also requirements for the spring: there should be no defects, with a load of 60-65 N, the height of the part should be 2 cm, in a free position - 3.8 cm. Do not bypass the pump cover, it should also not be damaged. Having identified all worn elements, replace them. Thoroughly wash all parts of the oil pump in kerosene or solvent, then reassemble it in the reverse order of disassembly.
Main causes of malfunction
What is a low pressure fuel pump, its design, operating principle and purpose
Structurally, the lubrication system is quite simple, but its functioning can be affected by other engine elements. Therefore, there are quite a few reasons why the warning light comes on:
- Oil pressure sensor malfunction;
- Damage to the sensor-indicator light circuit;
- Exhaustion of lubricant life or its inadequacy;
- Low oil level;
- Clogged oil filter element, malfunction of its bypass valve;
- Clogged oil intake;
- Oil pump wear;
- Reducing valve jammed;
- Critical wear of engine components (crankshaft and timing gear);
- Penetration of other technical liquids into the pan.
Note that these are only the main and general causes of a drop in oil pressure, which are typical for any engine. But there are also reasons that occur only on certain car models.
How to measure correctly?
How to check the engine oil pump? The technology is the same for all motors. But, if you lack some equipment for the service station, then it is better to buy it in advance. There is a slight difference only in the values of the threshold pressure level - it is different for different engines. You can find out about the minimum permissible pressure and its level for the valve to operate in the instructions for the car.
Using a classic VAZ as an example, we will look at how to check whether the oil pump is working. Measurements should be made in two modes - on a cold and hot engine.
How to change the oil pump of a VAZ 2107
If the problem is not a clogged pressure relief valve or oil intake screen, the pump must be repaired or replaced with a new one. Replacing the VAZ 2107 oil pump is performed as follows:
- install the machine on the inspection hole;
- clean the lower part of the engine, sump and crankcase protection from dirt;
- unscrew the bolts securing the crankcase protection (mud guard) and dismantle the part;
- place an oil container under the oil drain plug;
- unscrew the plug and drain the oil;
- unscrew the nuts holding the lower fastenings of the front engine mounts;
- placing the spacer, lift the engine using a jack;
- remove the studs from the crossmember supports;
- hang the engine on a winch or on a wooden block placed on the front wings of the “seven”;
- Using a 10mm socket wrench, unscrew the pallet mounting bolts (19 pieces);
- remove the pan and gasket;
- Use a knife to clean the pan and the adjacent surface of the engine from any gasket or sealant residues;
- Using a 13mm wrench, unscrew a pair of bolts securing the oil pump;
- remove the oil pump along with the gasket;
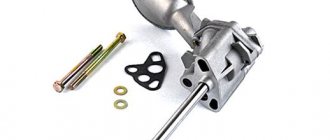
- install a new oil pump along with a new sealing gasket;
- tighten the oil pump mounting bolts;
- install the pan cover along with a new gasket;
- evenly tighten the 19 bolts holding the pan cover;
- lower the engine and install the engine mounts in place;
- tighten the support nuts;
- install the crankcase protection and tighten the fastening bolts;
- add new oil.
This completes the replacement of the VAZ 2107 oil pump. All that remains is to start the engine and check the operating oil pressure in the system.
Oil pump - thanks to this part, the most important units in engines are lubricated with oil, these include: Crankshaft, camshaft and other parts. If you remove this part from the car, then these parts listed above will not be lubricated with oil at all, which will lead to very rapid engine failure, so the oil pump must always be kept in good condition and, if it malfunctions, be repaired or replaced with a new one.
Replacement
1. Place the car on an inspection hole or overpass.
2. Remove the engine oil pan.
3. Using a 13 mm socket wrench, unscrew the two oil pump mounting bolts. The VAZ 2107 oil pump mounting bolts have different lengths.
4. Remove the oil pump and sealing gasket.
Installing an oil pump on a VAZ 2107 engine
1. Before installing a new oil pump, replace the sealing gasket.
2. Installation of all removed parts on the VAZ 2107 is carried out in the reverse order.
3. Fill the VAZ 2107 engine with oil.
Where is
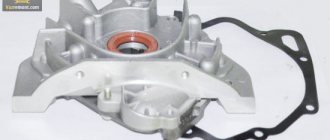
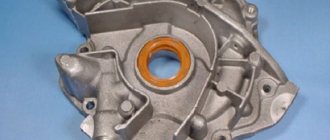
It is located inside the engine, so just looking at the engine you will not see it, and in order to look at it, you will first have to remove the crankcase protection, then you will need to remove the pan and only after that you will see the oil pump with your own eyes.
Pressure reducing valve
To avoid such problems, a pressure reducing valve was provided. At first glance, this is a simple unit, but without it, normal engine operation would be impossible.
The purpose of the oil pump pressure reducing valve is to control the oil pressure, weaken or increase it.
This is realized through two actions - opening the passage (to reduce pressure or prevent serious damage) or closing it (to ensure normal operation of the system).
The most common failures of the pressure reducing valve
As operating experience shows, a malfunction of the pressure reducing valve can manifest itself in the following:
1. Inability to maintain normal blood pressure. As a rule, this is caused by mechanical failures of the unit. The weakest element of the system is the spring.
During operation, it can stretch and open the valve even with a slight increase in pressure. As a result, oil does not reach many engine components, they wear out and fail.
The reasons for a spring malfunction are its wear due to long-term operation, installation of the wrong spring during a major overhaul (defective or excessively soft), and installation errors.
2. Problems with opening the valve when peak pressure is reached. During operation, the valve lumen may become clogged. As a result, the RKMN jams and does not open even at high pressure.
The result is the destruction of many important engine components and the need for major repairs. The main cause of the malfunction is untimely oil change.
It's easy to explain. Dirt particles are deposited on the surface and constantly increase the size of the growth. Poor flushing quality leads to the accumulation of various debris and chips in the channels.
Engine lubrication
To ensure the required oil pressure in the line and compensate for its consumption during engine wear, the oil pump has increased performance.
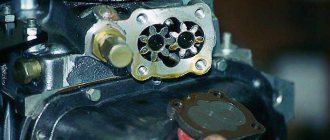
- The gear driven oil pump is mounted inside the oil pan. The pump is attached to the cylinder block using two bolts of different lengths. The drive gear of the product is fixedly fixed on the roller, on an axis fixedly installed in the pump body, the gear wheel rotates freely.
- Having passed through the filter mesh along the oil intake pipe, in the housing of which a pressure reducing valve is built-in, the oil is directed to the pump. The pressure reducing valve allows excess oil to pass into the oil receiver and prevents its pressure from increasing above the permissible level. An elastic spring ensures that the valve operates when the pressure increases.
- When the oil pressure drops below the permissible level, a warning light on the dashboard lights up.
- To clean the oil entering the engine, a non-separable, full-flow oil filter is installed, which must be replaced when changing the oil to ensure effective filtration.
When using a car, parts of any device gradually wear out. If it is noticed that the pump has begun to perform its functions incorrectly, the pressure differs from the nominal one: either increased or decreased at idle speed, it is necessary to replace the oil pump on the VAZ 2107.
Removing the oil pump
Advice: It is better when replacing the oil pump on a VAZ 2107 is done on an inspection pit or a lift.
- Replacing the oil pump on a VAZ 2107 begins with disconnecting the wire from the battery.
- Oil is drained from the engine crankcase.
Tip: To improve oil drainage, the engine must be warmed up well to operating temperature.
- The engine splash guard is removed.
- The nuts securing the engine front suspension cushions to the cross member are unscrewed. In order for the pillow pins to easily come out of the holes, the engine must be slightly raised using a jack or hoist.
- The engine crankcase of a VAZ 2107 is removed.
- The oil pump is removed.
How to Change the Oil Pump on a VAZ 2106
Replacing the oil pump on a VAZ 2101-VAZ 2107
Welcome! Oil pump. Usually called the "oil pump", it performs a very important function when the engine is running, namely, it supplies oil located in the oil pan, the crankshaft bearings and then through the air duct, distribution oil and the camshaft bearings, in most cases lubricating them.
Therefore, the oil pump plays a very large and important role in a car engine, and if it is damaged, then the lubrication system should not have the pressure it should have. (For more information about what will happen if the pressure in the lubrication system disappears, see the article “Useful information about oil pressure on a VAZ”).
The note! To replace the oil pump with a new one, you will need to stock up on: a basic set of wrenches, which will include a "10" and "13" wrench, and you will need to take the end sockets and extension cord to match the same heads, if possible, and pack your pockets with you!
Where is the oil pump located? It is located inside the engine so just by looking at the engine you won't see it, but to look at it you will first need to remove the crankcase, then you will need to remove the pan and only then will you see the oil pump with your own eyes.
READ How to Check Hall Sensor Audi 100 C4
When should I replace my oil pump? It can be replaced with:
1. Pressure drop in the vehicle's lubrication system at engine idle temperature, as shown by the oil pressure indicator.
2. As well as failure of the pump itself or its transmission, which, by the way, can be replaced individually without completely replacing the oil pump, see Article: “Oil pump repair.”
The note!
Sorry for the quality of lighting, this video shows the method of replacing the oil pump of you 2106
No.
Diagnostics and replacement of VAZ classic oil pump (LADA 2101-07)
Oil pump
the main part of any engine. And how much the engine depends on its condition. If you notice a drop in oil pressure after a hard blow to a bump that causes the crankcase to deform, it is likely that the oil pump, namely its intake pipe, is to blame for the drop in oil pressure! 3. And if your car's oil pressure is too high and outside the normal range, then most likely the culprit is a clogged relief valve, which can also be removed and replaced with a new one. (See How to remove this in the same pump repair article)
READ Knocking In Steering Rack Mazda 6
The note! What pressure in the lubrication system can you determine using a special indicator that shows the oil pressure in the system!
How to replace the oil pump with the same oil pump on a VAZ 2101-VAZ 2107?
The note! This job is time consuming, but it is still possible if you have the special tools, and this work should be done in a ditch or on elevators, otherwise the oil pump will need to be replaced!
Conclusion: 1) First remove any parts that prevent access to the pump, so first remove the crankcase from the car and then slide it to remove the pan. (For information on how to remove the deflector and oil pan, see the article “Replacing the oil tank on a VAZ”)
2) Next, remove the two screws that secure the oil pump to the car engine.
The note! Be sure to check which bolt you are going to remove as the two bolts are different lengths (one is shorter and the other is longer) so follow and then after installing the new pump, turn the same bolts in the correct places they were previously installed!
READ Replacing Oil Filter Nissan X Trail
3) Once the bolts are turned upside down, remove the pump and pay attention to it, as there should be a gasket on it, which also needs to be removed, and if it becomes deformed, replace it with a new one. The note! If you are going to install a new pump on a car, this gasket is replaced with a new one, because over time the old gasket shrinks and takes shape, and when you buy a new pump, it usually has a slightly different shape and can therefore oil leak through this place, the gasket does not fits its shape!
The note! If you are going to install a new pump on a car, this gasket is replaced with a new one, because over time the old gasket shrinks and takes shape, and when you buy a new pump, it usually has a slightly different shape and can therefore oil leak through this place, the gasket does not fits its shape!
Assembly: The new oil pump is installed on the vehicle in the reverse order before removal.
Oil relief valve
| GENERAL INFORMATION |
Oil pump.
Replacing the oil pump PETROL ENGINE
6-cylinder petrol engine
| 1. Oil pump. Sucks engine oil through the suction filter and suction pipe from the oil pan 2. Longitudinal oil passage to the oil filter 5. Main oil passage To the support areas 6. Oil jets. Engine oil is injected from below for cooling towards the piston bases 7. Pressure line to chain tensioner 8. Check blocking valve 9. Chain tensioner 10. Gas outlet hole in cylinder head gasket 14. Oil jet for control chain | 15. Discharge pipe to the cylinder head 17. Oil throttle. Inner diameter 4 mm 22. Oil channel. For lubrication of 12 disc tappets on the exhaust side 23. Oil channel. To lubricate the 12 intake side poppet tappets 27. Camshaft adjuster 30. Hydraulic tappet tappet a. Oil channel from oil pump to oil cooler b. Oil channel from the oil filter to the supporting surfaces c. Drain hole in the oil pan |
If the oil pressure is too low when the oil level is normal, check the valve. Removal
| 1. Vinit plug, SW22 2. Compression spring 3. Guide pin 4. Piston |
| EXECUTION ORDER |
| 1. Disassemble the oil pan. |
| 2. Unscrew the screw plug with a SW22 wrench. Warning The screw plug is under pressure from the compression spring and can easily jump out. |
| 3. Remove the compression spring, guide pin and piston. Warning A stiff or jammed piston can be removed using ring pliers. |
| 4. Clean the hole in the oil pump and blow out with compressed air. |
| 5. Move the piston of the oil pump hole back and forth several times. If the piston is difficult to move, smooth it slightly with a polishing cloth. |
Installation
| EXECUTION ORDER |
| 1. If you are replacing the piston, check that it moves easily in the hole. If necessary, remove burrs from the piston with an emery cloth. |
| 2. Install the piston with the guide pin and a new compression spring. |
| 3. Screw in the screw plug without the O-ring and tighten to a torque of 50 N.m. |
DIESEL ENGINE Removal
| 249. Vinite plug, 50 N.m. 250. Guide pin 251. Compression spring 252. Piston |
| EXECUTION ORDER |
| 1. Remove the oil pan. |
| 2. Unscrew the screw plug. Warning The screw plug is under pressure from the compression spring and can easily jump out. |
| 3. Remove the compression spring, guide pin and piston. Warning Remove a stiff or jammed piston using the outer ring collet. |
| 4. Clean the oil pump cylinder and blow with compressed air. |
| 5. Move the piston in the oil pump cylinder back and forth several times. If the piston moves hard in the cylinder, lightly polish the piston using a cloth. |
Installation
| EXECUTION ORDER |
| 1. If the piston is replaced with a new one, check the new piston for ease of movement in the cylinder. If necessary, remove burrs on the piston with an emery cloth. |
| 2. Install the piston with the guide pin and a new compression spring. |
| 3. Screw in the plug without the O-ring and tighten to a torque of 50 N.m. The screw plug is sealed with a conical fit. |
Checking the lubrication system components
If replacing the sensor and ringing the wiring did not bring any results, and the lamp still works, you should look for the cause further.
The next steps are:
- REPLACE THE OIL FILTER. This element is equipped with a bypass valve and if this valve does not work, then after starting the engine the system needs time to pump oil (this problem manifests itself in the form of a constantly burning light after starting). Another problem associated with the filter is its severe clogging, which is why it creates a strong obstacle to the movement of oil, preventing it from rising to the cylinder head where the sensor is installed;
- REMOVE THE PAN AND INSPECTION THE OIL PICKUP. Over time, the intake mesh becomes clogged with various deposits (this is especially true with frequent changes of oil brands and the use of additives). Due to deposits, it is difficult for the pump to “pull” the required amount of working fluid from the pan, so the pressure will be insufficient;
- CHECKING THE OIL PUMP. Backlash and wear marks on the gears will indicate severe wear. Due to the gaps, the unit is simply not able to pump oil and a loss of pressure occurs;
- WE EVALUATE THE CONDITION OF THE REDUCTION VALVE. This element is designed to relieve pressure when a certain value is exceeded. But if the valve gets stuck in the open position, it will leak oil, preventing the pump from pumping up the required pressure.
These indicate the causes of pressure drop associated with the lubrication system.
Cold engine measurements
In order to measure the pressure, before starting the engine, you need to make sure that the oil temperature is equal to the ambient temperature. The emergency sensor in the VAZ is configured to trigger at a pressure of 0.33 kgf per square centimeter. If the measurement result turns out to be like this, then it is necessary to dismantle the pump and troubleshoot it. With a gradual increase in the crankshaft speed, the pressure should increase to 4.5 kgf per square centimeter. The pressure relief valve should work, so the pressure will not increase further.
Electric fuel pump for VAZ 2107
Increasingly, owners of “classics”, including the VAZ 2107, are installing modern devices on their cars. So, the mechanical fuel pump is replaced with an electric one. The main goal of introducing an electric fuel pump is to get rid of the problems that arise with standard pumps. However, you need to understand that if on injection “sevens” such a mechanism is installed directly in the gas tank, then on carburetor cars it is placed under the hood.
Which one can be installed
As an electric fuel pump, you can install any device designed to work on fuel-injected cars on the “classic”. Based on reviews from Zhiguli car owners, Chinese-made pumps are often used, as well as Magneti Marelli and Bosch
It is important to know that the product must provide low pressure. A standard mechanical pump produces about 0.05 atm
If the indicator is higher, then the needle valve in the carburetor will simply let fuel through, which will lead to it leaking out.
Installation of an electric fuel pump
To install an electric fuel supply pump on a carburetor “seven”, you will need a certain list of materials:
- tee 8x6x8 mm;
- fuel line for VAZ 2107;
- check valve from the "eight";
- 8 mm threaded fitting;
- clamps, blocks from Kalina for a four-pin relay (3 pcs.) with a fuse holder;
- the four-pin relay itself (3 pcs.);
- fuel jet (150);
- fuel return hose from the V8;
- wires;
- non-latching button.
We carry out the work in the following sequence:
- We lay the fuel pipe (return) parallel to the standard fuel line, securing it in the factory locations.
Video: installing an electric fuel pump on a VAZ 2107
https://youtube.com/watch?v=S3K4whY6—0
Once the installation of the mechanism is complete, it will function according to the following algorithm:
- after turning on the ignition and pressing the pumping button, the pump is activated and pumps up gasoline;
- when the starter starts, the fuel pump turns on;
- while the engine is running, the pump is powered by a generator;
- after the engine stops, the operation of the unit stops.
Installation benefits
Owners of Zhiguli cars who have installed an electric fuel pump on their cars note the following advantages:
- an engine with such a device operates more stable at idle speed;
- when accelerating sharply, the car responds well to the pedal, there are no dips, which is not the case with a mechanical pump;
- when switching gears there is a smooth ride, and when the gas is abruptly released there is no twitching;
- at high speeds the engine spins better;
- there are no jerks at low speeds when starting the car after a long trip.
The VAZ 2107 fuel pump sometimes has to be repaired or replaced. Doing this is not as difficult as it might first seem. Repair and adjustment work is carried out with a minimum set of tools in accordance with step-by-step instructions.
Source
replacement, repair (photo and video)
A breakdown of the VAZ 2107 pump can be detected for two reasons: the appearance of a knocking or hum and a leak of coolant from the water pump (pump). A hum is the first sign of bearing failure and can cause the pump to jam. A gradual leak of coolant can lead to overheating and even seizure of the motor. In these two cases, there is no need to delay replacement. The consequence of all this may be overheating of the engine.
Pump replacement, preparation
Oddly enough, installing a new pump will not cost you much. Before starting work, prepare:
- a set of keys;
- new antifreeze;
- the pump itself;
- screwdriver;
- sealant;
- deep container to drain the antifreeze.
It is up to you to decide which pump to buy; it is recommended to buy a factory-made AvtoVAZ one. The original part is more wear-resistant than its plastic counterparts, which can fall apart at the most inopportune moment. Experienced car enthusiasts recommend taking a closer look at the companies Luzar, Nepu and ABRO.
Instructions on how to replace the pump
First you need to completely drain the coolant from the engine. Place the prepared container under the engine, unscrew the cap located on the engine block, if you want to replace the antifreeze completely, then also unscrew the cap on the cooling radiator. Next, unscrew the bolts that secure the electric fan casing, disconnect the contacts and pull out the electric fan along with the casing.
Loosen the nut, tension the generator belt and remove the belt.
Using a 17 wrench, unscrew the generator mounting bracket. After this, unscrew the three bolts securing the pulley, while holding it with a screwdriver, holding the pulley with a screwdriver and remove it from the shaft.
And finally, unscrew the four bolts securing the pump, which secure it to the engine cylinder block.
Remove the pump from the engine. Before installing a new one, you need to thoroughly clean the seat of grease and dirt. When installing, be sure to replace the gasket, otherwise you will have to repeat the whole job again. It is recommended to seal the gasket with sealant.
The final stage of pump replacement
Pour coolant into the radiator. To avoid air locks, you need to open the stove valve to maximum. Don't forget to disconnect the antifreeze supply hose from the intake manifold. Put it in place only when antifreeze starts flowing from this hose.
After filling the antifreeze to the required level, start the engine and let it warm up to operating temperature. After letting it run for a while, turn it off, after the engine has cooled, add the missing amount of antifreeze, if necessary. Also check the belt tension. After all these steps, the car is ready for use.
What to do when the oil pressure light comes on on Zhiguli cars
Service center specialists advise drivers of any cars, both domestic and imported, to stop driving and turn off the engine at the first signal of a drop in engine oil. When the oil pressure sensor is triggered, it is clear that there is some problem with the engine.
First action
The first thing to do after stopping is to measure the oil level. It is likely that it is below the minimum mark and you just need to add the required amount of liquid. After adding, it is necessary to take another measurement - if the level is between the Max and Min marks, then we can conclude that the sensor was triggered precisely because of a lack of oil in the engine. Try to start the engine, if the oil can icon disappears, then the problem is solved.
In VAZ-2106, VAZ-2107, VAZ-2109 cars special oil pressure sensors were installed. Modern models have not used this type of device for a long time. The oil pressure sensor on all cars of the Zhiguli family performs the same function - it measures the amount of lubricant in the engine unit. If there is not enough oil, the friction force between the moving parts of the engine increases, and this leads to rapid breakdown of both the valves, the camshaft or crankshaft, and cylinders.
The oil pressure sensor on classic VAZ models is mounted directly on the engine itself. And in the cabin, on the left side of the steering wheel, there is a dial-type indicator that shows the driver the current state of oil pressure. However, the oil can itself lights up only in one case - when there is completely no pressure in the system. The sensor cannot show any intermediate positions: either the pressure in the system is normal or there is no pressure at all.
What's next
Therefore, if you have checked the oil level and it is normal, you will need to take other measures. Maybe you recently changed the engine oil to new one? In this case, the likely cause of a sharp drop in oil pressure while driving is a defective filter. Alas, this is not uncommon these days. You will have to carry out the procedure of changing the oil and oil filter again.
Checking the sensor
Do not exclude the possibility that the oil pressure sensor is to blame. It is likely that the engine is not in any danger at all, but the sensor wiring is shorted or its life has expired, which is why it is sending incorrect signals.
To make sure that the fault lies in the sensor, you need to start the engine and at idle speed press the gas pedal to 1000–1100 rpm. If the oil can icon immediately disappears, it means that the oil pressure in the engine is actually normal and your car does not require repair. But the sensor will need to be replaced, since for various reasons it does not work.
Oil quality control
In cases where the oil filter and pressure sensor are in working condition, and the light continues to light, it is necessary to once again check the oil level in the engine, or rather, carefully inspect the oil dipstick itself. In some cases, antifreeze or gasoline may enter the engine, causing the oil level to rise. It is enough to lower the dipstick into the water; if bright stains characteristic of oil remain on the surface, it means that gasoline or coolant has actually entered the engine.
There should be only traces of oil on the oil dipstick, without the smell of any impurities
In this case, a minimum of engine flushing will be required, but most likely a major overhaul - service station specialists will determine the reason why foreign liquids are entering the unit.
Bottom line
Self-repair of a car is allowed only after studying the mechanism. Having learned how to check the oil pump, you can independently determine the cause of the pressure drop inside the system. However, it is better to entrust complete repairs and troubleshooting of the device to a qualified specialist.
Sources
- https://autoexpert174.ru/vidy-ustrojstvo-masljanogo-nasosa-dvigatelja-diagnostika/
- https://FB.ru/article/402092/kak-proverit-maslyanyiy-nasos-sposobyi-proverki-remont-sovetyi-spetsialistov
- https://masladvig.ru/kak-proverit-maslyanyy-nasos-diagnostika-i-sovety/
- https://carnovato.ru/zamena-maslyanogo-nasosa/
- https://autolirika.ru/soveti/kak-proverit-maslyanyj-nasos.html
[collapse]