Every modern car owner knows about the existence of an on-board computer, which can not only indicate the basic parameters of the operating mode (speed, consumption, temperature), but also recognize errors caused by various malfunctions. Unfortunately, Chevrolet Niva error codes cannot be deciphered without additional tables, since there are too many of them. Let's consider various diagnostic methods.
We receive the first signal about the presence of a malfunction using the indicator on the “Check-Engene” panel.
After turning on the ignition, all systems are tested, and if no errors are detected, this indicator goes out. Otherwise it remains burning. Specialized centers will quickly identify the error and not for free, but the Chevrolet Niva has a built-in on-board computer that can allow you to deal with the problem yourself.
Self-diagnosis
Without going into details of the operation of all electronics, we note that the functioning of all vehicle systems is “monitored” by an electronic control unit (ECU).
It receives information from numerous sensors. Like any computer, the ECU requires software called firmware. This firmware is capable of analyzing indicators received from sensors, comparing them with normal parameters, identifying errors and storing these errors in memory.
Carrying out self-diagnosis
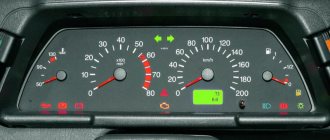
In the Chevrolet Niva, as in some other cars of the VAZ family, some parameters can be displayed on the VDO dashboard. It is often called an integrated on-board computer.
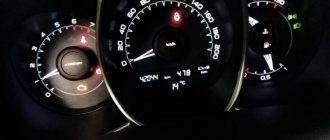
Testing is started by first pressing the daily mileage reset button and simultaneously turning the ignition key.
All instrument needles begin to move, which indicates the beginning of the testing process. Pressing the same button once will cause the firmware version to appear on the display, and pressing it again will give us a reading called an error code.
Panel codes should not be confused with ECU codes, which are diagnosed by external devices.
| Error code | Decoding |
| 1 | Processor faults |
| 2 | No signal from the fuel level sensor |
| 4 | Increased voltage of the on-board network (exceeds 16 V) |
| 8 | Reduced voltage on-board network |
| 12 | Control indicator malfunction |
| 13 | No signal LAMDA probe |
| 14 | Increased coolant temperature |
| 5 | Reduced coolant temperature |
| 19 | Error from HF sensor |
| 21-22 | Error with TPS |
| 24 | Error from speed sensor |
| 27 — 28 | Incorrect CO potentiometer parameters |
| 23 — 25 | Error from intake air temperature sensor |
| 33 — 34 | Error from the MAF sensor |
| 35 | Error from sensor XX |
| 41 | Error from phase sensor |
| 42 | Ignition system malfunction |
| 43 | Error from knock sensor |
| 44 — 45 | Rich/lean fuel mixture |
| 49 | Loss of vacuum |
| 51 — 52 | ROM/RAM errors |
| 53 | No signal from CO potentiometer |
| 54 | No signal from the octane corrector |
| 55 | Load on the power unit |
The operation of the on-board computer cannot be called flawless, since many errors arise as a result of software failure. You have to reset the errors by holding down the daily mileage reset button in testing mode. This diagnostic method is not entirely convenient for the reason that the error code can be the result of the sum of two codes at the same time (10=8+2).
Malfunctions
Due to the fact that the engines have been in use for a long time, some engines are 10-15 years old, a major overhaul is inevitable. So, the combustion chambers have already worn out, and the pistons have burned out from service life and mileage. In addition, engine oil for the VAZ 2110 no longer helps to maintain performance to such an extent.
So, it is worth repairing the power unit at a car service center, especially with regard to the 16-valve engine. The VAZ 2110 8-valve engine is used by most motorists in garage conditions, since it has a simple design that is similar to the Classic and Samara power units.
Diagnostics with a scanner
The information in this section is quite extensive, since there are many types of scanners.
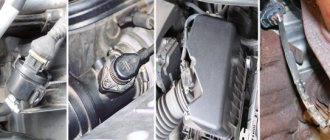
The basic principle of their operation is that all data, including errors, is transmitted from the ECU to a special diagnostic connector, which in a Chevrolet Niva is located on the driver's side under the steering wheel.
The scanner's job is to read and decode these messages.
Note that there are dealer scanners, that is, those that are designed for a given car. For Chevrolet Niva this is BC State.
It is inserted into the panel instead of the signaling device, and the information loop is prepared from the factory.
Universal scanners should be connected to the diagnostic connector. The most popular scanners today are models that allow you to transmit information via Bluetooth.
To do this, you need to install the appropriate application on your smartphone, for example, OpenDiag, and connect it to the scanner.
The program interface allows you not only to read the parameters, but also to manage some of them. You can also reset all errors from your smartphone. There are scanners with their own display. All error information in the form of codes is displayed on this display.
Idling
Code 0505 indicates a malfunction of the idle air control. Moreover, 0505 is most often “issued” when the engine is started with the gas pedal pressed. This often affects drivers who switched from a carburetor VAZ 2110 to an injection one.
However, 0505 also occurs if the ignition module, spark plugs are faulty, there are broken wires, or the engine speed is not the one set by the XX regulator.
Idle speed control
If you notice popping noises in the muffler, this may also indicate displacement of the crankshaft ring gear. Code 0505 can be displayed either alone or with 0300 (missing cylinders).
Chevrolet Niva error codes
Errors transmitted through the diagnostic connector are displayed on an external device as a four-digit code. There are special tables that allow you to decipher these codes.
| Code | Explanation |
| P0102 | Low signal level of the mass air flow sensor (MAF). |
| P0103 | High signal level of the mass air flow sensor (MAF). |
| P0112 | low signal level of the intake manifold temperature sensor (ITM). |
| P0113 | High signal level of the intake manifold temperature sensor (IMT). |
| P0116 | The signal from the coolant temperature sensor (TTOZH) is out of the permissible range. |
| P0117 | Low signal level of the coolant temperature sensor (DTOZH). |
| P0118 | High signal level of the coolant temperature sensor (DTOZH). |
| P0122 | Low signal level of the throttle position sensor (TPS). |
| P0123 | High signal level of the throttle position sensor (TPS). |
| P0130 | Incorrect signal from oxygen sensor No. 1 to the converter. |
| P0131 | Low level signal from oxygen sensor No. 1 to the converter. |
| P0132 | High level signal from oxygen sensor No. 1 to the converter. |
| P0133 | Slow response to enrichment or depletion of oxygen sensor No. 1 to the converter. |
| P0134 | Lack of signal (open circuit) of oxygen sensor No. 1 to the converter. |
| P0135 | Malfunction of the oxygen sensor heater circuit No. 1 to the converter. |
| P0136 | Short circuit to ground in the N9 oxygen sensor circuit 2. |
| P0137 | Low level signal from oxygen sensor No. 2 after the converter. |
| P0138 | High level signal from oxygen sensor No. 2 after the converter. |
| P0140 | Lack of signal (open circuit) of oxygen sensor No. 2 after the converter. |
| P0141 | Malfunction of the heater circuit of the oxygen sensor No. 2 after the converter. |
| P0171 | The fuel supply system (fuel-air mixture) is too lean. |
| P0172 | The fuel system (air/fuel mixture) is too rich. |
| P0201 | Open circuit for controlling the injector of the 1st cylinder. |
| P0202 | Open circuit in the 2nd cylinder injector control circuit. |
| P0203 | Open circuit in the 3rd cylinder injector control circuit. |
| P0204 | Open circuit in the 4th cylinder injector control circuit. |
| P0261 | Short circuit to ground in the 1st cylinder injector control circuit. |
| P0262 | Short circuit to the source of the on-board network of the injector control circuit of the 1st cylinder. |
| P0264 | Short circuit to ground in the 2nd cylinder injector control circuit. |
| P0265 | Short circuit to the source of the on-board network of the injector control circuit of the 2nd cylinder. |
| P0267 | Short circuit to ground in the 3rd cylinder injector control circuit. |
| P0268 | Short circuit to the source of the on-board network of the injector control circuit of the 3rd cylinder. |
| P0270 | Short circuit to ground in the 4th cylinder injector control circuit. |
| P0271 | Short circuit to the source of the on-board network of the injector control circuit of the 4th cylinder. |
| P0300 | Random/multiple misfires detected. |
| P0301 | Misfire detected in cylinder N91. |
| P0302 | Misfire detected in cylinder N9 2. |
| P0303 | Misfire detected in cylinder N9 3. |
| P0304 | Misfire detected in cylinder N9 4. |
| P0327 | Low signal level of the knock sensor (DS). |
| P0328 | High signal level of the knock sensor (DS). |
| P0335 | There is no signal from the crankshaft position sensor (CPS). |
| P0336 | The crankshaft position sensor (CPS) signal is outside the permissible limits. |
| P0337 | Short circuit to ground in the crankshaft position sensor (CPS) circuit. |
| P0338 | Open circuit of the crankshaft position sensor (CPS). |
| P0340 | Malfunction of the camshaft position sensor (CPS) circuit. |
| P0342 | Low signal level of the camshaft position sensor (DPRV). |
| P0343 | High signal level of the camshaft position sensor (CPS). |
| P0422 | The efficiency of the neutralizer is below the permissible threshold. |
| P0441 | Incorrect air flow through the valve. |
| P0443 | The canister purge valve control circuit is faulty. |
| P0480 | Cooling fan N91 relay control circuit malfunction. |
| P0481 | Cooling fan N9 2 relay control circuit malfunction. |
| P0500 | Incorrect vehicle speed sensor signal. |
| P0503 | Intermittent signal from the vehicle speed sensor. |
| P0506 | Low idle speed (idle speed control blocked). |
| P0507 | High idle speed (idle speed control blocked). |
| P0560 | The on-board network voltage is below the system operability threshold. |
| P0562 | Reduced voltage of the on-board network. |
| P0563 | Increased voltage of the on-board network. |
| P0601 | Controller ROM checksum error. |
| P0603 | Error writing/reading external RAM of the controller. |
| P0604 | Error writing/reading internal RAM of the controller. |
| P0615 | Open starter relay control circuit. |
| P0616 | Short circuit to ground in the starter relay control circuit. |
| P0617 | Short circuit to the on-board supply source of the starter relay control circuit. |
| P1135 | Malfunction of the oxygen sensor heater circuit No. 1 to the converter. |
| P1140 | The signal from the mass air flow sensor (MAF) is incorrect; the measured load parameter differs from the calculated one. |
| P1141 | Malfunction of the heater circuit of the oxygen sensor No. 2 after the converter. |
| P1386 | The test pulse or controller knock channel integrator is out of tolerance. |
| P1410 | Short circuit to the on-board power source of the canister purge valve control circuit. |
| P1425 | Short circuit to ground in the canister purge valve control circuit. |
| P1426 | Open circuit for controlling the canister purge valve. |
| P1501 | Short circuit to ground in the electric fuel pump relay control circuit. |
| P1502 | Short circuit to the on-board supply source of the electric fuel pump relay control circuit. |
| P1509 | Overload of the idle air regulator (IAC) control circuit. |
| P1513 | Short circuit to ground in the idle air regulator (IAC) control circuit. |
| P1514 | Short circuit to the on-board power source (or open circuit) of the idle air regulator (IAC) control circuit. |
| P1541 | Open circuit in the electric fuel pump relay control circuit. |
| P1570 | There is no response from the car anti-theft system (ATS) or the circuit is open. |
| P1602 | Loss of on-board power supply voltage in the controller. |
| P1606 | Incorrect rough road sensor signal. |
| P1616 | Low level of rough road sensor signal. |
| P1617 | High level of rough road sensor signal. |
| P1640 | Error writing/reading internal flash RAM (EEPROM) of the controller. |
| P1689 | Incorrect code values in the controller fault memory. |
Computer diagnostics
The most complete diagnosis is possible with a computer or laptop. In order to use this method, you must purchase an adapter. This adapter performs two functions at once. It is an adapter from a K-line port to a USB port or to a COM port. It also acts as a decoder, which allows you to transmit signals from the ECU to the PC. You will also need to install the appropriate software on your laptop. There are a lot of free versions on the Internet. There are universal programs, as well as programs written for a specific car. After connecting to the computer, you will need to turn on the ignition and launch the program. The connection will happen automatically.
The interface of the computer program is very convenient and allows even an inexperienced user to navigate intuitively. All functionality can be divided into several sections. These are parameters, errors and settings. If the first two sections are informational, then using the third section you can control the vehicle systems.
All modern cars allow you to determine a malfunction in the operation of certain systems and units using combinations of errors. Their identification is carried out using diagnostics. In this article, we will look at what Chevrolet Niva error codes are used to report breakdowns.
How to do it yourself?
Diagnostic devices
Resetting errors on Chevrolet
Video “How to check a Niva Chevrolet car before buying?”
Comments and Reviews
Conclusion
Malfunctions of the VAZ 2110 16 valve engine can be determined using diagnostics of the electronic control unit. Many car enthusiasts have been doing repairs and restoration with their own hands for a long time.
Of course, this is not a happy situation for car owners if the check engine lights up on the car’s dashboard. In this case, you have to contact a specialized service station, where they will diagnose the engine, or if you have an on-board computer installed, identify the breakdown yourself by deciphering the VAZ error codes.
Car diagnostics
Diagnostics of the engine and other systems and units in Chevrolet Niva, Cobalt, Lacetti, Lanos, Captiva, Cruze, Aveo 2004, 2005, 2010, 2012 and other model years allows you to timely identify the fault. Thanks to this, the car owner can prevent more serious damage. The errors themselves when diagnosing with a laptop or on a VDO display or other factory dashboard will be different. In the first case, the car owner receives the most accurate information about breakdowns, which allows them to correctly decipher and remove faults. Error combinations will be four-digit.
During self-diagnosis on the on-board computer State on the instrument panel of a VAZ 2123 or Chevrolet Tahoe, Orlando, Blazer, Lanos, Niva, Lacetti, Cruz, Captiva, Epica, Aveo in the T250 and T300 body, faults are displayed in two-digit form. Instead of combinations, messages may appear on the display to warn motorists.
Pressing the odometer button on the dashboard
How to do it yourself?
There are two ways to check for errors in a Chevrolet: self-diagnosis or using additional equipment or a computer. In order for the on-board computer to test for faults, you need to hold down the button on the odometer to reset the daily mileage and turn the key in the ignition. This will cause the needles on the speedometer and gauges to start moving along the scales. And when you press the button again, the ECU will display a message on the display about the version of the firmware being used. After the next press, combinations of problems, if any, will appear on the screen.
What codes may appear on a Chevrolet Niva after self-diagnosis:
- 1 - the microprocessor is not working correctly;
- 2 — a break was detected in the electrical circuit of the fuel level controller in the tank;
- 4 - increased voltage level in the vehicle’s on-board network, amounting to more than 16 volts, diagnostics of the battery and generator unit is required;
- 8 - the voltage in the Chevrolet electrical network is low, the same checking steps are performed;
- 12 - the control indicator is not functioning correctly;
- 13 - the control unit does not receive a signal from the lambda probe;
- 14 - the ECU received a signal about overheating of the coolant, this can lead to boiling of the engine;
- 15 - the operating temperature of the antifreeze in the cooling system is too low;
- 19 - the ECU received a signal indicating that the crankshaft is not operating correctly; we recommend testing the controller;
- 21-22 - the throttle valve is in the wrong position;
- 23-25 - the intake air temperature does not correspond to the norm;
- 24 - the dashboard does not receive an impulse about the speed of the vehicle;
- 27-28 - the control unit reports violations in the level of exhaust gases;
- 33-34 - The ECU receives incorrect data on air flow;
- 35 - the power unit does not operate correctly at idle;
- 41 - an incorrect signal is received from the phase controller or camshaft sensor;
- 42 - The computer reports problems with the ignition;
- 43 - incorrect impulse from the knock sensor;
- 44-45 - incorrect composition of the combustible mixture;
- 49 - The ECU detects a loss of vacuum;
- 51 - ROM malfunction;
- 52 - The ECU has detected a RAM error;
- 53 - the control module does not receive an impulse from the exhaust gas regulator;
- 54 - the octane corrector controller does not respond;
- 55 - the load on the power unit is too high;
- 61 - the oxygen controller gives incorrect readings.
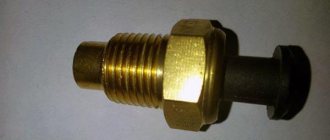
What is a Camshaft Position (CMP) Sensor?
The camshaft controls the opening and closing of the intake and exhaust valves.
In the cylinder head of a car engine there are one or two camshafts, which are equipped with special lobes and are designed to operate the intake and exhaust valves. The crankshaft is located in the cylinder block itself, which, when receiving torque from the movement of the pistons in the block, transmits this torque using gears directly to the timing chain (or to the timing belt) to the camshaft.
Camshaft
To initially determine which engine cylinder is on stroke, your car's computer monitors the rotation position of the camshaft relative to the position of the crankshaft using the camshaft sensor (CMS). The information received from the CMR sensor is necessary to adjust the timing of the spark supply to the combustion chamber and for the operation of the fuel injectors. Thus, the camshaft sensor directly affects the fuel consumption of the car and the amount of emissions in the exhaust.
The most common camshaft sensors are: - magnetic and based on the Hall effect. Both types of sensors transmit a voltage signal to the electronic engine control unit or to the vehicle's on-board computer.
The magnetic type of camshaft sensor produces its own alternating current (called a sine wave). Typically this sensor has two wires. Well, a sensor based on the Hall effect uses an external power source to receive a digital signal; as a rule, it already has three wires.
Camshaft position sensor
Depending on the make and type of your vehicle, your engine may have one or more camshaft sensors. There are also two types of CMP sensors that can be used in your car.
Decoding codes
Now we suggest that you familiarize yourself with the decoding of the combinations. Why errors may occur and how to eliminate them can only be found out as a result of diagnostics.
The elm327 channel published a video showing the diagnostic procedure for a Chevrolet Niva using a special adapter and an Android-based mobile phone.
Common mistakes
First, let's look at deciphering frequently occurring problems that occur in the Chevrolet Aveo in the back of the T250, T300, Niva and other models.
| Error | Decoding |
| p1396 | Code p1396 is an error in the operation of the ABS system. If this code appears in an Orlando, Niva, Lacetti or other Chevrolet model, the car owner needs to test the performance of the unit itself, as well as the rough road controller. Often the cause of 1396 is a failed sensor, damage, oxidation or contamination of its contacts. You can try to solve the problem by dismantling and cleaning the connector |
| p0661 | The car owner is informed about problems with the solenoid or damage to the electrical circuit. A detailed check needs to be done |
| p0404 | The on-board computer received a message about violations in the functioning of the exhaust gas recirculation system. Often the reason is related to a breakdown of the controller, so it is necessary to diagnose and replace the sensor |
| p1628 | Error code 1628 indicates a problem with the locking device. It is necessary to test the operation of the immobilizer. If you do not pay attention to diagnosing and checking this error, then over time the immobilizer may block the engine and, as a result, it will be impossible to start it. You can try to disable and activate the immobilizer or reprogram its chip |
| p1661 | The Check Engine light does not work. You need to check the functionality of the indicator light in the dashboard. Often the problem can be solved if the light bulb is working by resetting the error |
| p1602 | Error 1602 literally means a loss of voltage in the on-board network. The reasons may be different. If the car starts and the engine runs normally, the malfunction may be damage or poor contact of one of the plugs of the control unit, or poor soldering of its components. Perhaps this is a firmware glitch or some relay is not working. A qualified electrician can find the cause. |
| 136 | The meaning of this code may vary for different Chevrolet models. In Orlando cars, this error means a malfunction of the second lambda probe or damage to the wiring. In Cruze models, the code indicates the need to diagnose the parking radar. Perhaps the parking sensors are simply clogged |
Engine
Let's consider the malfunctions encountered in the operation of power units.
| Error | Decoding |
| p0013 | There is a break in the circuit between the crankshaft and camshaft devices. Shaft adjustment required |
| p0171, p0172 | The control unit received a signal about the incorrect functioning of the fuel supply control system. The volume of the air-fuel mixture in the power unit is reduced or increased. We need to identify the cause |
| p0201, p0262 | Malfunctions related to the operation of the injector of cylinder 1 |
| p0202, p0265 | Problems related to the functioning of the injector of cylinder 2 |
| p0203, p0268 | Cylinder 4 injector needs diagnostics |
| p0204, p0271 | Cylinder 4 injector check required |
Reporting a malfunction
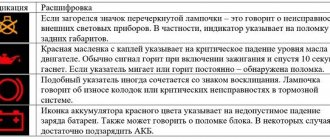
The battery icon lights up if the voltage in the on-board network drops; often this problem is associated with a lack of battery charge from the generator, so it can also be called the “alternator icon”. On vehicles with a hybrid engine, this indicator is supplemented by the inscription “MAIN” at the bottom.
The oil icon, also known as a red oil can, indicates a drop in the oil level in the car engine. This icon lights up when you start the engine, and does not go out after a few seconds or may light up while driving. This fact indicates problems in the lubrication system or a drop in oil level or pressure. The oil icon on the panel may have a droplet or waves at the bottom; on some cars the indicator is supplemented with the inscription min, senso, oil level (yellow inscriptions) or simply the letters L and H (characterizing low and high oil levels).
The airbag icon can light up in several ways: either the red inscription SRS and AIRBAG, or “a red man wearing a seat belt,” with a circle in front of him. When one of these airbag icons lights up on the panel, the on-board computer notifies you of a malfunction in the passive safety system, and in the event of an accident, the airbags will not deploy. Read the article on the website for the reasons why the airbag sign lights up and how to fix the problem.
The exclamation mark icon may look different and its meaning will accordingly be different. So, for example, when the red (!) light is on in the circle, this indicates a malfunction of the brake system and it is advisable not to continue driving until the cause of its occurrence is determined. They can be very different: the handbrake is up, the brake pads are worn out, or the brake fluid level has dropped. A low level is precisely what poses a danger, because the reason may not only be in heavily worn pads, as a result of which, when you press the pedal, the fluid disperses throughout the system, and the float gives a signal about a low level, the brake hose may be damaged somewhere, and this is much more serious. Although, very often the exclamation mark lights up if the float (level sensor) is faulty or shorted, and then it simply lies. On some cars, the exclamation mark is accompanied by the words “BRAKE”, but this does not change the essence of the problem.
An exclamation mark can also light up in the form of an “attention” sign, both on a red and yellow background. When the yellow “attention” sign lights up, it informs about a malfunction in the electronic stabilization system, and if it is on a red background, it simply warns the driver about something, and, as a rule, explanatory text is displayed on the dashboard display or combined with other informative text designation
The ABS icon may have several display options on the dashboard, but regardless of this, it means the same thing on all cars - a problem has occurred in the ABS system, and that the anti-lock wheel system is not working at the moment. You can find out the reasons why ABS does not work in our article. In this case, movement can be made, but there is no need to rely on the ABS to activate; the brakes will operate as usual.
The ESP icon may either light up intermittently or stay on constantly. A light with this inscription indicates problems with the stabilization system. The Electronic Stability Program indicator, as a rule, lights up for one of two reasons - either the rotation angle sensor has failed, or the brake light sensor (aka “frog”) has died for a long time. Although, there can be a more serious problem, for example, the brake system pressure sensor is covered.
The engine icon, some drivers may call it the “injector icon” or check, may glow yellow when the engine is running. It informs about the presence of engine errors and malfunctions of its electronic systems. To determine the reason for its appearance on the dashboard display, self-diagnosis or computer diagnostics are performed.
The glow plug icon may light up on the dashboard of a diesel car; the meaning of such an indicator is exactly the same as the “check” icon on gasoline cars. When there are no errors in the electronic unit’s memory, the spiral icon should go out after the engine warms up and the glow plugs are turned off. Read how to check glow plugs here.
This material is informative for most car owners. And although absolutely all possible icons of all existing cars are not presented here, you will be able to independently understand the main symbols of the car’s dashboard, and will not sound the alarm when you see that the icon on the panel is on again.
Resetting errors on Chevrolet
If malfunctions are found in the operation of certain systems, then the first thing to do is to correct them. If after repair the codes remain in memory and do not disappear, then you can eliminate them yourself.
There are several options for resetting errors:
- Clear codes by disconnecting the battery terminals. Open the hood and loosen the bolts on the clamps, then disconnect the alligator clips. Wait about one minute, then connect the crocodile clips into place.
- Using the on-board computer. The device has a special function for this. To delete the code, go to the “errors” section in the main menu, then press the middle key on the panel. You will hear a beep and dashes will appear on the computer display. If they exist, then the errors have been successfully removed from memory.
- Resetting can be done using the odometer button. You need to hold it down for five seconds. About 15 seconds will pass, after which the numbers will appear on the display. We wrote about errors during self-diagnosis at the beginning of the article, but if the number 0 appears on the display, then there are no problems with the operation of the sensors, engine and other systems in the car.
Troubleshooting
After finding out the reason why the Priora or Kalina does not drive, it is necessary to correct the situation. If the coding indicates a break in the power supply to a structural element, you need to completely check the entire line and the device itself. It is better to do this by replacing parts with known good ones (new ones). It is also taken into account that standard connectors may become loose or fail over time. In such a situation, the computer will show errors even with a 100% working network. To detect such “surprises”, it is necessary to check all terminals and connections for oxidation, broken contacts or loosening - the elements must fit tightly in the sockets, without play.
Note! If you are unsure of your own abilities, the motorist is strongly recommended to seek help from a specialized workshop or a qualified technician.
Video “How to check a Niva Chevrolet car before buying?”
The Two in Niva channel published a video that clearly demonstrated instructions for self-diagnosis of errors.
Few people know that the Chevrolet Niva has a self-diagnosis function that produces basic error codes that can be used to quickly find and fix vehicle problems. It is not difficult to carry out this procedure yourself; just press the odometer button firmly and turn on the ignition at the same time. The arrows on the speedometer will creep up, after pressing again, an information message about the firmware version will be displayed, and the next time, all error codes will appear on the monitor, naturally, if there are malfunctions in the car.