The VAZ-2114 is based on mechanics, so for many drivers it comes as a real surprise that the car has self-diagnosis. This allows you to avoid checking the operation of the machine at a service station using expensive equipment; the fault can be determined with your own hands at any convenient time, and then quickly eliminated.
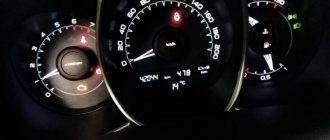
Diagnostics of the VAZ-2114 involves displaying an error code on the on-board screen, which indicates a specific breakdown. Error 8, displayed on the panel, stands for insufficient voltage in the machine network. We will tell you how to fix the problem, but first we will teach you how to enable self-diagnosis of the VAZ-2114.
Deciphering error codes
When purchasing a car from a dealership, you, as its new owner, must be provided with instructions for operating the vehicle. On one of its pages there is a description and explanation of each error. For example, error 8 on a VAZ-2115 indicates that the battery charge is too low. In order to get rid of this error and the problem in general, you just need to charge the battery. This can be done either while the car is moving, or by connecting a special charger to the battery.
From here it is easy to come to the conclusion that before you go to a car service station and pay your hard-earned money there, you should conduct an independent diagnosis.
Having seen the error codes shown by the on-board computer, as well as having correctly deciphered them, we can conclude that it is advisable to visit a service station. So, for example, if error 8 is detected on a VAZ-2115, it is not at all necessary to go to a service center, since the battery can be charged without resorting to the services of specialists.
There are many other errors, which will not be difficult to deal with on your own. As a result, the car will be fully operational, and money will be saved.
Car diagnostics
Of course, it is impossible to detect a malfunction in the operation of a vehicle without diagnostics. This can be done using special equipment, which can be found at every specialized service station. But you can also check your car for faults on your own. Note that when checking the car yourself, the error codes will not be the same as when diagnosing on the equipment.
Car VAZ 2115 tuning
So, how can you independently diagnose the state of the VAZ 2115 on-board computer? This question came to the mind of every owner of these car models. Now we will tell you about this in more detail. But diagnosing the car is half the battle, because the resulting combinations of faults also need to be deciphered.
Self-diagnosis of VAZ:
Pressing the odometer button to carry out self-diagnosis of the VAZ 2115
Error No. 8 on-board computer
Hello, dear guests, just yesterday I took up this problem. The fact is that I decided to work closely on Chek, in a fit of inspiration and the upcoming weekend, I checked the car for his personal mistakes. Well, you probably know how this is done, so I asked the machine what was bothering you, dear, and she told me, “The voltage in the vehicle network is too low.”
At first I didn’t believe it, because... I look at the generator and it shines like new, I look and don’t understand how this can happen (after all, I don’t know the instruments to check). After surfing the net yesterday I found a solution to this problem, but since it’s been like this since the 25th, because basically everyone wrote, “charge the battery,” but that may have been true, but I have a new battery, not even a year has passed. Damn I'm fucked. In short, pasans - All the problems of error No. 8 turned out to be in the generator brushes.
The uninitiated may ask, “WHAT THE FUCK IS THIS?”
I answer for those with a picture
“These brushes are not mine and the wear on my old ones is minimal, but the force of the springs is already less and most likely the contact was too small and therefore gave such an error”
Don’t worry about changing them - 15 minutes and you’re done (it will be difficult to install, because unsharpened ones can jump off the rollers and therefore need to be installed with a fair amount of skill)
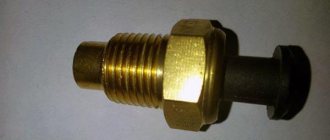
Principle of operation
The working surface of the sensor is a ceramic material coated with platinum. Its operating temperature is 350 ºС and above. Therefore, before heating, for the first 5 minutes the working mixture is adjusted according to the readings of other instruments in the engine power system. To speed up the heating of the lambda probe to operating temperature, an electric heater is installed in it. The principle of operation of the unit is that exhaust gases cover the surface of the lambda probe, which reacts to the difference in oxygen levels in the environment and exhaust gases. Next, it sends a signal to the ECU that regulates the working mixture.
Symptoms of error 8
Since the decoding of error 8 on the VAZ 2114 indicates reduced voltage in the on-board network, then the signs of this problem will be corresponding. Most often this is:
- The on-board computer shows excessively low voltage;
- Voltage drops according to dashboard readings;
- The battery indicator lights up;
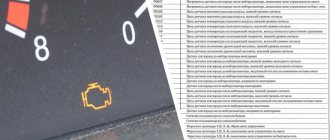
- The check light is on for a VAZ 2114 with an 8-valve engine. This does not always indicate a problem. The icon may light up for various reasons. Sometimes, if code 8 is present, it may not appear at all;
- Dim or flickering headlights;
- Difficulty starting the engine or inability to start it at all. The engine may take a long time to start, stall immediately after starting or during a stop, for example, at a traffic light.
These signs may be constant or appear periodically. The malfunction manifests itself especially often and clearly in winter or after the machine has been idle for a long time. Usually several symptoms occur simultaneously.
Autolider42.ru: online auto parts store | Topic author: Nikolay
People, tell me what could be the reason, the VAZ 2114 engine speed increases from 1500 to 1800 and when you press the gas pedal it stalls, as if it is choking. When you press the pedal to the floor, it starts to move. And it took a long time to start up.
VALERA (Rupesa) idle speed sensor change
Alexander (Charlize) Symptoms of excess air.
no (Vajrini) Try the air flow sensor first
How to make an ignition switch on a VAZ 2106
How to open the trunk of a Mercedes w220 without a battery
How Webasto works on Range Rover Vogue
How to reset an engine error on a VAZ 2114: comments
Sorry to interrupt you.
You are not right. Let's discuss this. Write to me in PM.
Reasons for error 8
Knowing what error number 8 on the instrument panel means, it is easy to determine the reasons for its occurrence. There are only two main reasons. This is a discharged or faulty battery or a failed generator.
For the latter, this most often indicates the need to replace the brushes, since the old ones are already worn out. In addition, the code may occur in such cases as:
- Poor contact at the battery terminals or generator contacts;
- Damage to battery or generator wires.
Sometimes an error indicates other problems. But this happens very rarely.
You can determine the exact reason for this behavior of the car on your own. First, you should visually inspect the battery and generator and their contacts. You may notice oxides and other defects on the terminals and connectors. There is often visible damage to the wiring. The battery terminals may not be properly tightened. In rare cases, you may notice that the battery is swollen.
It is useful to check what the voltage is in the on-board network on the dashboard. You need to pay attention at what point it decreases or constantly remains low. You should also diagnose the battery and generator with a multimeter in voltmeter mode.
Battery diagnostics is performed as follows:
- Set the measuring device to voltmeter mode. Select a voltage of about 20 Volts;
- Connect the black probe to the negative terminal of the battery, and the red one to the positive terminal.
- Evaluate the device readings. If the battery is charged, the display should show at least 12 volts.
If the value is lower, then the battery needs to be charged. If after this, it does not charge completely or discharges quickly, it should be tested with a load fork. This can be done independently or at a car service center.
You should also check the operation of the generator. To do this you need:
- Take a multimeter and set it to voltmeter mode, set the voltage to approximately 20 Volts;
- Connect the black probe to the negative of the battery, and the red one to the positive;
- Start the power unit and wait until the speed stabilizes;
- Evaluate the value on the device display. During normal operation of the generator, it should be at least 13.5 Volts. If the multimeter shows a figure less than the specified one, the generator is not charging the battery well or is not charging at all.
Checking and preparing for use of the battery
First of all, you need to learn how to care for the battery, charge the battery in order to extend its service life. Experts recommend doing the following:
- Remove the battery and wipe it with a rag. Pay more attention to cleaning dirt from the top of the battery.
- Now you can inspect the battery, paying attention to the electrolyte level. It should be the same in all flasks. If necessary, you can add electrolyte.
- The battery must be charged with a current of 5.5 A for 10 hours.
- During the process, the battery can heat up to +40 °C, which is considered normal. If you think that the battery is too hot, you should interrupt charging and wait until the battery cools down. It is because of the strong heat that it is recommended to charge the battery in a cool room and away from other electrical appliances.
- If the electrolyte temperature exceeds +45 °C, then you can not stop charging, but reduce the current by half.
- Before charging, it is worth measuring the battery capacity; after the recharge period has expired, it should increase by 1.5 times. If for some reason it has not changed or increased not so much, then it is worth replacing the battery.
When charging the battery, you must pay attention to the instructions that come with the charger and the recommendations of the battery manufacturer. Battery failure is caused by deep discharge and difficult operating conditions - sudden temperature changes, cold starts in winter. Therefore, error number 8 in the VAZ-2114 with eight valves most often occurs at the beginning of winter (after the first serious frost) or in the spring.
How to fix the problem?
If the battery is low, it needs to be charged. This is done like this:
- Remove the battery and wipe it with a dry cloth.
- Connect the charger to the battery and charge it.
- You should usually charge for at least half a day or fifteen hours if fully discharged. In this case, you need to set the current on the charger to 2.5 Amps if it does not select the mode automatically.
- Before removing the device, make sure that the battery is fully charged.
After charging, you need to check the battery voltage using the above method. If it is within the normal range, install it on the car. Observe for several days to see if the battery is draining. If rapid discharge occurs for no apparent reason, the device is likely faulty. Therefore, you will have to buy a new battery.
If the generator is faulty, it is usually enough to replace its brushes to restore functionality. To do this you need:
- Remove the wiring harness.
- Remove the wires from the generator and remove the nut securing them. Separate the protective cap from the positive terminals of the wires for protection.
- Remove the plastic casing.
- Find the voltage regulator and unscrew it with a screwdriver.
- Disconnect the wires and pull out the part along with the brushes.
- Replace the brushes and install the element on the generator.
If this does not help or visible defects are found on the device, other parts will also need to be replaced. VAZ 2114 generators are repairable. You can repair them yourself. But in some cases, it is better to replace the electric generator or contact specialists to restore it.
If the low voltage is associated with other faults that you could not identify yourself, you need to visit an auto electrician.
Why do light bulbs fail?
The main reason for the relatively rapid burnout is rather difficult operating conditions. Reduce resource:
- voltage fluctuations;
- vibration;
- overheating (in a closed space of the instrument panel this is normal).
In addition, filaments have a short service life of only 1500 hours.
In addition, lamps may stop working due to:
- wiring damage;
- destruction of board tracks;
- contact oxidation;
- blown fuses due to short circuit, etc.
For this reason, before replacing a light bulb in a Lada 2114, it is advisable to find out why it stopped working. Until the root cause is identified, the situation cannot be corrected.
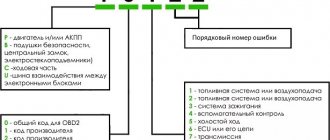
Error codes VAZ 2114, 2115, 2113: decoding
Avtovaz cars are popular among car enthusiasts, since the cost of the car and its repairs are inexpensive. The VAZ 2114 car is no exception; it is bought as a workhorse.
The secondary market mainly sells cars with an injection engine and an on-board computer installed in the cabin. Malfunctions that occur in a car can be detected using an odometer and a computer by connecting a laptop with a special program to it.
Which bulbs are suitable for the 2114th model
In general, the current legislation provides for quite serious sanctions against motorists who dare to make any changes to the design of the vehicle at their own discretion. In accordance with the rules, they are obliged to replace components and assemblies only with analogues of those chosen by the manufacturer. Failure to comply with this requirement provides grounds for punishment of the driver.
Fortunately, this standard applies to the dashboard purely formally. The owner only needs to ensure proper illumination intensity and proper operation of the display.
Thus, more and more owners are installing LED lamps on their 2114 Ladas instead of the standard halogen ones. This choice is easy to justify. In particular, they:
- consume approximately 8-9 times less electricity, which means the load on the on-board power system is reduced;
- last 5-10 times longer;
- give brighter light;
- practically do not heat up.
Finally, the dashboard looks much more attractive, because the light bulbs can be of different colors - blue, red, green, etc.
The problem is that LEDs cost about twice as much, but this disadvantage is more than compensated by their longer lifespan. In addition, LED lamps are becoming cheaper every year.
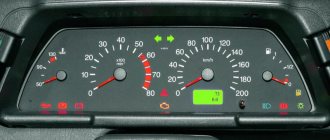
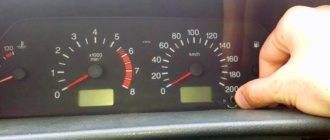
How to view the error code using the odometer
In the interior of the VAZ 2114 dashboard, the speedometer scale is combined with the odometer scale in one instrument. The error code will appear on the display if you perform the following actions:
- At the bottom of the speedometer there is an odometer button, which should be pressed and not released, and simultaneously turn the ignition key to the first position.
- Return the button to its initial state, then briefly press it again, the firmware version will appear in the window.
- If there is a malfunction, the error code numbers will be displayed on the display after pressing the device button for a short moment.
The error codes that the odometer shows differ from those displayed by the on-board computer; they have numbers ranging from 1 to 9, as well as two-digit numbers. The numbers do not say anything; to identify the problem, you need to look at the printout of the digital values in the verbal description.
Failures identified using the odometer
| Error code | Decoding code numbers |
| 1 | The malfunction is related to the microprocessor, a failure or a serious malfunction that requires flashing |
| 2 | The float sensor that determines the fuel level inside the gas tank has stopped transmitting readings |
| 4 | The voltage in the electrical network is higher than normal, there is a possibility of a short circuit |
| 8 | The voltage in the power supply has dropped to a minimum value, one of the reasons is the battery, it needs to be recharged |
| 12 | The indicator lamp on the instrument panel does not work correctly, the wiring is faulty |
| 13 | There is no connection with the oxygen sensor, possibly a wire break or short circuit |
| 14 | Engine overheating, high signal level of the coolant temperature sensor |
| 15 | Antifreeze temperature controller is faulty, wiring problem |
| 16 | There is increased voltage in the car electrical network |
| 17 | Low voltage, battery may be low |
| 19 | Malfunction in the crankshaft position sensor circuit |
| 21-22 | There is a malfunction in the throttle position sensor circuit, the cause may be a break or short circuit in the wiring |
| 23/25 | High or low signal level of the temperature sensor of the air entering from outside, possibly a short circuit of the TPS |
| 24 | The speed sensor circuit is faulty, there is no speedometer reading |
| 27-28 | Exhaust gas sensor signal is incorrect |
| 33-34 | The air flow meter does not work, there is a fault in the circuit |
| 35 | The idle air control has a deviation |
| 41 | The signal from the phase control sensor does not work correctly |
| 42 | Malfunction in the electrical circuit of the ignition unit |
| 43 | The signal from the mixture knock sensor is questionable |
| 44-45 | Fuel mixture is too lean or rich |
| 51 | Malfunction of the starter-charger |
| 52 | Malfunction of the memory module of the electronic control unit - RAM |
| 53 | CO potentiometer failure |
| 54 | Indicates that there is no signal from the octane corrector regulator |
| 55 | Lean air-fuel mixture (sudden throttle opening) at low load |
| 61 | Malfunction in the electrical circuit of the oxygen sensor (lambda probe) |
Will the car go
Every motorist will be interested to know in what situations your vehicle will flatly refuse to travel further. And there are only two such breakdowns:
- The case when the crankshaft sensor breaks. This sensor is the only one of its kind; if it breaks down, the car will travel 100 meters. The rotation of the crankshaft and the deduction of the response time of the injectors and the ignition module depend on it.
- You won't get far with a broken fuel pump either. The main reasons for its breakdown are low-quality fuel, which contains a large amount of dirt and water. If it is partially broken, you will notice a decrease in power and a kind of popping noise. If it breaks down completely, your car will not move.
It is very difficult to determine a fuel pump failure without qualified help, since there are a number of other malfunctions with similar “symptoms”. For example, a failed throttle position sensor. Its inoperability is characterized by a loss of engine power, “dips” and jerks with a sharp increase in speed (while overtaking), and unstable idle operation.
In order to avoid the above problems, you need to remember 3 digital codes that indicate these malfunctions:
- P1602 - the failure is guaranteed to be in the engine controller.
- P0340 – malfunction of the crankshaft.
- P0217 - this error may indicate two breakdowns - either the need to change the engine oil or overheating of the engine.
During all other cases of breakdowns and errors generated by the ECU, the engine is able to continue operating, but the on-board computer will go into emergency mode. If such malfunctions occur, you will definitely get to the nearest service station (subject to a low speed limit).
Problems with engine operation can occur at the most unpredictable moments, and that is why the ability to independently diagnose the error will always be useful. Having a computer or scanner with specially installed software at your disposal, you can carry out diagnostics in your own garage.
Don't forget that your car is a VAZ car. Yes, it is a more modern 8-valve injection car, but before a long trip it would still be better to “look” at a specialized service station. They have qualified staff and the most modern equipment, which will help you save a lot of time. If you think that everything is in order with your vehicle, it won’t hurt to take a fuel pump, crankshaft sensor and ignition coil on the road.
Error codes indicating a car malfunction by computer using the OBDII protocol
When a car breaks down, the on-board computer produces a certain number that needs to be deciphered. Digital codes can be divided into groups in different car systems.
Air supply system
| Error codes | Description of digital designation |
| 0030 | The electrical circuit of the sensor heater is damaged |
| 0031 | Oxygen sensor heater circuit low voltage |
| 0032 | In the same place, only increased voltage |
| 0100 | Damage in the air flow sensor circuit |
| 0101 | The mass air flow sensor circuit is damaged, the sensor sends an incorrect signal |
| 0102-0103 | The air flow sensor sends a false signal (low or high), possibly an open circuit |
| 0112-0113 | Incorrectly low or high signal level of the ambient air temperature sensor |
| 0115 | Invalid DTOZh signal |
| 0116 | Engine overheating signal, false signal from coolant temperature sensor |
| 0117-0118 | A malfunction has been detected in the coolant temperature sensor circuit (low or high signal) |
| 0122-0123 | Malfunction of the TPS, possible short circuit or damage to the insulation, the sensor sends an unreliable low or high signal |
| 0130 | Failure in the electrical circuit of the oxygen sensor, there is an incorrect signal |
| 0131-0132 | Problems with oxygen sensor 1, low or high voltage |
| 0133 | Slow action of DK1 on commands |
| 0134 | There is no signal from DC1, the power cable may be broken |
| 0135 | DK1 heater failure |
| 0136 | Broken or malfunctioning oxygen sensor 2 |
| 0137-0138 | Incorrect signal from DC2 |
| 0140 | The fuse at the oxygen sensor 2 has blown |
| 0141 | DK2 heater is faulty or broken |
| 0171 | The fuel mixture is too lean (the throttle is sharply opened) |
| 0171 | An excessively enriched fuel mixture, this applies to carburetor engines, when the filter becomes dirty and there is little air flow. There is no such problem with injection engines. |
Fuel supply system
| Error codes | Decoding of the digital designation |
| 0201-0204 | An open circuit was detected in the injector control circuit, respectively, from 1 to 4 |
| 0217 | Engine overheating |
| 0230 | The fuel pump does not work or the relay has failed, replacement is required |
| 0261 | Open circuit or short circuit in injector control 1 |
| 0262/0265/268/271 | Short circuit at +12 V in the injector circuit in series |
| 0263/266/0269/272 | The injector driver refuses to work adequately or there are “glitches” in sequence from 1 to 4 |
| 0264 | Short circuit to ground for injector 2 control circuit |
| 0267 | Short circuit of injector 3 control circuit (wire shorts to housing) |
| 0270 | Short circuit to ground (auto body) injector circuit 4 |
Ignition system
| Error codes | Description of digital designation |
| 0300 | The computer has detected numerous misfires, the car is difficult to start on the first try |
| 0301-0304 | Misfire in the engine, cylinders 1 to 4 |
| 0325 | Detonation sensor downtime detected, open circuit |
| 0327-0328 | Breakdown, DDS does not work, signal is lost, replacement is salvation |
| 0335 | Crankshaft position sensor signal is incorrect, wire failure or short circuit |
| 0336 | The component that controls the crankshaft position does not work correctly and displays an error. |
| 0340 | The computer shows that the phase sensor is generating an error |
| 0342-0343 | Phase distribution sensor failure |
| 0351-0354 | Open circuit or short circuit for pistons in series |
| 0363 | Emergency fuel supply cut-off, the mixture in the cylinders does not ignite |
List of codes that do not affect engine operation
| Error codes | Description of digital designation |
| 0422 | The converter does not work adequately, reasons: the catalyst is clogged, low exhaust gas flow |
| 0441 | Indicates that power to the canister purge valve (the device that traps hydrocarbon vapors in the fuel tank) has been interrupted. |
| 0443 | Indicates that the canister purge valve circuit is faulty |
| 0444 | The adsorber purge valve does not work, short circuit or open circuit |
| 0445 | Short to ground (tank wall) of the canister cleaning valve |
| 0480 | The on-board computer indicates damage to the wiring to the radiator cooler |
| 0481 | Cooling fan control circuit damaged |
Breakdowns and malfunctions in the SU speed control system
| Error codes | Decoding of the digital designation |
| 0500-0501 | The speedometer readings are unreliable, the speed sensor has failed |
| 0503 | The speed sensor requires repair, periodically does not work |
| 0504 | The pedal position sensor produces an incorrect signal |
| 0505 | Idle air control gives an error |
| 0506 | Low idle speed at 800 rpm |
| 0507 | Idle speed is higher than normal |
| 0511 | The idle air regulator line is damaged |
| 0560 | The mains voltage is distorted, the battery is discharged or the power cable is broken |
| 0562 | Electrical short circuit, low voltage |
| 0563 | There is a short circuit in the network wiring, high voltage |
Digital fault codes in the on-board network
| Error codes | Description of digital designation |
| 0601 | Problems with the electronic engine management system controller, memory checksum error |
| 0603 | External memory module error |
| 0604 | Internal RAM module error |
| 0607 | It was revealed that the detonation channel (abnormal combustion) is not working |
| 0615 | The secondary starter relay does not work, the wiring is damaged |
| 06916-0617 | The same thing, only the reason is a short circuit to ground |
| 0627 | Problems with the fuel pump control relay, the cause may be an open circuit |
| 0628-0629 | The same thing, only the cause is a ground fault (body) |
| 0645-0647 | Problem with compressor clutch, damaged wiring |
| 0650 | Check Engine Lamp Circuit Damaged |
| 0654 | Tachometer failure |
| 0685-0687 | Damaged main engine control relay |
| 0691-0692 | Problems with the cooling fan relay |
Deciphering faults in auxiliary systems
| Error codes | Description of digital value |
| 1102 | There are problems in the oxygen sensor heater, breakdown, low resistance |
| 1115 | Oxygen meter heating circuit is faulty, broken or malfunctioning |
| 1123-1124 | Problems at idle, lean or rich fuel mixture |
| 1127-1128 | Same problem only in partial load mode |
| 1135 | Heating of oxygen sensor 1 is broken, open or short circuit |
| 1136-1137 | In light load mode, lean or rich fuel mixture, check the throttle drive |
| 1140 | Modified and actual load does not match the calculation |
| 1141 | DK2 heater failure |
| 1171-1172 | Potentiometer problems, low or high gas level |
| 1301-1304 | In all chambers consistently, false ignition activation in the cylinder |
| 1386 | Knock channel test distorted |
| 1410/1425/1426 | There is a short circuit or open circuit in the canister flap control circuit |
| 1500 | Broken fuel pump relay line |
| 1501/1502 | Failure of the fuel pump relay due to a short circuit in the body or wiring |
| 1509/1513/1514 | The idle air control control circuit is damaged, short to ground or 12V, open |
| 1541 | Damage to the fuel pump relay control circuit, the cause may be oxidation of the terminals |
| 1570 | Damage to the traction control cable, incorrect signal |
| 1600 | No communication with immobilizer |
| 1602 | There is no power to the electronic control format control unit |
| 1603 | EEPROM (non-volatile memory) error |
| 1606 | The uneven road locking mechanism is damaged |
| 1612 | Electronic control reset error in the electronic engine control unit |
| 1616/1617 | Changed the signal level of the uneven road surface sensor |
| 1620 | Memorable part requires replacement |
| 1621 | Poor condition of the random access memory sensor |
| 2301/2303/2305/2307 | Closing the ignition coils to 12V, alternately for each piston |
Is a dual exhaust system necessary?
Before answering this question, let’s look at history and figure out what’s what. So, the need to install two exhaust manifolds has appeared since the invention of V-shaped engines, in which the cylinders are located at an angle. The result is one exhaust manifold for each side (line) of the cylinders. In other cases (with an in-line arrangement), one exhaust pipe is installed. The situation is a little different when car enthusiasts, in order to create decorative, visual improvements, make a branched one out of a single release. This gives the impression that the engine has a dual exhaust system. In other words, tuning the exhaust system gives your car only external changes and does not affect the operation of the engine.
Conclusion:
- From a technological or design point of view, there is no need for installation.
- From a tuning standpoint, this is an excellent, safe and inexpensive solution.
Wheel alignment
After replacing wheel rims, the dimensions and bolt patterns of which differ from those provided for by the design of the VAZ 2110, it is necessary to make all the necessary adjustments in order to ensure reliable protection of the entire chassis, as well as tires and arches.
Correct alignment angles are required for each front wheel.
There are three parameters that require correct installation: wheel toe, caster angles of the steering axles, and camber angles of each wheel.
The rules by which the parameters of the front wheel are set are as follows: