Cars admin26.02.2020
1200 rub. for the photo report
We pay for photo reports on car repairs. Earnings from 10,000 rubles/month.
Write:
Those who are engaged in repairing a car generator cannot do without the procedure for checking the regulator relay. How to check the VAZ regulator relay, watch the video lesson.
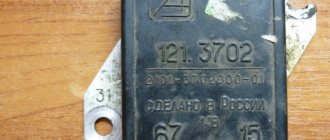
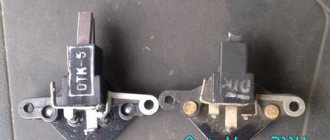
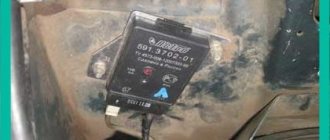
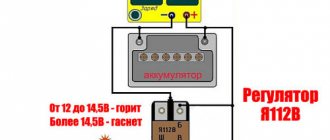
And so there is a relay regulator 3613702 which is installed on Samara (VAZ 2108, 2109) and to check it you need a power source with a voltage of about 16 V and a light bulb, and all data will be taken with a multimeter. When applying voltage, we monitor the light bulb (incandescence) in the region of 14 V; it should go out if the relay is working properly.
Today we will tell you how to check the VAZ 2109 generator voltage regulator relay. In the early 90s, the VAZ automobile concern released the 2109 model car. As in any mechanism, the health of the car is ensured by the VAZ 2109 generator voltage regulator relay as one of the main components of the electrical system. Most of the machine functions depend on constant current power.
In the Zhiguli 2109, as in many other cars of modern brands, on-board computers are used to synchronize the operation of the equipment and for its correct operation. Motorists call them the “brain” of the car. And for a computer to operate, a constant current must be maintained in the electrical network. This is impossible if the VAZ voltage regulator fails.
Generator operating principle
The VAZ-2109 generator consists of an armature, two covers, a stator, a pulley with a fan. These are the main elements of the body. There are windings on the stator and rotor. The first consists of three parts, since it is necessary to obtain a three-phase voltage at the output. There is only one reason for this - such a scheme allows you to get rid of pulsations, therefore, the efficiency of the device is higher. But this also imposes some requirements, which will be discussed below.
The operating principle is based on the fact that the rotor moves inside the stator winding. It has a coil that is powered by the vehicle's on-board power supply. Consequently, a constant magnetic field is formed around the rotor, which also moves. And these are the main conditions for the operation of the generator set. The only thing that should be ensured for normal operation is voltage stabilization on the generator rotor winding.
Reasons for premature failure of fuses
- Moisture getting into electrical contacts. This can cause a short circuit and a voltage surge.
- Damage to on-board wiring or serviced mechanisms. In such cases, sharp surges and voltage fluctuations occur in the wiring section. As a result, the fuse blows.
- Setting the fuse element to a too low rating. Some users may mistakenly insert a fuse that is too weak into a loaded circuit. After activating the device, the insert will immediately fail.
Connection diagram and operating principle
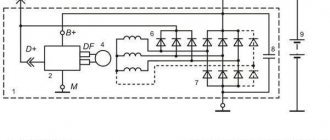
The voltage regulator on most cars is connected to the on-board network according to the diagram below.
The operating principle of a voltage regulator (VR) is the same as that of a relay. In other words, it opens and closes an electrical circuit. That is why the device is also called a relay regulator. It is triggered when a predetermined voltage value coming from the generator changes.
The first regulators had an electromagnetic design. These were real relays. Modern devices are made on the basis of semiconductors. They are small in size, and in addition, they work much more accurately and efficiently. Some of them are even equipped with special alarms that allow the driver to monitor their performance.
Electrical circuits VAZ 2109
“Nines” are divided into those that were released before 1998, and those that were after. Accordingly, the machines were then equipped with different fuse mounting blocks. On the first models the marking was 17.3722. Structurally, the unit consists of a housing with a cover and an engineering board, to which wire contacts are soldered, into which fuses and relays are inserted.
On the new models of the “nine”, as well as on all variants of the Samara 2 family, a new model unit marked 2114-3722010-60 was installed. The main feature is the presence of fuses. The type of mounting block installed is not affected by the type of fuel injection, injector or carburetor, which means that the mounting blocks on different engine types can be identical.
The unit is located in the engine compartment, next to the windshield wiper motor, on the driver's side. Depending on the marking, the blocks differ from each other in the location of the parts, the current strength and the absence in the new block of a relay for the electric motor of the SOD fan, as well as a time relay for the windshield washer on the rear window.
Dismantling the mounting block
When electrical equipment fails, you should always start your search by checking fuses and relays. However, we must also remember that they rarely burn out on their own; there is always a reason. If it is not corrected, the new fuse will quickly burn out after replacement. Anyone can remove and replace a relay or fuse; no special skills are required.
- Open the hood and remove the negative terminal from the battery (this must be done during any work with electrical equipment to prevent a short circuit).
- Release the cover latches and remove it.
- On the back of the cover is a diagram of the location of each fuse and relay. Use this diagram or the tables above to find the part you need.
- Using special pliers, remove the burnt out element and install a working one in its place.
As for the relays, they are easy to reach by hand. Identifying a faulty fuse is easy. Visually you can detect a metal thread inside. If it is melted, it is faulty. When melted, the thread breaks the electrical circuit. Thus, electrical equipment does not burn out due to short circuit or high voltage. After replacement, you need to replace the cover, connect the negative terminal and check the functionality of the required element of electrical equipment.
Source
Diode bridge
It is necessary to ring each diode separately in different directions. But normally the signal will sound only once. If a squeak is heard in both cases, the part needs to be replaced. However, in fact, the easiest way is to install a completely new bridge - it is not that expensive.
Dismantling the generator
First of all, you need to disconnect the battery to completely cut off the power to the car.
- disconnect all wires from the generator;
- loosen the nuts holding it in place;
- lift the device and remove the belt;
- completely unscrew the screws of the fixing bar from the cylinder block;
- under the engine there are bolts securing the bracket - they need to be removed;
- the generator is removed.
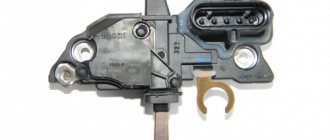
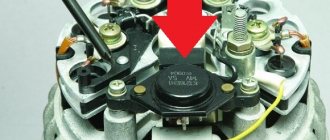
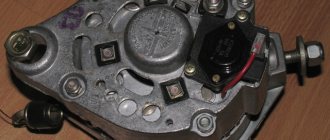
Relay regulator VAZ 2109:
1 – brush holder, 2 – brushes, 3 – voltage regulator
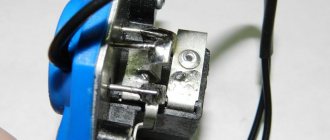
Diagnostics of the VAZ 2109 generator regulator relay
Check the serviceability of the VAZ 2109 voltage regulator. Connect a 12 V test lamp to the brushes. Apply 12 V voltage: “ ” to the terminal, and “–” to the “ground” of the brush holder. The indicator lamp should light up
Where is the old-style VAZ 2108 fuse box located?
Where is the old model VAZ 2108 fuse box located (carburetor, injection models). The relay and fuse box is located under the hood, in the compartment in front of the windshield on the left side.
The fuse box of the VAZ 2108 of the old and new models is almost no different; the new model simply has a different arrangement of relays and fuses and the fuses themselves are “knife” ones that hold well. They have 11 relays and 16 fuses. The Ш11 connector is located on the side and the contacts face the interior. Both have a transparent rare cover. The new model unit has one board, making it easier to repair and solder.
Examination
In order to determine the nature of the breakdown at home, you first need to know how to diagnose the generator.
The first stage is carried out without removing the device from the machine. There are several options, but the best quality is a multimeter. True, for this it is best to involve someone you know.
First of all, you need to find out whether the voltage regulator is capable of doing its job. Experts note that most often it is because of this that the generator may not function properly. The problem with it arises due to excessive voltage in the electrical network.
The generator itself is tested like this:
- set the multimeter to volts;
- start the power unit;
- measure the voltage at the battery and at the generator terminals.
Normally, the device will show from 14 to 14.2 volts. After this, you will need to depress the gas pedal - the voltage increase should not exceed half a volt in this case.
An increase in this indicator indicates that the generator’s performance is impaired. Most likely, the voltage relay will need to be replaced.
Alternatively, you can also do this:
- start the engine and let it run for a while;
- press the gas and bring the crankshaft to 3 thousand revolutions;
- turn on the headlights (high beam);
- heated rear window;
- stove fan.
With such a load, the battery voltage should be more than:
- 13.2 volts (generator type – 9402.3701);
- 13,6 (37.3701).
Indicators different from normative ones indicate:
- winding faults;
- failure of the voltage regulator;
- brush breakage.
To exclude the regulator from the list, you need to de-energize all devices except the headlights and measure the voltage again. If the specified node is serviceable, then the indicators will be as follows:
- for 37.3701 – up to 14.6;
- for 9402.3701 – up to 14.7.
This is interesting: Which winter tires are better and how to meet the season fully armed?
Battery and generator breakdowns
If the battery or generator malfunctions, first of all, check the integrity of the fuses responsible for their operation in the mounting block.
If the generator on a VAZ 21099 does not charge, this may be due to the following reasons.
- Bearing failure. This problem is indicated by extraneous noise during generator operation. Fixing the problem is quite simple. You need to remove the generator, disassemble it, change the bearing, reassemble it and put it back in place.
- A broken belt connecting the generator to the engine. Using the car for a long time causes the belt to wear out, and it may eventually break. You can replace the belt almost in the field, and it does not take much time.
- Reducing the voltage at the “output”. The owner of the VAZ 21099 should be notified of this malfunction by a lit lamp on the dashboard. The cause may be worn brushes or poor contact between the winding and the rotor. Fixing the problem depends on what caused it.
- Increase in voltage at the “output”. For this reason, as a rule, fuses burn out. And the reason for this is the failure of the diode bridge of the generator.
VAZ 21099 owners often encounter this problem: the generator does not charge the battery. This usually involves the wiring system running from the alternator to the battery.
If the generator does not charge, a special multimeter is needed to identify the problem. This device measures voltage. If the battery is charging, then numbers from 13.4 to 14.6 appear on the device. If the generator does not provide it, then the voltage on the multimeter will be exactly 12 V.
There are several ways to eliminate the problem of lack of charge in the battery from the generator.
- Belt tension. Do not allow excessive sagging of the belt. If the belt cannot be tensioned as needed, you should simply replace it with a new one.
- When the brushes are worn out, they are replaced.
- If the cause is the fuse, it should be replaced in the mounting block. The fuse number F10 is responsible for the generator.
If the cause of all malfunctions of the generator, battery and other parts of the electrical circuit are blown fuses in the mounting block, they need to be replaced with new ones.
Determining electrical system faults
One of the main advantages of the new VAZ 2109 is fuel injection. This type of supply of the fuel mixture is significantly more economical than the carburetor method. In addition to fuel consumption, the injector also improves the vehicle's driving characteristics. For the injector to work properly, the computer or, as motorists call it, “brains” must also work correctly.
In turn, the operation of the computer, as well as all electrical sensors and devices, directly depends on the constant current power. The device that is responsible for supplying power to the vehicle's devices is called a voltage regulator. The main sign of a malfunction of this element is the readings of the voltmeter on the instrument panel.
Also, if while driving the car your fuel consumption has noticeably increased, but at the same time the car began to pull worse, then this is one of the main signs of failure of the voltage regulator relay. This type of breakdown manifests itself especially well in the dark. At this time, dimensions and other electrical appliances are involved, which significantly increase power consumption. If it is not enough, then the instruments and dimensions light up very dimly - it’s time to change the relay!
We repair the voltage regulator and relay
Removing the voltage regulator in a VAZ 2109 car is not difficult. The technical characteristics of this car model allow this work to be performed without removing the generator. The only tools you will need are standard screwdrivers and wrenches.
To replace the voltage regulator in a VAZ 2109, the first step is to purchase a new element. Nowadays this will not be difficult, because it is sold at any car dealership. Recently, three-level regulators have become widespread. However, VAZ cars are still produced with standard regulators.
Therefore, it is better to entrust the replacement and connection of a three-stage voltage regulator to an experienced electrician, since this process requires a slight modernization of the generator contact group.
The main difference between the three-stage regulator and the standard one is the new relay. The three-stage regulator relay is much better in performance and quality than the stock one. This type of regulator makes the voltage more stable and of higher quality, and also protects the entire electrical system of the car from significant fluctuations in the network. It is recommended to charge the battery before performing any replacement work. When finished, reinstall everything in reverse order and take new measurements with a tester at the battery terminals.
Replacing the starter relay on a VAZ 2108, VAZ 2109, VAZ 21099
Hospitality! Starter ignition relay - some at the moment will think that this will be a retractor relay, there is no real one, the starter has two relays in total, one turns it on, the second one is pushed by the bendix and does not press its gear on the crankshaft pulley (the 2nd is the same retractor relay ), when the first one fails (sometimes it happens, especially due to overloads or faulty wiring), the start does not start at all, this is not the reason the car does not start, when the second one is ready to fail, the situation will be a little different and the car itself may also not start, when you turn the key there is no click, but this is still acceptable for viewing, but if this relay fails one hundred percent and does not even return the bendix to the reverse position, then the following will happen, when you turn the key, the starter will begin to turn the car engine, it will not it will get there, no matter how much it sounds f the trick when returning the key, if the engine starts. In this position, the bendix will not contact the starter (the retractor relay will not work), and in a very short time the starter will become unusable.
Note! To change the relay, which is only responsible for turning on the starter, you need to stock up: only the “8” key, and not just a degree, not only do you have nothing to take, but only a larger key, therefore, than in the case when the terminal is reset less by the battery!
Summary:
Where is the starter relay located? it is located under the hood, there it is not attached to the car body with a single nut, in the photo below this relay is indicated by a reddish arrow, and the blue one is an air hose, behind which this relay does not fit.
When should the starter relay be replaced? There are people who either don't know the electronic part of their car or just never look at that relay (they say it never breaks permanently), I would just like to say that when many people see their car won't start with key, they go straight up in the starter, remove it first, then replace the parts here, remember for the future, always start small, not just accessible, not just after you move on to hard to reach things and don't change them so that check if a fault is detected.
Checking the rotor field winding
The field winding can be checked without removing the generator from the car by removing only the protective casing and the voltage regulator along with the brush holder.
After cleaning the contact rings with sandpaper, if necessary, use an ohmmeter or a test lamp to check whether there is a break in the field winding and whether it is shorted to ground.
Stator check
The stator is checked separately, after removing the rectifier unit.
First of all, check with an ohmmeter or using a test lamp and a battery to see if there are breaks in the stator winding and if its turns are shorted to ground.
The insulation of the winding wires must be without signs of overheating, which occurs when there is a short circuit in the valves of the rectifier unit.
Replace the stator with such damaged winding.
Finally, after disassembling the generator, it is necessary to check with a special flaw detector whether there are any short-circuited turns in the stator winding.
Low voltage on the generator.
Another common malfunction is when the warning light goes out while the engine is running, but over time signs of a dead battery appear. There may be several reasons for this. The first reason is the breakdown of the main diode of the rectifier bridge. It is detected by measuring the voltage at terminal 30 of the generator with the high beam headlights on and off. If the voltage is normal or close to normal when the headlights are off, but begins to drop when the headlights are on, then the diode bridge needs to be replaced. If a KATE generator is installed, this can be done without removing the generator from the engine. But before changing the diode bridge, pay attention to the belt tension and the condition of the generator pulley. If the bottom of the pulley is shiny, this indicates that the belt is slipping due to pulley wear, which is the second reason for poor charging. In this case, the belt must be replaced, and if the new belt falls into the pulley groove, then the pulley must be replaced. In this case, it makes no sense to pull the belt through the belt. In addition, it can lead to damage to the armature bearings.
Also, weak charging may be in poor contact at terminal 30 of the generator, in the battery terminals, or in the connection of the negative terminal to engine ground. A bad contact at pin 30 can be detected by touch. Just be careful when doing this. The terminal may become very hot. If the terminal does not heat up, then use a voltmeter to check the voltage across all connections with the high beam headlights on. A voltage drop of 0.5 V indicates poor contact.
All the problems described above when the VAZ 2109 battery is not charging can be eliminated independently and in a short time. In addition to those described above, there are many more faults, but detecting and eliminating them requires more in-depth knowledge and much more time. There is no point in dwelling on them here.
admin 10/17/2014
“If you notice an error in the text, please highlight this place with the mouse and press CTRL+ENTER” “If the article was useful to you, share the link to it on social networks”
First aid for a car
The first thing to do in such cases is to check the battery terminals; perhaps they are not making good contact. If there is poor contact at the battery terminals while driving, it will not be charged sufficiently, which may cause problems during further operation of the car. To fix this problem, you need to lubricate the terminals and tighten them.
If your car's alternator fails, you need to have it repaired immediately. Most often, the voltage regulator fails. The failure of this generator element has rather unpredictable consequences. While driving, the regulator controls the required amount of current for the car; if it fails, the voltage in the network changes and can be either more or less. Very often, fuses blow at high voltages.
The VAZ 2109 voltage regulator is located directly in the car’s generator itself. When it fails, most often the generator relay breaks. It consists of several elements such as an electromagnet, an armature and a switch. These elements interact with each other when electric current is applied to them.
Repairing a generator - VAZ features
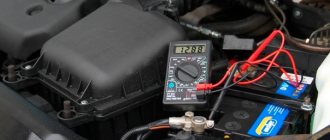
To check the car's power supply, you need to take measurements at the battery terminals. To do this, you need to start the car and let it run for a few minutes. After this, take readings with a terminal tester. Next, turn on all possible car devices, dimensions, tape recorder, heating and repeat the measurements. With a properly functioning voltage generator, as well as its regulator, the average voltage in the network should be 12–13 Volts.
The most normal voltage in a VAZ 2109 car is 14.1 Volts. If your readings are more or less than the acceptable average, then you need to start repairing your generator. First of all, you need to check the ground on the generator block. It often happens that it oxidizes under the influence of moisture. Because of this, it may not carry enough current to the vehicle. This terminal is located on the generator block; it needs to be cleaned and lubricated.
Another reason for a lack of vehicle current is a sufficiently worn or loose alternator belt. Using a belt, the generator is driven by the operation of the car engine. If the belt is not tensioned enough, it will slip while driving. Thus, the car generator will not perform the required number of revolutions, and accordingly, the required amount of current will not flow.
If the generator does not produce enough voltage, the battery is not fully charged, which significantly affects its service life. To fix the problem, you need to replace the belt or tighten it. It is very important not to overtighten it, as during movement it will stretch much faster or may even burst. You should not buy belts of dubious production - a low-quality belt wears out very quickly, dries out and stretches.
How to check the pH on a VAZ-2110 without removing it
If you find at least one of the listed signs, do not be lazy to check the voltage regulator on your VAZ-2110. This procedure will not take more than 10 minutes. To do this, you will need a voltmeter or multimeter turned on in its mode, as well as an assistant. The verification procedure is as follows:
- We start the car engine and warm it up to operating temperature.
- Without turning off the engine, we connect one voltage probe of the generator, and the second to the “ground” of the device.
- We ask the assistant to turn on the low beam headlights and press the accelerator pedal, keeping the speed at 2000-2500 thousand rpm.
- We measure the voltage with the device.
For the VAZ-2110, the voltage regulator should produce 13.2-14.7 V. This is the norm. If the voltmeter readings differ from those shown, diagnostic measures should be continued.