ALSO SUITABLE:
Lada:
• Granta 2012 - 2016. • Kalina 2013 - 2022
We will answer by phone: +7
To complete a car with an original factory radio
Lada adapter frame number 95-3311 is suitable for installing a 2-din radio in Lada Granta cars. Replacing the old radio with a more modern device that understands new formats and is equipped with a Bluetooth module, a problem that sooner or later faces any owner of a car produced in the first decade of the 21st century. It’s not very convenient to use one radio, and as for speakerphone, this has long been a mandatory norm approved by law. The height of the standard radio allows you to install a large multimedia device as an optimal option.
The process of replacing the car radio itself will not take you much time. The standard radio is quite easily removed, the new one is installed in its place and fixed with a frame. The only important point is connecting the radio to the on-board network and connecting the standard antenna to the receiver. If you do not prepare in advance, problems may arise, because the standard Lada wiring has a specific connector, unique only to cars of this brand. To solve this issue, it is enough to purchase an additional adapter for the antenna and an adapter for connecting the power supply to the radio. This will avoid compromising the integrity of the standard wiring and preserve all the functions inherent in the factory radio.
By purchasing this adapter, you can be sure that it fits perfectly into the original location, fully compensating for the gaps left after installing a 2 DIN head unit. The color and texture of the frame perfectly matches the original color and type of plastic of the car panel. We chose high-quality ABS plastic as the material for making the frame, which will serve you for many years, will not crack, bend, or fade. The ease of installation of a new radio does not require special skills, but with additional accessories (see above). Replacing the standard speakers can even more dramatically improve the sound of your car's audio system, keep this in mind.
Adapter frame for installing 2 DIN standard car radios in the standard place of Lada Granta 2din cars (fasteners).
The adapter is made of high-quality plastic, has a texture and color identical to the original ones. To equip a car with an original standard radio, Correspondence table for standard Lada Granta speakers:
| Speaker placement | Size |
| Front doors | 13.0 cm |
| Rear doors | 13.0 cm |
Designed to fit a car with an original standard radio.
Incar transition frames are made of high-quality ABS plastic and the manufacturer guarantees long and flawless service of the product.
All adapters and frames purchased from our online store are checked for defects.
The official online store INTRO-ONLINE (INCAR trademark) sells only certified products of excellent quality. On our website you will find the most complete information on INCAR products: adapter frames, standard radios, rear view cameras, video recorders, ISO adapters and other accessories. Also the latest information about new products and much more. Our store sells only certified products with a one-year warranty.
- Payment and delivery. You can choose the method of payment and delivery when placing your order through the CART.
- Delivery is carried out by Russian Post EMS. When purchasing a standard radio, we deliver within Russia FREE OF CHARGE , regardless of the number of items in the order.
- All products undergo additional packaging when shipped, which guarantees the absence of mechanical damage.
- After dispatch, a postal item number is sent to the buyer’s email address, with the help of which the recipient of the item can independently track the forwarding process and the date of receipt of the item at the post office. The number is usually sent on the second day after departure.
Since the beginning of 2011, all Lada Granta models have been manufactured with audio preparation: factory radios and receivers. The quality of reception and sound is not always at the highest level due to its cheapness and simplicity. When purchasing a Lada Grant from the showroom, the owner receives audio preparation, acoustic wires, and installed electrical wiring.
The door panels have already prepared openings for installing speakers. True, few people use the standard seat, as they prefer the rear shelf to improve the sound.
Choosing the right radio size
We carry out installation either independently or by contacting specialists at the service center. In the second case, the service is paid.
By default, all VAZ and Lada models are equipped with a 1-DIN radio. The opening dimensions correspond to: 180 x 50 mm. This is an old standardization that has been in force since the times of the USSR. Modern audio modules can be purchased complete with a pre-installed LCD display. The size of the opening must comply with the standard: 180 x 100 mm, that is, doubled in height. Size marking: 2-DIN.
To install the radio in the Granta liftback, cut out the top pocket, remove the plastic, and install the assembled module. For a beginner, the process will seem somewhat complicated, so strictly follow the instructions.
What to choose for Grants
Granta can be equipped with a 1 or 2 Din head unit with a touch or standard display. When using alternative equipment, it is necessary to purchase or independently manufacture a decorative frame framing the body of the radio. This is especially true for 2 Din systems, since small head units are equipped with a standard frame that fits the Grant instrument panel. The final choice of car radio remains with the car owner.
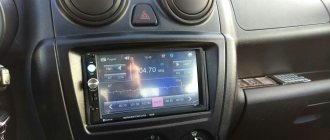
AvtoVAZ produces a special 2 Din radio for the Lada Granta, equipped with a touch screen.
The advantage of using such equipment is the identical backlighting of the control buttons and other elements on the dashboard.
To install a standard radio, you need to purchase an original decorative panel on the center console, since the standard mounting socket is not designed for such equipment.
How to connect a Lada Granta head unit with a 1-DIN connector
- We carry out the work inside the car, having previously disconnected the terminals from the battery in order to prevent a short circuit in the circuit;
- We remove the plastic partition - pocket. It covers the hole, preventing objects from falling inside the torpedo. We use a flat-head screwdriver to unscrew the bolts;
- Two ISO plugs are visible behind the partition body. These types of wire terminals are manufactured in accordance with international automotive standards. More than 98% of all automakers use the standard when equipping technical equipment;
- We remove the metal frame - the block - from the body of the audio unit and place it in the cavity of the torpedo.
- We first connect the blocks with wires. Fitting into the connectors is accompanied by a characteristic click;
- We insert the module into the metal frame.
Note to the driver. Incorrect terminal connections result in a short circuit. To ensure the safety of the connection process, the connectors have guides that allow you to install the block in only one position.
How to install 2 din in grant norm or standard
- dismantle the center console trim - unclip the fastenings, move it forward and disconnect the buttons and heater handles;
- cut out a vertical plastic partition that will not allow you to install a 2 din device;
- file the plastic casing of the central air duct;
- try on a new acoustic unit, adjust the fastenings if necessary;
- install adapters from the delivery kit on the wiring (if required);
- install the device;
- if we leave the old center console trim: we cut out the partition, try it on, put it in place with the buttons and handles connected, adjust the decorative frame of the control unit, install it;
- if we put a new trim on the console under a 2 din device: replace the heater control unit and buttons from the old trim, install it in place, put a decorative frame on the control unit.
Common mistakes when installing a standard Granta liftback radio with your own hands
- when connecting additional terminals, manual twisting of wires is used instead of classical soldering;
- regular insulating tape is used on connections instead of heat-resistant sleeves;
- Incorrect connection of a large number of speakers on one branch leads to overload, heating, and short circuit.
Installing a sound amplifier
By liftback radio amplifier we mean:
- crossover installation;
- subwoofer installation.
The choice is up to the owner of the Lada Grant, as different goals are pursued: cleanliness, sound quality. Obviously, the cost of equipment will also increase. Crossovers are installed in the cavity of the glove box, since their dimensions do not exceed 100 x 150 mm and are rectangular in shape. Subwoofers are fixed in the luggage compartment. Equipment requires more space.
Connection of an external device is carried out strictly in accordance with the operating instructions:
- brown wire color: responsible for the operation of the system;
- black: power supply to equipment;
- yellow: audio module activation;
- red: settings and programming.
At the very end, do not forget to connect a red wire with a pre-installed fuse to the positive terminal of the battery. It directly connects the amplifier (subwoofer) to the current source.
Installing two speakers in the front doors
- dismantle the door card, handle, control unit;
- We compare the standard cutouts for the speakers with the actual dimensions. If necessary, expand with a file or fine sandpaper. It is strictly forbidden to use cutting objects, as there is a high risk of damage to the plastic of the door card;
- we check for the absence of roughness in the hole, install the speaker, fix it, connect the standard terminals with wiring;
- we check the operation of the speaker, install the door card, and fix the metal grille to protect the speaker from mechanical damage.
How to install and connect
To install a radio on Grant, you need:
- Remove the decorative plug in the front panel by lifting it with a mounting spatula. Wires with ISO standard connectors are located in special routings on the back.
- Place a 1 Din mounting shaft in the rectangular hole and press firmly.
- Use a screwdriver or other object to bend the metal corners that will keep the part from falling out.
- Open the glove box lid to find the antenna cable, which is located under the floor sound insulation near the front passenger's feet.
- Connect the power adapter (depending on the type of head unit). Route the cables through the installation shaft.
- Install the speakers in their original places. The doors of the basic configuration do not have cables for connection; there is only a connection plug located near the clutch pedal. In this case, the cables should be installed independently, passing them through the corrugated protective channels located between the stand and the door.
- The laid wires are wrapped in foam rubber, which is secured with tape or insulating tape. This manipulation allows you to avoid extraneous sounds caused by the contact of cable insulation on the metal door panels.
- When using speakers with a diameter of more than 13″, it is necessary to make wooden or plywood podiums that will allow the equipment to be installed in a standard hole.
- Connect the plugs to the head unit, which is then inserted all the way into the mounting shaft.
- Check the operation of the radio receiver and player in different modes.
- Install the decorative frame in its original place.
To install a double-din head unit you need:
- Using a mounting spatula, remove the air conditioner control knob.
- Pry up and remove the plastic cover of the central part of the instrument panel. When dismantling, it is necessary to disconnect the wiring plugs to the control buttons for additional equipment.
- Using a hacksaw and a construction knife, cut out the central jumper in the instrument panel. At the same time, the transition channel for the central interior ventilation deflectors is shortened by 4-5 mm.
- Install the radio in the shaft using modified mounting brackets. The device is attached to standard points located in the instrument panel.
- Mount the modified decorative frame onto which the deflectors have previously been rearranged.
If the head unit supports a low-frequency speaker, then a separate wiring is laid to it, which runs under the trim on the thresholds. When using an active subwoofer with a bass reflex, it is necessary to route the power cables, equipped with a separate fuse, into the luggage compartment.
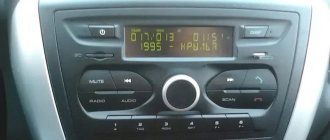
Characteristics of the standard radio "Lada Grants Liftback"
The radio for the Lada Granta liftback is supplied as standard equipment. Product in 2-DIM format (100 x 180 mm).
In addition to the classic radio, there is a built-in card reader, Bluetooth, and a USB output for connecting flash drives. The only disadvantage of the audio module is that it is a push-button type. Which is not to the liking of many car enthusiasts, which is why they install more modern modifications.
During the startup of the audio module, a greeting from Lada Kalina 2 is displayed. This is not an error, as many owners think. This type of audio was originally developed for the Lada Kalina 2. Obviously, the manufacturer did not change anything and started production for the Granta. Installation/disassembly of the module is somewhat complicated due to the tight fit, so be prepared for this.
It is based on the Windows operating system, which allows you to connect to the World Wide Web via a 3G modem. There is no such option out of the box; you first need to reflash the device, but more on that later.
Via Bluetooth, it is possible to connect to a phone, and the “hands-free” option is activated. Which is very convenient and practical when driving. The owners were also pleased with the stock radio. At first glance it looks simple, but it turns out not to be so. Available programming function for a specific channel on a given topic.
For example, as soon as a news broadcast comes on, the radio automatically switches to the programmed channel. The audio module reads the following formats: MP3, WMA, WAV, WMV. Control of the standard radio of the Lada Granta liftback is accessible and intuitive, even for an inexperienced owner.
Audio preparation Grants of different configurations
In the “standard” configuration, the Lada Granta has pre-installed power wiring harnesses, which are located in the console opening. Electrical wires are connected only to the radio, so don’t be surprised if you don’t find them in the doorways. To wire to the doors, you will need to pull power wires, which are located under the console panel
In this configuration of the Lada Granta, the stereo system can be installed independently, if due attention is paid to it
In the Lada Granta Norma, the power wires coming from the console are already routed to the doorways. You only need to connect the audio system in accordance with the assembly diagram. It's not uncommon for the stock door wiring to not match up with some speaker connectors. To solve this problem, you need to purchase suitable wires and replace them in the doorway. Lada Granta Norma has a trim with a special pattern for the speakers. Based on it, you can cut the opening yourself.
During assembly at the factory, the Lada Granta luxury version is equipped with a touchscreen multimedia system and speakers. The improved radio tape recorder is complemented by Bluetooth function and a 5-inch display with line output. In addition, the built-in radio allows you to connect a USB 2.0 flash card, through which you can listen to recorded music.
The standard radio for the Lada Granta model is an improved device, the design basis of which is the “Sirf Atlas” processor, supplied by the well-known. In addition to the presence of a radio receiver, the device is equipped with a large touch screen and has the ability to connect an external source via a video input by replacing the software and performing firmware. However, in the basic configuration of a domestic car there is only a push-button radio. Many owners are not happy with this fact and want to connect a more modern radio. This article will tell you how to install a radio.
How to flash the firmware
- Buy an SD card, format it in FAT, exFAT format;
- We download the firmware for free on the manufacturer’s official website;
- We save the data in the root directory of the SD card;
- We insert the SD card into the slot on the radio, start it, wait for the update to finish;
- Turn on and off the module;
- We customize the new interface for ourselves.
If the firmware is installed incorrectly, additional screen calibration using the CAN bus will be required. It is impossible to do this yourself, only in a service station. After successful flashing, the following is available:
- graphic equalizer;
- viewing photos, pictures, videos;
- improved sound quality;
- possibility of installing a navigation system.
Disadvantages of a standard radio
- Outdated firmware from the “box”;
- Not all options are initially available;
- The need for periodic software updates;
- Push-button interface.
Features of audio system installation
When connecting the stereo system wiring, it is necessary to take into account certain features of the electrical supply. This is provided using red and yellow wires. The first is responsible for remembering the audio system settings, the second is for turning off the radio, which is controlled by the car’s ignition.
It is recommended to use a parallel connection type for both wires so that the audio system can only be turned off manually. In this case, it will not be affected by the car’s ignition key, but there will be a problem of excessive electricity consumption in parking mode, which is solved by installing a special regulator for the red electrical wire. With its help, you can turn off the radio by hardware when leaving the car for a long time. This regulator can be connected to the alarm system, that is, when the vehicle is locked, the audio system will turn off automatically.
The disadvantage of this system is the extra current consumption, but in any case it is much less than the indicators that provide power to the radio during standby mode.
Reviews
| Module type | Price, rub.) |
| Standard 1-DIM (push-button version) | from 3500 – 3700 |
| Standard 2-DIM (sensor) only for Lada Granta liftback | from 7500 – 8000 |
| Third party manufacturers, depending on configuration and specifications |
| № | Positive |
| 1. | Victor, 39 years old: after buying the car, he did not change the radio, despite the push-button control option. The sound quality is good, the radio reception is excellent, that's enough for me. |
| 2. | Konstantin, 41 years old: bought the car second-hand, second owner. I didn’t change anything, I left the original radio. The functionality is good, the build quality is also good, it reads from a flash drive. |
| 3. | Vasily, 44 years old: I listen to the radio more, the reception in the city is good. True, it causes interference near metal structures, but this is natural. |
| 4. | Kirill, 36 years old: I work as a taxi driver, on wheels all day. The standard tape recorder saves the day, it works properly. My friends recommended replacing it with a touchscreen model from the new Granta, but so far the old one hasn’t failed. |
| Negative | |
| 1. | Victor, 38 years old: the standard audio module, although not bad, seemed to me not enough, so I replaced it with a foreign one and supplemented it with an amplifier. Now the volume is good, the quality is high. |
| 2. | Mikhail, 42 years old: I work as a courier, I drive for the entire shift. I expected more from the standard radio, so I had to replace it with a new one. The volume suits me, I plan to connect an amplifier - a crossover. |
| 3. | Ivan, 33 years old: I bought the car second-hand, immediately replaced the audio module, the reviews are not good. New and high-quality equipment from Trinity, no problems. |
| 4. | Vladlen, 40 years old: friends gave me a gift in the form of a radio with touch control for our anniversary. Before this there was a push-button one. Can't compare, quality, sound, control, functionality at a high level. |
Installing speakers in a car
In addition to the radio itself, you will need to correctly place and connect the audio speakers.
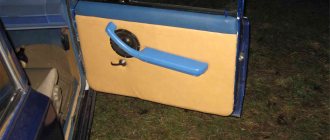
Installation of the rear and front speakers is carried out according to the same scheme. To do this, you will need to cut openings in the door trim, so for ease of installation you need to remove them. The upholstery is removed in the following sequence:
- the door handle is removed;
- The plastic casing under the handle is removed;
- the adjusting handle for raising the glass is removed (only for Lada Granta Standard).
The stock upholstery has 16 cm diameter openings that are specifically designed for speakers. Certain difficulties may arise if you decide to install speakers of other sizes.
For speakers with a diameter of 13 cm, you will need to cut out the central plug in the door trim. The layout diagram is included with the speaker kit. Having understood the intricacies of a particular model, you will have to slightly increase the plane of fastening of the tongues, since standard openings are larger.
Speakers on the rear parcel shelf of a car
Speakers with a diameter of 16 cm are most often easy to install, but sometimes the sizes do not match. In this case, it is necessary to adjust the metal opening allocated for installing the speaker using an electric jigsaw. After each adjustment, be sure to try on the column, as it is very important not to overdo it in this matter.
After successful installation, you will need to connect power and check the functionality of the speaker. Then you can install the door trim back. A protective grille is placed over the column, which must be secured with self-tapping bolts.
Choose speakers with a flat surface. Otherwise, they will interfere with looking into the glove compartment; to do this, you will have to open the front right door every time.
Review of modern car radios
The variety of car radios is great, and it is becoming increasingly difficult to choose. The perfect choice of car radio depends entirely on certain rules. First of all, you need to make sure that the car has a special connector for this type of equipment. If there is one, you need to determine its size and only then go shopping.
Next, the driver must familiarize himself with the functions of modern equipment: the ability to reproduce audio recordings, receive radio signals, and broadcast television programs. The latter is not welcomed by car enthusiasts, since there is no full opportunity to watch TV while driving, and the signal quality leaves much to be desired.
Most modern car radios have additional functions: reading information from a flash drive, connecting a laptop and other gadgets, bluetooth, navigation, remote control and much more. Therefore, when buying a radio, you can not only get the opportunity to enjoy your favorite music on the road, but also many useful and interesting functions.
The car radio is the main element of a car's stereo system; the sound quality depends on it. The subwoofer will provide surround sound. It must be selected in accordance with the desires and requirements for the quality of music reproduction. All devices are divided into two types: 1 din radio tape recorders with a height of 50 mm and 2 din radio tape recorders with a height of 100 mm. This or that model is selected taking into account the opening on the car control panel. In this case, an adapter frame will help in installing the radio.
The power of car radios depends on the indicators declared by the manufacturer. The higher the rated power, the better the sound. Control occurs from the panel on which the buttons to press are located. An addition may be an FM tuner that can automatically search for radio waves. Using a removable car radio means regularly checking its fastenings.
Other features of standard multimedia
The general feelings of owners who have a standard radio in their car are positive. The display is informative and easy to read. The touch keyboard functions flawlessly. The standard radio itself is capable of high-quality reproduction of sound programs from micro-SD cards. However, using USB format media can be challenging.
The device also has some nice options:
- equalizer;
- activated replay mode;
- random sequence of playing tracks (“Random”).
Multimedia LADA Granta is capable of supporting images in 5 formats, which allows you to view photos without any problems. But not everyone can make the correct settings for the “phone” option on the first try. This function will be convenient for a busy owner who is forced to communicate by telephone even while on the road.
The standard speakers of the LADA Granta disappoint many, since even at a 45 percent volume level they emit wheezing, characteristic of bass overload. Some timid music lovers are alarmed by volume jumps when switching to “radio” mode.
Here is a list of shortcomings that provoked many Grantavods to purchase an alternative version of the radio. Today, the progressive version “2191” claims to replace the outdated standard device “2190”. The new device will please you:
- improved sound;
- interface for connecting with a rearview camera;
- navigation complex;
- integrated input for connecting a subwoofer.
Not every minimum configuration of a car today will please you with the presence of a standard radio. If, nevertheless, such a device is present in the database, it is far from a fact that it can please you with its informative interface and sound quality. If your version of the car has a push-button radio, then, as we found out from the article, installing a more modern radio, as well as the subsequent connection of the radio, is not a difficult matter, the main thing is to approach everything correctly.
The LADA Granta model also did not acquire the role of an exception in this list. After all, the trend of a modern car suggests the owner’s ability to carry out exciting measures to improve and tune his “iron horse,” and you shouldn’t be upset, because a push-button radio is easily replaced with a modern one.
Many motorists face the problem of removing the radio in their car. Some people cannot remove the standard device installed at the factory, others inherited the music along with the car, and others simply lost special keys. There are also plenty of reasons for dismantling - from repairing wiring to buying a new stereo system. Hence the demand for information arose on how and with what help you can carefully remove the car radio without damaging the plastic of the front panel. And although the operation is primitively simple and can be easily performed with improvised means, there are pitfalls in it that you need to be aware of.
Functions and installation 2 din
2 din differs from a stamped radio in the type of size. This designation conveys information to the owner about the dimensions of 178×50×180 mm. This device cannot be installed in any car. This radio has a sufficient number of functions:
- combined amplifiers increase signal reception several times;
- radio search is simplified due to the permissibility of viewing existing files or folders;
- the router map is calculated in the integrated radio navigator;
- with the help of shock protection, the service life is increased;
- access to interesting programs from radio stations in the FM and AM bands;
- enhanced low frequencies in music;
- Music Zone made it possible to switch the listening frequency while in the car;
- ability to connect external drives using a USB connector.
The development of digital technologies at the highest level is used in modern cars. But the size of a 1 din radio has a fit in any car, which cannot be said about a 2 din one. AvtoVAZ is mass selling the improved Lada car. The front-wheel drive sedan is recognized by many car enthusiasts in our country because it has an excellent combination of cost and quality. The modest configuration of the Lada Grant does not include some car devices, including a radio.
Dismantling a standard music center
The general feelings of owners who have a standard radio in their car are positive. The display is informative and easy to read. The touch keyboard functions flawlessly. The standard radio itself is capable of high-quality reproduction of sound programs from micro-SD cards. However, using USB format media can be challenging.
The device also has some nice options:
- equalizer;
- activated replay mode;
- random sequence of playing tracks (“Random”).
The standard speakers of the LADA Granta disappoint many, since even at a 45 percent volume level they emit wheezing, characteristic of bass overload. Some timid music lovers are alarmed by volume jumps when switching to “radio” mode.
Here is a list of shortcomings that provoked many Grantavods to purchase an alternative version of the radio. Today, the progressive version “2191” claims to replace the outdated standard device “2190”. The new device will please you:
- improved sound;
- interface for connecting with a rearview camera;
- navigation complex;
- integrated input for connecting a subwoofer.
Not every minimum configuration of a car today will please you with the presence of a standard radio. If, nevertheless, such a device is present in the database, it is far from a fact that it can please you with its informative interface and sound quality. If your version of the car has a push-button radio, then, as we found out from the article, installing a more modern radio, as well as the subsequent connection of the radio, is not a difficult matter, the main thing is to approach everything correctly.
The LADA Granta model also did not acquire the role of an exception in this list. After all, the trend of a modern car suggests the owner’s ability to carry out exciting measures to improve and tune his “iron horse,” and you shouldn’t be upset, because a push-button radio is easily replaced with a modern one.
Many motorists face the problem of removing the radio in their car. Some people cannot remove the standard device installed at the factory, others inherited the music along with the car, and others simply lost special keys. There are also plenty of reasons for dismantling - from repairing wiring to buying a new stereo system.
Often, standard head units (aka radios) are removed using the method described above, since they are attached to 2 or 4 clips. For example, the factory player on a Lada Priora car is held on by two latches, and to unlock them, thin steel strips must be inserted between pairs of radio channel switching buttons “2” - “3” and “5” - “6”.
To remove car radios that are fastened with screws, you need to prepare a simple set of tools:
- thin flat screwdriver or knife;
- Phillips screwdriver;
- set of small sockets (from 6 to 10 mm).
With this mounting option, the factory turntable must be unscrewed using the heads
On different brands of cars, standard players can be mounted in different ways, but the principle is approximately the same: the device is screwed to brackets that are covered from the outside with a plastic lining. As an example, we propose to consider removing the radio on a Korean Hyundai Solaris car, performed in the following order:
- Use a flat-head screwdriver or knife to pry up the lower corner of the plastic decorative panel framing the stereo. Pull the edge and grab it with your hand.
- Gently pull it towards you and release the first latch, and then move around and unlock the rest.
- Holding the panel with both hands, remove it and, if necessary, disconnect the connectors located at the bottom.
- Unscrew the 4 mounting screws with a Phillips screwdriver and pull out the radio.