The standard radio for the Lada Granta model is an improved device, the design basis of which is the “Sirf Atlas” processor, supplied by the well-known. In addition to the presence of a radio receiver, the device is equipped with a large touch screen and has the ability to connect an external source via a video input by replacing the software and performing firmware. However, in the basic configuration of a domestic car there is only a push-button radio. Many owners are not happy with this fact and want to connect a more modern radio. This article will tell you how to install a radio.
Installing a radio on the Lada Granta
In a modern car, not only the engine and chassis are of decisive importance, which allows us to judge the comfort of movement.
At the time of the new era of multimedia technologies, it is becoming extremely important to provide the car with high-quality sound and image, providing the driver and passengers with a level of comfort that will allow them to fully enjoy the journey in the vehicle.
New creations of the Volga Automobile Plant make us talk about them as modern and high-tech vehicles, not deprived of the latest achievements of science and technology.
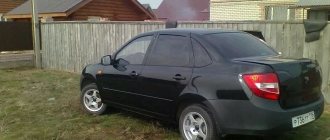
In particular, the Lada Granta leaves the impression of a completely European car. This is probably one of the first cars that came so close to the family of European-class cars, both in terms of quality and pricing.
Radio on Lada Granta: multimedia happiness
Owners of Lada Granta, having acquired a new car, want to bring everything in it to perfection: they do anti-corrosion treatment, install an alarm system, and tint the car. But there is one more procedure that every car enthusiast does when he acquires a brand new Granta - installing a radio on the Granta.
There is probably not a single person who does not like to listen to music, and doing it in your car is doubly pleasant.
This article will help all car enthusiasts who own such an attractive and reliable car to install a radio on a Lada Granta on their own, without resorting to the help of such expensive and sometimes unprofessional craftsmen. Moreover, the result of self-installation will be no worse than installation by a specialized service.
It should be said that the manufacturer significantly eased the fate of the owners of the Lada Granta car, since it took pity and initially installed all the necessary connecting wires to power the radio and the speakers themselves.
Compared to the “ten” and “twelve” families, whose owners were forced to carry out wiring procedures from start to finish, Lada Granta owners are freed from such a tedious and expensive manipulation.
Multimedia capabilities on buttons
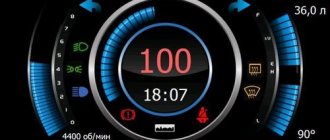
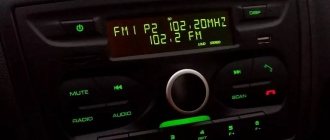
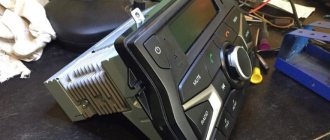
If we evaluate the Grant FL push-button radio according to the criteria of modern times, then although it is a basic design, without any frills it is quite a harmonious design for a rather modest salon interior. The build quality is without any complaints, without any gaps or backlashes. With green backlight.
In the left, and therefore in the part closest to the driver, there is:
- on/off button;
- CD card slot;
- multifunctional buttons – Radio and Audio.
Further down the center are:
- radio display;
- decoder washer;
- At the bottom there is a row of multifunction buttons.
On the right side of the audio system panel there are:
- telephone mode entry button;
- USB connection;
- Various multi-function buttons.
As for the USB connector, the following connections are possible:
- Flash card with memory up to 64GB;
- Flash player with 1024 GB RAM;
- HDD with FAT32;
- phone, however, only for charging.
To connect mobile devices using Bluetooth, including listening to music tracks, there is a special button with a picture of a handset.
In addition to Bluetooth, as expected from the name, the radio tape recorder has Handsfree functions, allowing you to use your phone hands-free. True, the instruction manual for the radio receiver and music file player contains a warning that some models of cellular devices cannot interact with this MMC.
As a summary, it should be said that the standard push-button multimedia Grants FL has, let’s say, the basic functions of musical accompaniment for trips in this car, especially for representatives of our garage community for whom buttons are more convenient than sensors.
What young drinking buddies in our community cannot come to terms with is because they need touch screens and high-quality sound of modern music tracks.
Dimensions of the radio for installation in a regular place
The niche where the Lada Granta radio is installed is located on the instrument console and is designed for a regular 1 DIN car radio.
Owners who want to install a 2-DIN car radio will have to resort to a trick and cut the partition up and adjust the console frame to the dimensions of the audio system. Although this is a little, it still complicates the life of a music lover.
Settings
After all operations have been completed, you should configure the new device and check the voltage in the on-board network. Many Grants suffer from current leaks or have a weak generator. With a powerful audio system, this can drain the battery quickly. Therefore, it is necessary to determine the cause of the leak and eliminate it. The generator may also require modification or replacement. Cars from the first years of production often have problems with this unit.
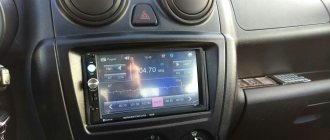
The 2 DIN audio system is distinguished not only by high sound quality and ease of use, but also often by advanced functionality. Often this is a full-fledged multimedia complex based on Android. In addition, the device allows you to connect an amplifier and subwoofer, as well as a rear view camera.
Also watch the video tutorial on installing a 2 DIN radio:
Find out what kind of lighting to install in your car from our article.
How to connect a radio to a Lada Granta: course of action
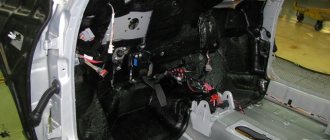
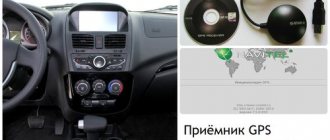
The very first manipulation that needs to be performed in order for the installation of the radio on the Granta to be successful with your own hands will be the dismantling of the plastic pocket installed in the place of the future audio system. This procedure is easy to perform by using a screwdriver that has a flat blade.
When removing the pocket, the driver will find that on the reverse side there are slots where ISO connectors are inserted - connectors for connecting a car radio. These connectors are held quite tightly in your pockets, which means you don’t have to look for them on the panel for a long time to connect all the connections.
Next, we remove the metal frame from the car radio and install it in the place where until recently there was a plastic pocket. Reliable fixation can be achieved by unbending the frame antennae.
The next step will be to connect the connectors to the car radio and install it in the frame already installed in the niche. When performing the installation, the installer will only need tools to change the shape of the holes (this could be a saw or a file). It should be taken into account that all sizes are already made in accordance with the housing standards for 1 DIN car radios.
Connecting Pioneer to the multifunction steering wheel
If you need to install a non-standard radio in a car with a multifunction steering wheel and not lose control from its buttons, use an adapter. They are universal and specialized for specific brands. Look in stores for an adapter for a multifunction steering wheel. Its connection is carried out as follows:
- disconnect the battery from the car’s on-board network;
- remove the standard radio and pockets, if any;
- find the ISO connector for connecting the car radio - the adapter will be installed in it;
- connect the adapter cable (supplied with it) to the radio, and the adapter itself to the ISO connector of the car;
- configure the steering wheel buttons;
- reconnect the battery to the network.
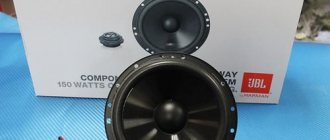
Installing speakers in the front doors on a Lada Granta
Installation of a multimedia system is not limited to installing a car radio. For normal operation of the entire audio system, it is also necessary to install acoustics and speakers in the doors of the Lada Granta. To cut holes in the plastic door trim, it is better to remove it from the car.
We remove the door handle, then dismantle the plastic casing of the door opening lever and the glass position adjustment lever.
The front door trim already has a hole for the speaker, equal to 16 cm. Next comes connecting the speaker and installing it in its original place using 4 screws, followed by installation of the door trim and installation of the speaker grille
Installation of an audio system on Granta of different configurations
In the “standard” configuration, Grant already has pre-installed power wiring harnesses, which are located in the console opening. The wires are connected exclusively to the car radio, so don’t be surprised if you can’t find them in the doorways.
In the Lada Granta Norma, the power wires coming from the console are already connected to the doorways. You just need to connect the sound system in full accordance with the assembly diagram. It often happens that the pre-installed door wiring does not match with some speaker connectors. Here we get out of the situation by purchasing additional suitable wires.
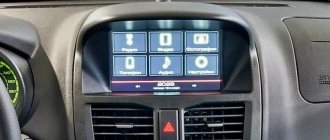
During assembly, the Lada Granta “luxury” is equipped with a special touchscreen multimedia system and already installed speakers. The improved radio is complemented by a Bluetooth system and a 5-inch display with a linear output.
Among other things, the built-in car radio allows you to connect a memory medium - a USB 2.0 flash card, through which you can listen to recorded music.
Possible problems and how to solve them
When using the radio, problems may occur due to connection errors. For example, the device will not turn on due to incorrect connection of the power circuits. If there is a fuse, it will blow if a short circuit occurs due to careless handling or connecting the power wires to the terminals of speakers or service devices.
To solve this problem, you should turn off the radio, remove it, inspect the wiring and check the connection according to the colors of the wires. The incorrectly connected wires are then disconnected and reconnected according to their intended purpose.
If after turning on the device there is no sound, then you should set the volume control to a position other than zero. If the radio suddenly turns off or an error message appears on the display, then there is a leak or short circuit in the speaker wiring. To deal with this problem, the integrity of the insulation and the location of the wires are checked. Damaged cables are replaced and moved away from hot and sharp objects.
Features of audio system installation
When connecting the audio system wiring, you should take into account some of the power supply features of this unit. This is provided in the car via red and yellow wires. The task of the first is to remember the audio system settings, and the task of the second wire is to turn off the radio, the process of which depends on the position of the ignition key.
The manufacturer recommends using a parallel method of connecting both wires; in this case, the audio system will only be turned off manually, and the ignition key will not influence the operation of the radio.
You can find many videos on the Internet where a radio is installed on a Grant video, but there is no universal option for installing an audio system on this car. Here, a lot depends on the equipment of the Grant, and the richer it is, the less headache it gives its owner with the installation of the radio.
Almost always, when a radio is installed in Grant, the installation is carried out with the negative terminal on the battery removed. Failure to comply with basic safety requirements can not only damage the acoustic equipment, but also significantly damage the entire electrical system of the car.
In such a matter as installing a Grant radio, haste cannot in any way contribute to a successful installation, because the stable operation of the audio system and the good mood of the driver who has decided to acquire car “music” depend on the quality of the installation and compliance with safety measures.
Connectors and their markings
So, in order to correctly connect a car multimedia system to a car battery or ignition switch at home, you first need to understand the connectors. Currently, most car radios are usually equipped with two standard outputs, marked with ISO symbols. Each of them has eight contacts equipped with a special key.
One of them consumes linear current in amperes, that is, a power circuit should be connected to it, which is a brown connecting element, marked as A. The second is intended for connecting music speakers, usually black wires are connected to it, and it is marked with the letter B.
Connecting the radio plug in a car
It should be noted that in some cars, in order to properly connect the power to the network, it is necessary to use non-standard connectors. But such elements are usually labeled the same, so there are several options here. The first is to simply cut off the old connector and connect the wires to it, then wrap them with electrical tape, but this option is less practical. The optimal solution would be to purchase a special adapter, with which you can correctly connect the system directly to the battery or through the ignition switch. Currently, you can purchase such a device without any problems, especially since the domestic market offers customers a huge assortment.