pros
Let's look at why disc brakes are better than drum brakes:
- Braking becomes more reliable, braking distance is reduced;
- Braking forces are distributed more evenly, given that the VAZ 2110 is a front-wheel drive car;
- There is an effect of faster response after pressing the pedal;
- Unsprung masses are reduced;
- Heat dissipation occurs better, which is especially important when driving on a mountain road or during active acceleration/braking. For this reason, the brake system is cooled better;
- Disk ones are much easier to dismantle and replace;
- There is no need to adjust the handbrake after each repair of the rear brakes, although this will have to be done the first time;
- They do not freeze in winter after washing, like drum ones;
- Rear disc brakes installed on the VAZ 2110 are much more convenient to control and promptly notice pad wear.
This article will help you replace the rear brake pads if they are worn out:
Adjustment
, a leak test procedure and, of course, bleeding are required .
But the work cannot be considered completed at this point, since the braking force needs to be adjusted.
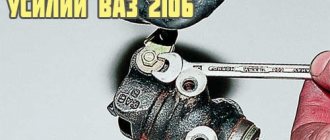
The efficiency of disc brakes is much higher than drum brakes, therefore the braking force regulator must be adjusted.
- This unit is located at the left wheel, fixed to the body and connected to the beam by means of a small traction.
- Loosen the fastening of the rod to the regulator (sorcerer), move it 2-4 millimeters back.
- In this position, the thrust is fixed.
- Such manipulations allow you to deceive the sorcerer. It will distribute less braking force to the rear brakes.
- Drive the car in favorable weather conditions for several days after replacing the brake system, brake carefully, and do not press hard on the pedal.
- Please note that “rolling” can have both a positive and negative effect on the behavior of the car. If the machine behaves well, then you have successfully replaced the drums with discs. If problems arise with the stability and balance of the brakes, it is advisable to entrust the adjustment to specialists from good service stations.
Minuses
Replacing brakes with disc brakes was not without the famous “fly in the ointment,” although it rather concerns precisely those problems that their installation can cause.
Firstly, our law enforcement agencies consider their installation on a VAZ 2110 as a design change.
What might this entail?
Following:
- Fine when passing a technical inspection;
- You can be simply wrong in a controversial accident if traffic police officers emphasize that you have “wrong” brakes;
- And the insurance company may also consider this a reason for non-payment of insurance.
Secondly, the handbrake will additionally need to be modified - or replaced with a hydraulic handbrake, although the latter weakens over time.
An article containing step-by-step instructions for replacing the handbrake cable can be found here:
Thirdly, it is necessary to refine or carefully adjust the sorcerer so that on the VAZ 2110 the rear wheels do not brake more than the front ones, as this will certainly cause a skid, especially on ice or wet asphalt. To do this, sometimes you even have to grind down the pads by a quarter, or even more.
Determination of breakdowns of the GTZ VAZ-2110
You can determine the faulty part yourself; to do this, you just need to know what to look for:
- Leaks in the brake fluid on the vacuum booster at the junction with the main brake cylinder indicate that the cuff in the cylinder is worn out.
Leaks on the vacuum booster indicate wear on the seal in the cylinder.
In any case, you need to determine for yourself whether it’s worth bothering with disassembling the GTZ and repairing it or immediately installing a new part.
Is it worth buying a repair kit and is it profitable?
Buying a repair kit can save the money spent several times, but it will increase the time costs.
Based on the cost of the GTZ at 1,000 rubles, you need to think carefully about whether it is worth disassembling the brake cylinder for such a sum. Repair kits can be incomplete or complete. In any case, you need to purchase a complete one, since no one will measure the forces on the return springs.
You can also repair the brake master cylinder yourself.
An attempt to save money will result in a long procedure of disassembling, washing and drying all parts. When washing, you need to make sure that no gasoline or oil gets on the rubber parts, as this can damage them.
Therefore, the use of a repair kit can only be justified in the following cases:
- The assembled part is not available for sale.
- Inability to allocate 1,000 rubles for a purchase.
- The desire to understand the brake system with your own hands from beginning to end.
In other cases, it is better to immediately install the assembled part.
Design Features
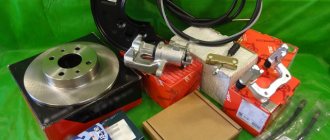
It is better to purchase rear disc brakes as a complete set. The VAZ 2110 fits 13 or 14 inch brake discs (ventilated or non-ventilated). Try to purchase certified discs so that they do not have to be modified.
Rear disc brake kit with necessary components
You also need a caliper, which comes in three types, so you need to select it to match the disc. The caliper comes with a hose and brake pads. The kit includes a universal clamp suitable for all calipers - a faceplate.
Selecting disc brakes
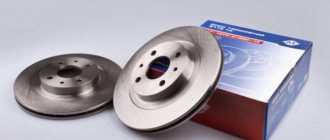
Discs
You yourself understand that it is stupid to skimp on brakes, at least from the point of view of your own safety. It is also recommended to purchase ventilated discs. Additionally, it can be equipped with the option of ABS or hydraulic parking brake.
If you have not previously upgraded the brakes on the front wheels, then 13-inch discs are installed at the rear. If the front wheels are larger in size than the standard ones, then choose the rear ones 1 inch smaller.
Don't forget the importance of the caliper, which is available in three versions. It is selected according to the disk. The caliper comes with a brake pad and hose. Plus, each kit includes a faceplate. This is a universal clamp that will fit any type of caliper.
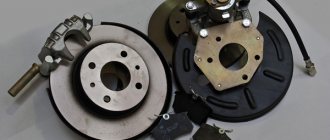
Dismantling
Before installing disc brakes, you need to dismantle the old rear brake mechanisms of the VAZ 2110.
This is done like this:
- Remove the wheel;
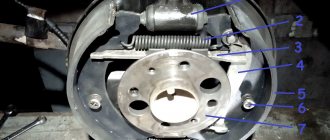
- Remove the brake drum;
- Remove the pads;
- Remove the hub from the wheel, having first unscrewed the brake pipe.
You should prepare for the fact that dismantling will not be easy. Not only do the brakes have the unpleasant tendency to stick during operation, but the bolts are also “welded” by corrosion. Therefore, it is advisable to treat the nuts and bolts themselves with a special agent (for example WD 40) so as not to tear off their edges.
It is important to plug the removed pipe with something so that brake fluid does not leak out and air is not sucked into the system. After that, knock down the hub. This works best if you attach a board or lath to the back of the support disk and hit it with a hammer, moving the blows: one from below, the other from above. This will prevent you from causing serious damage to the disk.
Parking brake system drive
The mechanically actuated parking brake system acts on the brake mechanisms of the rear wheels. The parking brake drive consists of lever 2, adjusting rod 4, equalizer 5, cable 8, lever 10 (see Fig. Rear wheel brake mechanism), manual pad drive and expansion bar 8.
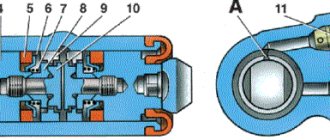
1 – protective cap; 2 – sensor housing; 3 – sensor base; 4 – sealing ring; 5 – clamping ring; 6 – reflector; 7 – pusher; 8 – bushing; 9 – float; 10 – fixed contacts; 11 – moving contact
Mechanical brake fluid emergency level sensor. The sensor body 2 with a seal 4 and the base 3 with a reflector 6 are pressed by a clamping ring 5 to the end of the tank neck.
A pusher 7 passes through the hole in the base, connected to the float 9 by means of a sleeve 8. There is a moving contact 11 on the pusher, and fixed contacts 10 are located on the sensor body. The contact cavity is sealed with a protective cap 1. When the level of brake fluid in the reservoir drops to the maximum permissible, the moveable the contact moves down onto the fixed contacts and closes the circuit of the hazard warning lamp on the instrument panel.
Installation
It's time to install disc brakes instead of the removed rear drum brakes.
Having knocked off the hub, we will put it back, but in a different way:
- It should be installed through the plate into which the caliper is already mounted. Carefully ensure that all holes line up. Particular attention to alignment;
- Next, use a hammer to straighten the corner of the beam so that the caliper does not rest against it;
- Now you can put the brake disc on the hub, placing spacers between these parts, and secure the disc with a bracket;
- We install brake pads from VAZ 2110;
- First, carefully and securely attach the brake hose to the caliper, and then to the tube;
- To reduce the braking force of the rear brakes compared to the front, you need to partially grind off the friction material of the pads.
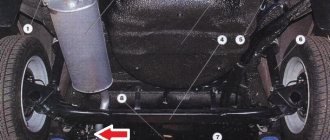
Rear beam
Grindable tab on the hub
Grindable tab on the hub
Grindable tab on the hub
Grindable tab on the hub
Grindable tab on the hub
Axle with dumbass
Adjustment plate on axle with hub
Hub installation
Grind down the corner of the beam that prevents the caliper from getting into place
Installing the brake disc using 2 washers and attaching the caliper to the special. plate
Rear disc brakes installed
Examination
Having carried out all the above operations - first on one wheel, and then on the second, you also need to check the system for leaks. The first phase is to simply press the pedal.
The fact that everything is done normally is indicated by the fact that the pedal is pressed with force, quite tightly.
But this is not enough. Have someone else press the brake pedal while you try to rotate the parts that make up your new rear disc brakes.
If nothing moves, it means that your VAZ 2110 now has new rear disc brake systems - better and more reliable than the previous ones.
To minimize the braking distance, it is recommended to install a vacuum booster. Details: https://vazweb.ru/desyatka/tormoza/vakuumnyi-usilitel-tormozov.html
Bleeding and adjustment
After any manipulations with the brake system (it doesn’t matter whether you repaired the rear, front or parking), on a VAZ 2110 it is vitally important to bleed the brakes so that an air plug does not form anywhere in them, which can negate the ability to brake at the right moment.
It is convenient to do this together, but you can do it yourself, although this requires some additional equipment. Many people know how to bleed the brakes on a VAZ 2110. The main thing is not to forget to do this diagonally, always starting with the front wheels, and pump the right one first.
After bleeding, you still need to check the braking forces. This requires an outside observer. You accelerate and brake sharply, and he watches as the brakes apply. The front ones should work first, then (with a small gap) the rear ones, and the braking force should be greater for the front ones.