Review of offers of alternative (tuned) optics for VAZ 2110-2112 from ProSport and Hella
It’s worth mentioning right away that such exotics are quite expensive.
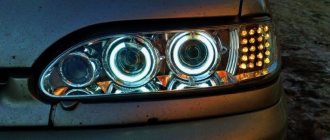
On average, this kind of offer will cost 2 or 3 times more than the original optics. But all this pays off with the many design delights and sophistication of tuning offered. With alternative headlights from ProSport and Hella, your VAZ 2110 (2112) will look truly impressive and expressive. Hella 2110 headlights
The problem is that this kind of optics on the VAZ 2110 often does not have better lighting characteristics and does not guarantee high reliability. Therefore, such headlights for the VAZ 2110 (2112) are good only from an aesthetic point of view. The headlights from the ProSport Aggressor and Hella series have proven themselves best in terms of durability.
If you like the idea of installing tuned optics on your VAZ 2110 (2112), you should also take into account the fact that it is compatible with different modifications of the car. For example, the optics on the VAZ 2112 from ProSport are not installed on coupe-type bodies, and the ProSport series is not suitable for the VAZ 2110 M series.
ProSport Aggressor headlights
Due to the highly controversial advantages of alternative optics on VAZ 2110-2112 cars and its high price, most motorists do not consider purchasing ready-made headlight modifications, preferring to independently tune the original VAZ lighting equipment. In this regard, undoubtedly, TM Kirzhach headlights remain the leader.
Alternative option
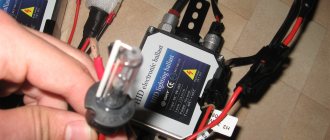
If the driver of a VAZ 2110 car seems that simple Kirzhach headlights do not provide good road lighting, then a bi-xenon module can be installed in them if desired.
The Kirzhach headlight module and the bi-xenon module are not very different, but this will not be an obstacle to replacing them.
Installing a bi-xenon module consists of several stages:
Installation of xenon lamps is very simple, because it occurs without changing the wiring. After the alteration, the lighting will be completely different from what it was before. After changing the modules, the ignition unit is attached to any point, there are many places for this, it is installed anywhere at the driver’s request.
Afterwards, everything is put back in its place and the glow at night is checked in practice.
After modernization, modifications and various alterations, at the request of the driver, the Kirzhach headlight must be mounted back on the VAZ 2110 using a sealant or a special construction sealant.
My headlights “decided to live a long time” As everyone knows, lens headlights don’t shine a damn thing on the tenth family. And mine were probably worse than the dimensions, and out of anger I shoved the xenon into the far one! after which everyone started blinking and swearing)))) And then a friend fitted me with lensed headlights and I decided to finish them a little for our “conscientious” AvtoVAZ drivers.
1. Zoomed in on the lens in the lamp
2. I made two new straight curtains from polish covers with a shelf of 1mm, so I removed the “graph”, anyone in the know will understand
3. I covered the curtains with foil for better light diffusion
The headlights are still undergoing modifications, but I connected the lenses this way and checked that they shine many times better than the standard ones. Plans to paint the glitter ) around the reflectors black and push the LED strip in place of the light bulb size!
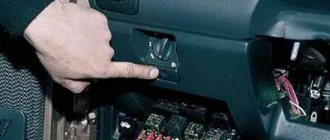
Replacing hydraulic corrector VAZ-2110
There shouldn’t be any difficulties during replacement; we only need standard tools for the job, and we can change the hydraulic corrector even in the field.
Let's get started:
- Open the hood, loosen the clamps, and release the hydraulic drive line pipes.
- Remove the working cylinders by releasing the clamps using a flat-head screwdriver.
Open the hood and remove the actuator cylinders from the inside of the headlights.
As you can see, replacing the system is not at all difficult and it will not take much time. But the new hydraulic corrector will only work for a year or two, after which the operation will have to be repeated. By the way, there are electric headlight levelers on the market (from 3.6 thousand rubles) and electromechanical automatic ones (from 6–8 thousand). Their service life is much longer, and the adjustment accuracy is better than that of a hydraulic system.
Good luck with your choice and bright, accurate headlights on night roads!
Glass
The simplest reasons are most likely.
Dirty headlights reduce illumination by 50%. Cleaning them with a dry cloth is not a good idea. This approach will also scratch the glass, which will make their dim glow permanent over time. If you don't want to wash your headlights by hand regularly, use a washing machine. For ten, by the way, the unity of the Volga is ideal. Moreover, the installation is quite simple and can be done independently.
The glass could break. If you notice a crack in the surface, you will need to remove the projector and replace it with a new one.
If your car is already running, the glass may become dull over time. Being in the first rows when driving, dust, grains of sand and small debris falling on the headlight at speed leave microscopic scratches on the glass. Most of them are so small that they cannot even be visualized, but at the same time they refract and scatter light like a prism. The glass will need to be replaced; and so that the next replacement can go as far as possible, you can cover it with a protective film on top.
Let's talk about remodeling
For those who decide to upgrade their lighting, products from the Kirzhach brand are the most suitable option. They allow several modification options, and there is also the possibility of installing xenon. Thanks to such modifications, the efficiency of the headlight and its light output increases. Having the skills to work with various plumbing tools, you can perform such alterations yourself.
In order to begin upgrading these products, you must first remove the headlights from the car. Next, you will need to completely disassemble the removed optical elements. First of all, you need to carefully separate the glass from the headlight housing. It is attached to the body using a special sealant
This work must be done carefully so as not to damage the glass, otherwise you will have to buy a new one
➤ Adjusting headlights on the Lada Granta - description of the process
The factory adjustment of the headlights on the Lada Granta is not ideal; owners often independently adjust the optics to “their needs.”
The adjustment process is not complicated, every driver can do it. If you don't have time, contact the service center for assistance.
Why does the headlight adjustment go wrong?
Poor quality assembly of components, insufficient fixation with fasteners;
- Manufacturing defect;
- Due to damage, the headlight range control does not work;
- Violation of operating conditions;
- Inconsistency in temperature conditions, as a result of which the reflector, base, and mounting socket are destroyed and deformed;
- Negative consequences of an accident, impact, collision;
- Wear of springs, front / rear struts, ground clearance decreases, the car body leans forward.
The given list of reasons why headlight adjustment is impossible is exhaustive.
Procedure for adjusting the headlights of a Lada Granta with your own hands
Tool preparation: screwdriver, hexagon.
- Installation of the machine within the perimeter of the repair area, on a flat platform.
- Checking the tire pressure, the presence of a spare tire in the trunk, the weight of the load on the driver's seat is 75.0 kg.
- Adjustment / correction of the light beam at a distance of no more than 3.0 meters from the wall.
- Check the illumination angle of each headlight one by one.
- Completion of work, testing for serviceability and accuracy of lighting.
The lighting system on the Lada Granta (liftback) is completely identical to that of Kalina, Priora, Vesta. The turn signal, high beam, and daytime running lights (hereinafter referred to as DRLs) are located together in one module.
Each lamp is placed in a separate socket with the possibility of autonomous adjustment using a hydraulic cylinder. The headlights are adjusted using two hexagonal screws:
- the top one is responsible for the horizontal position of the light beam,
- bottom for vertical.
Preparation and adjustment of headlights in accordance with GOST
Adjustment scheme
- We first check the tire pressure, place a load (75.0 kg) on the front seat, squeeze the parking brake lever;
- On the wall (obstacle) we draw a horizontal line at a distance of 550 mm. from the earth. This will be the level of visibility of the driver’s pupils at a distance of three meters from the front bumper;
- We draw a line perpendicularly passing through the center of the light beam for each of the headlights: line 1 and 2.
- A vertical line is drawn down the center.
Adjusting and adjusting the headlight manually
- We measure the distance of lines 1 and 2, they should be equal. For the objectivity of the data, let’s rock the side of the car and check the accuracy of the beam accuracy restoration, simulating a road bump;
- Using the hydraulic corrector, we complete the headlight height adjustment. Initially, set the lever to position “0”. Experts recommend setting up each of the headlights separately, after covering the inactive one with an opaque material;
- Adjusting the low beam headlights on the Lada Granta is considered complete when the light spots on the wall completely coincide with the horizontal line;
- If necessary, repeat the setup process again.
We improve the quality of work done
In order to increase the efficiency of roadway lighting, we check body elements for defects, damage, and deformation. By ignoring the curvatures on the body, it is impossible to achieve maximum concentration of the light beam.
We check the integrity of the headlight glass and the tightness of the sealing elements. There is dust and dirt inside the optics module - a sign of poor sealing. Replace the rubber seal, update the silicone sealant.
Long-term operation of the machine on rough terrain or unpaved surfaces leads to damage and scratches on the optics. It is not at all necessary to change the headlights; it is enough to carefully polish them with special means.
If the reflector or mirror surface is damaged, unconditional replacement of the optics. Such a defect cannot be restored.
Installation of lamps strictly in accordance with catalog articles. Purchasing components other than factory ones does not guarantee the quality of lighting or service life.
Let's talk about remodeling
For those who decide to upgrade their lighting, products from the Kirzhach brand are the most suitable option. They allow several modification options, and there is also the possibility of installing xenon. Thanks to such modifications, the efficiency of the headlight and its light output increases. Having the skills to work with various plumbing tools, you can perform such alterations yourself.
In order to begin upgrading these products, you must first remove the headlights from the car. Next, you will need to completely disassemble the removed optical elements. First of all, you need to carefully separate the glass from the headlight housing. It is attached to the body using a special sealant
This work must be done carefully so as not to damage the glass, otherwise you will have to buy a new one
Disassembling headlights
Before you start modifying the headlights in a VAZ 2110 car, you need to perform the following simple steps:
Their removal and disassembly
Using a utility knife, the glass is carefully removed from the headlight, and since it is secured using a special sealant, extreme caution is required so as not to break it. But if it breaks, then this is not a problem, you can buy it separately; Next, the reflector is removed, unscrewing several bolts. The next step is to remove all the wires from the back of the headlight and the spring from the place where the hydraulic corrector is inserted, and only then is it possible to remove the frame with the module itself from the headlight housing. Remove the low beam module using a screwdriver and disassemble it completely.
In order to make the glow better, they are refined, which includes the following steps:
- Shifting the lens closer to the reflector;
- Modernization of curtains;
- Changing the shape of the reflector.
These are the main stages that will ultimately lead to the complete modernization of Kirzhach headlights on a VAZ 2110 car. Now it is necessary to consider each individual stage.
Lens in the headlight of Kirzhach VAZ 2110
Shifting the lens closer to the reflector
The alteration begins with shifting the lens to reduce the area of the lens onto which the light flux falls. As a result, the curvature of the lens will also become smaller.
- Disassembling the module and removing the lens from it. Carefully mark the cut at the intended location of the module. It is imperative to ensure that the lens curtain does not move from its place, but remains at a distance of 50 mm due to the focal length of the lens;
- Cut off the lens at the marked location and attach it to the module. It is attached using the cuts that were made earlier, but the module itself will become shorter. The main thing in all this is that the closer the lens is, the more heating will occur due to its small area. In order not to miss the distance, the most optimal would be to approximate the lens by 10 mm.
Carrying out modernization of curtains
To carry out modernization and modification at the highest level, good and high-quality light distribution is done. The curtain is made straighter so that the light does not blind passing drivers driving in front of the VAZ 2110 into the rear mirrors. This type of curtain was developed according to the European GOST standard and is very successful.
To do this, you will need cardboard from which the curtain template will be made. The prepared cardboard template is transferred to a plate of metal material. To cut it out, metal scissors are used and the finished curtain is attached to the module. Also, if desired, it can be wrapped in foil to provide better light dispersion; it can also be used to install fog lights.
Under the lens on the module body, the edges are cut off. If they are cut correctly (no more than one millimeter along the ring), then the edge of the ring will not interfere with the correct flow of light.
Changing the reflector shape
If you want to change the width of the light output without changing its height, then you can change the shape of the reflectors yourself. By the way, on imported cars the reflectors have an oval shape, which is the best option.
Refining the headlights with a complete change in the shape of the reflector will help to significantly increase the width of the light beam. The reflector on a VAZ 2110 car has a standard round shape, and if you take it and press it to the floor, you can easily get an oval shape.
To reduce the cost of the reflector, it is made from ordinary sheet metal using an inexpensive cast method and therefore this material is very elastic and can be easily changed in shape.
Reflector in the headlight of Kirzhach VAZ 2110
To avoid cutting your hand, you should wear a glove. But you shouldn’t get too carried away, since there are certain standards for the width, which should be 93.2 mm in the flattened part. If this standard is not maintained, then the light beam will have a deformed feed shape. Therefore, when changing the shape of the reflector, efforts are applied little by little, controlling the change in size. So that when installing the reflector, all the fasteners coincide, they are also made oval in shape, as is the reflector fastening itself.
These changes, simple in their technology, will allow you to easily and without additional costs upgrade the Kirzhach headlights on a VAZ 2110. But the main thing is that all the changes made are not certified and fall entirely on the responsible shoulders of the driver.
After upgrading the headlights, it is imperative to adjust the VAZ 2110 headlights.
How to move the lens?
This operation is carried out to move the lens to reduce its area that receives illumination from the lamp. This achieves a decrease in the curvature of the lens. This can be done this way:
- It is necessary to completely disassemble the module and remove the lenses from it. Cuttings must be made at the proposed new location for installing the module. At this time, it is necessary to carefully monitor the position of the curtain; it should always be at a distance of 50 mm;
- In the marked place, you need to saw off the module and strengthen the lens; for this, previously made cuts are used, and the module becomes somewhat shorter. It is important to take this point into account; the lens heats up, so the optimal approximation size will be 10 mm.
How can you improve your headlights yourself?
Only when the luminous flux
adjusted, with slight modifications you can improve the headlight illumination on your own car without the help of others. First the headlight
is removed, and improvement is carried out in this order:
- The protective glass is removed. To make it easier to remove the protection, it is recommended to heat the glass using a regular hair dryer for this purpose. A warm air flow will warm up the sealant, after which the panel, of course, can be easily separated from the headlight using a sharp knife;
- carefully remove the reflective gasket;
- When using the appropriate tool, it is necessary to move the lens approximately 15 mm towards the reflector or slightly shorten the modular ring on a lathe.
Such actions will help not only improve the light of the headlights, but also increase the luminous flux and make it much wider. Both adjusting the headlights and improving the luminous flux, as you can see, is a fairly common process that is available to every car enthusiast.
Reflector
If your glasses are fine, a loose reflector may be causing the dim light. No matter how powerful a lamp you screw into the projector, you will not get the light brightness you want. In most foreign cars, in this case, you will have to completely change the headlight; On a VAZ you can only replace the reflector. Moreover, the procedure is very simple:
- The optical group is disassembled with the battery disconnected;
- The glass is removed from it. It is placed on a sealant, which is softened when heated with a construction hairdryer. The glass is then pushed and carefully removed;
- One light bulb is unscrewed;
- The shabby reflector is disassembled, a new one is installed, and the headlight is reassembled in the reverse order.
Before installing the glass, do not forget to clean both it and the body of the old sealant and degrease it before applying a new layer.
Voltage problems: Particularly common in cars with halogen lamps. No voltage may be caused by a faulty alternator or oxidation/broken contact. Normal light is emitted at a voltage of 13.8-14.2V, the same should be at the ends of a working lamp. No more than 0.2-0.3 V drop on it is allowed at a rotation speed of 2000 rpm.
A lower voltage indicates poor contact in the circuit. It is necessary to identify and eliminate the defect; Installing more powerful lamps before repair is strictly prohibited - this can lead to overheating and even fire of the faulty contact point.
High-quality and complete modification of Kirzhach headlights on a VAZ 2110
Experienced drivers have repeatedly noticed that the luminous flux on a VAZ car has poor lighting, but they would like it to be brighter and wider. This can be corrected by refining and improving the headlights of the Kirzhach VAZ 2110. Their effectiveness lies in a convenient design that allows for modification and modernization, as a result of which the glow will improve many times over.
Left headlight Kirzhach for VAZ 2110 assembled
Today, the automotive market is filled with lighting equipment from various manufacturers, with the help of which you can not only improve the illumination of the roadway, but also transform the appearance of the car thanks to their updated appearance. Most owners choose products from two companies. This is domestic, Kirzhach optics from this company receives good reviews, and German branded from Bosch.
No one can say for sure which one is better, but some features of these products should be mentioned. The optics are expensive, but have a built-in lens for the low beam lamp. Its presence allows you to focus the light flux, which means improving your visibility of the roadway. These headlights lend themselves well to numerous tuning options. Also for these products there is a legal installation of xenon.
If, to improve illumination, we take original products from Bosch as a basis, then it does not have all of the above features and advantages. Manufacturers do not produce modifications of these products, but their price is somewhat lower than domestic products. Bosch optics are more susceptible to contamination, since their glazing area is larger than that of a domestic headlight.
Adjusting the luminous flux
In order for the VAZ 2110 to be driven comfortably, all the rules of correct light supply must be followed so as not to blind oncoming drivers. There are special screws on the headlamp housing that are used to adjust the light supply.
When you turn the left screw, the angle of inclination of the optics changes vertically, respectively, turning the right screw changes the optics horizontally.
This material will help you install angel eyes on a VAZ 2110 yourself:
To correctly set the luminous flux, a horizontal line is drawn from the ground to the center of the headlights and another similar horizontal line is drawn 65 cm below it. After all the preparation has been completed, you can proceed directly to the adjustment:
- the right headlight of the car is covered with cardboard paper and the low beam is turned on;
- Using the adjusting screws, the center of the light beam of the left headlight is set, which is done in the same way with the right one.
We install “foglights” with our own hands
Fog lights are a very useful attribute of every car when you need to drive in bad weather conditions. These headlights on the presented model are provided in the “Lux” configuration. As a result, their installation falls entirely on the shoulders of the car owner.
First, decide where on the machine you want to install them. The best option is the bottom of the bumper. There are holes here where they will fit perfectly. Next, you should choose their type: with transparent or corrugated glass. The first ones shine with spots, so it is better to refuse them. The second option perfectly diffuses light, illuminating the entire surface of the road. Next, you need to purchase frames for them, a set of wires, a relay and a power button. Route the wires that are located in the dashboard directly into the engine compartment. Connect the wires to the connectors on the headlights and insulate them well with electrical tape. Next, install the headlights in the frames and secure them firmly in the appropriate place on the bumper. Connect the wires. If you need the headlights to be turned on from a button, then you need to install it in the gap of the corresponding power wire. When the work is completed, adjust the headlights.
Problems with the generator - the light dims due to lack of voltage
Many car owners drive with poor lighting and do not even suspect that the culprit is not the lamps or the headlights themselves, but the electrical circuit in the car. The first step is to check the generator, which produces a certain voltage during the trip and is the main source of electricity after the engine has been started. If the generator does not work well and does not produce the required voltage, the following troubles are possible:
- all elements of electricity consumption will not work very well, many may not turn on at all due to the lack of normal network operating conditions in the car;
- instead of the required 12V, 8-9V is supplied to the headlights at a constant network load, this can be checked by turning on the headlights with the engine off (if the light is normal, the generator is to blame);
- Also, if the generator malfunctions, fuel consumption increases, since the computer increases engine speed in order to obtain a more or less normal voltage in the network;
- Also, the poor quality of the generator is due to the fact that when you press the gas pedal, all lighting elements, as well as fans and other electrical appliances, begin to work better.
If your car has a non-original generator, the most logical solution would be to install a factory version of this device. Often, for various modifications, the plant offers a more powerful version of the generator. This is an excellent solution, but remember that it may somewhat spoil the impression of the machine. In particular, fuel consumption may increase. Otherwise, only native generators can seriously change the situation.
We repair the light fixture without disassembling it
You can snap the ball into place without removing the glass, through the holes of the light bulbs on the back side of the illuminator:
- We drill a hole exactly opposite the latch at the top of the headlight;
- Insert a screwdriver into the hole;
- Attach the collet to the corrector ball;
- We seal the hole we drilled;
- We attach a hinged loop from a furniture cabinet (hinges 5-6 centimeters long, with mounting holes and a cutout on top on which it is attached) to each broken corrector unit;
- We insert the canopy into the slot of the adjustment screw;
- We move the screw so that the slot is in a narrow place of the canopy;
- Holding the canopy, unscrew the screw until it stops with force. This is how the canopy is fixed, which needs to be placed in a horizontal position;
- Using an electric drill, using a 3 mm drill, we make a hole in the base of the light where there is a hole on the canopy;
- We screw a shortened screw into the hole so that it does not reach the high beam reflector. This slot secures the adjustment screw securely; it can be broken again.
Video “Polishing optics with toothpaste”
How to polish the headlights on a “ten” with your own hands using toothpaste, see the video below (the author of the video is Dima Artist).
Do you have any questions? Specialists and readers of labavto.com will help you. Support the project - share the link, thank you! Rate the benefit of the article: Rate the author (vote(s), average: out of 5) Loading…
The most common cause of road accidents is poor visibility. Therefore, there is no need to explain why your headlights should be well adjusted. On foreign cars you can find adaptive light - this is when the headlights direct light depending on the angle of the car, load and other parameters.
The easiest way to adjust the headlights is at a service station. But we do everything with our own hands and don’t want to give away extra money. Therefore, in this article I will tell you how to adjust the headlights on a VAZ 2110. Before starting the adjustment, in order to avoid errors, you should check several things, namely:
- Check the headlights for dirt.
- Inspect the headlights for damage.
- Check tire pressure.
- You should be driving at a weight that is approximately equal to yours.
- We make the adjustment on a completely level place. In this case, there should be a wall opposite that stands at 90° to the site.
- The distance from the wall to the car is 5 m.
- Draw this design on the wall with chalk. Or draw this image on sheets of paper and stick them on the wall.
- We draw the first line parallel to the platform, the distance from the platform to the line should be equal to the distance from the platform to the top of the headlights.
- We draw the second line parallel to the previous one, 7.5 cm lower.
- We draw 2 lines, conditionally running along the center of the headlights. Let's call these lines A and B. They are parallel to each other and perpendicular to lines 1 and 2. Let's call their intersection points with line 2 E. The distance between these points is 936 mm.
- If your VAZ 2110 has a hydraulic corrector, then set it to position 1 and turn on the low beam headlights.
- Cover one of the headlights with something light-proof (cloth)
- We achieve the glow of the headlight beam along line 2. (Using the adjusting screw at the back of the headlight)
- Using the second screw, we achieve alignment of the break point of the light in the vertical boundary of the center of the headlights.
- Now cover this headlight with a cloth and adjust the second one in the same way as the first.
We see that there is nothing complicated and it doesn’t take long. But you will be sure that in the dark you will clearly see the road surface and will not blind oncoming drivers.
(votes: 1, average: 5.00 out of 5).
Tags: VAZ 2110/2111/2112Adjusting headlights Before purchasing, each driver needs to decide which VAZ 2110 low beam bulbs provide optimal brightness and have a compatible base.
Adjusting VAZ 2110 headlights with your own hands.
modification and tuning of headlights
| The headlight unit can be dismantled for repair, replacement with a new one, or for tuning or modification. In this article we will talk about the removal and disassembly of a VAZ headlight of the tenth family, depending on its manufacturer (Bosch or Kirzhach). |
| The better the roadside is illuminated, the safer driving becomes. Foreign cars have an “adaptive lighting when turning” option for this case, but Russian cars still lag behind foreign cars. You can improve the illumination of the edge of the road by swapping the fog lights and direction indicators. |
| To make your car attractive, replace the standard optics with alternative ones, for example, ProSport headlights. And if you want the car to be 100% unique, then do the ProSport headlight tuning yourself. |
| ProSport tuning is familiar to many; it is a wide range of parts not only for VAZ, but also for foreign cars. If we talk about ProSport headlights for the “ten”, then all the reviews fit into the “beautiful, but don’t shine” category. Let's try to figure out how to remake them with our own hands. |
| With the advent of LEDs and LED strips, the possibilities for car tuning have expanded significantly. A specific example is the installation of illumination of headlight lenses on a VAZ 2110. |
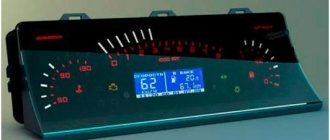
Do they shine or glow? To search for the truth, I decided to conduct comprehensive tests (due to my capabilities), the main example of which was a set of one of the most popular and interesting (in my opinion) headlights with an integrated turn signal - ProSport (ProSport). Naturally, to complete the picture, in the article this optics will have many competitors, but first things first.
| Many car owners notice that their car headlights sweat. This is an unpleasant situation, for which there may be several reasons. We are trying to figure out why the headlight fogged up and what to do in this case. |
The light of low and high beam headlights does not suit many drivers. In one case it is too dim, in another the headlights shine low. The last problem can be solved by a simple modification, which will take 5 minutes of time, but the effect will be amazing.
You have to adjust the headlight beam quite often, especially on station wagons, when the car trunk is heavily loaded and the light is directed into the eyes of oncoming drivers. If at one point you notice that the reflector has fallen and the light adjustment does not work, then you can try to repair the 2110 headlight yourself.
Imagine that you never use high beam headlights, then the useless parts of the headlight can be used as additional low beam. Let's figure out how to get rid of the high beams and install low beams in their place.
Model features
Experts assessed possible headlight options for VAZ according to several parameters:
- ensuring excellent visibility at night. At the same time, the light should not blind oncoming drivers. In this parameter, both Kirzhach and Bosch are approximately the same;
- features of reflectors. The German analogue of the headlight has reflectors for low and high beam, while the domestic one has a lens for low beam and a reflector for high beam. This ensured almost the same level of illumination during the tests. The lens, which is installed in the headlights of the Russian manufacturer, provides better brightness (helps create clear lines of light, and is also suitable for installing xenon optics). In addition, some drivers note that the illumination is not very high-quality when the low-beam headlights are on; the product, due to the reduced lighting area, does not have such a drawback.
Differences between the Kirzhach headlights
Another feature of the Kirzhach headlight is that it can be easily bought in city stores, because the sales market for such headlights is in Russia. This and other features of the headlight make it more attractive to VAZ 2110 drivers and determine a slightly higher price for components from this company.
Sometimes it happens that, having purchased new headlights from a Russian one for your VAZ, you notice that their glow is not very good. Inexperienced drivers may attribute this to a defect or poor quality of the purchased product.
However, most often the problem is in the usual setting of the headlights. It is advisable to adjust the new lighting components that you install in place of the optics you just removed.
To do this, you will need, in addition to the skill of a draftsman, a flat surface. But if you do not have the necessary skills and time, entrust the adjustment of the Kirzhach headlights to specialists.
Removing a headlight from a VAZ 2110
Phosphor headlight illumination
Everyone has heard about illuminating optics with LEDs, and have seen them more than once. In this photo report I want to talk about tuning with phosphor. What kind of powder is this, what properties does it have, where can you buy it, and is it really possible to tuning the headlights with a phosphor?