MD throttle tuning, myth or not?
| It is believed that the inventor of MD (Modern Throttle) tuning is the American engineer Ron Hutton. According to him, this modification of the throttle assembly allows you to change the state of the air flow (create turbulence), which allows you to increase engine power and reduce fuel consumption by up to 25%. Is it really? |
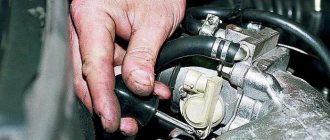
How to make MD throttle tuning with your own hands
Great accuracy does not play a role here.
The cutting depth should depend on the wall thickness, usually 2-3 mm (no more than 5 mm). To remove any burrs that have formed, you can use fine sandpaper. The process is not complicated and does not require ECU firmware. How to do MD tuning is shown in the video (watch from 8 min 46 sec):
If the tool is powerful enough, the work will not take more than 15 minutes. At service stations they charge from 7,000 rubles for such tuning of the throttle valve.
Reviews about MD tuning
After such modernization of the throttle assembly:
- + The gas pedal becomes more informative (more responsive).
- + Increase in power from 1000 to 3000 rpm.
- + Reduced fuel consumption.
- ─ Loss of elasticity.
To find out whether there is an effect from MD tuning, an experiment was carried out (look at the video above from 12 minutes 30 seconds):
- The car's tank was filled to maximum.
- We drove about 20 km by car.
- We filled the tank to the maximum (consumption was 2.01 liters).
- A modernized throttle assembly (diameter 46 mm) was installed.
- We drove the car along the same section of the road.
- We filled the tank to the maximum (gasoline consumption was 1.61 liters).
Thus, fuel savings amounted to about 20%. In addition, an increase in low-end power was noted.
If, after upgrading the throttle assembly, problems with idle speed appeared, then most likely the tightness of the closed throttle valve was broken (too large recesses were made).
What reviews can you leave about MD tuning?
Tuning by replacement
The standard valve (throttle assembly) usually has a diameter of 46 millimeters; many fans of various tunings decide to replace this part with an alternative one:
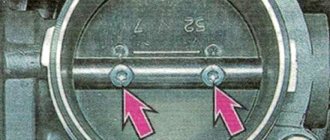
- VAZ 2112 throttle valve 52 has a larger diameter (there are also valves of 54 and 56 millimeters)
- Is there any benefit from such tuning?
- In various online stores they often offer to replace the standard 46 mm throttle body (DU) and install 52, 54 or 56 mm
- The product description says that an enlarged throttle body (also known as the throttle body) leads to a decrease in air flow speed, which improves the performance of the air intake system
- The effect of installing an alternative damper will be clearly visible when using a zero-resistance filter in the system
- We recommend installing a unit with a diameter of 52mm, because... the diameter of its air inlet for a standard receiver is 53mm
The valve is standard (standard) on the left and new (increased flow diameter) on the right
- In order to install a remote control of a different diameter, as a rule, nothing needs to be modified
- The maximum necessary action is a small trimming of the gasket (this is most often necessary when installing a 56mm throttle assembly)
The following positive effects are noticed after such an installation:
- The car becomes more agile
- Problems with idle speed disappear
- The gas pedal also becomes more responsive.
Installation disadvantages:
- Fuel consumption increases, although many believe that the BC gives incorrect readings and consumption does not change
- Some owners see the effect exclusively on 16-valve engines
The picture we described above may appear completely different:
- All the positive effect that many people notice when installing a larger diameter remote control usually appears because the old remote control already needed cleaning and naturally the motor was not working correctly
- After installing a (clean) new remote control, the engine starts working in its normal mode, this seems like a “new breath”
- In other words, all the described effects appear after regular cleaning of the remote control.
- And besides this, after replacing the remote control, with a larger diameter you will have new problems with the operation of the motor that did not exist before
- This is due to a violation of the ratio of gasoline and air, which the ECU is no longer able to correct.
- And instead of simply returning the remote control to the standard diameter, the owners are recommended to replace the firmware, the price of which is higher, but there is no point
- There is also an opinion that a remote control with a diameter of 52, 54 or 56 millimeters is a completely useless thing, and only installed in combination with other engine tunings produces a noticeable effect
- It remains unclear whether this effect is caused by remote control or other modifications to the engine
- After all, if on a turbo engine with a power of no more than 200 horsepower, standard 46mm dampers are left and their work is quite enough
Cleaning the throttle valve of a VAZ 2114
There are two cleaning methods: - Without removing the unit; — And accordingly with its dismantling.
Which method should I choose? It all depends on the degree of pollution. If the mileage has been up to 25 thousand since cleaning or replacing the throttle. Then, most likely, it is possible to limit ourselves to superficial cleaning and prevention without removing the part. In other cases, it is recommended to completely dismantle the unit for deep, thorough processing, cleaning and gaining access to hard-to-reach places.
We will describe in detail the process of complete removal after which the first option will not be difficult to complete. So, let's begin:
To begin, unscrew the cap of the expansion tank with antifreeze. This is necessary in order to “relieve” the pressure and avoid antifreeze leaking out of the hoses.
Next, we need to unscrew and loosen all the clamps that tighten the hoses attached to the throttle block. The same applies to the air pipe. To carry out the work, we will need a 13mm wrench or socket. After removing the clamps, we disconnect the hoses themselves. We disconnect the pipe from only one side and, for convenience, move it to the side.
Now remove the throttle cable from the throttle drive selector.
Turn off the power to the sensors.
Take the 13mm head, unscrew the two bolts and remove the throttle assembly. Remove the old gasket.
To treat contamination, you can use carburetor cleaner and a clean rag or rag. If the degree of contamination is very high, then you can use a toothbrush with hard bristles. Just before cleaning, disconnect the idle air control. Apply the product to the contaminated surface. Using progressive movements, remove carbon deposits from the metal surface. If you are not satisfied with the result, repeat the operation again until complete cleansing
It is very important to clean or blow out the channels that are in the product. A lot of dirt accumulates there
It is most convenient to carry out purging using compressed air. To do this, you can use a regular car pump. If the sensor socket and the sensor are clogged, be sure to clean them too. Do not forget to carefully clean the junction of the throttle assembly and its internal cavity. To do this, apply some cleaning product to a rag. Distribute evenly on the inner walls of the parts. Take a brush and clean the problem areas. After finishing the treatment, wipe the cleaned areas with a damp cloth and remove any remaining dirt. After washing the unit, it is recommended to clean and blow out the disconnected pipes. We expect a short amount of time. We install a new gasket at the junction of the throttle assembly. We attach and secure the knot in place. We connect the IAC sensor. We pull the hoses onto the fittings of the cooling system and connections to the adsorber. We put on the throttle body pipe. We fix the cable on the drive. Tighten the clamps of all attached elements. We connect the sensor chips. Close the cap of the expansion tank with coolant. We start the car and test its operation.
Cleaning the throttle valve VAZ 2114, 2115, 2110
The non-removal method is somewhat similar to the one we described earlier. The only difference is that we will only remove the air duct pipe and nothing else. The work steps are as follows: — Remove the pipe; — We repeat point number 10 of the previous method. — We connect and secure everything in the reverse order, not forgetting to replace the old gasket with a new one.
Keep in mind that this method is most suitable for preventative, light, superficial cleaning. If malfunctions or incorrect operation of the engine occur, use only the removal method. Now we know how to clean the throttle valve on a VAZ 2114 using two different methods, quickly and without much difficulty.
Helpful advice
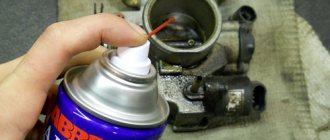
Please note that if you do not have a carburetor cleaner available, you can use other cleaning products, for example the well-known WD-40
Superficial intervention or deep cleaning?
There are two ways to clean the throttle valve.
The first is a superficial intervention that does not require complete removal of the entire device. And the second is a complete cleaning, which must be performed in cases where your car’s engine is not working well. To perform the first type of cleaning, you will need a pre-purchased cleaning product and a fine brush. Open the hood, remove the corrugation, it goes from the air filter housing to the throttle valve. You will see a valve - it is easy to recognize by its completely round shape. Treat it with a chemical and let it sit for a few minutes, then remove the dirt with a brush. If necessary, use a rag. Repeat the procedure several more times until the flapper valve turns a bright color. This work can be carried out once every 3–5 thousand kilometers, fortunately, it does not take much time.
Removing the corrugation from the throttle valve
For more detailed cleaning of the throttle valve in a VAZ 2110, you need to completely remove the entire injector mechanism. It is also recommended to replace the gasket and O-ring, which are included in the throttle valve repair kit, which is easy to buy at any auto store. Before starting cleaning work, remove the terminals from the battery.
Then disconnect all air pipes connected to the throttle body. After this, remove the fastenings of the throttle cable and unscrew the throttle valve itself. It is attached to two bolts that are screwed into the engine housing.
Electronic sensors must be disconnected carefully to avoid damaging them.
Disconnecting the air pipes of the throttle assembly
After that, take a chemical and treat the entire body and all the grooves of the throttle body. Do this until you completely get rid of the dirt. You can also clean the air flow meter sensor. To do this, carefully treat its hairs with a cleaning product and remove the dirt with a brush. Give the entire device time to dry completely before reassembling. Do not forget to change the gasket and ring, which are located in the corrugation
Also pay attention to whether all air pipes are intact. Perhaps some require replacement with new ones
For maximum effect, you can also replace the air filter.
Home →
Device → Fuel and exhaust systems → Fuel injection system →
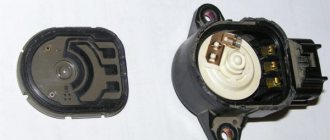
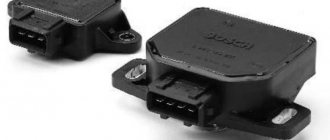
How to check and replace TPS?
The VAZ throttle position sensor (TPS) is part of the engine throttle assembly. Therefore, when checking the TPS, check the IAC at the same time (see the article How to check the IAC (Idling Air Sensor)?. Because in certain situations they have similar symptoms of a malfunction:
- uneven idle speed;
- Unstable engine operation (the engine stalls after releasing the gas);
- no idle speed;
- the car moves jerkily when the gas pedal is pressed at a certain level;
- low vehicle dynamics (in addition to a malfunction of the sensor itself, low engine dynamics can be the result of many reasons:
- low compression in the engine (How to measure engine compression correctly?);
- wear of the camshaft cams. or incorrectly aligned timing belt marks;
- cylinder head valves are leaking or burnt out;
- the engine power supply system is faulty;
- the air filter is dirty;
- brake cylinders jam;
- the clutch slips;
- the fuel filter is clogged;
- exhaust system is faulty).
It is worth noting that this sensor is not available on new samara-2 models due to the use of an electronic gas pedal.
How to check TPS?
To check the throttle position sensor, we will need the following tools: a multimeter (ohmmeter, voltmeter), pieces of wire.
- Having opened the hood, we find the sensor we need (we look for it on the throttle assembly next to the IAC).
- Disconnect the wire block from the sensor.
- Take a multimeter and set it to voltmeter mode. Volts negative terminal (on the engine). We connect the positive terminal of the voltmeter to the sensor wire block to terminal “A” (the pin numbering is indicated on this wire block).
- Turn on the ignition and check the voltage: the voltmeter should show a voltage of around 5 volts. If the voltage is not supplied, or it is much lower than 5 volts, then the problem is either an open circuit or a malfunction in the electronic engine control system (in the brains). But if the voltage is normal, then, accordingly, the TPS is faulty.
Conclusion: If the sensor is faulty, then there are two options to solve the problem:
- Repair the sensor (How to repair the TPS?). Most often it is easier to replace the sensor with a new one, because The cause of failure is most often normal wear of the part.
- Replace the sensor with a new one.
How to replace TPS?
To replace the throttle position sensor we will need:
- Unscrew the 2 screws securing the sensor to the throttle assembly (see picture).
- Remove the sensor from the damper axis.
- We install the new sensor on the damper axis so that its leads are directed towards the partition of the engine compartment.
- Rotate the sensor relative to its axis until the mounting holes align.
- We wrap the sensor.
- We regulate TPS.
- We connect the sensor contacts.
- Reset the battery terminals for 5 minutes.
How to adjust TPS?
We open the damper by turning the sensor drive sector or pulling the accelerator cable. If this operation fails, the sensor is not installed correctly. In this case, you need to remove the sensor and reinstall it at an angle of 90 degrees relative to the damper axis.
As for manual adjustment of the damper position, the sensor is not adjustable.
The controller automatically uses the sensor's low idle voltage as a reference point. But it happens that after replacing the sensor, the controller uses the values for the old sensor, which causes the throttle valve to open a few degrees. In this case, you need to reset the controller parameters either through the on-board computer or remove the battery terminal for 5 minutes.
Cleaning the remote control
If these signs appear, it is recommended to clean the throttle valve on the VAZ 2110. To carry out this operation, special auto chemicals are used. The most commonly used product is to clean carburetors.
Cleaning the throttle body will cost much less than buying a new throttle body for a VAZ 2110. The price of a new unit is several times higher.
To clean the throttle unit with your own hands, you must use the following materials and tools:
- screwdriver;
- set of tools with keys and heads;
- new throttle body gasket;
- protective gloves;
- carburetor cleaner;
- ear sticks for hard-to-reach places;
- old toothbrush.
The procedure for cleaning the throttle valve on a VAZ 2110:
1. Raise the hood of the car. Remove the terminals from the battery. It is enough to throw off the negative terminal. To do this, we use a key set to 10. 2. Dismantle the receiver. Loosen the clamps on the 5 pipes. We remove the pipes. Four pipes are visible from above, the fifth is located under the throttle valve assembly. 3. Disconnect the connectors from the sensor on the throttle valve and the idle air control (IAC). 4. Disconnect the throttle control cable. 5. Unscrew the throttle block from the receiver with a key. 6. Using a screwdriver, unscrew the idle speed control crosswise. We remove the IAC from the throttle block. 7. Using a cleaning product, an old toothbrush and ear sticks, we clean the throttle unit
We pay special attention to the channels and landing sites of the IAC. Remove carbon deposits and dig
Before using a special carburetor cleaner, you can wash the unit with plain gasoline. 8. It is recommended to apply lubricant to the idle speed control rod. To do this, we use silicone grease, which will help extend the service life of the IAC and the throttle unit as a whole. 9. Assemble the throttle assembly. We screw it to the receiver, not forgetting to install a new gasket. We connect all pipes and connectors.
An important part of the throttle valve is the “nickle”. Some car enthusiasts bore out the chamber of the assembly and install a “penny” of increased diameter
This can achieve a more enriched combustible mixture. Motor power increases. It is better to entrust the engine tuning operation to a motor specialist. You should not carry out such an operation on your own, without good preparation.
Another reason for unstable behavior of an internal combustion engine may be a faulty throttle sensor. On a VAZ 2110, you can replace the sensor yourself. Its price is low. It is recommended to use a non-contact sensor. Its cost is slightly higher, but the sensor will last significantly longer.
You can diagnose the sensor yourself. For this you need a tester. Let's look at it step by step:
- The ignition must be turned on. We measure the voltage between the potentiometer contact and the “minus”. The correct value on the voltmeter is 0.7 Volts.
- We turn the plastic sector to the limit, thereby opening the damper completely. The voltmeter should show 4 Volts.
- The ignition should be turned off, disconnect the connector from the sensor and measure the resistance of the potentiometer of the remote sensing sensor.
- We smoothly turn the sector and observe the tester readings. If the sensor is working properly, the needle will move without jerking and smoothly. If this is not the case, then the throttle sensor should be replaced.
If cleaning and replacing the idle speed sensor does not solve the problem of smooth running, you need to contact a motor mechanic; it may be necessary to conduct additional engine diagnostics or adjust the idle speed control. This operation is carried out using special devices.
Reviews about MD throttle tuning
Advantages of MD tuning:
- The gas pedal becomes more informative (more responsive).
- Increase in power in the range from 1000 to 3000 rpm.
- Reduced fuel consumption.
Disadvantage of MD tuning:
- Loss of elasticity.
1.
Checking the effectiveness of MD tuning in practice (cable):
- The gas tank was filled to maximum.
- We drove about 20 km.
- Once again we filled the tank to the maximum and got a consumption of 2.01 liters.
- We did MD tuning on a throttle body with a diameter of 46 mm.
- We drove along the same section of the road.
- We filled the tank to the maximum (gasoline consumption was 1.61 liters).
Thus, fuel savings after modification of the throttle assembly amounted to about 20%. During the experiment, an increase in low-end power was noted. Watch the experience in the video above from 12 min 30 sec.
2.
Testing the effectiveness of MD tuning in practice (E-Gas):
A similar experiment was carried out on a car with E-Gas. Fuel economy in this case was about 9% (was 1.5 liters, now 1.37). There is a faster response to the gas pedal. See also how to adjust E-Gas.
ps If after MD tuning there are problems with idle speed, then most likely the tightness of the closed throttle valve was broken (the chamfers were made too deep).
Have you modified your car this way? What feedback can you leave about MD tuning?
Let us remind you that we previously talked about other modifications that can improve engine performance. For example, installing a PCV valve in the crankcase ventilation system, as well as installing capacitors in the car’s ignition system.
Engine tuning methods
Every motorist invents different ways to increase engine power: it all starts with installing additional equipment and ends with a complete rework of the engine itself. The most well-known way is to increase power through the exhaust system and air filter.
Method 1
To change the exhaust system, you need a straight-through muffler, which will be larger than your standard one. This will help you increase the performance of your engine and increase the load capacity and reduce exhaust gas emissions. In other words, with an increase in the release time of used gases, we will be able to add several horses.
These changes will require you to change some more parts of your engine. So, you will need to replace the air filter so that air can flow more freely. It is best to purchase an exhaust with a 3-inch muffler. Additionally, you can install a second air filter – a sports one.
The next change you'll need is some additional cooling equipment for the intake air, as hot air rushing in like a hot blast will reduce engine efficiency.
Check your wiring and spark plugs to ensure they are good and resistant to these power fluctuations. There is no need to skimp on spark plugs; good spark plugs will ignite fuel better.
Method 2
But there are other ways to increase engine displacement. You can try boring out the rings on the engine cylinder. Or replace the crankshaft. However, these changes are costly and time-consuming.
In the first case, you will need to bore the cylinder and buy new rings and pistons. In the second case, you will have to search long and tediously for a crankshaft that will have a larger stroke. If you do find the crankshaft you need, replacing it will not be easy.
Do-it-yourself ring boring
Method 3
Good gasoline can also add power to your engine. When more fuel enters the cylinder, your engine will increase in performance. To increase the scale of filling the cylinders with fuel, you can try to reduce the aerodynamic resistance of the intake and exhaust systems.
Method 4
A very popular way to increase speed is to increase fuel compression. To do this, craftsmen grind off the surface of the heads or change the gasket to a thinner one. However, it is worth remembering that the head can get used. Therefore, it is better not to take risks with this matter.
But before you make any changes under the hood, check the engine for errors. Perhaps something is malfunctioning, which leads to a decrease in power and creates dull sounds and rumble. Very often there are breakdowns of the cylinders themselves. The rings are worn out or the cooling system is clogged.
Stories from our readers
“Fucking basin. "
Hi all! My name is Mikhail, now I’ll tell you a story about how I managed to exchange my two-wheeler for a 2010 Camry. It all started with the fact that I began to be wildly irritated by the breakdowns of the two-wheeler, it seemed like nothing serious was broken, but damn it, there were so many little things that really started to irritate me. This is where the idea arose that it was time to change the car to a foreign car. The choice fell on the melting Camry of the tenth years.
Yes, I had matured morally, but financially I just couldn’t handle it. I’ll say right away that I am against loans and taking a car, especially not a new one, on credit is unreasonable. My salary is 24k a month, so collecting 600-700 thousand is almost impossible for me. I started looking for different ways to make money on the Internet. You can’t imagine how many scams there are, what I haven’t tried: sports betting, network marketing, and even the volcano casino, where I successfully lost about 10 thousand ((The only direction in which it seemed to me that I could make money was currency trading on the stock exchange, they call it Forex. But when I started delving into it, I realized that it was very difficult for me. I continued to dig further and came across binary options. The essence is the same as in Forex, but it’s much easier to understand. I started reading forums, studying trading strategies. I tried it on a demo account, then opened a real account. To be honest, I didn’t manage to start earning money right away, until I understood all the mechanics of options, I lost about 3,000 rubles, but as it turned out, it was a precious experience. Now I earn 5-7 thousand rubles a day. I managed to get the car buy after half a year, but in my opinion this is a good result, and it’s not about the car, my life has changed, I naturally quit my job, I have more free time for myself and my family. You’ll laugh, but I work directly on the phone)) If If you want to change your life like me, then here’s what I advise you to do right now: 1. Register on the site 2. Practice on a Demo account (it’s free). 3. As soon as you get something on the Demo account, top up your REAL ACCOUNT and go to REAL MONEY! I also advise you to download the application to your phone, it’s much more convenient to work from your phone. Download here.
The first step is to remove the VAZ 2110 throttle assembly (instructions). To upgrade the throttle assembly you will need a file. Using it you need to make a 2-3mm groove in the indicated location.
As a result, this modification of the remote control eliminates some injector diseases, for example, when it is difficult to start when hot. By reducing the vacuum in the receiver, the run-out increased. That is, now you can ride 500m on the highway with zero fuel consumption, and at the same time the speed will drop by 7-10 km/h. In addition, low-end thrust has increased and engine vibrations at idle have disappeared.
What to do additionally
After modernization of this type, it is necessary to perform a number of additional manipulations:
- Rechip the ECU, since using a new part the old program will not work adequately. It will not be able to properly control the ratio of air and fuel in the mixture.
- Install a sports receiver. But before installation, be sure to consult with specialists or simply contact a car service center for help.
- Replace existing camshafts with more advanced ones.
Refining the throttle assembly is a serious procedure, there are a lot of different disputes regarding it, those who have tried such tuning in practice praise the result, but theorists swear. But the opinion of practitioners still prevails, and the fact that after modernization fuel is saved by 30% is already a proven fact.
Let's sum it up
| Supporters of replacing the remote control with a different diameter argue | Opponents of replacing the remote control with a different diameter argue |
| Replacement increases power and improves engine speed and gas pedal responsiveness | Washing or repairing a standard remote control gives similar effects |
| Does not affect gas mileage | Affects gas mileage, as everything is interconnected |
| Does not create problems in engine operation | Creates problems because the ECU cannot correctly adjust the ratio of air and gasoline in the mixture |
| Problems that arise can be solved with firmware | Problems are solved by flushing |
| Clearly, all tangible effects are associated with changing the remote control and are enhanced in combination with other improvements | Tangible effects are achieved by flushing the unit, and the use of other improvements improves the performance of the engine without replacing the remote control |
Here everyone decides for himself, we will not enter into disputes, there are simply different opinions, and we are obliged to warn about the pitfalls and the other side of the coin.
A little theory
Using a standard throttle valve, air consumption measurements showed that the engine consumes approximately 14 kg at idle, and about 22 kg at 3000 rpm. All this, of course, only applies to a fully functional engine. If we take measurements with a modified damper, then consumption at idle speed remains the same, but at the same 3000 revolutions it increases from 22 to 33 kg. This means that the increase in power is only felt at rpm of 2500 and above.
In a word, such tuning of the throttle valve on the VAZ 2110 takes place if the car often moves along the highway. In the city you won’t be able to experience all the delights of the modification.
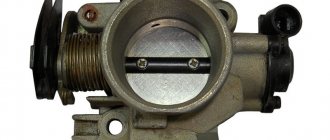
What does it look like?
A common method of tuning a throttle valve with your own hands is to install a throttle valve of increased diameter. For example, on VAZ models the standard damper has a diameter of 46 mm, the tuned one – 54 mm. Of course, you shouldn’t count on a colossal increase in power due to such changes, but such tuning of the VAZ throttle valve can still change the behavior of the car.
The shutter is made from an old one; you just need to bore out the channel and install an enlarged shutter. That's all the tuning of the throttle valve of a VAZ 2110, or another model. In a simple way, the narrowest oxygen supply channel is enlarged.
Flushing the throttle "tens"
Often, VAZ 2110 owners confuse a malfunction of the throttle assembly with an ordinary clogged valve. The main symptoms of the latter include:
- when you release the gas pedal, the engine does not immediately switch to low speed;
- the engine is difficult to start in severe frost;
- after starting, the engine vibrates for a few minutes;
- The engine jerks regularly at low crankshaft speeds.
To clean the throttle valve, carefully remove the plastic decorative trim that covers the top of the engine. Next, disconnect the ventilation system hose and drain the oil from the air pipe. After this, unscrew the cap from the expansion tank and disconnect the fuel tank ventilation hose. Having done this work, we get free access to the throttle valve of the “tens”.
The part itself must be cleaned using aerosol products such as Wynn's or WD-40. The procedure for washing the part should be repeated with a short pause of 15 minutes. At the first stage, we treat the part with an aerosol and wipe it with a damp cloth. The second time, an aerosol is also needed, only you need to wipe the part with a dry piece of cloth. During the cleaning process, it is strictly forbidden to use brushes for working with metal, as they severely damage the surface of the throttle assembly.
When cleaning the throttle valve, you should also pay great attention to the crankcase ventilation duct. This part of the assembly is most susceptible to contamination.
To wash the internal channels of the damper itself, unscrew the idle speed sensor. If during the process of dismantling the sensor you find play, the part should be replaced. You also need to pay attention to the condition of the gasket in the throttle assembly. It's best if you replace that too.
Cleaning Rules
Before removing and cleaning the throttle valve, you need to buy a special cleaner for it. There are many manufacturers, there is enough choice. Among the inexpensive ones, Abro is effective.
Disassembly:
You need to remove the engine cover (decorative plastic); Reduce the pressure in the cooling system by unscrewing the expansion tank cap; Loosen the clamps and remove the hose from the forced ventilation air pipe; Use a screwdriver to remove the heating hoses for the remote control (it is advisable to plug them for now); Disconnect the cable and unscrew the fastening nuts. Now removal of the throttle assembly is possible; Use a cleaner to wash everything very thoroughly. Most often, it is necessary to use a needle to check whether the forced ventilation channel is coked, and also to clean it; Cleaning is necessary for the idle air regulator, for which it must be removed and inspected. If you find that it is jamming and adjustment is impossible, then it needs replacement; After washing, reassemble everything as it was
Please make sure that the gasket is intact and in good condition, then you can leave it. If this is not the case, then only replacement.
How to adjust the throttle cable on a VAZ 2110-VAZ 2112?
Note! A lot of engines were installed on cars of the tenth family, ranging from carburetor 1.5 to injection 16 valve engines. Let us immediately warn you that carburetor engines from the Samara family were installed on dozens, and we already have information on adjusting all the valves on carburetor Samaras and it is posted in two article, the first is called: “Adjusting the throttle valves”, the second: “Adjusting the air damper”, so if you have a carburetor, then go straight to them, because in this article we are talking only about injection cars and we will not touch on carburetor cars!
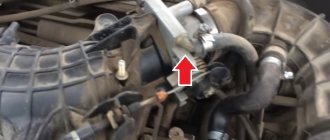
Note! Let's say a few words about the adjusting screw, the most important thing is not to confuse it with any other screws (For example, with screws A, by the way, they cannot be turned out at all), it stands on the side, for clarity, in the photo below it is indicated by an arrow with the letter B!
Additional video: Using the example of a Renault Logan car, look at how the cable is adjusted, it applies to 16 valve cars; on dozens with a 124 engine, this adjustment is done almost exactly the same way.
Adjusting (tuning) the Solex 21083 carburetor on a VAZ - part 3
Part 1 - accelerator pump - Part 2 - economizer, cam.
4 – bracket; 5 – bushing; 6 – locking bracket; 7 – cable end; 8 – cable sheath; 9 – bracket for the adjusting tip; 10 – adjusting nuts; 11 – sector with throttle valve control lever; 12 – return spring
Perform removal and installation only on a cold engine. To do this, remove the air filter. Disconnect the cable and return spring 12 from sector 11 (Fig. 2–90) of the throttle valve control lever. Unscrew the fastening screw and remove block 3 (see Fig. 2–83) of carburetor heating.
Disconnect the electrical wires of the forced idle economizer and the hoses of the semi-automatic starting device from the carburetor.
Unscrew the carburetor mounting nuts, remove the carburetor and close the inlet pipe inlet with a plug.
Install the carburetor in reverse order. Before installation, check the condition of the carburetor spacer and the planes of connection of the intake pipe to the carburetor. For the tightening torque of the carburetor mounting nuts, see Appendix I.
Fastening and tightening the fastening nuts of a heated carburetor is not allowed.
Theory and design testing
The essence of the modification is to install special rings or a swirler with blades in front of the throttle. Allegedly, such interference swirls the air in a special way, and thanks to this, the process of mixture formation is improved, the engine runs better, and fuel consumption is reduced.
Actually, a friend of mine who tested this modification assured me that, according to the readings of his on-board computer, fuel consumption was reduced from 0.6 l/h to 0.3 l/h
. This reduction looks more than significant. I didn’t believe this and decided to try it myself.
First of all, I decided to make sure that the air really swirls before entering the throttle assembly. A smoke generator made from a cigarette helped me with this. Having put on the cut-off bottle, I clearly saw that the air flow went straight without interference, but with a cylinder with blades inside, it began to twist in a spiral.
That is, in theory, the air should really mix better with the fuel, which will ensure its more complete combustion, and, accordingly, an increase in power.
Correction of a factory miscalculation
It is quite common for a throttle assembly to come out of the factory with something that cannot even be called a defect, but can still be attributed to design errors. In theory, air should flow into the space behind the throttle, for which a channel of approximately 2.5 mm is specially made.
But the whole problem is that this channel was pressed against the wall of the receiver, thus blocking the possibility of air flow. A slight modification of the throttle assembly can help in this case.
This material will help you install engine crankcase protection yourself:
Bored channel for air flow in the throttle
To do this, just take a file and use it to make a small groove in the indicated place. 2 - 3 mm will be enough. But before doing this, it is necessary to remove the throttle.
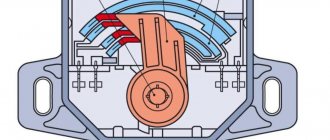
How does a mechanical throttle work?
Any mechanical throttle has a channel for operating the engine at idle speed. And there is an idle speed regulator that regulates the air supply and prevents the engine from stalling. If you do not press the gas pedal, the throttle is closed by the throttle valve. And air enters the engine through the bypass channel. This is idle mode.
When you are driving at speed and release the gas pedal, the idle mode is activated. Engine speed drops, consumption is minimal. The car will begin to gradually lose speed. A car with an automatic transmission will stop. But with a manual transmission, it will start to stall and then may stall if you don’t add gas or shift to a lower gear or engage neutral.
After modifying the throttle, the torque improves and a rolling effect appears. That is, the car starts to idle. On most cars, this effect appears precisely after modifying the throttle.
Car owners note the appearance of some ease of movement of the car. If you release the gas pedal at speed while the gear is engaged, a coasting motion appears. It feels like the car is driving in neutral gear. This effect especially delights car owners with an automatic transmission. For example, on the Lexus LS430 4.3 liters. at a speed of 110-130 km/h, the roll-up is 2 km on a flat road without loss of speed. If you watch various videos on the YouTabe channel “AvtoSila'007“, most car owners talk about the appearance of this effect. The most striking example is on the Hover H3. Until the modifications, he doesn’t want to go downhill at all. And after modification it starts moving at idle. A very useful effect for driving in city traffic jams. Here you can watch a video of how this happens on Lada Largus.
On a car with a mechanical throttle, the appearance of the rolling effect cannot be explained by an increase in the amount of air, since the throttle is closed in idle mode. Then how can you explain that after modification the engine has enough power and starts to roll?! This is explained by the fact that when the valves open, the wave hits the valve and clings to the groove, and also twists from our groove. As confirmation, look at how a regular stock Chevrolet Niva with a mechanical throttle idles.
On cars with electronic throttle, the above described effect also appears. The most interesting thing is that after modifying the throttle on some cars, the idle speed decreases. The electronic throttle has the throttle valve slightly open for idling. But when the engine is running, the damper closes, reducing the passage of air. Thereby moving away from the grooves in the opposite direction by a couple of millimeters. Therefore, it is impossible to explain the better performance of the engine at idle speed by the large passage of air due to the grooves! There is a completely different magic here!
Malfunctions
Symptoms of the problem can manifest themselves in different ways, but this mainly affects the engine’s throttle response.
Signs of a malfunction of the TPS, indicating its breakdown:
- difficult starting of a cold engine;
- unstable idling until the engine stops completely;
- forcing the gas causes failure of the engine followed by a sharp increase in speed;
- idle mode is accompanied by increased speed;
- fuel consumption increases unjustifiably;
- the temperature indicator tends to go into the red zone;
- From time to time, the “Check Engine” message appears on the dashboard.
Worn resistive sensor track:
Dismantling
On a VAZ 2110, the throttle assembly is removed in the following sequence:
- Disconnect the connectors of the sensor that regulates the position of the throttle valve, its drive cable and the XX regulator;
- We partially drain the coolant;
- Next is the removal of the air hose located on the body of the mass air flow sensor. Why do you just need to loosen the clamp;
- We also loosen the clamps: where the throttle pipe is attached to the air hose; where the hose of the 2nd crankcase exhaust circuit is attached to the cylinder head cover pipe. We remove the connected hoses - the air and 2nd crankcase ventilation circuits;
- Having loosened the clamp, remove the hose of the 1st crankcase gas exhaust circuit from the throttle assembly fitting;
- Having loosened the clamps, we remove the hoses supplying and discharging coolant;
- You will need a wrench with a 13mm head, with which you need to unscrew the nuts securing the throttle assembly to the receiver on a VAZ 2110;
- It is now possible to remove the throttle assembly from the studs;
- It remains to remove the sealing gasket and, if your VAZ 2110 has a system that traps gasoline vapors, disconnect the hose for purging the adsorber.
Step-by-step instruction
All repairs are divided into two stages - disassembly and cleaning. The cleaning time depends on the degree of contamination of the damper and the general wear of the engine. There is no need to use great physical force here; each stage can be done alone without outside help.
What you need for washing
Repairs must be carried out after the engine has cooled down. To remove the throttle assembly, you will need two screwdrivers, as well as a 13mm socket wrench. Almost every car enthusiast has these tools. Any cleaning agent is suitable for working with the damper itself, the main thing is that it removes oil and soot well. For better cleaning, we recommend using cotton swabs; they will help you reach the most difficult to reach places.
Cotton swabs will help to better clean the damper from dirt
When disassembling the mechanism, it may turn out that some consumables are no longer suitable for further use. Therefore, it is better to purchase a throttle valve gasket or a receiver O-ring in advance, depending on the engine size.
Removing the throttle assembly and cleaning it
The throttle assembly must be removed in the following sequence:
- Having opened the hood, remove the plastic cover that covers the top of the engine.
- Remove the rubber vent hose.
If there is a large amount of dirt, remove it with a regular rag. Remove the ventilation hose using a screwdriver - Before removing the mechanism itself, we will need to relieve the pressure from the cooling system.
To do this, remove the hoses with the antifreeze liquid, having previously wrung out several clamps. We remove the hoses with antifreeze liquid, having previously wrung out the clamps - To protect the holes from dust during repairs, it is better to immediately cover them with small plugs.
- To gain access to the valve itself, you will need to remove another hose that ventilates the fuel tank.
- Now you can remove the damper by first unscrewing the two mounting bolts and disconnecting the cable that connects the part to the accelerator pedal.
We remove the damper by first unscrewing the two bolts
For further work, you need to decide which cleaning method you will use. For minor contamination, choose the simpler and faster surface cleaner. If the mechanism is covered with a large layer of dirt, and some elements are coked, then a complete cleaning is suitable. Surface cleaning does not require further disassembly of the mechanism. It is enough to remove oil deposits from internal and external surfaces with a rag and cotton swabs. We recommend using gasoline or thinner as cleaning agents.
When completely flushed, we will need to replace the gasket or o-ring. To disassemble the tool, take a small screwdriver and a 13mm wrench to unscrew two more bolts. After cleaning, mechanics recommend blowing out all the holes with a stream of compressed air - this will remove excess moisture and small dust particles.
This is interesting: We tint glass, glue decals and decals - how the law looks at it
What does the throttle valve look like before and after cleaning?
When disassembling the throttle assembly, we recommend paying special attention to the idle speed sensor. The efficiency of fuel use and the smooth movement of the vehicle depend on its correct operation.
To clean it, it is better to use WD 40 and thin cotton swabs. We remove dirt from the case and thoroughly clean the contacts of the device.
Options for tuning the throttle assembly, which you can do yourself
To reduce harmful emissions into the atmosphere, many car manufacturers install catalysts on cars and equip cars with various technical means that are controlled electronically. Such a device is an electronic throttle. Since cars with remote control will have to be slightly modernized. But even if the throttle is mechanical, it should also be modified, since the principle is the same and 25-30% of the fuel remains unused, and the power is low.
The throttle valve itself regulates the volume of air entering the gasoline engine and produces the fuel-air mixture necessary for its operation. A simple do-it-yourself throttle tuning in your car can greatly improve performance.
Throttle bore
Stayed after work, planned for a couple of hours...
I worked too diligently and meticulously on the cone and steps, there was little time left for the rod, but it turned out to be very strong, and it was not possible to grind it down completely... I wanted to somehow get home and put the damper in place at night without comme il faut)))
Result: I've been riding for 3 days already, honestly, I haven't really felt any results... Maybe, maybe, etc. at rpm from 2000 to 3000 the car drives a little more lively, but maybe it was the wind at the back, a hillock, etc.))) I think we still need to cut grooves, then maybe we’ll feel the result. And the engine should probably be set to 1.6))) then it will drive more vigorously than 1.4)
But as a matter of fact, there are a lot of reviews on the Internet for these improvements, some for, some against. I just decided to try it because I don’t have to spend money on it, I have the tool, just time. Until you try it yourself, you won’t know what the result will be.
Results after MD tuning
We decided to test the effectiveness of MD tuning. First we conducted an experiment on a machine with a cable. The verification consisted of the following stages:
- Full filling of the gas tank;
- Driving approximately 20 km;
- The gas tank is full again, fuel consumption is 2.01 liters;
- Performing MD tuning on a 46 mm throttle assembly;
- Riding again 20 km;
- The gas tank was full again, fuel consumption was 1.61 liters.
As you can see, the implementation of MD tuning made it possible to save approximately 20% of fuel. Low-end power has also increased.
Next, we decided to conduct the same experiment on a car with E-gas. In this case, the throttle upgrade saved approximately 9% of fuel. In addition, the response to the gas pedal has accelerated.