Many owners of carburetor cars are familiar with such a procedure as flushing the carburetor. But the owners of injection cars, including Kalina, think that if the car has fuel injection, then there is no need to clean or rinse anything. In fact, the Kalina injector throttle assembly also needs regular cleaning. Of course, you shouldn’t do this constantly every 10,000 km, but I would recommend doing this procedure once every 50 thousand km.
Before removing the throttle body from the vehicle, first familiarize yourself with the accessories:
Instructions for cleaning the throttle body on LADA cars
In some cases, problems in engine operation may be associated with the formation of all kinds of deposits on the walls of the throttle valve.
In this case, cleaning the throttle assembly (DU) can help. We'll tell you how to perform this procedure yourself. The remote control cleaning process is carried out similarly on all modern LADA cars (XRAY, Vesta, Largus, Priora, Granta, Kalina, Lada 4×4). You will find examples of work on specific LADA models in the comments.
Do I need to remove the remote control?
It is not necessary to remove it to clean the throttle assembly. However, with the part removed, this can be done easier and better (see how to remove the remote control).
How to clean the remote control?
The book on repair and operation of the LADA Vesta car (and other LADA models) indicates that to flush the throttle assembly, you need a means to clean the engine inlet pipeline. As a last resort, you can use a carburetor cleaner.
How to clean the remote control?
We spray the cleaning agent not only on the throttle valve itself and the cavity around it, but also on all channels and hidden cavities. The use of soft rags is allowed. When cleaning the remote control with E-gas, make sure that the cleaning agent does not get into the electrical part of the unit. The process is shown in the video:
- Do not remove the throttle valve mounting screws. If they are then poorly tightened and tightened, the loosened screw can get into the engine cylinder and damage it.
- Use a coarse lint cloth or wire brush for cleaning.
- Do not touch the throttle on cars with an electronic gas pedal, so as not to reset the factory setting.
If it was not possible to eliminate the engine malfunction by cleaning the throttle assembly, then the throttle assembly must be replaced (if you are sure that it is the cause of the malfunction). When installing a new throttle body, special diagnostic equipment may be required to check the "calibration" of the throttle position at the extreme positions. This operation can be performed at a specialized service station. See also: Procedure for adapting throttle valve zero on Lada Vesta and XRAY.
An example of flushing the throttle valve on a Lada Vesta after 75,000 km:
Have you ever had to clean the throttle body yourself? What were the difficulties?
Source
Comments 19
So, how's it going, did you dig up anything?
Share information dear. Nothing. There is no finances yet to understand in detail. I reset the errors with the computer and that’s all. It's hardly a good thing, but that's how it is.
So, how's it going, did you dig up anything? Share information dear.
After a couple of thousand miles I will do maintenance and replace some of the problem areas. I'll see what comes of this. ran into the same problem?
I have a problem that may be related to one of the above, or maybe something else.
Kalina sedan, 1.4 16 valves, year 2008, mileage 65,000 (I don’t believe it, I’m the 3rd owner, but I don’t have other numbers).
I turn on the first one, drive, pick up the speed, turn on the second, and if I immediately press the gas pedal to the floor, the car stutters and drives weakly, picking up speed very slowly, rather than I just pressed it moderately, gradually increasing the pressure.
At the beginning I found a problem in the rubber tip of the ignition coil in 4, to be more precise, it tore, in the absence of another and another tip, I rewound it with an isobraid (don’t trample me), and the problem went away. It was still gaining momentum somehow sluggishly.
I turned off the mass air flow sensor, the problem disappeared, I decided to thoroughly wash it with the carburetor cleaner I had on hand, I just quickly sprayed it a little and dried it. I installed it, everything is fine, the car began to run 60 percent better, but something tells me that I need to check the rest of the spare parts, at least without fanaticism.
Removing and cleaning the throttle assembly
Many owners of carburetor cars are familiar with such a procedure as flushing the carburetor. But the owners of injection cars, including Kalina, think that if the car has fuel injection, then there is no need to clean or rinse anything. In fact, the Kalina injector throttle assembly also needs regular cleaning. Of course, you shouldn’t do this constantly every 10,000 km, but I would recommend doing this procedure once every 50 thousand km.
Before removing the throttle body from the vehicle, first familiarize yourself with the accessories:
Symptoms of a dirty throttle body
- The speed is XX;
- Unstable operation of the internal combustion engine (vibration);
- Dips when moving;
- The engine does not develop power;
- Difficulty starting;
- Increased speed XX;
All of these symptoms may indicate contamination of the throttle assembly, and if these problems are detected in your car, the first thing you need to do is clean the throttle assembly.
List of necessary tools for removing the assembly
- Flathead and Phillips screwdrivers
- Head for 13
- Extension cord short
- Ratchet or crank
- Pliers (in some cases)
Before starting repairs, disconnect the battery by removing the negative terminal, since you will then have to disconnect the sensor plugs, and the turned on power will be of no use.
Instructions for removing the throttle assembly from Kalina 1.6 8 valves
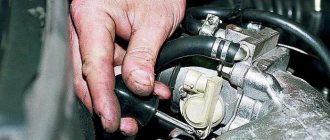
The first step is to disconnect the inlet pipe that runs from the air filter to the unit itself. Loosen the clamp as shown in the photo below:
You also need to loosen the thin hose that extends from the inlet. It is better to do this from the side of the valve cover:
Then we disconnect the thick pipe and this thin hose and move them to the side so that they do not interfere with us in the future:
Then you need to unscrew all the hose clamps that are connected to the throttle assembly. Three of them are at the top:
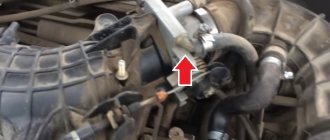
And the fourth is at the bottom of the throttle; the photo below clearly shows its location:
If you have problems removing the hoses, you can use pliers. Carefully grasp the seat of the hose and twist it along the tube. Like this, as shown in the picture:
Now we disconnect the plugs from the sensors, which are located on the inner side of the unit. The result should look like this:
There is very little left: unscrew the two nuts securing the unit to the manifold. The most convenient way to do this is with a ratchet with an extension - for the lower nut, and for the upper one you can do without it.
And remove this entire structure from the studs:
All that remains is to free yourself from the throttle cable. To do this, take a flat-head screwdriver and pry up the metal bracket on one side, approximately as shown in the photo below:
Then we pry this latch with our finger and take it out:
Then we take the throttle cable with our hand and lower it to the very bottom so that it is opposite the removal hole:
And on the reverse side, pressing a little on the holder, move the cable to the side and calmly remove it:
That's all ready - now the throttle assembly can be removed completely, because there are no more obstacles to this:
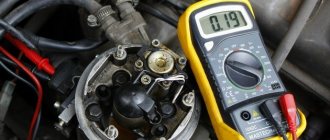
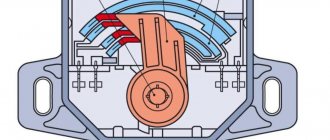
Operating principle of the sensor
The Kalina throttle sensor is used to transmit a signal to the engine ECU. This part is a potentiometer, the maximum output voltage of which does not exceed 5 Volts. The element consists of a housing, inside of which there is a variable resistor. The positive power wire is connected to one of the contacts of the product, and ground to the second. An output conductor is connected to the third terminal, the voltage of which depends on the angle of the throttle valve. The potential difference is changed by moving the moving part of the third contact along resistive tracks.
The moving contact of the potentiometer is installed on the throttle valve axis, so a change in the position of this element is instantly responded by a change in voltage at the output contact.
Cleaning or flushing the Kalina throttle
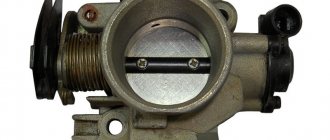
After my mileage, just under 50,000 km, the condition inside was quite normal, I did not find any strong deposits or soot. There was only a little dark coating, something like soot on the walls:
I didn’t wash it, but just took a dry, clean rag and thoroughly wiped everything inside to a factory shine. If you decide to do a full flush, first unscrew the sensors from the assembly. Black plaque also accumulates in their seats, which will need to be removed.
The need to adapt remote sensing
This definition refers to the operation (or training) that is carried out so that the ECU “knows” what position the throttle valve is in relative to the degree of depression of the accelerator pedal. This procedure is simply necessary if the engine is unstable at idle.
For most Toyota, Lexus, Mercedes, Nissan, and Audi cars, it is necessary to adapt the throttle valve, as this allows you to eliminate the malfunction. The procedure is performed in the following cases:
- in the event of a critical drop in the voltage of the on-board network (the battery is switched off or completely discharged);
- the ECU was replaced;
- the valve was cleaned and the throttle was removed;
- when replacing the throttle module itself;
- the accelerator pedal was replaced, usually with an electronic one.
It is worth noting that due to the layer of dirt, the gap between the damper and the body changes, and after cleaning the damper, its position has changed. But the ECU “has no idea” about this and continues to control the fuel supply according to previous indications (before the cleaning operation). Adaptation will completely eliminate this gap and restore engine performance.
Cleaning the throttle valve on viburnum
“Throttle valve” is a popular name; the unit is correctly called a throttle assembly; it contains a valve. Therefore, while studying this article, pay close attention to the words; we call the details by their proper names.
Note! First you need to remove it from the car. Purchase a special gasket from the auto store that is inserted between the throttle assembly and the receiver pipe. The article provides a link to instructions for removing the throttle assembly. Also stock up on carburetor cleaner; it removes dirt from metal well. The throttle body gasket, carburetor cleaner and assembly are shown in the photo below:
The red arrow in the photo indicates a gasket, but don’t go to a car store for the same one - they are all different depending on the receiver. There are two options: remove the damper and gasket from the receiver and go buy the exact same one, or, relying on the experience of the seller, tell him the car model, and he will select the part!
Summary:
Node location
For e-gas engines or a standard assembly with a cable, the part is located in the same place, but they are slightly different in shape - you will immediately understand when you open the hood and look at it. In the photo below, the red arrow indicates the location of the e-gas system unit.
When should I clean it? 1. Over time, any part of the car becomes dirty and has to be cleaned. In injection cars, you have to clean the unit and four injectors; they become dirty from low-quality dirty fuel. The unit becomes dirty from dirty air passing through it while driving.
Note! To avoid contamination, we recommend that you change the air filter more often. Check out the article about replacing the air filter: “Replacing the air filter on a VAZ”!
2. How can you tell if a unit is dirty and needs cleaning? The car begins to behave differently: the idle speed appears to float (this occurs due to the fact that the damper does not close normally due to dirt on it), the car stalls and jerks.
Signs of a clogged damper
When the throttle valve becomes clogged, the engine begins to operate in an unstable mode. Typical signs of a malfunction in this case are:
- increased idle speed;
- delayed engine response to pressing the accelerator pedal;
- while the car is moving, jerks are observed, and sometimes the vehicle changes speed independently, without the driver’s participation;
- abruptly releasing the gas pedal causes the power plant to stop.
In some cases, the CHECK indicator on the instrument panel will light up. Sometimes tar deposits settle on the throttle shaft, causing it to seize. Then the gas pedal is pressed with noticeable force.
Before moving on to solving the problem of how to adapt the throttle valve on a Skoda or any other car, you need to make sure that the diagnosis is accurate by conducting a visual inspection of the mechanism. To do this, you need to remove everything that is possible in order to open access to the module. Be careful not to accidentally disconnect the cooling system pipes.
Cleaning the throttle valve on models 1117-1119.
Note! This article concerns cars with a cable mechanism; for e-gas you will have to look for additional information on removing the damper. The damper on the e-gas system is mounted on three hex bolts, and the coolant supply and discharge hoses are connected to it. The most important difference is that there is no cable in the system. (We do not recommend removing the unit during negative ambient temperatures (even -1), work when the temperature is above zero)
Important point! Before starting work, remove the negative terminal from the battery and disconnect it from power. If you don’t know how to remove the terminal, read the article: “Replacing the battery in a car.”
Removal:
1) There is no point in cleaning the damper that has not been removed, because the dirt that flows down during washing will flow into the car engine through the gap. Contaminating the inside of a car engine is unacceptable.
Note! We recommend that you read the article: “Replacing the throttle assembly on a VAZ”!
2) For e-gas cars, after removing the unit, we do not recommend touching the damper itself: the unit will most likely fail, which means you will have to replace it with a new one.
3) Place the removed assembly on a clean, flat surface, away from contamination, and prepare carburetor cleaner.
Note! Before starting cleaning, it is recommended to remove the “idle air control sensor” from the throttle assembly. More details are described in the article with instructions for removing the unit from the car.
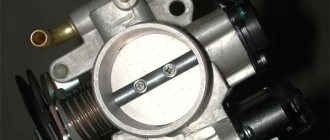
There is no need to clean the entire assembly with carburetor cleaner; it is enough to go through the places where the air passes. Clean the inside, where the damper is located (see photo below), place the part in the sun and wait until all the liquid evaporates. You can speed up the process by taking a soft rag that does not damage the inside of the part, and gently wiping off any remaining dirt and carburetor cleaner!
4) Now we move on to cleaning the sensor. Clean only the working surface - the place where the sensor comes into contact with the assembly. The part that goes outside the unit does not need to be cleaned.
Note! When cleaning, make sure that no liquid gets inside. Carefully remove dirt only from the tip (indicated by the arrow). If liquid gets under the spring and flows through the o-ring inside, the sensor will break and you will have to buy a new one.
Installation:
Proceed in the reverse order of removal. If you find cracks or damage on the gasket between the unit and the receiver, we recommend that you replace it with a new one.
Note! Do not start the car immediately after installation is complete! This applies to the e-gas system because on these vehicles the controller must first adapt and understand the location of the node's zero throttle position. Having installed all the units in their place, get into the car, turn on the ignition and wait about 30-40 seconds while the controller adapts. We offer a detailed overview of the damper adaptation process in the information letter:
Additional video: The video below will help you learn more about cleaning the throttle assembly.
Source
How to adapt the gas pedal?
We carry out adaptation either after repair, replacement of the computer, or long-term removal of the battery.
- We connect the battery.
- We insert the key for the first time after installing the battery and turn it to the “ignition” position. The indicators on the panel light up, wait at least 30 seconds and start the engine. Important: the temperature of the air and the engine must be at least 7 degrees warmer, otherwise adaptation is useless, the engine will operate in emergency mode.
- Next, we adapt the ignition diagnostic function: we accelerate in second gear and brake with the engine at 4 thousand rpm. Up to 1 thousand rpm - we must perform this operation six times during one trip.
Adaptation of the diagnostic function is necessary to preserve the catalyst and possible fire.
Cleaning the throttle valve: sequence of actions and common mistakes
Most of the car's automotive components do not require careful and professional maintenance. It is enough for a car enthusiast to change consumables and auto chemicals, as well as change individual parts in accordance with the regulations. For example, rubber-metal products and individual suspension components have to be changed much more often than parts of the engine group.
The latter have such a long service life that some motorists do not face the need to replace them throughout the entire period of using a particular car. But what if the car is used? Let's say you bought a vehicle that has been in use for a long time. Or your car has already become a real “old man”. One of the elements of the car that is worth paying attention to is the throttle valve.
In this material, Avto.pro experts will share tips on cleaning and maintaining the throttle valve, and also consider some of its malfunctions.
What are we talking about?
The throttle valve is one of the main elements of the automotive intake system. It is the damper that is responsible for the metered supply of air, which will be used to prepare the fuel-air mixture. Most budget cars have a simple mechanically driven damper, while more advanced vehicle models are equipped with an electronically controlled device. Since the throttle valve opens and closes frequently, i.e. is constantly in use, it often fails . There are several symptoms here:
- Extremely unstable engine operation “when cold”;
- The Check Engine light comes on (often it lights up, goes out, and so on constantly);
- Loss of traction when trying to gain speed;
- “Floating” speeds at different engine operating modes;
- Abrupt stoppage of engine operation;
- Increased fuel consumption.
Algorithm of actions for identifying a throttle malfunction
It is important to understand that the most reliable way is to download error codes to a smartphone or PC via the diagnostic connector. But, if this is not possible or the connector is not working, you can verify that the node is faulty using the following algorithm:
- Check the air duct for foreign bodies, dirt, water, etc. Clean the channels if necessary.
- Make sure the air filter is suitable.
- Use a tester to check the operation of the accelerator pedal position sensor.
- Check the operation of the idle air control.
- In the same way, fix the malfunction of the damper position sensor, as well as the electric motor.
- If everything is in order, it makes sense to disassemble the block and verify the integrity and functionality of the shock absorber itself.
All measurements using the tester must be made with the ignition on and at different positions of the accelerator pedal.
General information about the control system
The speed starts to fluctuate, which means the TPS is faulty. It is necessary to determine the speed and degree of opening of the throttle valve. Its design is based on a simple potentiometer: when the damper position changes, the signal output of the sensor changes voltage. A potentiometer is a variable resistor, more often it is called that way.
The sensor is installed directly on the damper axis. The connection with it must be tight, so the presence of even the slightest backlash is unacceptable. Potentiometer pins:
- supply voltage, which is usually 5 Volts;
- signal output that connects to the vehicle's ECU;
- “ground” (“minus” of the power supply, which is located on the body of the car).
The highest resistance of the sensor is observed when the damper is closed, while the voltage on the ECU is minimal. You press the gas pedal and open the throttle, at which time the resistance changes and the voltage gradually increases to its maximum value of 5 V.
The electronic control unit contains firmware in which all important parameters are recorded. Depending on the opening value of the damper, the ECU adjusts the ignition timing, as well as the opening time of the injectors. Non-contact type TPS can also be used - magnetoresistive. They consist of the following elements:
- electronic sensitive element, which is processed with a special material;
- a permanent magnet that has a rigid connection with the throttle valve.
When you press the accelerator pedal, the permanent magnet rotates. At this time, the sensitive element changes its resistance due to changes in the magnetic field around it. Only in this case the ECU sees a change in angle, not voltage. If the sensor fails, problems arise with starting the engine, gasoline consumption increases, engine speed constantly changes, and vehicle acceleration is difficult.
Frequent injection system malfunctions
Pay attention to the ignition module. It is quite possible that the malfunction lies there. But the module can only be checked using modern motor testers. Therefore, you need to contact an experienced auto electrician who will quickly identify the fault and replace or repair the module. If it is possible to install and test a working element, take advantage of it. The engine started working perfectly - run to the store for a new module. Repairing this unit is possible, but finding a professional technician is quite difficult.
A malfunction of the idle speed control can be determined by the following symptom: it is impossible to start the engine without pressing the gas. The sensor is located next to the TPS, directly on the pipe. But you shouldn’t change it right away; try rinsing and cleaning it first. Very often the regulator simply becomes dirty, so it feels like it has failed. The price of such items has now dropped, and the choice of them in stores is very large.
Removal
Cleaning the Lada Kalina throttle assembly begins with its dismantling.
Note. There is an opinion that it is not necessary to remove the component. This is true, but in this case all the carbon deposits will pour into the engine!
First of all, you need to turn off the engine, let it cool, and then remove the terminal from the battery.
Then the clamps securing the hoses and pipes are unscrewed:
The plugs are disconnected from two sensors - TPS and IAC.
The accelerator cable is removed.
To prevent antifreeze from leaking, the hoses must be fixed at the top. In addition, you can insert M12 bolts into them.
In the end, all that remains is to unscrew the 2 nuts using a 13mm socket and remove the remote control.
The simplest way to carry out adaptation
Now the question of whether it is necessary to adapt the throttle valve after cleaning should definitely not arise if there were still doubts. The easiest way to carry out the operation is to simply reset the battery terminal. Just to begin with, it is worth warming up the engine well to operating temperature, for which you should take a short trip.
During this period, all ECU parameters should return to the original (factory) settings. Next, all that remains is to connect the terminal and start the engine - the speed should return to normal.
Removing the throttle valve
Before you start cleaning this element of the fuel supply system of your Lada Kalina, you need to gain access to the nemo; the easiest way to do this is by removing the part from under the hood. And so, dismantling the damper is quite simple, but has several nuances, and it will take place in three stages:
Removing the throttle valve Lada Kalina
- First you need to access the object. To do this, you need to remove the air pipe that runs from the air filter to the throttle valve itself. Unfasten the throttle cable that is attached to the position sensor and mechanical drive.
- Now you should carefully disconnect the coolant supply hoses. Please note that these hoses should be detached when your viburnum has completely cooled, this way you will avoid burns and minimize coolant leakage. When the hoses are dismantled, you need to wait a little, literally 5-7 minutes, to make sure that the outflow of liquid has stopped.
- Now that you have completely freed the throttle body, removed all the tubes, removed the wires, you can dismantle the part. In the Lada Kalina, this mechanism is usually secured with four bolts; you just need to unscrew them and pull them out.
Dismantling and repair of parts
Often the cause of a malfunction is contaminated contacts and system elements. When a sensor breaks, the following happens:
Before starting work on replacing or repairing the sensor on a Lada Kalina car, you must disconnect the negative terminal from the battery. Then the plug is disconnected from the position sensor connector by pressing the plastic latch. The TPS is attached with two screws, which can be unscrewed without much difficulty. Only after this the knot is removed. Carefully inspect it for damage, measure the width of the sensor shaft (it should be 5 mm). It is possible that the throttle body will need to be cleaned before installing a new potentiometer. If the axle is dirty, the sensor will have difficulty moving.
Cleaning
To clean the throttle assembly of the Lada Kalina, you need to treat it with a cleaning agent. To do this, it is sprayed, not only on the damper itself, but also on the entire space around it, including all cavities and channels. You also need to apply the product to the IAC, as carbon deposits usually form on it as well.
Note. If work is carried out on a car with an electronic accelerator pedal, you need to do everything carefully so that the solution does not get on the electrical components.
When cleaning the throttle assembly of the Lada Kalina, you can use a soft cloth. It is worth remembering what is prohibited to do during work:
- Use a wire brush, coarse or lint cloth for cleaning;
- Unscrew the screws that secure the damper itself. If they are poorly tightened and locked during assembly, the screw may end up getting caught in the cylinder.
- Manipulate the throttle valve if it is a car with an electronic accelerator pedal, as the factory settings can be reset.
This completes the cleaning of the Lada Kalina throttle assembly.
Assembly is carried out in reverse order.
back Replacing steering tips on Lada Kalina - reasons, purchase, progress of work
Next Replacing the door handle Lada Kalina
Installation and causes of sensor failure
- partial or complete wear of the substrate;
- erasing the spray;
- failure of the movable core with contacts.
Repairing sensors is extremely difficult, since it becomes necessary to create a new contact layer. This cannot be done at home, and not every service station has such capabilities. If you look at the cost of similar sensors for a Lada Kalina car, it turns out that it is easier to buy and install a new one. Another advantage (besides the low price) is that replacement takes no more than five minutes. And this is provided that you simultaneously clean the contacts and the throttle valve.
How to clean the throttle valve on a viburnum
“Throttle valve” is a popular name; the unit is correctly called a throttle assembly; it contains a valve. Therefore, while studying this article, pay close attention to the words; we call the details by their proper names. Note! First you need to remove it from the car. Purchase a special gasket from the auto store that is inserted between the throttle assembly and the receiver pipe. The article provides a link to instructions for removing the throttle assembly. Also stock up on carburetor cleaner; it removes dirt from metal well. The throttle body gasket, carburetor cleaner and assembly are shown in the photo below:
The red arrow in the photo indicates a gasket, but don’t go to a car store for the same one - they are all different depending on the receiver. There are two options: remove the damper and gasket from the receiver and go buy the exact same one, or, relying on the experience of the seller, tell him the car model, and he will select the part!
Summary:
Node location
For e-gas engines or a standard assembly with a cable, the part is located in the same place, but they are slightly different in shape - you will immediately understand when you open the hood and look at it. In the photo below, the red arrow indicates the location of the e-gas system unit.
When should I clean it? 1. Over time, any part of the car becomes dirty and has to be cleaned. In injection cars, you have to clean the unit and four injectors; they become dirty from low-quality dirty fuel. The unit becomes dirty from dirty air passing through it while driving.
Note! To avoid contamination, we recommend that you change the air filter more often. Check out the article about replacing the air filter: “Replacing the air filter on a VAZ”!
2. How can you tell if a unit is dirty and needs cleaning? The car begins to behave differently: the idle speed appears to float (this occurs due to the fact that the damper does not close normally due to dirt on it), the car stalls and jerks.
Cleaning the throttle body on models 1117-1119
Note! This article concerns cars with a cable mechanism; for e-gas you will have to look for additional information on removing the damper. The damper on the e-gas system is mounted on three hex bolts, and the coolant supply and discharge hoses are connected to it. The most important difference is that there is no cable in the system. (We do not recommend removing the unit during negative ambient temperatures (even -1), work when the temperature is above zero)
Important point! Before starting work, remove the negative terminal from the battery and disconnect it from power. If you don’t know how to remove the terminal, read the article: “Replacing the battery in a car.”
Common mistakes and choice of cleaning products
Inexperienced car enthusiasts who decide to clean the throttle valve themselves often make mistakes. Despite the fact that this unit seems extremely reliable, its performance is easy to disrupt. The fact is that the surface of most damper models is coated with molybdenum. This is a fairly hard material, which, however, can be easily removed from metal surfaces using abrasives , which should be avoided. Here's what to keep in mind:
- There is no point in cleaning the damper frequently;
- At least once, the assembly must be dismantled and all visible surfaces must be thoroughly cleaned - after such a procedure, the damper can be cleaned without removing it, but even then only for a while;
- Do not use abrasive materials, hard brushes, etc. for cleaning. The best option would be a soft rag, and you need to wipe the surface of the damper carefully;
- After the cleaning procedure, the damper must be “trained” according to the algorithms in the previous section;
- If the mechanism has rubber elements, they should be removed before using chemical cleaners - they corrode the rubber.
On the automotive chemicals market you can find many specialized products for servicing throttle valves. As practice shows, there is no great need for them - they only simplify the cleaning procedure. A car enthusiast can use acetone, gasoline or any other solvent, as well as WD-40 . Taking into account the fact that a heavily contaminated valve will have to be cleaned several times, it makes sense to use gasoline first, and only then a specialized product. The main requirement for the chemistry used: the ability to dissolve oil deposits. It is worth highlighting the following semi-professional products:
- Liqui Moly DrosselKlappen-Reiniger is one of the most expensive, but at the same time the most effective means for servicing dampers;
- Abro Cabro & Choke Cleaner - affordable and effective cleaning chemicals;
- Mannol Carburetor Cleanor is a universal cleaning agent, although it is focused on working with carburetors;
- Wurth Air Intake and Throttle Valve Cleaner is a cleaner that boasts an excellent price-quality ratio.
A car enthusiast can buy either an inexpensive universal product, such as acetone, or an expensive, highly specialized one. Cleaners from Liqui Moly perform best, although competitors' analogues are not very much DrosselKlappen-Reiniger If you want to save money, you can carry out the first stage of cleaning with gasoline, and the second with WD-40 - the result will be no worse. There is no particular point in cleaning the throttle valve to a mirror shine, since it will still quickly become covered with dust and oil deposits.