You can try to find a possible reason why the instrument panel of the VAZ 2114 does not work on your own. However, to do this you may need to remove it and then reinstall it. If you are not ready for this, contact a specialist. But, before getting to work, it is recommended to check the elementary places where the solution to the problem may be hidden.
The instrument panel of the VAZ 2114 does not work, and this breakdown caught you on the road and there is neither the desire nor the opportunity to thoroughly bury yourself inside the car. Initially, you need to check how well the positive wire going to the source object is secured. Quite often, the front seat passenger touches it and pulls it out of the terminal. In this case, you need to fasten it in place and securely fix it so that the situation does not repeat itself.
After this, it is recommended to check the integrity of fuse F3. If you find a burnt one, insert a new one and drive to your house or garage. There is no point in dwelling on this; if it burns out, then the situation may repeat itself, so it is advisable to find the reason that led to this. In most cases, this happens because the car was in a car wash and water got inside, which shorted the system. This situation happens on cars that have traveled more than one hundred kilometers.
If you find a fuse that is intact and not blown, you do not need to put it back in place. First of all, check your contacts. It is quite possible that its seat has oxidized due to time and moisture and turned into a so-called dielectric. Basic cleaning of the oxide solves the problem. Having found traces of oxidation, it is recommended to check the remaining sockets; it is quite possible that you have been driving for a long time without the brake lights or turn signals lighting up.
Healthy!
There is such a concept as “metal fatigue”, which means the loss of the composition of its standard characteristics. Therefore, on older machines it may be necessary to completely replace the fuse box.
If all the described verification methods can be performed on the road, then the following actions imply an in-depth search for a solution to the problem. First of all, you should pay attention to the ignition switch. The contacts in it may burn out. Although this happens infrequently, it should not be ruled out. In this case, the element is removed, a check is performed, and the detected bad contacts are cleaned. Sometimes it may be necessary to install a new ignition switch.
In addition, we can name a couple more cases when repairs may take some time:
- Burnt tracks on the board are not repairable. In this situation, everything can be solved by installing a new circuit. You shouldn’t be afraid of this, its cost is not high, and you can replace it yourself.
- A break in the electrical wiring can be called the most complex, unpleasant and difficult to identify type of breakdown. In this case, power is not supplied to the instrument panel or one of the indicators and it stops working. The fault is determined using a multimeter. The required wire is called, the location of the break or poor contact is determined and, if necessary, replaced or cleaned.
Healthy!
If the dashboard lighting suddenly goes out, check the lamp brightness adjustment knob. It is quite possible that the child who was sitting in your car before unscrewed it, setting it to minimum.
If problems are detected in the operation of one of the sensors or devices, you need to take into account that the reason may be hidden inside the panel, in the indicator itself. For example, a crack in a gear will cause the odometer to no longer show the distance traveled. In this case, everything can be solved by simply replacing the plastic part that has become unusable with a new one. A frequent malfunction of the brand, associated with the fact that the arrow of the fuel level indicator lives its own life, is explained by the fact that the float located in the gas tank is incorrectly located and periodically sticks to the wall. Thus, it can show a full tank when 5 liters are filled and vice versa.
Light bulbs
By bulbs we mean LED lights, which are often connected incorrectly, which is the reason for the dimming of the light on the dashboard. In this case, all contacts in the backlight are checked.
If we talk about incandescent lamps, then even the breakage of one element leads to the fact that the backlight stops functioning. The test is carried out with a tester, ringing the entire circuit.
To summarize, we can say that the main reason for the lack of backlight on the dashboard is often a short circuit. It will not be difficult to inspect and, if necessary, repair yourself. But you can also contact a car service center, where such work will be carried out more professionally.
Cleaning the contacts of the window lifter button on a VAZ-2114
If suddenly the power window button on a VAZ-2114 begins to jam or refuses to work at all, you need to take a number of measures to diagnose it and correct the problems.
- First, dismantle the button. To do this, use the tip of a knife or the tip of a flat screwdriver to pick out the edge of the part body. And then they remove it from the nest with their hands. Carefully remove the button along with the fastening chip and wires. If this is not done, then to find the nest you will have to remove the podium.
- The chip remains in the hole in the housing, and the button itself with clamps and contacts needs to be diagnosed and, if necessary, repaired.
- To do this, place the part on a clean, light, flat surface in a well-lit room.
- Use the tip of a flat-head screwdriver to open the button. On both sides, both parts of the device are connected with special “bee” latches. Alternately unlocking one by one, the button is divided into two parts.
- The top part is the contacts. She is dismissed.
- The lower part is the “brains”, among which there is an electronic board. Its dismantling is carried out only after marks are made on the body about its exact location.
The contacts are carefully bent at an angle of up to 90 degrees, after which they are cleaned. And then they move on to analyzing the correct order of connecting the contacts. To do this, it is important to understand the principle of pinout of the power window button.
Instrument panel device
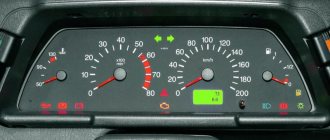
On the instrument panel of the VAZ-2112 there is:
- Speedometer.
- Tachometer.
- Fuel level indicator.
- Direction indicator.
- Liquid temperature indicator in the cooling system.
- Control lights.
- Blocks for connecting wires.
Before you start doing any work on the dashboard, it is recommended that you familiarize yourself with its pinout. In other words, you first need to understand where each wire goes and what it is intended for.
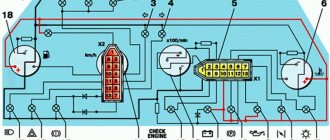
Pinout and instrument panel diagram
Instrument panel pinout
1 — fuel reserve warning lamp; 2 — instrument cluster lighting lamps; 3 — right turn indicator lamp; 4 — left turn indicator lamp; 5 - backup warning lamp; 6 — coolant temperature indicator; 7 — indicator lamp for external lighting; 8 — control lamp for the carburetor air damper; 9 — oil pressure warning lamp; 10 — parking brake warning lamp; 11 — battery charge indicator lamp; 12 — tachometer; 13 — control lamp “CHECK ENGINE”; 14 — speedometer; 15 — brake fluid level warning lamp; 16—hazard warning lamp; 17 — control lamp for high beam headlights; 18 — fuel level indicator.
Troubleshooting
There are several most common problems that may cause the instrument panel on a VAZ-2112 to not work. These are:
- The backlight does not light up. Here you will need to check all contacts, wiring and its condition. Fuses or light bulbs may also simply blow out. There can be many reasons for this, and therefore it will not be possible to quickly solve the problem. We need to understand everything in detail. We had a case where all the instrument panel backlight diodes burned out at once. I had to change all the light bulbs.
- Node failure. This is the most serious problem of all. In this situation, all devices stop functioning. In order to fix the problem, you first need to check fuse No. 1 (5 amps initially, but we have 7.5, 5 amps were knocked out).
You can find it on the mounting block. If it is burnt out, you just need to replace it. It is also necessary to discover the reason why it failed. Usually a short circuit in the wiring leads to such consequences.
- The arrows are jumping. Here the main reason is that the mass on the shield is bad. To get to the ground wire you will need to pull out the car radio. Such a wire may be shifted to the side when installing, for example, an alarm system. Therefore, if there is an alarm in the car, and there is no wire under the radio, you need to look for it in another place. It may be behind the upholstery in the area of the driver's left foot. Also, the ground wire may be damaged during the installation of a new radio. You need to take the time to fasten such a wire to the car body.
- Problems with the instrument panel. Here you will need to check if everything is fine with him. To do this, you need to pull it out from its seat, but do not disconnect the wires. You need to check the voltage in the wiring. Be sure to also look at the back of the device to make sure that the conductive paths are not damaged.
- Cigarette lighter. Often the instrument panel may fail due to the cigarette lighter (for information on replacing the cigarette lighter, see “replacing the cigarette lighter on a VAZ-2112 with your own hands”). Drivers can use various additional devices through this connector, for example, phone chargers. As a result, a large amount of energy is consumed, which causes fuses to blow. For this reason, the instrument panel may also not work correctly. In this case, you need to check fuse F18 and replace it if necessary.
Malfunctions
How to remove the instrument panel on a VAZ 2114
On modern VAZ models, fully electronic instrument panels are installed. When you start the engine, all indicator lights light up, and after 2-3 seconds they go out (if all systems are working properly). If, when you turn on the ignition, one or several light bulbs do not work, then you need to find out the reason by performing a number of characteristic actions.
If one or more lamps do not light, the first step is to replace the lamps themselves. All indicators of the VAZ 2114, like the backlight, are illuminated by LEDs, and during prolonged use they tend to burn out.
If replacing the lamps does not help, then the situation is much more serious. As you know, each indicator is responsible for some kind of system, and in the case when it does not work, the cause may be any element associated with the indicator light in one circuit. For example, if the battery charge sensor does not work, you need to check the entire circuit using a voltmeter, starting with the battery itself and ending with the terminals, high-voltage wires, etc. In the event that a short circuit or breakage of contacts occurs in the system, the corresponding light also does not light up.
Very often, a situation occurs when all indicators stop working at the same time. The reason for this failure is obvious - failure of the corresponding fuse. When you replace it, everything will fall into place.
If the speedometer or tachometer on your VAZ 2114 has stopped working, then there are not many options either. The first of them is a failure in the electrical system itself. To eliminate it, you need to remove the terminals from the battery for 10-15 minutes and install it back. Thus, the system crashes and reboots. If after these steps the device still does not work, then the reason is clearly not in the instrument panel.
Also, sometimes such a problem occurs - the panel backlight does not light up. In order to correct the current situation, you need to decide: how many lamps are not working - one, several, or all.
Installing diodes in the instrument cluster
If one or several lamps do not light, the reason is in the diodes themselves, and they should simply be replaced. If all the lamps do not light up, then the problem may be in the wiring itself. To detect this malfunction, you need to check the entire circuit using a voltmeter.
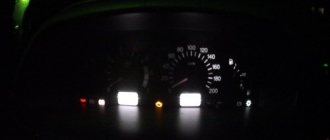
Why doesn't the instrument panel light come on?
I'll give you an example from my life. I went fishing in the summer with my friend in a VAZ 2115 car. On the way, before arriving at the place, the instrument panel lights stopped lighting up
The malfunction would seem insignificant for daytime, but in the evening and at night the driver in this situation is unable to concentrate his attention on the instrument readings, which means it was necessary to eliminate the malfunction
What to do in this situation, where should you look for the cause of the malfunction? Spare bulbs were available, fuses were missing. Or maybe the reason is not in the fuses, but in a break or lack of contact? In general, it’s impossible to immediately figure out where to start. That is, we asked ourselves a single thought: How can we determine the malfunction in this case?
One or more light bulbs do not light up
In this case, there can be two situations:
- The backlight of the VAZ 2114 instrument panel does not light up;
- One or more warning lamps are not working.
Let's consider the first variant of malfunctions, when the backlight of the VAZ 2114 instrument panel does not work. You must begin checking the functionality of the backlight by checking the serviceability of the fuse in this circuit. This only applies when all the backlights are off.
The fuse box on this model, as well as on the VAZ 2113 and VAZ 2115, is located in the engine compartment on the driver's side. You need to remove its cover and find the fuse responsible for the backlight, this is F10. It is designed for a current of 7.5 A. If it burns out, replace it with a new one and check the operation of the backlight paws.
Further events can develop as follows: either everything works or it doesn’t. If the instrument panel backlight works, the test ends here, otherwise it is necessary to continue troubleshooting. It may be due to poor contact of the connectors or an open circuit in the power supply of the backlight lamps.
To find and eliminate these problems, you need to remember the basic concepts of the laws of electrical engineering, and have a car LED electrical circuit tester, tester or voltmeter. If there is neither one nor the other, then it is better to seek help from an auto electrician.
The situation is much simpler when one or more, but not all, backlights are off. Burnt out light bulbs are simply replaced with known good ones. From the practice of auto electricians, we can conclude that in most cases a fuse or light bulb blows. It rarely comes to troubleshooting using instruments, but sometimes it happens. You should be aware that if a replacement (new) fuse blows repeatedly, you should look for a short circuit in the electrical circuit.
In the second case, they do approximately the same, but take into account that there are no fuses for each indicator lamp. They try to replace the light bulb with a new one, if it doesn’t light up again, then the contacts need to be checked. As a rule, this is enough to troubleshoot problems. Otherwise, it is better to ask a specialist for help, because the sensor that works in conjunction with this warning lamp may be the culprit.
Dashboard lamps
VAZ 2115 fuse diagram: even a child can figure it out
Much has been said about the importance of such a small component of automotive wiring as a fuse. Indeed, the smallest part made of fusible metal, which melts and breaks the circuit when the permissible values are exceeded, can protect the car from short circuits, local power surges, and even fire
And besides, even a small child can actually figure out the VAZ 2115 fuse diagram
And besides, even a small child can actually figure out the VAZ 2115 fuse diagram.
What does a car enthusiast do if his beloved “iron horse” suddenly stops responding to individual orders? The windshield wipers or power windows suddenly stop working. What to do? Change the motor, and maybe the entire element, so to speak, as a whole? In fact, the first thing you should check is the fuses. It may well be that the whole problem is a spare part, the cost of which is comparable to a ticket for a city regular bus.
Location of relays and fuses in the mounting block: K1 – relay for turning on the headlight cleaners; K2 – relay-interrupter for direction indicators and hazard warning lights; K3 – Windshield wiper relay; K4 – lamp health monitoring relay; K5 – power window relay; K6 – relay for turning on sound signals; K7 – relay for turning on the heated rear window; K8 – headlight high beam relay; K9 – relay for low beam headlights; F1-F20 – fuses
Of course, replacing fuses only takes a professional a couple of minutes. However, you still need to get to a specialist. What if the ignition doesn't work? Order a tow truck? Expenses, expenses. But often it is enough to check the functionality of the fuses responsible for a particular block and spend the same five minutes replacing them. And your car will be like new again, and a visit to the service station can be postponed until there are really serious breakdowns.
The fuse box in the VAZ 2115 is hidden under the hood, on the driver's side. By opening the cover (it is secured with two simple latches), you get access to the fuses themselves and special tweezers, which are stored right there in the mounting block. It is very easy to decipher the designations of the relays and fuses located in the mounting block, especially if you have a diagram at hand. Relays are designated by the letter “K”, fuses by the letter “F”, the number allows you to determine the area of responsibility of a given fuse or relay; the value in “A” (amps) means the maximum voltage level for this fuse. So, next to fuse F2, which is responsible for the turn signals and the operation of the hazard warning lights, a level of 10A is indicated, that is, this is the load the fuse can withstand. Excessive voltage will damage the fuse, but will preserve the integrity of the system itself.
Electrical diagram of VAZ-2115-20 cars (left half): 1 – headlights; 2 – fog lights; 3 – air temperature sensor; 4 – electric motor of the engine cooling system fan; 5 – blocks connected to the wiring harness of the ignition system; 6 – engine compartment lamp switch; 7 – block for connection to a single-wire type audio signal; 8 – sound signal; 9 – washer fluid level sensor; 10 – front brake pad wear sensors; 11 – oil level sensor; 12 – generator; 13 – engine compartment lamp; 14 – coolant temperature indicator sensor; 15 – starter; 16 – battery; 17 – relay for turning on fog lights; 18 – coolant level sensor; 19 – brake fluid level sensor; 20 – reverse light switch; 21 – windshield wiper gearmotor; 22 – oil pressure warning lamp sensor; 23 – block for connecting to the rear window washer electric motor; 24 – electric motor for windshield washer; 25 – instrument cluster; 26 – mounting block. Conventional numbering of plugs in the blocks: A - block headlights; B — electric fuel pump block; C — blocks of the mounting block, ignition switch, windshield wiper gearmotor; D — interior lamp
The backlight of the VAZ 2114 instrument panel does not light up: do-it-yourself repairs
The dashboard on the VAZ 2114 allows the driver to control engine data, monitor the remaining amount of fuel, his speed, and other data. The panel should be maintained in working condition so that the backlight not working does not cause discomfort, and the sensors show real values.
Bright backlight
But quite often, VAZ 2114 owners discover that the instrument panel lights do not light up. If such a situation occurs, appropriate action should be taken immediately to eliminate it.
Why the instrument panel does not work
Disassembled dashboard
The first thing you need to figure out is why the instrument panel on the VAZ 2114 does not work. If the backlight goes out, there may be several reasons for this:
- The incandescent lamps burned out, the LED lighting groups stopped working;
- The connectors have oxidized;
- The electrical wiring is faulty, there are defects in the circuit;
- The fuse box has stopped working;
- Damage appeared on the common contact board;
- The dimensions system is damaged;
- There is no minus on the body (weight).
Removing the dashboard
To replace the light bulbs in the dashboard of the VAZ 2114, it will first have to be dismantled. Without this action, you will not be able to access the problematic device.
Panel disassembly diagram
Therefore, now we’ll figure out how to disassemble the instrument panel on a VAZ 2114:
- Unscrew the three screws, remove the trim and the protrusion from below. It comes out of your car's body bracket;
- Now remove five more screws located on the right console trim;
- Remove the screen; Disconnect the negative terminal from the battery;
- Disconnect the wiring harness connector from the cigarette lighter;
- Remove the handle from the lever;
- The fasteners for the electric fan of the heating system, that is, the stove, also have to be removed;
- Unscrew the steering wheel block bracket fixing bolts;
- Remove LEDs, lamp sockets and decorative inserts on the panel;
- Unscrew the hydraulic corrector illumination lamp. For this you will need a key for 21;
- Now all that remains is to remove the screws at the top and bottom.
Thus, we figured out how to remove the dashboard on your VAZ 2114. Be sure to cover the electrical circuit with something after the measures have been taken to prevent moisture, dust and all kinds of contaminants from getting there.
Proceed to replace the lamps that turned out to be faulty. At the same time, many are interested in how many light bulbs are in the dashboard of the VAZ 2114. There are 13 of them, but only 8 can be replaced. Do not forget to clean the contacts if there are traces of oxidation on them. In some cases, it is not the lamp itself that has to be replaced, but the socket for it.
Selection of light bulbs
Wiring ringing
Today the market offers a wide range of lamps that can be used for the dashboard of the VAZ 2114. Among the most well-proven devices, we note a few. Their name and cost are presented in the table.
| Manufacturer | Price |
| LED lamps Sho-Me SM-T5 (blue, white and red (Korea) | 80 rubles - pair |
| High Brightness SMD LED Module | 20 rubles |
| LED Sho-me SM-T5-cap-super (white) | 50 rubles |
| Osram and Philips halogen lamps | About 40-80 rubles per unit |
Replacing the backlight
In analysis
To improve the quality of your dashboard lighting, it is advisable to install new LEDs in place of the old ones. They provide excellent illumination, consume minimal energy, and guarantee a high level of data reading.
- Buy a set of LED lamps, having previously calculated the number of devices needed for each sensor.
- After removing the block, install the resistors and lamps in specially designated places on the VAZ 2114 - in the sockets. To dismantle the cartridges, they are carefully unscrewed counterclockwise. New sockets are installed in their place and light bulbs are inserted. Respect the polarity and position the LED heads. They will have to be carefully ground off.
- Connect the power and check how the new backlight works.
- Reassemble step by step. Be sure to route the wiring to the board and carefully secure it to it. This way, the backlight components will not interfere with the reassembly process.
- Make sure the instrument panel arrows are positioned correctly. When trying to quickly complete a job, they often become deformed and bent.
- The backlight structure is fixed with screws.
- The power for the LEDs is connected to the power supply for the light bulbs, the arrows are put on and set to zero.
- Using the on-board computer, check the operation of each sensor and device. If the IDs are functioning correctly, return the instrument panel to its original condition. That is, assemble the entire assembly.
Selection of light bulbs
Today the market offers a wide range of lamps that can be used for the dashboard of the VAZ 2114. Among the most well-proven devices, we note a few. Their name and cost are presented in the table.
| Manufacturer | Price |
| LED lamps Sho-Me SM-T5 (blue, white and red (Korea) | 80 rubles - pair |
| High Brightness SMD LED Module | 20 rubles |
| LED Sho-me SM-T5-cap-super (white) | 50 rubles |
| Osram and Philips halogen lamps | About 40-80 rubles per unit |
How to disassemble the dashboard of a VAZ 2114
Before embarking on this complex process, the driver must carefully familiarize himself with the design and arrangement of the instrument panel on his car. When disassembled down to the cogs, it looks like this:
If you carefully study this diagram, it becomes clear how to remove the panel on a VAZ 2114. Having determined the order for yourself, you can begin the process.
Using a Phillips screwdriver, you need to unscrew the three screws holding the left console screen
For convenience, when doing this work, it is better to use a screwdriver with a short handle and blade. When removing the screen, carefully remove the lower edge of the trim from the body bracket. The right console screen is secured with five self-tapping screws. Using a Phillips screwdriver, carefully unscrew all the screws while holding the trim with your hand. Remove the screen without allowing it to get caught in the wiring harnesses that are hidden behind it. Disconnect the ground from the battery by disconnecting the connectors. If your car has a radio, disconnect it from the main bundle of wires by pulling out the connecting block
If there is no radio installed on the car, then simply pull the wires out of the panel; they should be closed with a plug. Be sure to turn off the cigarette lighter and remove the socket with the ashtray light bulb. Remove the handles from the heater damper control levers. To make the process easier, pry them off with a flat-head screwdriver. Despite the apparent simplicity of this item, removing the handles from the levers can take a lot of time. To do this, a clear example is given of how this should be done on a removed unit. Remove the electric heater fan handle by simply pulling it towards you. Unscrew the self-tapping screws with a cross-shaped head that secure the instrument panel to the brackets on the right and left with a screwdriver. In the window on the instrument panel, where the instrument unit is located, there are two self-tapping screws at the top and two at the bottom - under the window. It is necessary to turn them out, loosening the cover (2) and the shield (8). Pull out the plug and unscrew the self-tapping screw located behind it. Remove the two self-tapping screws from below that hold the trim and remove it. Having marked the wires suitable for the switches, disconnect them. Unscrew the bolts from the steering wheel bracket. Use an “8” key to unscrew the screws of the lower bracket mounting. Unscrew the self-tapping screw and remove the light guide. Remove the fasteners from the heating control unit and remove the cartridges from the back of the unit. remove the decorative insert, removing all external parts. Unscrew the nuts with a key set to “21”. Remove the hydraulic corrector illumination. Unscrew the upper and lower fastenings of the panel, and remove the fastening to the cross member on the left side. Now you can remove the VAZ 2114 torpedo. Installation is done in the reverse order.
In order to clearly see the whole process in motion, you can watch a video on how to remove the dashboard on a VAZ 2114.
Complete instructions for removing the control panel
To remove the device correctly, follow the instructions below:
- Using a Phillips screwdriver, remove the three screws that secure the center console;
- remove the cover, the protrusion located at the bottom, remove the protrusion from the bracket;
- Using a nozzle, unscrew the five screws located in the console on the right and remove the screen;
- Disconnect the terminal with the (-) sign from the battery. If there is a radio receiver, you need to remove it, remove the plug from the shield;
- Disconnect the wires coming from the cigarette lighter, remove the cartridge;
- Using a narrow screwdriver, remove the handle from the levers;
- pull the handle towards the heating and fan switch;
- unscrew the two screws above the panel and the two located under it using a screwdriver;
- unscrew the screw located behind the panel;
- Also unscrew the two self-tapping screws securing the cover;
- disconnect the harness and wire connectors. To avoid confusion when installing the panels, you should mark the order in which they are connected;
- unscrew the fastening bolts;
- unscrew the two self-tapping screws, those that secure the bottom bracket using an 8 key;
- unscrew the self-tapping screw securing the light guide and remove it;
- Also unscrew the screws securing the heating unit;
- remove lamp sockets;
- after removing the external parts, remove the decorative insert;
- unscrew all nuts with a 21 key;
- hydrocorrector, remove its lamp;
- Unscrew the screws that are attached to the cross member on the left.
Finally, the panel itself is removed. The panel is assembled accordingly in the reverse order.
It is important to remember the sequence of actions if you are performing this procedure for the first time. When disassembling and assembling you need to be extremely careful and attentive.
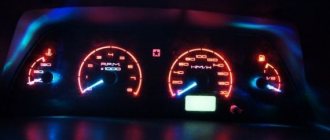
Hi all. Today I will write about the experiments that I have been doing for the past two weeks. The idea to re-illuminate the dashboard with boards belonged to DMMC, and I agreed because 2 LEDs in my dashboard burned out. One is off, the other is blinking and there is a disco on the dash. It was also necessary to make a smooth ignition so that it would be completely good. While driving, I found diagrams for smooth operation and tidying, if you look hard enough, you’ll find them too. I went to buy textolite, diodes, resistances and other necessary ingredients. Required: - Textolite; — Diodes 3528 white; — Resistance 330 Ohm (For white LEDs, for others you need to calculate); — Soldering acid, solder, citric acid, hydrogen peroxide and nail polish remover (or whatever you have on hand to remove toner from the chip) Printed out the diagrams on glossy paper,
Tidy 2115: description and purpose of buttons and knobs
If everything is simple with the levers on the steering rack, there is a headlight position switch and a turn signal switch on the left. Buttons are more difficult.
On the dashboard, the main keys are placed in a separate “strip”. To understand the essence, we present their decoding from left to right.
- Switch for outside parking lights.
- Activation of low beam headlights.
- Front fog lights.
- Rear PTFs. If not installed, reserve.
- Rear window heating button.
Lada 2115: the oil light on the center panel is on
If an icon in the shape of a watering can appears on the console, this indicates that there are problems in the engine lubrication system. This is caused by a drop in the oil level in the crankcase or a pump malfunction. If the engine is old, the problem may be caused by clogged oil lines.
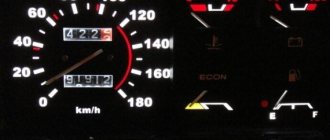
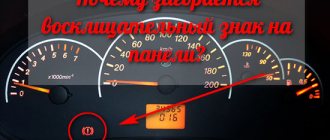
What does the exclamation mark on the Lada 2115 tidy mean?
On the "tag" the symbol is used in only one form - a red indicator in a circle. The icon indicates a malfunction in the vehicle's brake system. If this symbol lights up while driving, stop and find the cause of the breakdown. Usually it is enough to add fluid to the expansion tank or replace worn pads.
The battery light on the dash is on 2115
A red battery icon indicates that the battery is not charging properly. A complete diagnosis of on-board systems associated with the generator set and its wiring is required.
Lada 2112 ᵀᴴᴱ ᴼᴿᴵᴳᴵᴺᴬᴸ › Logbook › WHY VAZ 2110-2112 DEVICES DO NOT WORK
Mikhail Grebenkin, 27 years old I drive a Lada 2112 ᵀᴴᴱ ᴼᴿᴵᴳᴵᴺᴬᴸ (before that - Lada 2108) Voronezh, Russia
The instrument panel of the VAZ-2110-2112 contains: speedometer, tachometer, fuel level indicator, coolant temperature indicator, 12 different indicator lamps, 6 dashboard backlight lamps, one reserve socket for the indicator lamp and two wire connection blocks. It is very easy to distinguish the pads, the one that is white in electrical diagrams is designated as X1, and the one that is red is designated as X2. The instrument panels themselves, installed on VAZ-2110 cars, can be of two types: the old model, where the instruments are placed symmetrically, and the new model, with fuel and coolant level indicators shifted to the right side of the dashboard.
The biggest malfunction of the instrument panel will be its complete failure. In this case, neither the control lamps nor the devices themselves work. The driver, first of all, needs to check the 15 amp fuse F6. It is located in the mounting block. If it burns out, it is necessary to look for the cause of this phenomenon, otherwise the new one installed will repeat the fate of the previous one, that is, it will also burn out. The cause of blown fuses is a short circuit in the electrical circuit.
There are times when instrument needles begin to jump along their scales from minimum to maximum. Most likely, the reason for such actions of devices will be poor contact with ground. The ground wire coming from the instrument panel is attached to the partition separating the engine compartment from the passenger compartment. You can find it by removing the radio from the socket. But if an alarm was installed on your car, then it is quite possible that the fastening of this massive wire, for ease of operation, was moved to another place, more accessible. Usually, alarm installers move it behind the interior trim in the area where the driver’s left foot is located. A similar picture can occur when installing a radio. When connecting its negative wire, the ground wire of the instrument panel was unscrewed, and then it was wrapped poorly, as a result of which it weakened under the influence of vibrations transmitted to the car body. They wrap it poorly because it is not very convenient to do so.
If everything is in order with the fastening of the ground wire, then you will have to check the instrument panel itself. To do this, you need to pull it out as far as possible from its mounting location without disconnecting the wires going to the pads. You will need to check on the white block X1 the ground wire going to contact 1, and at the same time check the voltage on contacts 6, 9, 10, it should be equal to 12 volts. Look, on the back side of the instrument panel, for the integrity of the paths along which electric current flows to the corresponding consumers.
Another cause of instrument panel failure may be the cigarette lighter. The fact is that through this socket, some drivers connect additional devices, such as: a cell phone battery charger, an electric tire pump, or a car interior vacuum cleaner. Considering that these consumers require high current, either the cigarette lighter itself fails or fuse F19 blows, which leads to failure of the instrument panel. By the way, you can also disable the cigarette lighter by holding it in the on position for a long time. In these cases, you can make the instrument panel work by disconnecting the cigarette lighter connector if fuse F19 is intact.
In principle, the driver himself can eliminate all malfunctions associated with a complete failure of the instrument panel. For this, he does not need any additional knowledge in electrical engineering. The only thing he needs to know is the probable causes of failure of the instrument panel.
Previously “Blind spot” - learning to keep control Next Why does the VAZ 2112 start and stall
The most common breakdown
{banner_content}Before digging into the inside of the car, check how securely the ground wire leading to the front panel is secured. A restless passenger in front often simply pulls him out of his place with his feet. To prevent the situation from repeating itself, after fastening it is worth insulating the wire from reach.
The situation is a little more complicated
Its signs are very characteristic:
- All indicators do not work:
speedometer, tachometer, odometer, fuel level recorder, coolant temperature sensor; - The rest of the equipment - optics, radio, even the panel backlight - turn on normally and do not act up;
- The ignition works properly, the car does not refuse to start;
- Fuse F3 is
almost 100% . It is located in the mounting block and will have to be changed. But first you need to find out why it was covered, otherwise the new one installed will suffer the same fate. In most cases, a short circuit is to blame for burnout. On well-used VAZ-2114, the fuse often blows after each wash. Instead of carrying a spare one, you need to figure out where moisture is getting into it.
If the fuse is intact, this is not a reason to immediately leave it alone.
It would be a good idea to remove it and check the contacts: if the fuse is live, but the terminals are oxidized, the circuit will be interrupted, and the device will stop showing any signs of life. Next weak link:
It is the ignition relay. It is located to the left of the steering column, fixed on a pin, so to speak, upside down. You need to remove it and try to make direct contact with the wires. If there are obvious signs of revival on the instrument panel, it immediately becomes clear that the time has come to change the relay.
Possible malfunctions of the VAZ 2114 speedometer
The basic, historically established function of the speedometer remains necessary only to comply with traffic rules. Information about the vehicle speed is used by the electronic control unit to maintain stable power mixture supply conditions.
Symptoms
Characteristic signs indicating incorrect operation or breakdown of the speed meter are:
| The instrument panel does not light up (there is no supply voltage to the instruments when the ignition key is turned); |
| The indicator arrow does not deviate and jumps while the car is moving; |
| The speed reading differs from the actual value. |
Possible reasons:
- fuse F19 in the mounting block has blown;
- a worm gear made of plastic is destroyed (worm, gears);
- the end of the cable that engages the gearbox transmission mechanism has broken off;
- bent, the cable casing collapsed;
- break in the signal and power wires of the speed sensor;
- oxidized, contacts in the connector disappeared;
- problems with the sensor electronics;
- the speedometer on the dashboard is out of order;
- wheels with a different outer diameter were replaced;
- the device has been replaced by another, calibration has not been done;
- the speed sensor does not match the gear ratio (external color difference).
Wiring damage
One of the unwanted breakdowns is damage to the wiring. Small contacts, resistors and plugs are difficult to repair without tools. Lack of power to the connectors and bulb sockets leads to their malfunction. As a DIY repair attempt, you can disconnect the plugs and connectors, and then clean all contacts from oxides. In rare cases, this procedure can restore contact. The backlight of the VAZ 2114 dashboard is not a key design component, but its absence seriously complicates the process of operating the car at night. When replacing lamps, you can carry out overexposure procedures and replace standard elements with LED ones. In addition to increased brightness, you will get a longer service life. The photo above shows a detailed diagram of the connections of the VAZ 2114 instrument panel.
Troubleshooting steps
To diagnose and repair the backlight system for the instrument panel on a VAZ 2114, you will need a pair of wrenches, sizes 8 and 21, and a set of screwdrivers. The general procedure for dismantling and adjustment work boils down to the following steps:
- Remove the trim by first unscrewing the three fastening screws and removing the protrusion from the body part bracket.
- Remove the five mounting screws from the right side of the console and remove the screen.
- Disconnect the terminal with the battery suitable for the negative power source, as well as the block with the bundle of wires from the cigarette lighter system.
- The handle of the lever mechanism is removed.
- The stove ventilation system clamp is dismantled.
- The screws securing the steering column brackets are removed.
- The sockets are unscrewed, the light guide and the decorative panel insert are removed.
- The light bulb for illuminating the hydraulic corrector is removed using a 21 key.
- Finally, the screws that secure the top and bottom of the instrument panel itself are unscrewed so that it can be removed.
Once the instrument panel is removed, you can begin to find the reason why the backlight is not on. First of all, it is customary to check the lamps on the VAZ 2114. If they are working properly or after replacing the damaged unit the system still does not work, you should clean all contacts from the oxide film. To speed up the process, it is better to use special mixtures such as VD-40.
Upon completion of all these manipulations, it is necessary to perform a wiring test to detect a break. For this you will need a multivoltmeter or tester. If all the checked elements are in working order, but the backlight does not light, the safety module is to blame. It needs to be replaced with a unit with similar technical characteristics (and preferably from the same manufacturer).
Fuse
The side lights are located in the main headlights, but many owners modify the lighting and install additional diodes in the turn signals. In each case, the design contains a fuse that protects the electrical circuit. Its failure means a malfunction of the entire circuit. If the rear left indicator does not light up, check the condition of the indicator under the F10 marking.
The fuses for the left and right side of the side lights on the 4 are located in the mounting block. Fuses marked F10 and F11 protect the left and right sides of the lamps, respectively. The photo shows the location of each of the fuses in the mounting block of the new model. The fuse marked F10 is responsible for the left side of the dimensions, and F11 for the right.
The simultaneous cessation of lighting in the listed places indicates a malfunction of fuse F10, whose task is the left side of the light bulbs on the machine. When considering the reasons why the dimensions on the VAZ 2114 do not work, do not be lazy to check the condition of other fuses for integrity. Normal operation of electrical appliances simplifies the operation of the machine.
The purpose of each of the fuses on the car
If you turn over the removed cover, then on its inside you will see a diagram of the location of the relays and fuses in the mounting block (fuse block). On it, all these elements are numbered and designated from F1 to F20. Naturally, everyone is responsible for the performance of various consumers in the vehicle’s electrical network:
Diagram with the location of fuses VAZ 2114
- F1 – rear fog light and indicator lamp for turning on the latter (10 A);
- F2 – turn signal breaker relay, VAZ 2114 emergency alarm, turn signals (10 A);
- F3 – front and central interior lighting, trunk, trip computer and brake light bulbs (7.5 A);
- F4 – heated rear window (20 A);
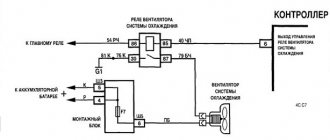
- F5 – sound signal, cooling system fan (20 A);
- F6 – power windows (30 A);
- F7 – electric motor for heater, front window, washer, glove compartment lamp, cigarette lighter (30 A);
- F8, F9 – fog lights, right and left, respectively (7.5 A);
- F10, F11 – left clearance, as well as right, indicator for turning on dimensions, license plate lighting, as well as instrument lighting lamp, ashtrays (7.5 A);
- F12, F13 – right and left low beam, respectively (7.5 A);
- F14, F15 – high beam left and right, respectively (7.5 A);
- F16 – turn signals, dashboard indicators – parking brake, low battery, etc., as well as a trip computer (15 A);
- F17-20 – reserve respectively for 7.5, 10, 30 and 20 A.
The VAZ 2114 fuse diagram also contains backup fuses for 7.5, 10, 20, and 30 A, located in the lower part of the VAZ 2114 fuse block. Having pulled out the supposedly blown one, you should inspect it visually. If it is clear that the integrity of the thread is broken, then it can be unequivocally stated that the reason for the inoperability of the vehicle equipment lies precisely in the malfunction of the fuses. You can replace the inoperative one with a backup one of the same power according to the data that is presented to you by the diagram on the back of the plastic cover of the mounting block.
Private situations
General signs do not always indicate specific breakdowns. There may be exceptions.
If individual devices refuse to work, it is quite possible that this is their personal problem. You'll have to parse the specific pointer. It may have a cracked gear that needs to be replaced.
Also, why doesn’t the instrument panel of the VAZ 2114 work? If the fuel gauge and tachometer are capricious (either they function, or they don’t react at all), the contacts and the mounting block are normal - you need to do a small check.
Reset is pressed and held, and the ignition is turned on at the same time. Raised arrows indicate the need for further searches. Lifeless - that microcracks have appeared in the shield itself. You will have to remove it and examine all soldering and traces under a magnifying glass. In principle, these are all the main options. If calling all the listed components and parts did not lead to the revival of the instrument panel, your case is individual, and you will have to determine the situation in the company of an experienced auto mechanic.
If you find an error, please select a piece of text and press Ctrl+Enter.
Hard case
Until now, situations have been sorted out when the torpedo still showed some signs of life.
If non-working power windows, turn signals, and windshield wipers have been added to the devices, the issue is no longer a matter of relays and fuses. There may be 2 options:
- The contacts on the ignition switch are burnt
. In principle, after installing the relay (even on the VAZ-2109 version), this problem rarely arises. However, the possibility remains. The lock is removed, the contacts are checked and, if necessary, cleaned; - Mounting block
. There may be burnt tracks on its board. The only thing that will save you is replacing it with a new one. However, the cost is by no means astronomical, and the installation is available as a standalone option.
Dashboard lamps
The dashboard provides the driver with a lot of useful information that allows him to monitor the condition of the car, the driving process, diagnose breakdowns in a timely manner and correct them. So, the panel light comes on for the following reasons:
- The battery is not charging.
- For one reason or another, the handbrake is stuck.
- Not enough fuel in the tank.
- The oil pressure has decreased (which indicates the need to urgently stop the engine to avoid more serious consequences).
- Excess water in the filter. To prevent water from entering the pump, which could lead to damage, you need to drain excess water from the filter.
- The fuel system is malfunctioning.
- There was a failure in the propulsion system and much more.
As you can see, the panel lamps allow you to determine what is wrong in the car; if the lamps themselves fail, then you can miss a very important breakdown, which can even lead to an accident
This is why it is so important not to delay replacement (lamps cannot be repaired)
Today, the car market offers a wide range of lamps for the control panel, ranging from the standard version, which is cheaper but also has average characteristics, to modernized versions that give the panel, and therefore the entire atmosphere of the car, a different, more expressive atmosphere.
Professionals also advise replacing standard lamps with LEDs, which largely decorate the panel.
So, we list several of the currently most popular options suitable for the VAZ 2114.
- LED lamps Sho-Me SM-T5 (blue, white and red). Country of origin: Korea, price: 80 rubles. for a couple.
- High-brightness SMD LED module – 20 rubles.
- LED Sho-me SM-T5-cap-super (white) – 50 rub.
- Halogen lamps from Osram and Philips cost approximately 40-80 rubles apiece.
As you can see, prices for lamps are not high. It is worth noting that replacement takes very little time, which we will talk about later.
Solutions
So, when all the main reasons are, so to speak, “in the face,” you can try to determine the exact location of the breakdown, and also fix it yourself. As always, it is worth noting that if a motorist does not know the design of the car or is not confident in his abilities, then it is recommended to contact a specialist car service center.