Dear customers, in order to avoid errors when sending a seat heating harness 2123 with a Euro connector, in the “Comment” line indicate which connector is Euro or simple, your car model, year of manufacture, which key or block of electric heating control buttons is used.
For every driver, comfort when operating a car plays an important role. The climate in Russia is quite harsh; sitting in a car for a long time, especially in the cold, is not a pleasant experience. Everyone knows how quickly the interior of a car cools in the winter in an open parking lot or in an unheated garage. Usually a car has a heating system for the interior, but this is not always enough. That's why car seat heaters are simply indispensable accessories in cold weather.
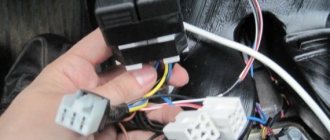
Wiring harness 2123-3724076 with Euro connector, connects to heated front seats with Euro connector in 4 x 4 cars, Chevrolet Niva and their modifications. Can be used for self-installation and replacement. The contacts are already crimped onto the wires and inserted into the connectors according to the pinout, so they can be installed on the car.
Wiring harness for heated front seats 21230-3724076-00:
31 - to the electric heating control unit;
32 — to the electric heater of the right seat;
33 — to the rear harness block;
34 - to the electric heater of the left seat.
Stationary heating elements are mounted between the upholstery and the foam layer of the car seat. For their manufacture, mats made of carbon fiber fabric or reinforced wires are used.
Carbon fiber or thermal fiber mats do not have any restrictions. They can be cut at the desired location to attach the fittings to the car seat. The cost of such products is high, but is compensated by reliability.
Heating the seats in the car not only increases driving comfort, but also protects against many diseases associated with constant hypothermia.
In new cars, this function is most often provided initially, but owners of domestic cars are often forced to solve the problem on their own.
Installation and replacement of the harness 2123-3724076 with a Euro connector, which is connected to the heated front seats with a Euro connector in 4 x 4 cars, Chevrolet Niva and their modifications, can be done independently, without contacting specialized service centers.
Other article numbers of the product and its analogues in catalogues: 21230372407600.
VAZ 2123, VAZ 21213-21214i heated seats with Euro connector.
Any breakdown is not the end of the world, but a completely solvable problem!
Why the heated seats do not work on a Niva Chevrolet: connection diagram
If your Niva Chevrolet car has such an option as heated seats, then in the winter season you have to use them one way or another. It is especially often used after long periods of parking in severe frosts. However, great discomfort can occur when this system suddenly fails and simply stops functioning. In this article, we'll take a closer look at why this happens, as well as how to best resolve the issue.
Lada Granta diagram - ignition part
- 1 – indicator of lubricant pressure in the crankcase of the power plant;
- 2 – generator connector;
- 3 – power supply to the fuel mixture supply valve;
- 4 – cooling system thermometer;
- 5 – sending a signal to the dashboard;
- 6 – adsorber purge;
- 7 – speedometer;
- 8 – mass air flow sensor;
- 9 – DPKV;
- 10 – DC in front of the catalyst;
- 11 – control pulse device;
- 12 – oxygen concentration sensor in exhaust gases;
- 13/14 – coil and spark plugs, respectively;
- 15 – injector drivers;
- 16 – ignition contact group;
- 17 – detonation measurement sensor.
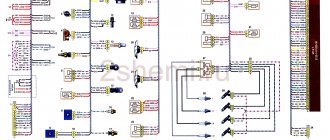
A SET OF SOME DIAGRAMS FOR NIVA CHEVROLET
Wiring diagram for fog lights
I - Fog lights, II - fuse box, III - fog light switch, IV - fog light relay. A - Constant voltage, B - to side lights
Seat heating connection diagram
I - Heating elements, II - seat heating switch, III - heating relay, IV - ignition switch A - Side lights, B - to the battery.
Wiring diagram for heating and controlling mirrors
1 - Ignition switch, 2 - fuse block, 3 - heated mirror relay, 4 - mirrors, 5 - mirror control switch, 6 - heated mirror switch. A - To the battery, B - to the side lights.
Connection diagram for tape recorder and speakers
1 - Radio, 2 - front right speaker, 3 - rear right speaker, 4 - rear left speaker, 5 - front left speaker. A - To the side lights, B - to the battery.
Radiator cooling fan switching diagram
1, 7 — Radiator cooling fan, 2, 6 — low speed relay, 3 — fuse, 4 — engine control unit, 8 — high speed relay. A, C - To the battery, B - to the power sensor.
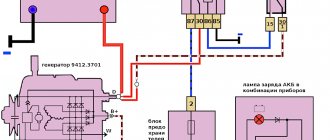
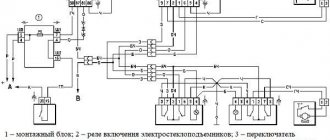
Front seat heaters are installed on Chevrolet Niva cars in a variant version. The diagram for switching on the heaters is shown in Fig. 7-42.
Rice. 7-42. Scheme for switching on the heated front seats:
1 – mounting block; 2 – front seat heaters; 3 – front seat heating switch; 4 – relay for turning on the heating of the front seats; 5 – ignition switch; A – to power supplies; B – to the external lighting switch; C - conditional numbering scheme for plugs in the front seat heating switch block.
The heaters are switched on by switches in control unit 3. The rated power of the backrest and seat cushion heating element is 36 W.
Recently I started equipping my cars with heated seats. But on models that were produced earlier, for example, the 2004 or 2006 Chevrolet Niva, this option is not provided. Installing a heated seat does not lose its relevance even in spring and summer, since it is easier to work on a car in warm weather. Heating, turned on to maximum, heats the seat up to 30 degrees, after which the comfortable temperature is maintained until the system is turned off.
Car enthusiasts sometimes claim that heated seats consume too much electricity, which is bad for the battery, but this is not true. The heating system requires the same amount of energy as standard parking lights. Now we will take a closer look at the process of installing heated seats on a Niva Chevrolet
and what kind of system it is.
The heated seat system is a special electrical device that is installed on the front seats of a car to heat them. The device consists of electric heating panels that are installed in each of the two parts of the car seat. There are two types of these systems: seat covers and built-in heating system. The most common system is the cape. This is a seat cover with built-in electric heating panels - this system has a remote control panel. Now we will take a closer look at the advantages of both systems.
see also
Comments 19
There should be a plug, the heating sits on a common relay along with the electric mirrors, and accordingly it is common, at least on the pre-Restayl. There are two relays that click when the ignition is turned on - these are for the power windows and for the heated mirrors. I could be wrong. But plus a hundred pounds can be taken from the power window relay
There should be a plug on the floor upholstery to connect the heated seats, I connected it like this...
I read that after 12 years there seems to be nothing there, I’ll look for it this weekend
Electrical diagram equipment rshnivy and old shniva: rutracker.org/forum/viewtopic.php?t=4346365 There you need to understand the principle of the circuit, I separately drew on paper the fragments that interest me, there is an electrical circuit. heating page 40
There is an error in the diagram - IV is the mounting block, the ignition switch is position V. I have a 2012 LC car, when I installed the heating, I discovered that in the installer in connectors X1 and X4, sockets 2 and 17, respectively, were occupied, then I discovered the relay (the color of the wires matched seat heating relay) it has a + on pin 87 when the ignition is turned on, so I connected the wire from the heating switch to it. In general, I concluded that the main wiring harness and mounting block are the same for all configurations, only there are no wiring harnesses for consumers.
Ok, thanks, I'll take a look
There is an error in the diagram - IV is the mounting block, the ignition switch is position V. I have a 2012 LC car, when I installed the heating, I discovered that in the installer in connectors X1 and X4, sockets 2 and 17, respectively, were occupied, then I discovered the relay (the color of the wires matched seat heating relay) it has a + on pin 87 when the ignition is turned on, so I connected the wire from the heating switch to it. In general, I concluded that the main wiring harness and mounting block are the same for all configurations, only there are no wiring harnesses for consumers.
where is this relay located? Otherwise, I also bought it, opened the mounting block and there the connector for heating was occupied, in the end I never connected it.
One of the relays hanging separately under the mounting block (I installed it myself 2 years ago, I don’t remember which one). It should click when you turn the ignition on and off. To make sure it is or not, remove the fuse (F10 in the diagram), there will be no “clicking”. By the way, if sclerosis serves me right, the headlight relay is also hanging there. I connected my fog lights using a kit from Priora, I didn’t bother to redo it, so the additional relay is hanging on the wires near the installer.
I recently connected it myself.+ I took it from the unit, rang the circuit and connected it there, presented it at 15A, the relay is in the button. — I found it on the cigarette lighter. It’s very simple.
Cigarette lighter fuse
If the cigarette lighter does not work, then the first thing you should check is the socket itself for the presence of foreign objects and the integrity of the fusible link, which opens the circuit if the reverse mechanism of the cigarette lighter spiral does not work.
p, blockquote 48,0,0,0,0 —>
p, blockquote 49,0,0,0,0 —>
Next, check the fuse on the unit itself. On the diagrams it is marked as number 6 (F6).
p, blockquote 51,0,0,0,0 —>
In another version, this is the adjacent element (cigarette lighter and sound signal)
p, blockquote 52,0,0,0,0 —>
p, blockquote 53,0,0,0,0 —>
If this does not help, then the question remains with the electrical wiring itself.
p, blockquote 54,0,0,0,0 —>
We have also prepared video material on this article.
p, blockquote 55,0,0,0,0 —>
p, blockquote 56,0,0,0,0 —> p, blockquote 57,0,0,0,1 —>
Anything to add? We will be glad to see your comments.
Grant's electrical circuit responsible for the engine compartment
Here are the main parts of the Lada Granta wiring, which are responsible for the normal operation of the power plant:
- 1 – power supply to the headlight, front right;
- 2 – power supply for windshield washers;
- 3 – voltage to the left side of the head optics;
- 5 – on-board power supply;
- 6 – head fuse block;
- 7 – generator;
- 8 – horn;
- 9-11 – terminal blocks to the dashboard;
- 12 – contact pair of rear headlights;
- 13 – main radiator fan drive.
replacing heated seats in a Chevrolet Niva
✅ INSTALLING HEATED SEATS ON A CHEVROLET NIVA WITH YOUR OWN HANDS. HOW TO CONNECT SEAT HEATING.
You can pay much less for fuel if you use Now we will take a closer look at the advantages of both systems.
Chevrolet Niva Shevik › Logbook › Repair of heated seats. Since the summer, the heating on...
Car enthusiasts sometimes claim that heated seats consume too much electricity, which is bad for the battery, but this is not true. If you have a Chevrolet Niva in the L configuration, then it has wiring for heated front row seats; three cables are located under the carpet and sound insulation. In the floor tunnel of the Chevrolet Niva, we cut out a hole in the regular place for the block of heating control buttons.
Covers with heated seats on a Chevrolet Niva ease of installation changing the design of your interior and ease of connection disadvantages the cigarette lighter only works when ignited, this means that you cannot leave this system overnight the quality of the covers wants the best it is almost impossible to achieve fixation Advantages of a built-in heating system: Do not forget to install resistance to replace heated seats Niva Chevrolet and insulate all connections well.
Now we will take a closer look at the advantages of both systems. Covers with heated seats on a Chevrolet Niva ease of installation changing the design of your interior and ease of connection disadvantages the cigarette lighter only works when ignited, this means that you cannot leave this system overnight the quality of the covers wants the best to achieve fixation is almost impossible Advantages of the built-in heating system: After achieving the desired temperature, the system automatically turns off; the system is equipped with a fuse and in the event of a possible short circuit it will burn out. The service life of heating systems is very long, often they last much longer than the car.
Installation of a heating system
To install heated seats on a Niva Chevrolet yourself, you will need the following:
- M8 bolt terminal
- wire 0.75 (0.5 meters)
- insulating tape
- soldering iron and solder
- heat shrinkage and ties for 100-150mm (25 pieces)
- drill and drill for it 8mm
- rough file
First of all, you need to check the functionality of the device. To do this, you need to connect the heating pad to the battery using wiring. After making sure that the heating pad works, you need to remove the console. The terminals have been removed, now you need to glue the templates onto the heating pad and make holes. The best place for attaching it would be a niche. It is strictly not recommended to attach the heating pad from the back, as it will be inconvenient for you to view the heating pad’s modes.
The holes must first be drilled with a drill, and then finished with a file. Be careful when working, the fact is that the buttons have a small apron, and if you overdo it, there will be a hole. You also need to drill carefully so that you do not scratch the console.
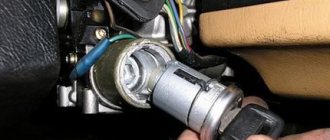
The final mission of heating the Niva Chevrolet seats will be to connect the heating pad. There are only three connection options:
- to the cigarette lighter
- to the white chip, it is located in the area of the right seat
- to the black chip, it is located under the driver's seat
That's it, after connecting the heating pad, the work is completed, now all that remains is to test the result of the work performed. You need to turn on the heating and if the corresponding indicator on the button lights up, it means that you have connected all the wiring correctly. Next, you need to wait a few seconds after placing your hand on the seat; if the temperature does not change, then everything is installed correctly and there is no reason to worry. Good luck with the installation!
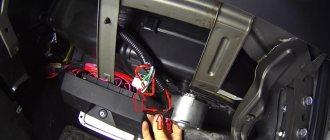
We will install heated seats on a Chevrolet Niva. First you need to completely remove the front seats. This is done very easily, first we move the seat as far forward as possible, then unscrew the screw on the slide. There is a self-tapping screw on the reverse side; unscrew it and remove the plastic cover.
Heated seat covers for Chevrolet Niva
- ease of installation
- change the design of your salon and ease of connection
flaws
- The cigarette lighter only works when ignited, which means you can’t leave this system on overnight
- the quality of the cases requires the best
- achieving fixation is almost impossible
Advantages of a built-in heating system:
- more stable and reliable operation, since the heating element is made of carbon fiber
- ease of use, such systems are equipped with an on/off button. After reaching the desired temperature, the system automatically turns off
- the system is equipped with a fuse and in case of a possible short circuit it will blow out
The service life of heating systems is very long, often they last much longer than the car.
As for the appearance, nothing will change after installation; the built-in heating system is installed under the seat trim, so the appearance remains the same. You can install a heating system on almost any car. You may ask why practically, because there are cars on which the seats are glued to foam rubber; if you peel off the trim, the seat will lose its aesthetic appearance. But in reality such cases are rare. Installation can be carried out with the following seat upholstery: when the upholstery is leather, covered with fabric, or when the seats are upholstered with a leather substitute. The heating system can be installed even in seats that are electrically adjustable and have built-in airbags.
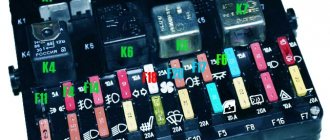
Mounting block diagram:
When troubleshooting electrical problems, you may also need a wiring block diagram , which can be used to easily find the desired contact or determine how to wire a particular fuse.
It is better to check the fuses with a tester, because on the outside they may look intact, but in fact there may be a break inside. To avoid unnecessary problems, you should always have known working fuses of different ratings on hand.
Do you often encounter electrical problems in a Chevrolet Niva? What do you usually do when troubleshooting? What solutions have you had to use to restore the functionality of devices?
Equipment:
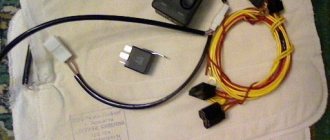
- Heating element - 4 pcs.
- Button block - 1 pc.
- Mounting kit for connection - 1 pc.
- Installation diagram - 1 pc.
The product is certified
Set: 4 heating elements, button block, installation kit, diagram
Diagnostics and repair
All electrical equipment of a Lada Granta car must be diagnosed using multimeters and test benches. If damage is detected, the element is replaced exclusively with a known good one. The use of used parts can lead to unexpected breakdowns and incorrect operation of equipment and devices.
The electrical circuit of the Lada Granta is a complex part of the car's equipment. Diagnostic work and repair of on-board circuits must be carried out with the required tools and necessary knowledge. In the absence of the above, it is recommended to contact qualified professionals for help.
Stock
Emelya uk-2. heated seats in chevrolet niva - logbook chevrolet niva auster 2011 on drive2
For a long time we wanted to add heated seats to the shniva, although I probably wanted it more than the person who drives it. But everything was somehow postponed until later, and then another spring came... In general, the reason is clear, the car spends the night in the garage, and the long periods of parking in the open air during the winter can be counted on one hand. But this year, although a little late, they decided to do it. There was no particular agonizing choice - “Emelya” is well known, the quality is good, there are no problems in operation. All that was left was to pick a kit. And then I “missed”, like Kipling: “Akela missed!” I chose and chose, and I chose. UK-2 with regulators for as many as 8 positions, and even in the style of regulators for standard headlight range control and instrument panel lighting. Why did he refuse the standard unit? Yes, because “it was not part of the plans to open a bakery,” and the regulator with one position promised “baking buns of maximum roasting.” In general, the UK-2 kit seemed optimal, so we bought it.
The kit includes 2 regulators, 4 elements, 2 sets of turnkey connection harnesses, a disconnected 4-pin relay and some small things in the form of templates/ties/adhesive tape.
The elements are different, the back is thinner, the base of the seat is much thicker
Many have probably already guessed what the mistake was, and if not, then I won’t reveal my cards now, everything will be visible during the installation process.
We start by installing the heating elements. The back and seat can be disassembled separately and independently of each other, so there is no difference where to start. There is no need to remove the covers completely. The photo shows and understands without words.
the backrest disassembles much faster than the seat
The heating element fits perfectly, almost to the size of the section - the threads do not get into the folds.
Before gluing, degrease the foam rubber and heat it with a hairdryer.
Having laid the element, we heat it with a hairdryer and smooth the entire area so that there are no creases, we wrap the edges in foam seams or cut them off.
We run the wire under the backrest and lead it to the wiring connection point.
The wires could have been routed under the seat, as is done on many cars, and the wiring could have been laid there, but we routed it to the side - to the tunnel.
The seat is supposed to be easy to disassemble, but in reality it is not. Terribly inconvenient location of everything relative to everything. It’s cramped, “neither arms nor legs can fit in” to remove the side hooks. However, they are removed)
everything seems simple
The element, just like on the back, fits perfectly. There is a special hole in the seat for the heating wire - this is good, you don’t have to cut it. True, the wire does not come out from below very neatly. To avoid rubbing against the edge, we pack it in a corrugation - this way the wire will have free movement inside the corrugation and there will be no tension.