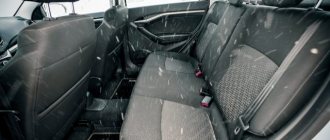
The option of heated seats on domestic cars is no longer new. This feature should be present on every machine. With the onset of the first frosts, more and more VAZ owners are wondering why the heating does not work on the fourteenth. This is especially true for those whose cars are parked on the street.
Concerns from the northern countries were the first to install heated seats on manufactured cars. Initially, the option appeared on expensive cars, and later this will not surprise anyone on domestic vehicles.
Naturally, those who have already tried this option have only positive things to say about it.
Now we will look at the reasons why the seat heating system on a VAZ-2114 may not work. The information contained in the article will be partially useful to car owners of other cars, because the operating principle of the heaters is similar.
Let us immediately draw your attention to the fact that the process of troubleshooting is quite troublesome and will require you to have experience in carrying out repair work on the vehicle’s electrical network and the availability of certain devices.
Why does the VAZ-2114 seat heating not work?
The option of heated seats on domestic cars is no longer new. This feature should be present on every machine. With the onset of the first frosts, more and more VAZ owners are wondering why the heating does not work on the fourteenth. This is especially true for those whose cars are parked on the street.
Concerns from the northern countries were the first to install heated seats on manufactured cars. Initially, the option appeared on expensive cars, and later this will not surprise anyone on domestic vehicles.
Naturally, those who have already tried this option have only positive things to say about it.
Now we will look at the reasons why the seat heating system on a VAZ-2114 may not work. The information contained in the article will be partially useful to car owners of other cars, because the operating principle of the heaters is similar.
Let us immediately draw your attention to the fact that the process of troubleshooting is quite troublesome and will require you to have experience in carrying out repair work on the vehicle’s electrical network and the availability of certain devices.
Is modernization possible?
Often, while in the process of modernizing their own car, many drivers try to connect heated seats, which is quite often successful. What’s remarkable is that there is a ready-made circuit that can be easily installed in your car. It is suitable for several models at once: from 2111 to 2115. It should immediately be noted that the pricing policy for this invention is quite diverse, but experts strongly recommend not saving. A poor-quality heating system can fail without working for even a few months.
The installation process begins with disassembling the seats, inside of which the heating elements are mounted.
This is not at all difficult to do even for an ignorant driver. The greatest difficulty is the connection process.
A special button is mounted directly next to the handbrake, allowing the system to be activated at the moment when the driver needs it. All that remains is to connect the wiring. Most often this is done through the ignition relay and cigarette lighter, but variations are also possible, invented by the driver himself. The manufacturer clearly indicates all the nuances, providing the VAZ 2114 seat heating system with a color description. It will be almost impossible to get confused in it. However, if difficulties still arise, you should definitely contact a professional. Electronics are a rather fragile thing that, if handled incorrectly, will instantly fail. The entire car will be damaged.
Why does the VAZ-2114 seat heating not work?
The function of seat heating on Russian-made cars has long been nothing new. This feature should be on every machine. With the arrival of the first frosts, more VAZ owners are wondering why the heating does not work on the fourteenth. This is especially true for those whose cars are parked on the street.
Concerns from the northern countries were the first to install heated seats on manufactured cars. At first, the function appeared on expensive cars, and then this will not surprise anyone on Russian vehicles.
Naturally, those who have already tried this option have only positive things to say about it.
At the moment, we will look at the reasons why the seat heating on the VAZ-2114 may not work. The information contained in the article will be partly needed by car enthusiasts of other cars, therefore the mechanism of operation of the heaters is similar.
Let us immediately draw your attention to the fact that the process of troubleshooting is quite troublesome and will require you to have experience in carrying out repair work on the car’s electronic network and the availability of certain devices.
See:
Why do you need heated seats?
Having such an option in the car is extremely necessary during periods of severe frost. Getting into a car that has been parked in the cold for a long time is unpleasant and dangerous for the health of the driver and passengers.
Overheating of seats also poses a danger to human health, as well as to the car.
There are many articles on the Internet about the benefits and harms of heating. Let's dot all the i's. Driving with a heater for long periods of time can be harmful to women and men. Accordingly, it is recommended to use the option consciously in order to protect yourself from cystitis or prostatitis.
General rules for using heating:
- Do not allow the seats to become overheated significantly.
- In cold weather, turn on the heating and do not sit on them for a while.
- Once the seats have been warmed up, turn off the system. Next, heat the interior with a stove.
- You cannot stay in the cabin in warm clothes for a long time.
Following these rules will allow you to protect yourself from overheating and not harm yourself.
Why do you need heated seats?
Wiring diagram for heated seats VAZ 2110
This is an important and necessary thing in your car, especially at a time when it is bitterly cold outside. If you very often get into the cabin of a car that has been standing in the cold for a long time, it is not only unpleasant, but also dangerous to the health of the driver and passengers. But at the same time, overheating of the seats also promises problems for those sitting on them, and in some cases for the car.
You can find a lot of information about both the benefits of heating and its inappropriateness. Let's try to understand this information together. Long trips with the heaters on can have a negative impact on men and women. Therefore, you need to be able to use this function correctly and in a timely manner. Sitting in a cabin with leather seats in winter can cause problems for drivers of both sexes, in the form of cystitis or prostatitis.
There are certain, developed and time-tested rules for using heating:
- Do not allow the seats to become overheated;
- In a cold car interior, you should turn on the heating system, but do not sit on them for some time;
- After warming up, the system must be turned off, further heating must be carried out using a heater;
- There is no need to stay in the salon for a long time in warm clothes.
If you follow these simple rules, you don’t have to worry about overheating and there will be no harm to your health.
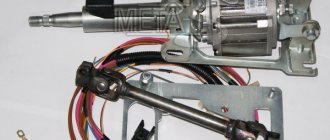
Operating principle of heated seats
At the head of the system is a heating element, which is connected to the on-board network of the machine.
The parts are placed in an elastic panel and mounted in the front seats. The systems are divided into two types: some are built into chairs, others are made in the form of seat covers. The operating principle of both types is almost the same. The heating elements are treated with a special coating that insulates them from direct contact with the upholstery. There are designs with one or two heating elements. The heaters are connected to the vehicle's electrical network through a control unit. Some system models allow you to adjust the temperature.
A sensor that controls heating is placed next to the heater. When the required temperature is reached, the system turns off the power. It is also possible to have a function for automatically maintaining the heating level, which is set by the driver. Other systems are controlled by a timer.
Dual-element built-in units can provide a quick warm-up, after which the system switches to lower power and less heat. The number of modes depends on the heater model.
Dismantling works
To install heating elements, you first need to carry out a dismantling procedure. It includes the following activities.
- Unscrew the plastic fasteners that connect the seats to the body of your car.
- Remove the skids. Two pieces are located in front, and two more are located in the back.
- Remove the chairs from the interior, otherwise it will be extremely uncomfortable to work.
- Separate the back from the chair. To do this, there are bolts on the sides, which can be removed with a 10 mm wrench.
- On the back there is a plug for the headrests, which can be removed.
- The upholstery is removed from the hooks below. To do this, the hooks are slightly unbent.
- Now you can completely remove all the trim.
- Carry out a similar procedure with the second seat if you plan to install heating on it too.
While you are installing the heating, throw the upholstery into the washing machine. This will not harm her, and the interior will look newer and nicer.
Installation of heating elements
Many people forget about the need to securely fix the elements responsible for heating the seats. As a result, over time they can shift, thereby disrupting the performance of the system.
To avoid such situations, experts advise sewing heating elements directly to the inside of the upholstery. Although today some car owners prefer another option, which uses double-sided tape. The elements are held on it quite reliably, and the tape is attached to the foam rubber itself.
Connection process
Regardless of the chosen fixation method, reverse assembly looks the same for all options. This is the most difficult stage, so strictly adhere to the specified sequence of operations.
Pull the covering back onto the back, where the heating was already fixed. Using a mallet, the plugs are driven into place. We are talking about plugs for headrests. Next, the fabric is stretched. The front one is pushed through the hole, and the back one is straightened down. The fabric from the front is draped over the hooks and then stretched
Just watch the degree of tension so that the fabric does not tear. Now you can put the rear trim element on the hooks. The next step is to insert the wire into the front and tension the sheathing. If you plan to change the foam rubber, cut out the new elements in strict accordance with the dimensions of the old material. Pay attention to the areas where the spring contacts the body and seat ties. To avoid squeaks, use pieces from the washer tube, or simply wrap several layers of electrical tape. Heating for the lower part of a car seat is often mounted using double-sided tape or sewn to the trim on the inside.
You can use plastic clamps or wire brackets, which will prevent the heating elements from moving from their installation locations. After this, the plastic fasteners are tightened. Connect the backrest and seat. A wire is pulled through the hole in the frame and the foam rubber, with which the heating will be connected to the on-board network. The wiring connection is carried out strictly according to the diagram. It is necessarily included with the set of heating elements, so you don’t have to look for anything additional. The standard location for installing heating on and off buttons is the area near the handbrake. Although you can place them as you wish. It’s not uncommon for car owners to take an alternative route, installing a standard heating system on top of the seats, after which they put car covers on top.
There is a modern and very simple solution - heated capes that can be put on in winter and removed during warm periods. Their disadvantage is that the wire runs freely, which can interfere with the driver. Plus the capes do not fit tightly to the chairs.
Option with capes
Possible malfunctions with heated seats
The heating device must have a fuse. On the VAZ-2114, two such elements are responsible for the stable operation of the heating. One fuse is located in the mounting block (F16), the other is located under the dashboard.
If you notice that the control lamps do not light up when the heating is turned on, the problem most likely lies in the fuses.
Relay problems:
- The system is turned on in an electromagnetic relay, which is located under the dashboard.
- After the unit is triggered, check the voltage at terminal 87 with a multimeter.
- If operation does not occur, then you need to examine the relay winding at terminals 86 and 87 with an ohmmeter.
- If the problem lies in the relay, it needs to be replaced.
Another problem may be the usual lack of nutrition. To check this, do the following:
- It is necessary to check the power with the power off at the connectors under the seats.
- The black wire is the ground of the car, the second is the power supply, which should have 12 volts.
- Use an ohmmeter to check the resistance of the heater windings. As practice shows, the problem most often lies here. The windings burn or break.
Depending on the situation, the problem with heated seats can be solved independently. However, this requires disassembling the chairs.
To summarize the article, we note that we have not considered all the possible reasons why heated seats may not work. But using the information above, you will know which direction to go to identify the problem.
If you have experience in carrying out such a repair plan, then finding the problem will not be difficult for you. Otherwise, we recommend contacting a specialist.
Heated front seats VAZ 2113-2114-2115
- Front seat heating activation diagram
- 1 – left front seat heaters
- 2 – left front seat heater switch with on indicator lamp
- 3 – relay for turning on front seat heaters
- 4 – ignition switch
- 5 – mounting block
- 6 – switch for the right front seat heater with a warning light
- 7 – right front seat heaters
- 8 – 16 A fuse
- A - to power supplies
On parts of the Lada Samara 2, a heating system for the front seats is installed. Heater switching diagram
The heaters are turned on by switches 2 and 6 (left and right seats, respectively). The heaters have built-in thermostats for electric seat heating. The thermostat contacts close at a seat surface temperature of (25±5) °C, and the thermostat contacts open when heated to a temperature of (31±4) °C. The temperature difference between closing and opening the contacts of the built-in thermostat must be at least 5 °C.
Selecting heated seats
In order to choose heated seats, you need to decide what kind of heating you need. There are several types of seat heating for Lada Priora: Cover, Standard heating, Emelya heating
Heated seats from the cigarette lighter (cape)
This type of heating has a wide area of application and is quite easy to install. To install heated seats from the cigarette lighter, you do not need any auto electrician skills. To install such heating, you just need to insert the heating plug into the cigarette lighter and select the heating position. It should be noted that the reliability of such heating leaves much to be desired. Filaments are used as a heating element, but since the cape is poorly attached to the seat and is often subject to creases, which leads to the breakage of the filament and, consequently, failure of the entire heating.
Heated seats standard
The standard heating for Lada Priora is a very reliable device that can be bought at any auto parts store at a price of 1000 rubles. Standard heating has only one heating position and does not regulate the heating temperature, i.e. The seat will heat up until you turn it off. This is its only drawback. The advantage of this heating is that there is no need to use additional intermediate relays to unload the contacts. Since the relay itself is already built into the button. The standard heating has heating elements for the seat and lower back.
Heated seats Emelya
Emelya's heated seats have proven themselves quite well on the market. The cost of such a heating kit is not cheap, starting from 2000 rubles. This heating is installed in the same way as standard heating. However, a significant difference from standard heating is the ability to regulate seat heating. But it is also worth noting that installing the seat heating button in the standard place will be difficult; you will have to cut out and trim the standard place. This type of heating has heating elements for the seat and lower back.
Third-party, but factory heating
Lada 2114 Samara (VAZ 2114)
Okay, but what if there is no standard heating? What to do then? Calm down, you can buy a third-party factory one, now our Russian one is highly praised and is designed for almost any car.
The main thing is to choose the size of the “seats”, it is important to understand that you do not need to heat the entire place, but strictly in the center, the side cushions (not installed for support)
The principle is also simple - we remove the standard seat covers, lay and glue the mats - then we put on the covers and connect them to the electrical system. You can do everything yourself, the kit costs about 2000 - 2500 rubles, for two seats (back + lower part). A short video, let's watch.
Installation of heated seats
We will look at installing seat heating using the example of installing standard heating. Since the installation of other heating systems will be similar to the installation of standard seat heating.
In order to install heated seats yourself, you need to remove the seats from the car and remove the upholstery from them. The heating installation will be divided into several stages.
- Removing the seats
- installation of thermoelements in them
- putting the seats back
Removing the seats
Tools needed to remove seats:
- Ratchet
- Head at "13"
- Head on "8"
- Head at "10"
- Screwdriver “+”, “-”
- Insulating tape
Seat removal process
- Move the seat forward as much as possible and pull out springs 1 and 2
- Using a ratchet with a head set to “13”, unscrew the seat mounting brackets
- Using a ratchet with a head set to “8”, unscrew the seat skis in 5 places
- Disconnect the seat belt sensor plug
- We take out the seat
- Next we move on to disassembling the seat itself and installing thermoelements
Installation of thermoelements
- We bend the plastic clips of the seat upholstery and lift the upholstery up.
- We slip the thermoelement under the upholstery and sew it to the foam rubber.
- We stretch the upholstery over the seat frame and secure it with plastic clips.
- Fold the backrest, pulling out the hooks securing the backrest.
These latches must be released
- Remove the backrest adjustment knob. You need to pull the plastic gear towards you and it will come off.
- Using a “10” socket, unscrew the bolt securing the gear to the seat
- We bend the pins holding the backrest upholstery and remove it from them.
carefully bend the pins and remove the fabric
- We slip the thermoelement under the upholstery and sew it to the back.
- We stretch the upholstery over the back of the seat and secure it with clamps.
- Connect the seat heating plug to the lumbar heating plug
- We extend the same procedure with the second seat.
Button installation and connection
Connection diagram
A simple diagram for installing standard seat heating in a Lada Priora
Connection
- We drill holes on both sides near the air duct for the rear passengers' feet to bring out the plugs for each thermocouple.
- Remove the cover for the seat heating button.
- We insert the wires into the holes under the seat heating button and separate the thermocouple wires in different directions and insert the holes.
- We screw the ground wire under the nut securing the central dashboard near the gearshift lever.
- We stretch the positive wire to the fuse block under the central dashboard.
- We connect the positive wire to fuse F11, this is the wiper fuse, power appears on it only after the ignition is turned on.
- We insert the wiring plug into the heating button and install the button in its normal place.
Seat installation
- We connect the free plug on the seat with the heating wiring.
- We check that the connection is correct, that is, the right button should be responsible for the right seat. If it’s the other way around, remove the button and swap the wires.
- Installation of seats is carried out in the reverse order of removal.
How to properly prepare a seat for installing a heating element
Installing heated seats yourself is a rather labor-intensive process and requires preparation. First you need to remove the upholstery of the chair itself. Usually it is mounted on special hooks. Sometimes the sheathing is attached to the hooks using tie rings, which are quite difficult to remove carefully, so they should be cut off with side cutters. There is no need to worry about this, since ordinary plastic clamps, which will be used, are an excellent replacement for these fasteners.
Next, after removing the casing from the body, you need to take preliminary measurements for the slot for the heater mat. To do this, we apply the mat to the place where it is attached and mark with a marker the required dimensions for the slot. This will allow you to later attach the heating element to the seat. But do not be too zealous, as you can cut the heating filaments. We pull the heater power wire through the foam rubber and bring it out behind the seat under the armrest. The rest of the wire should be corrugated to ensure safety.
Installation of heated seats "cape"
The heated seat “cowl” fits over the cover or seat of your vehicle. Fixed on the seat with elastic bands. The heating plug is inserted into the cigarette lighter and narrower, after which the desired operating mode is selected on the heating button. Such heating is dangerous because some models do not have protection and leaving it in the cigarette lighter can lead to dire consequences.
The installation of heated seats on your vehicle is complete. Standard heating only works when the car's ignition is turned on.
We hope our article was useful to you.
Standard heating
Standard heated seats on the VAZ 2114 are the best option of all. You just need to buy a seat heating kit from a dealer or a specialized store that sells original spare parts for VAZ.
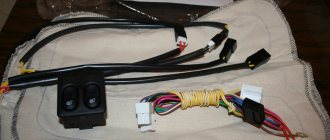
To install, you need to remove the trim from the seats, glue the heating element, embed the VAZ 2114 seat heating buttons, run all the electrical wires and put the trim back on.
Set for heated seats VAZ 2114
If you don’t have the opportunity to buy standard heating, it doesn’t matter. Modern manufacturers offer good options for third-party heated seats.
Problems with heating VAZ 2114
Heating a VAZ 2114 is a fairly common problem that haunts many motorists.
The most annoying thing is if the breakdown occurs during the cold season, when the stove is needed more than ever. However, if the problem is accidentally discovered during the warm season, it is also not recommended to ignore it.
It is better to understand the issue in advance, while there is an opportunity. In the future, it may be forgotten and reappear on the horizon only with the arrival of the first cold weather. Then it will have to be resolved urgently and, if not independently, then at any cost.
Basic principles of heating operation
The basis of any heating system for interior seats is a heating network, powered, like other electrical appliances, from the vehicle’s on-board network. Being enclosed in a flexible molding, it is built into the cushion and back (without a headrest) of the seat, although if you wish, you can equip a car without this option with heating - simply by purchasing a seat cover that connects to the cigarette lighter.
In order not to melt the filling inside the seat, the contact network, which transfers heat to the outside, is additionally placed in a safe coating that flexibly follows the topography of the chair.
Set for heated seats VAZ 2114
The simplest connection diagram involves just one serial heating circuit with a simple thermal relay that turns the heating off and on, depending on the temperature preset by the factory.
More complex options allow for the presence of not only a temperature sensor, but also a manual regulator that allows you to set the desired degree of heating - thanks to this, instead of aimlessly increasing the temperature, the chair will maintain the same indicator until it turns off.
There are other types of heating options:
- a timer that turns the heating on and off at certain intervals;
- separate choice of temperature for the cushion and back of the chair;
- memory of several selected temperature modes, activated with one click;
- the presence in the chair of several independent circuits with varying degrees of heating.
Seat heating connection diagram
What could happen?
It should be noted that heating problems in the VAZ 2114 can arise for various reasons, but they can be conditionally divided into two categories:
- heating is not provided;
- the air is heated too weakly.
It is quite possible to understand the problem on your own. However, first, it is important to understand where exactly you need to look for the root cause of the problem.
In particular, the culprit of difficulties may be:
- Airlock. Once in the area of the cooling radiator, air has every chance of moving into the thermostat. It is not possible to “drive” it out by starting the engine. You will have to add antifreeze to the pipe, thanks to which the air lock will quickly dissolve. Another, unspoken reason is lack of fluid. The antifreeze level should be checked at least once a month.
- Blockages. Quite often, the stove does not work due to the formation of blockages, which can be eliminated by dismantling and then cleaning the part. Immediately after this, the stove begins to heat up like new.
- Malfunction of the stove tap. It is quite simple to check the likelihood of this problem occurring - by tightening the cable located in the immediate vicinity of the pedal assembly. If the faucet does not open in this case, the only way out of this situation is to replace it.
- Broken fuse and relay. The simplest and at the same time unpleasant problem, which any technically savvy driver can easily cope with. However, determining why this situation has developed will be problematic. Most often, both the fuse and the heating relay fail due to a short circuit. But, if the driver wants to delve even deeper into the specifics of the problem, it would be more reasonable to move the car to the nearest service station.
- Motor failure. This usually happens when the car is used for a long time, and this component is rarely repairable. The most reasonable thing would be to simply replace it with a new element, having first checked the integrity of the remaining components. If everything is in order, you can purchase a new motor and install it in place of the previous one.
The heating system on the VAZ 2115 is standard. However, without sufficient skills and dexterity, you should not undertake repairs. It is better to entrust the issue to a professional who certainly cannot do any harm.
How to repair broken heated seats
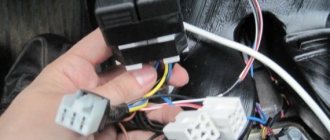
To understand why the VAZ 2114 seat heating does not work, you need to know about several key diagnostic areas in which breakdowns are most often detected. For example, one of the most common causes is the VAZ 2114 seat heating fuse, located in the common mounting block under the index F16 (or, less commonly, its analogue behind the dashboard).
It is easy to determine such a malfunction - when the heating option is turned on, the control lamp will not light up, indicating a malfunction in the functioning of the fuses.
VAZ 2114 fuse box
In addition to the second fuse, behind the dashboard there is also an electromagnetic relay that closes the contacts and is responsible for directly turning on the heating network. At the moment of its activation, it is necessary to measure the voltage at terminal 87, for which you will need to use the simplest voltmeter.
If there is no result, you will additionally need to measure the winding resistance in order to begin the repair, but you can do it easier - replace the entire relay, fortunately, it is inexpensive.
Operation of heated seats VAZ 2114
Another likely scenario is a break or melting of the supply contacts and their windings under the seat itself.
You can determine whether such a problem exists as follows:
- checking the power supply to the connectors at the bottom of the chair;
- disconnecting the contacts from the heating element;
- connecting the black wire to the vehicle ground terminal, the second wire is supplied with 12V from the on-board network;
- measuring the resistance of the heating wire windings.
Finding Wiring Damage
If there is mechanical damage to the contact network inside the seat, you will have to remove its upholstery and remove the heating elements, which will not be so easy to do without special qualifications.
However, Lada owners do not encounter such a problem so often - usually the fault is caused by the VAZ 2114 seat heating fuse, which can be purchased for little money in every car store.
In any case, putting aside the solution to the problem will be problematic if there is frost outside, especially since such malfunctions (for obvious reasons) are discovered only with the onset of cold weather.
How to make built-in heated seats with your own hands?
Installing a seat heating system
First, you need to purchase the so-called backbone of the entire structure - heating elements. Why buy and not make it yourself? The issue is your safety. Since the elements are built-in, and any inaccuracy in independent work cannot be identified and eliminated in a very short safe period of time, it is better and more reliable to use ready-made elements. Their selection is quite large. We will focus on domestic (Russia), the quality of products of which is not inferior to reliable Germans, and the price is much more pleasant.
Included in this set you will find an electronic temperature controller and overheat protection.
The heating element in Emel is represented by reinforced cable or carbon fiber.
Additionally you will need:
- Screwdriver Set,
- wrenches for disassembling the chair,
- plastic clamps,
- scissors,
- knife with replaceable blades,
- insulating tape,
- multimeter,
- heat shrink tubes,
- pliers, marker,
- soldering iron,
- double-sided tape (you can use glue 88),
- stranded wire 2.5 mm sq. cross section - for wiring.
First, decide on all the control buttons and their fastenings, so that if necessary (suddenly they don’t fit in their regular place), purchase the ones that are suitable for this car.
Now we can get down to business.
- Disassemble the seats: start with the headrest, then remove the plastic elements, then the seat upholstery, making room for laying heating mats. To remove the “back” trim, remove the plastic bushings for the headrests.
Place the sheet with heating elements on the seat foam, marking its dimensional contours with a marker. Following the marked lines, stick on strips of double-sided tape or use glue 88. If there is a temperature sensor, also install it on the foam rubber. Glue (attach) heating mats to the designated area on the seats
Here you should pay special attention to the location of the wires. Don’t forget that they should be on the right on the driver’s seat, and on the left on the passenger seat
Remove the power wires.
- Install the “original” skin on the supplemented foam base, using plastic clamps in the required places. Also return all plastic elements, headrests to their original position and install the seats in their original places. The wiring should be laid in the locations where the power connections and controls are located.
A very important point: the wires going to the heating mats from the regulators cannot be laid under tension; leave such a margin that you can easily move the chair away if necessary.
It's time to connect the heating elements. The instructions included with the installation kit should help you with this issue. If it is not an assistant for you in connecting the unit to the on-board network, it would be better and more correct to turn to professionals for help
If you are confident in the correctness of your actions and are ready to try to figure out this stage yourself, we recommend that you pay attention to certain recommendations:
- It is necessary to detect the power (12V), ignition and backlight circuits using a multimeter.
- Connect the positive wire of the thermal relay to the ignition switch connector, where power appears only after turning the key.
- Connect the power wire to the positive terminal of the battery through a fuse.
- Connect the negative wire to ground, and the button backlight wire to the cigarette lighter contacts.
- All connections, of course, must be soldered and insulated. Then you can check the system.
An important point: a correctly assembled system will only work when the ignition is turned on. Otherwise, you risk not starting the car someday.
Only one question remains unclear: what to do with the rear sofa and its heating? For those who constantly travel with their family in a car, this is a very important point. But there is nothing complicated here either: installation and connection of the rear seat heating system is similar to that described above. The only difference is that for one sofa you will need two sets of heating elements.
What seats fit on the VAZ 2114 without modifications?
The most budget option for replacing seats is to choose VAZ models. On 2114 they install seats from nine, ten and other models.
The UNP company produces anatomical and sports seats for VAZ models. The seats are made of quality materials and are sold complete with mountings and accessories.
UNP seats in VAZ
The Viller company offers sports and anatomical seats for all VAZ models, including 2114. The seats are certified according to GOST. They relieve stress from the spine and have enhanced lateral support. There are heated seat options.
Viller seats for VAZ 2114
Comfortable and high-quality seats from foreign cars for the VAZ 2114 can be supplied from Audi A4, Hyundai Lantra, Opel Vectra, Opel Astra and Ford. If you are going to disassemble, you need to measure the dimensions of the seats and photograph the mounting points so that you can compare and make the right choice. It is better to select seats from a donor car with the same external dimensions as 2114.
Ford seats are sometimes too wide. If you install such seats on a car, it may be difficult to pass inspection.
Ford seats for VAZ 2114
When considering the options for which foreign car the seats for the VAZ 2114 are suitable for, keep in mind that for a comfortable fit it is better for a fist to fit between your head and the ceiling of the cabin.
Before making the final choice of a seat, you can try it out and check for ergonomics by sitting in the cabin of the same car as the donor car.