Heated front seats have long become a common option even in the B class car segment, but this cannot be said about the rear ones. Regarding domestic models, the Lada Vesta has heated rear seats, but only in the most expensive Exclusive configuration, but the X-Ray does not have this option at all.
However, it is always possible to install the heating yourself.
Where can I buy?
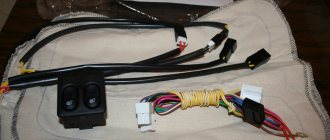
First you need to purchase all the components. As practice shows, the front seat heating kit from Lada Priora is perfect. However, some choose analogues from Renault and other companies.
- Heating elements;
- Control keys;
- Relay (4-pin);
- Wiring.
Usually all this is included in the kit, but this point should be clarified when purchasing.
You can buy heated rear seats for Lada Vesta and X-Ray from Priora in the following online stores:
Connection
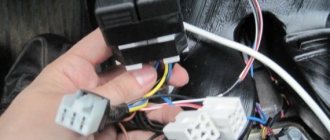
Connection diagram for heated rear seats:
It is better to take contact “B” from a protected high-current circuit with a fuse. Contacts “A” and “C” can be found in the ERA-GLONASS lighting lamp, in the ISO radio or cigarette lighter connector. Before starting the connection, do not forget to disconnect the negative terminal of the battery.
Installation and connection of heated rear seats on a Lada Vesta on video in several episodes:
Let us remind you that we previously learned how to connect heated windows/mirrors to an additional alarm channel on Lada Vesta and XRAY, as well as how to turn on the heated windshield through a separate button.
Found a mistake? Select it and press Ctrl+Enter..
Source: xn--80aal0a.xn--80asehdb
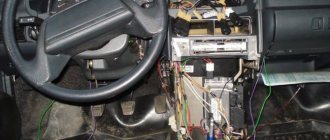
Installation
First you need to remove the rear sofa cushion from Vesta and X-Ray, but it is not necessary to remove the backrest. The dismantling algorithm is slightly different.
Vesta
To remove the rear seat cushion from the Lada Vesta, you must first pull it up, due to which the 2 latches in the front part will come out of the grooves. Afterwards, you need to move the entire pillow back, towards the luggage compartment, and lift it a little so that the loop on the pillow comes out of the bracket on the car body.
The dismantling process is clearly demonstrated in the video.
In the case of X Ray, the algorithm is slightly different. First, you need to lift the pillow a little from the back, and then fold it forward. This will provide access to the hinges that secure the pillow, and it can be removed.
Everything is shown in more detail in the video.
Heating installation
It is not difficult to install the rear seat heating of Lada Vesta and X-Ray yourself. First you need to remove the upholstery from the pillow, which is attached to metal rings. Instead, you can use plastic clamps.
Then the heating element itself is installed. If it doesn't fit, it can be trimmed, and there is no guarantee that the included wiring will be sufficient. In this case, the wires will have to be extended.
Trying on heating elements
IMPORTANT! The heated rear seat of Vesta or X-Ray must be secured with double-sided tape. Some people use glue for better fixation. However, these elements periodically burn out and in this case it is very difficult to remove the element glued with glue.
Connection is carried out according to the diagram
Connection diagram using Priora as an example
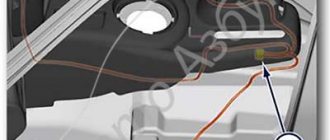
For example, in X-Ray, when connecting, the wires are pulled to the fuse box and connected directly to it. Of course, it is possible to connect to the front seat heating circuit, but there is no guarantee that the circuit will withstand such a load.
Connection to the Lada X-Ray fuse box
It is recommended to solder all connections and secure the wiring to the body with zip ties. In addition, it is strongly recommended that all wires be corrugated for greater safety.
As for the heating keys, they can be installed in a place convenient for a particular owner.
Good afternoon Winter still doesn’t want to go away, so I decided to install heating, maybe the well-known law will work and drive away the winter)) In general, all the components were purchased in the fall, but I only got around to installing them now, in principle, if only I had looked into the question earlier, then I would have understood that it was possible to install it earlier because all work can be carried out in the house, and this is warm, comfortable and good lighting. All the work took two evenings in the house with beer and very little work in the car. I took the experience of these guys 1, 2, 3 for guidance, for which I thank them very much! And I simplified the circuit a little, I didn’t pull the wire from ACC because... I took the power from the cigarette lighter, and we already have ACC. I also organized all the work so that it was carried out not in the car, but in the house. I assembled it on UAZ relays 456.3747-02, I bought the heating with buttons and USB here, the seller explained that these are original heating units, but still the heated seats had to be slightly altered and trimmed a little, the heated backrest fit as it should, there were also wires included in the kit, but they I also had to re-solder it to install the UAZ relays. I also modified the USB charging, I read about it here And so on the first evening I removed the seats, it took about 10 minutes and installed the heaters in them in two or three hours, in the morning I also installed them back in about 10 minutes. On the second evening I spent probably three hours fiddling around with the electrics and in the morning I made the connection in the car, all that was left was to connect to one wire; it took about 40 minutes or so. As a result, we have a heating mode of operation that turns out to be the following: when turned on, it heats up for about two or three minutes and you can already feel that the thermostat that is installed in the heating itself is starting to get hot at this time, turns it off, then cools down for about 5-6 minutes and turns on again, according to At this time, the seat feels neither cold nor warm (about 25-30C when the thermostat turns on), after switching on it quickly heats up and then the UAZ switch turns off (10 minutes). In general, the heating doesn’t fry at all, I’ll keep an eye on it, if I want to add a little, I’ll take it apart and leave less of the heating element under the thermostat so that it warms up longer before turning off. P/s/ I will later replace the 5A fuses with 2-3A ones, I just couldn’t find them in the store.
Seat heating buttons on Lada Vesta
Main stages during dismantling and disassembly:
- We place the car on a flat platform, platform. A roadside overpass or inspection hole will not be needed.
- We provide priority safety measures, squeeze the parking brake.
- On the driver's (passenger) side, move the seat all the way back and unscrew the two screws at the base.
- Similar steps, just move it forward all the way and unscrew the two screws.
- Turn off the ignition and reset the battery terminals.
- We disconnect the contact chips from the limit switches.
- We remove the seat from its regular place and place it on a workbench for preventative maintenance.
- We dismantle the plastic decorative insert and cladding.
- Unclench the metal brackets and release the heating element.
- We remove the foam rubber.
- We carry out troubleshooting of the EPS and detect mechanical damage.
- Based on the results obtained, we decide on the advisability of replacing or restoring the previous one.
- We assemble the structure in reverse order.
Checking the operation of the heated windshield
The efficiency of the windshield heating, like other heating systems in the car, depends on the ambient temperature. Owners of Vesta have noticed that at -3 degrees, only 3.5 minutes are enough for the ice and snow from the windshield to melt. Then we make one sweep of the wipers and all the ice goes away:
At the lowest temperature, for example, when it is -20 degrees outside, the windshield heats up more slowly. Thanks to the heater, after 3-4 minutes the first signs of thawing appeared at the bottom of the glass. The main part of the ice disappears only after 7-10 minutes, you can move.
By the way, if the filaments are clearly visible inside the glass, and the heating does not work, contact your dealer with this question; it may be that this function is simply not activated on your car.
On Lada Vesta SW and Lada Vesta SW Cross, the windshield heating is turned on with a separate button. Heating efficiency on video:
Where is the heating mechanism located?
In cars of the Lada Granta and Lada Vesta family, the EPS are located under the front driver and passenger seats.
To carry out preventive maintenance and diagnostics, first dismantle the seat.
Note to the driver. Before dismantling, be sure to turn off the ignition and reset the battery terminal. Since an AIRBAG unit is located under each of the seats, turning off the limit switches when the power is activated will lead to an open circuit and false alarms of the sensors.
Defrost MAX mode
On luxury Vestas with air conditioning, the “Defrost MAX” mode appears. It allows you to very well clean all windows and external rear view mirrors from fogging, freezing or icing. To enable this mode, you must press the appropriate button (No. 24) on the climate control unit.
When the mode is activated, the air conditioning (if conditions permit), the electric heating of the windshield and rear windows, and also the side mirrors will be forcibly turned on. The entire air flow is directed to the blowing nozzles of the windshield and front side windows, and the highest air speed and temperature are also set.
Why doesn't the heated seats work?
There are only three reasons causing EPS malfunction:
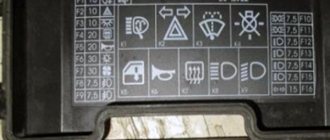
- the seat heating fuse on the Lada Vesta has blown;
- break in the heating element circuit;
- The mechanical switch (button) has failed.
Most often, a chain break occurs due to frequent pressure on the corner of the seat with the knee.
First, determine if the fuse is working properly. It often happens that after dismantling the “seat” and disassembling it into its component elements, the cause of the breakdown was not identified.
If the fuse is faulty, the indicator on the dashboard will not light up when the engine starts. The factory fuse is marked F33, current 15A.
The fuse box is located at the bottom of the dashboard on the driver's side.
The heated driver's seat may not work due to failure of adjacent mechanisms and units. For example, electronic control unit, fuse box, battery, temperature sensor.
Reviews
| № | Positive |
| 1. | Ivan , 39 years old, Sverdlovsk: satisfied with the standard heating, the car is in its second year, no complaints. |
| 2. | Vladlen , 41 years old, Samara: bought a Lada Vesta secondhand, got it from the previous owner in good condition. All mechanisms are in good working order, including heating, heater, air conditioning. |
| 3. | Peter , 45 years old, Krasnodar: in three years of active use of the car, I replaced the heating fuse (FF33) once. I am pleased with the build quality of the domestic car. |
| 4. | Gennady , 38 years old, Rostov-on-Don: the “native” seat heating works effectively, without any comments. It heats up in just under a minute, the heating area is the outer perimeter of the seat. |
| 5. | Dmitry , 41 years old, Kursk: the temperature heats up quickly, consumes little energy. As a drawback, I would like to note the insufficient heat conduction when the covers are on. |
| 6. | Negative |
| 7. | Victor , 35 years old, Uralsk: after the first winter, the heated seats stopped working, so he contacted a service station. Based on the diagnostic results, it turned out that the wiring had burned out. They replaced it with a new one under warranty. For a car of this class, the quality should be higher. |
| 8. | Fedor , 42 years old, Moscow: my heating is unstable. I checked the fuse, it is working, apparently the reason is in the heating element itself under the casing. |
| 9. | Kirill , 32 years old, St. Petersburg: in general, I’m happy with the Lada Vesta car, breakdowns happen, I try to quickly fix them. Of course, domestic transport is far from its foreign counterparts. |
| 10. | Vasily , 42 years old, Pskov: dissatisfied with the build quality of the Lada Vesta, since the heated seats stopped working in the first year of “life”. In the workshop I discovered the cause - a defective temperature sensor. |
Today we will install eco-leather covers on Vesta.
The central inserts are perforated. Since the car is silver, the covers are gray and black. Cases from the middle price category - without weights.
Let's start with the driver's seat, as it is the most difficult. First you need to remove it. You can put the covers on in place, but it will be more difficult and the result will be worse.
First of all, remove the headrest. We just pull it up.
Then we move the seat as far back as possible to get to the front bolts.
Use a Torx 40 wrench to unscrew these bolts.
After this, move the seat completely forward. Use the same torx to unscrew the two rear bolts.
Don’t forget to disconnect the connectors for heated seats and the passenger sensor (in the case of a passenger seat). The photo shows the connectors (bottom view):
Remove the lumbar support handle (if equipped).
To do this, you need to pull out the retaining bracket.
After this, you can remove the handle itself.
Depending on the weather, the seat can be taken home or to the garage for further action. You can continue to practice outside.
The seat lift handle can now be removed. The cover has a slot for a screwdriver.
We pry up and remove the decorative cover.
Under the cover we find two screws securing the handle.
Using a shaped screwdriver, unscrew them and remove the elevator handle.
The plastic cover on the side of the seat is held in place by latches. Carefully pry them off with a screwdriver and pull them out. Some latches need to be squeezed with pliers.
The casing does not need to be completely removed. Simply unclip the latches and thread the case using a ruler, for example, through the casing. If necessary, the casing can be removed; inside it is held on by a couple of latches.
On the other hand, the backrest reclining handle will interfere with removing the cover. It is held on a metal lever with a single latch. Bend it and remove the handle. Now you can remove this side panel.
We put the cover on the lower seat cushion. We thread, pull, tie and hook all the elastic bands and cords, depending on the model of the covers. Here we simply put rubber bands on the springs of the seat cushion, tightened and tied the main tightening cord of the covers. You can use special hooks from the cover set.
That's it, the bottom pillow is ready.
Assembling the seat. We install and snap back the plastic sides, put the elevator handle and the backrest tilt handle in place.
Next, we put the cover on the back of the seat. In some places, you may have to unfasten the standard seat trim. But there is no need to remove it completely. We tie all the laces and the cover is in place!
Find the location for installing the lumbar support handle.
Cut a hole large enough to fit the handle into place. The base of the handle should fit inside the cut out circle. It is better to cut with a scalpel or a stationery knife.
We thread the headrest locks into the finished holes of the covers. If necessary, we trim the holes or cut them out if they are missing.
Depending on the presence of the armrest and the hole for it in the cover, you may have to cut out this hole. This Vesta did not have an armrest.
So, the driver's seat is ready. We install it in place, tighten the bolts, and put on the connectors.
We carry out the same operations with the front passenger seat. Then we put the covers on the front headrests. We put the head restraints in place and adjust their height. To do this, there are clamps on the headrest locks that must be pressed when adjusting.
The front seats are ready, let's move on to the rear ones.
Lada Vesta SW Cross - interior declassified!
We look into the trunk of the all-purpose Vesta and are surprised at the European-style, thoughtful decisions.
LADA > Vesta
The door rises high: with a height of 186 cm, I pass under it with supplies. And since there are no sharp corners, unexpected contact (for example, if the machine is standing on an uneven surface) will not be dangerous. On the inner door trim there are two strong and comfortable handles for a natural grip. At the same time, the force is selected in such a way that even a fragile lady will close the door without much difficulty.
The size of the trunk “under the curtain” is 480 liters, like a sedan. One should not have expected anything else, since the lower part of the car, including the rear bumper, was unified between the sedan and the station wagon - to reduce production costs. Because of this, the loading height is not the smallest, and the clearance is not the largest, but this is an inevitable sacrifice.
If you fold the back seat, the size of the trunk almost doubles - up to 825 liters. VAZ drivers usually indicate the size not to the roof, but to the window sill. If you load it to capacity, it will be far beyond a cubic meter.
For once, the Lada looks like a foreign car not only from the outside, but also from the inside - including the luggage compartment!