Any driver, if desired, can equip his car with an electronic system for starting the internal combustion engine and opening doors. New cars are equipped with such devices, which provide certain convenience, but over time they stop working. Not everyone will immediately guess that the battery is dead, so it is worth describing the procedure for replacing it, especially since it is not difficult to perform. Accordingly, there comes a time when you have to replace the battery in the Volkswagen key. The procedure is not complicated, but there are some nuances that depend on the model of the central locking system and immobilizers.
Signs that the battery is dead
The main symptom is, of course, that the alarm does not go off and the car cannot be started.
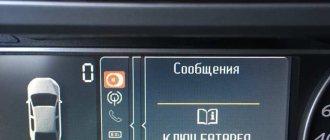
In this case, you need to use a regular mechanical key to open the car. And then we need to figure it out. In modern foreign cars, just look at the dashboard. There is an indicator that shows the pairing of the car key and the car system. If it blinks, it means there is no pairing, and this only happens when the battery is dead.
But in order to check this, you still need to open the car. This is easy to do if you have a mechanical key. But some brands produce cars that don’t even have a hole for a key. But there is a hidden emergency key that will allow you not only to open the car, but even to start the engine so that you can get to the service center.
In cheaper car models, it is possible to open the car with a regular key. But it’s better not to let the situation get to the point where the battery is completely discharged. The following signs indicate that she is close to this:
- Reducing the range of the remote control.
- A warning signal appears on the dashboard.
- The car ignition does not immediately respond to key signals.
This means you need to change the battery, but first you need to read the instructions.
How pomenyat batarei ku v avtoklyuche
The same goes for starting a car with a button.
It's also worth knowing that the battery in the factory remote control is not needed to start the engine. Yes, a dead battery will not allow you to start the engine by simply pressing the button; to do this, you must follow the instructions for your car (study this issue in advance).
Algorithms may vary. Or you will need to lean the key fob against the “Start-Stop” button, or hold it in the area of the steering column, or insert the failed key into a special socket to unlock the immobilizer (should be marked with a “key” icon).
On some models, the "contact point" is hidden, for example under the drink holder, in the center console or inside the glove compartment. There are many options, once again, read the instructions.
There are also types of keys with buttons for Volkswagen cars, in which replacing the batteries is somewhat different from the examples given above, for example, for the VW Passat.
There are also types of keys with buttons for Volkswagen cars, in which replacing the batteries is somewhat different from the examples given above, for example, for the VW Passat.
Why does the volkswagen passat key not work?
Why the Volkswagen Passat key does not work, let’s take a closer look:
When you press the door open button or any other button on the key fob, the LED indicator on the case should light up (if one is present). If the indicator does not light up, this is the first sign of a dead battery.
Volkswagen Passat B6 - replacing the battery in the key
You need to open the door with the key and try to start the car. If starting is difficult, only relay clicks are heard - this means that the battery is discharged and needs to be charged. If the engine starts without difficulty, in normal mode, then the condition of the battery is satisfactory.
- The contact of the central locking unit has failed or is broken, also called the comfort unit.
To provide access to the block (connector) of the comfort unit, it is necessary to remove the glove compartment; the unit is located behind it. The glove compartment is secured with 7 screws, 3 from the bottom and 4 from the top, you need to unscrew all the screws and press the rectangular hole from below with a flat screwdriver and remove the glove compartment.
Next, remove the connector from the comfort unit and check the presence of power using a multimeter or a test lamp (car voltage indicator 6-12V), after which you need to check the integrity of the wiring from the comfort unit to the door, which does not respond to the key fob if one of them does not work from the doors.
- Disturbances in the operation of the reception and transmission in the key or comfort unit.
In this case, nothing can be done without special equipment - you need to go to a service station.
- The door lock solenoid contact is faulty or broken.
To check the operation of the door solenoid, it is necessary to remove the door trim, remove the connector from the solenoid drive and check the integrity of the wiring from the solenoid connector to the comfort unit connector using a multimeter in the “ring” mode or using a 6-12V voltage indicator (test lamp).
To do this, you need to insert the probe into the connector and press the open/close button on the key fob, moving the probe accordingly to different contacts of the connector. If the signal passes (the light comes on), you need to apply 12V to the solenoid drive, observing the polarity ( /-), if the solenoid does not respond, replace it.
Volkswagen Passat door
- The button on the key board has failed.
If there is no reaction after pressing one of the buttons on the key (the feeling that the button “falls through” when pressed), it means that the button in the key fob has failed. To replace the button, you will need a soldering iron with a thin tip, a soldering kit (rosin, solder), and a new button.
In the cases indicated in paragraphs 3-6, if you do not have enough knowledge in electrical and mechanical engineering, then you need to go to a service station.
Still need help?
Call our service center. We'll be happy to diagnose the problem and fix it for you. Be sure to check out our special offers to make sure you're getting the best prices.
Step 10
Insert the new battery into the battery compartment and reinstall it in reverse order. Be sure to insert the new battery back under the retaining lip at the back of the case. Also remember to connect the positive terminal to the battery first and then. negative.
Start the Jetta to ensure proper operation, and then remove the car computer memory saver. Remove the 9-volt battery from the screensaver until the next time you need it.
Step 4
Remove the battery cover bolt located in the center of the front along with the ratchet and socket.
Items you will need
- Set of ratchets, extension and metric sockets
- Memory Saver for Car Computer with 9V Battery
- Wire brush
- Protective glasses
- Terminal/Pole Cleaning Tool
- Spare battery
- Anti-Corrosion Spray for Battery Terminals
Step 2
Step 2
Take the half with the buttons on it and pry it open with your fingernail or other thin object (such as a small flat head screwdriver). You should see a seam where the plastic will separate.
Second key option
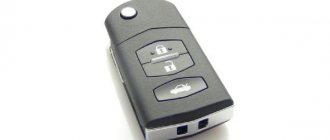
The second option is a retractable (flip) key. This type is presented in the form of a black plastic box with three buttons: opening the lock, opening the trunk, closing the lock. At the top there is a button that releases the spring and allows the key to extend.
In the internal part there is a microcircuit that includes an immobilizer (part number ID48A1) and is a signal conductor between pressing the button and transmitting a radio signal to the car. To purchase this particular key, there is an article number, original number, K0 959 753 AB (5K0837202AD).
This article is not a guarantee that the purchased key will be original, however, all the internals that the key contains can be transferred to a similar blank. The article number can be found in the tip storage cavity. The original key is assembled very firmly, the latches hold very tightly.
As a rule, the original key does not play and will hold together. This key is not so easy to disassemble, you will have to use a drill to get the insides out.
Between the two parts of the plastic case there is a gasket that prevents moisture from entering the inside of the key. There is an LED indicator indicating signal transmission. The battery in the flip key is CR2032 3V.
The central locking frequency is European, 433 MHz. Blade HU66.
Where to buy a key and how much it costs
The most reliable, guaranteed and high-quality way to get a new key is to order from an official VW dealer.
When ordering from an official dealer, it is important to know that the key will be delivered from the manufacturer’s factory, completely new and already having the necessary firmware that matches your car. The dealer does not make duplicates.
With this method of purchasing a key, prices for ordering a regular key without a remote control start at 3,500 rubles, and for a switch key at 8,500 rubles. It takes 3-4 weeks from order to receipt.
A less reliable way would be to order a key on websites or services specializing in the manufacture and sale of car keys. Having a special code (VIN number), you can be delivered a key with a carved pattern on the key blade.
Prices for a flip key for a Volkswagen Polo, in which the blade will be turned and programmed, for example, in Moscow are in the range from 5,000 to 7,000 rubles. The key can be received within a week.
You can also order a non-original key from AliExpress using the keywords volkswagen polo, key article number.
The price will be 500-600 rubles, but after receipt, you will need to grind the ignition key to fit the lock cylinder (500-1000) and programming (1000-1500 rubles), which in total can amount to 2000-3000 rubles. This method will be the cheapest.
In terms of time, you can never predict with certainty when the key will be delivered from China, usually it is 3-4 weeks, to which time you need to add a trip to the service.
Summary table of prices and production times:
Place of order/purchase Official dealer Car services not related to ODA Aliexpress and other online trading platforms
| Price, rubles. | from 3500 – regular; | from 1500 – regular; | from 500 – regular; |
| from 8500 – flow-out; | from 5000 – flow-out; | from 2000 – discharge; | |
| Production time, days. | 3-4 weeks | Less than 1 week | 4-5 weeks |
Is the remote control broken? You can probably fix it
Car remotes and keys have a hard life: they are subject to falls, vibrations, humidity, high and low temperatures. If replacing the battery does not have the desired effect, it may need to be repaired. You can reproduce almost anything: you can buy new cases, erasers, microelements and electronic components for popular models.
How to change the battery in a Volkswagen Polo key fob
In this article, auto mechanic Alexey Bakulin communicates with readers on the topic “How to change the battery in a Volkswagen Polo key fob?”
Changing the battery in a VW key fob with your own hands is very simple. When you need to replace the battery in a Volkswagen car key, you should know that there are basically two types of key fobs:
- old - the Volkswagen logo has a blue outline;
- new - Volkswagen logo is silver and black.
This photo report will show how the battery is replaced in both cases.
First you need to turn the key fob over and separate the halves of the key fob using a screwdriver. Then remove the cover from the bottom - this will give you access to the battery.
Carefully remove the old 3-volt CR2032 battery and insert a new one. The battery is installed “ ”, positive side down. After which you can assemble the keychain in reverse order.
To replace the battery of a key fob with a new style, you need to press the button and throw out the ignition key. Then insert your finger into the groove where the key is and remove the cover.
Having thus gained access to the battery, carefully remove the old one and install a new CR2032 3-volt battery. Unlike the old version of the key fob, here the battery is installed “ ” upward. And then comes the assembly and testing of the key fob.
However, there are other models of key fobs. In more detail how to replace the battery in the key on specific cars:
Old and new version of the Volkswagen key fob.
After 1.5 years, the battery in the key died. No, she was still working, but from a shorter distance than before, and she didn’t always catch him behind the trunk. I didn’t wait until it completely sat down.
I found universal instructions for VAG on the Internet. Fortunately, we have a new type of key that can be disassembled in 5 seconds.
You need to pick out the protrusion pimp using a little physical and psychological effort:
And then release the hooks, continuing to move the lid in the same direction. A view of the cover to understand where the hooks are. The one with the pimply, bottom left:
The minimum battery voltage is 3V, mine was a little more by hundredths of a Volt. Type CR2032.
If the battery in your car key fob runs out, you can contact a service center to replace it. But since any device of this type has a simple design, you can independently figure out how to change the battery in a Volkswagen key without turning to the services of professional technicians. In general, the principle of replacing batteries is simple and should not cause serious difficulties.
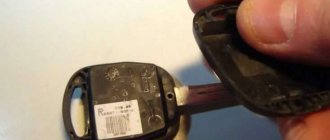
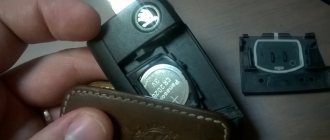
Replacing the battery in the key for Volkswagen Passat B6, 7 and other models begins with the fact that you first need to remove the service key. To remove it, you need to find a small button on the side of the key fob, press it and pull the device towards you. After this, you should carefully remove the chrome trim by carefully moving your finger to the left of the VW logo.
The chrome trim is removable and there is a small hole underneath it. Now you should also carefully pry the case up with a small screwdriver or an unbent paper clip. It should be borne in mind that the case is latched. After a characteristic click, the case moves and a battery compartment is revealed inside.
Volkswagens of various modifications (Golf, Passat) have keys that need to be opened either from the side, or the key fob can consist of two parts, which, when opening, should be pulled with force, but very carefully, in different directions, after holding the button. A wide flathead screwdriver will come in handy to pry the lid up.
First, as usual, remove the spare key by pressing the Volkswagen logo. After this, you will have access to the holes, into one of which you can carefully insert an unbent paper clip. This way the cover is removed (in this case, it is located on the side). We recommend watching the video below, everything is shown clearly there.
Replacing the battery in a Volkswagen Touareg key is simple: the compartment lid is opened with your finger, and the old battery is removed from the compartment and replaced with a new one. Next, the compartment is installed in place, and the key fob is assembled in the reverse order: first the cover (until it clicks), and finally the key is returned to its place.
Any key fob, regardless of differences in design, is so simple that it is not at all necessary to contact a service center to replace the battery. If you want and are careful, you can do this yourself.
About Volkswagen: Regulations for replacing the fuel filter Polo sedan - Collections of auto recommendations for 5 stars
Replacing the battery in a car remote control
Below we will show you how to replace the battery in the remote control used in many modern VW AG models, including Skoda, Volkswagen and Seat. Disassembly can be done without the use of specialized tools. One flat blade screwdriver is enough.
Attention! In other cars the procedure may be completely different, for example in older cars from the same VW group it was necessary to first remove the remote control housing and then open the battery compartment cover.
In alarm remote controls for cars with a keyless entry system, you must first remove the “sting” of the folding key and only then begin to open the case. After replacing the battery, the remote control may need to be re-synced with the vehicle - this also varies by model.
Opening the case: in this case, this can be done with your fingers, but it is better to help yourself with a screwdriver.
Most remote controls are not bolted together, but are secured with latches that can be accidentally broken during removal.
It is recommended to prepare a new battery before removing the old one: a remote control that has been deprived of power for too long may lose memory.
Correct battery? The cell type, size and voltage rating are important. The cheapest batteries, purchased in large sets, are often of poor quality and do not contain the required parameters.
We take out the old battery, put the new one in place and close the case in the reverse order. Ready? Unfortunately, this is not true!
If the light on the remote control comes on but the car does not respond, it needs to be recoded. First you must get to the castle.
On this particular model, start by removing the cover from the lock and then pressing the button on the remote control.
Use the key in the lock for a minute. The car should connect to the key and open. If it doesn't help, then somewhere there was an error during assembly. Contact the professionals.
Source
Recovery key for vw polo (volkswagen polo). the story of one repair
- Call the wizard to open the machine. open car door.
- Call a tow truck. The car was pulled into one of the car repair shops in the parking lot.
- At the car service, the alarm was turned off, the ignition switch was removed and sent to one of the key workshops. VW ignition key repair.
- The key workshop allegedly restored the Polo's ignition without a chip. (then we will explain why “supposedly”)
- The car service center replaced the ignition switch. The car was parked awaiting further action.
- Technicians were called in to repair the chip in order to start the engine.
But the main chip key for Volkswagen Polo could not be registered.
So how many different companies or people were involved in this incomplete chip repair process? Lock master, tow truck, car service, parking, key workshop, chip registration master. 6 people. And everyone must pay! How many calls did it take to organize so many people?
But the worst thing about this job is that everyone only does part of the work, but no one needs to ask about the overall result of chip key recovery! As they say in such cases, you will not find extremes.
READ How Webasto Works on a Volkswagen T5
Spare ignition key for Volkswagen Polo. blog, news, photo
- Photo
- Sale Vw Polo Ignition Switch - discounted products on AliExpress
- Video
Thanked: 0 times. I would be grateful to those who know what type of chip is in the ignition key of the Polo sedan of the year. I lost my spare key.
About Volkswagen: What is the volume of oil in the engine of Volkswagen Polo sedan 1.6
Volkswagen Polo Sedan Highline › Logbook › The ignition key is broken. I was looking for a way around it, you can buy a key to another polo on Avito and you can register it, but the OA refused (of course, the people there are greedy).
Volkswagen Polo Sedan (Comfort Line) › Logbook › Need help - Spare key. — What do you need to buy to make a duplicate key? As I understand it, it is programmed into the immobilizer.
And during the way to the house, I simply tied it to the steering column. It turns out that outwardly the clips are the same in size, but the dimensions of the grooves of the ejection mechanism and the holes for the spring are different! Injection systems for diesel engines But the job is done, we need to move on... I put the broken eyes on superglue, cleaned up the torn edges with a file, it will do for a working key.
Disassembling the vw jetta key to replace the battery
We offer a step-by-step summary that will help even a new person replace the battery in the remote key for a Volkswagen Jetta. To do this, you only need a small set of screwdrivers or at least some narrow iron object and a couple of minutes of free time. So, your actions and their sequence look like this:
- first you need to open the key body, to do this, pull out the bit by pressing a special button;
- insert the screwdriver into the groove and begin to twist it into the spacer, and then move the key apart with your hands, visually dividing it into two parts;
- remove the cover on the back of the key body in the direction of the arrow;
- after carrying out the above operations, you will see a round flat battery, which you need to change;
- to get an old battery, you need to use a suitable narrow object or a small flat-head screwdriver to remove the battery from a special compartment;
- position the new battery as shown in the figure, observing the polarity conditions;
- press it into the compartment in the direction opposite the arrow;
- position the cover as shown in the figure and press it against the key body in the direction against the arrow until it locks;
- Next you need to synchronize the key; to do this, pull out the key bit;
- remove the cover from the driver's door handle, if provided;
- press the button on the key with the image of an open lock, while doing this, it is important to be close to the vehicle;
- within one minute, unlock the Volkswagen Jetta car with the key bit, thereby completing the synchronization process;
- Then put the cover in place.
Repair Volkswagen Passat, replacing the battery in the remote control key vw passat b5
Warning
When removing the battery, check the marks to ensure that the polarity of the battery connection is present, otherwise apply the marks.
Position of the contact plate (1) before removing it from the head
1. Controls, instruments and equipment
1.0 Controls, instruments and equipment1.1. Keys
2. Maintenance
2.0 Maintenance2.1 Technical specifications2.2. Maintenance frequency2.3. Engine oil2.4 Checking the exhaust system2.5. Engine cooling system2.6. Spark plugs2.7 Draining water from the fuel filter (diesel engines)2.
8 Replacing the fuel filter (diesel engines) 2.9 Checking the tightness of hoses and fluid leakage 2.10 Replacing the air filter filter element 2.11 Checking the condition of the poly V-belt 2.12 V-belts 2.13 Measuring the wear of timing belts on diesel engines 2.14 Gearbox/final drive 2.
15 Checking the drive shaft protective boot 2.16 Visually checking the tightness of the gearbox 2.17 Checking the oil level in a manual gearbox 2.18 Checking the oil in the final drive of automatic transmissions 2.19 Checking/replacing the oil level in an automatic gearbox 2.
20 Checking the front suspension and steering 2.21 Checking the dust covers of the front suspension joints 2.22 Checking the shock absorber 2.23 Checking the radiator 2.24 Checking electrical circuits 2.25. Brake fluid2.26 Checking the front brake pads2.27 Checking the rear brake pads2.
28 Checking the brake hoses 2.29 Checking the handbrake cables 2.30 Checking the fluid level in the power steering 2.31 Dust filter 2.32 Battery 2.33 Door hinges 2.34. Window washers2.35 Wiper blades2.36 Checking the initial position of the windshield wiper arm2.
37 Checking the angle of the windshield wiper arm 2.38 Replacing the battery in the remote control key 2.39 Resetting the Service indicator
3. Engines
3.0 Engines 3.2 General information 3.3 Lower splash guard of the engine compartment 3.4. Four-cylinder petrol engine 3.5. Diesel engine 1.9-I-TDI3.6. Engine 2.3-I-VR53.7. Engine 2.8-I-V6
4. Cooling system
4.0 Cooling system4.2 Adding coolant4.3 Composition of coolant mixture4.4 Replacing coolant4.5 Thermostat4.6 Radiator4.7 Water pump (1.8-I and 1.6-I ADP engines)4.8 Cooling system hoses4.9 Cooling system malfunctions
5. Fuel system
5.0 Fuel system 5.2 Fuel pump/fuel level sensor 5.3 Fuel filter on models with gasoline engines 5.4 Accelerator cable adjustment (gasoline engine) 5.5 Additional adjustment (automatic transmission) 5.6. Diesel engine fuel system
6. Motor control
6.0 Engine management6.2 Operation of the engine management system6.3 Checking the fuel injection system6.4 Sensors and actuators of the engine management system6.5. Ignition system6.6. Fuel line and fuel injectors 6.7 Main malfunctions of the engine management system
7. General information
7.0 General information7.2 Catalyst7.3 Operation of vehicles with a catalyst7.4 Turbocharger7.5 Replacing the muffler7.6 Oxygen sensor
8. Transmission
8.0 Transmission8.1. Clutch disc 8.2. Manual transmission8.3. Automatic transmissions
9. General information
9.0 General information9.1. Shock absorber 9.2. General information9.3. general information
10. General information
10.0 General information10.2 Airbag10.3 Steering wheel10.4 Tie rod10.5 Installation of the power steering pump10.6 Front wheel alignment angles10.7 Basic suspension and steering faults
11. Brake system
11.0 Brake system 11.2 General information 11.3 ABS/EBV/EDS/ASR/ESP systems 11.4 Checking the vacuum brake booster 11.5. Replacing the front brake pads11.6 Replacing the rear brake pads11.7 Checking the brake disc11.
8 Brake disc 11.9 Bleeding the hydraulic brake system 11.10. Brake lines and hoses11.11 Brake light switch11.12 Handbrake lever11.13 Handbrake adjustment11.14. Front wheel drive cars11.
15 Basic brake malfunctions
12. General information
12.0 General information12.2 Body care12.3 Upholstery and carpet care12.4 Repair of minor body damage12.5 Repair of severe body damage12.6. Front cross panel 12.7 Front bumper 12.8 Removing the hood lock lever 12.9 Adjusting the side guide bracket of the bumper 12.10 Rear bumper 12.
11 Front fender 12.12 Front wheel well lining 12.13 Air intake grille 12.14. Hood 12.15 Radiator grille 12.16. Hood lock opening cable 12.17 Hood lock 12.18 Interior door trim 12.19 Differences when removing the right front door trim 12.20 Door mechanism control unit 12.21 Door seal 12.
22 Side trim of the luggage compartment of Sedan models 12.23 Side trim of the luggage compartment of Station wagon models 12.24 Rear trim of the luggage compartment on Sedan models 12.25 Trim of the trunk lid 12.26 Trim of the trunk door 12.27 Covering of the luggage compartment floor of the Station wagon models 12.28 Trunk lid 12.29. Trunk lock12.
30 Adjusting the position of the trunk lid/rear door 12.31. Rear door lock on Station wagon models12.32 Front door12.33 Front door lock cylinder12.34 External door release handle12.35 Door lock12.36 Manual lowering of door glass12.37 Door glass12.38 Door bracket12.39 Interior rear view mirror12.40 Center console12 .
41 Front ashtray 12.42 Rear ashtray 12.43 Decorative lever trim (automatic transmission) 12.44 Decorative trims under the radio 12.45 Lower trim of the instrument panel on the driver's side 12.46 Glove box 12.
50 Door sills 12.51 Windshield and rear windows 12.52 Front seats 12.53 Head restraint 12.54 Side airbags 12.55 Rear seat 12.56 Left rear seat backrest 12.57 Carpeting 12.58 Interior trim 12.59 Outside rear view mirror/mirror glass 12 .60 Outside mirror housing 12.61 Roof guard/curb 12.
62 Side body trim 12.63 Replacing rubber bands of windshield wiper blades 12.64 Windshield washer nozzles 12.65 Windshield wiper arms
13. Heating, ventilation
13.0 Heating, ventilation 13.2 Ventilation nozzles 13.3 Heater control panel 13.4 Central damper lever 13.5 Heater control unit 13.6 Heater resistor unit 13.7 Heater and air conditioner control unit 13.8 Air conditioning compressor 13.9 Heater fan
14. Electrical equipment
14.0 13 Electrical equipment14.2 General information14.3. Electrical circuits 14.4 Fuses 14.5 Battery care rules 14.6 Checking the battery 14.7 Charging the battery 14.8 Battery 14.9 Charging system 14.
About Volkswagen: Volkswagen Golf 2.0 FSI GTI 3dr. (11.2006 - 06.2008)
14 Starter traction relay 14.15 Replacing external lighting bulbs 14.16 Replacing internal lighting bulbs 14.17 External lighting devices 14.18 Actuator motor for headlight range control 14.19 Headlight adjustment 14.20 Low beam headlight discharge lamps 14.21 Instrument cluster 14.22 Multifunction steering column switches 14 .23 Switches14.
24 Radio14.25 High-frequency loudspeakers14.26 Low-frequency loudspeakers14.27 Antenna14.28 Checking the rear window defroster14.29 Windshield wiper motor14.30 Rear window wiper motor14.31 Windshield washer pump14.32 Central locking system14.33 Main generator malfunctions14.
34 Basic starter malfunctions 14.35. general information
Guide to self-disassembly and modification of the key
In each of the above cases, to implement the idea, it is necessary to disassemble the key body. The only cost in the process is purchasing a blank (of course, if you are not going to disassemble the key for fun). You can buy a Chinese “pacifier” for 600 rubles. in an online store, or the original, which will cost almost twice as much.
Of the tools, the most suitable candidate for drilling would be an engraver. He will handle with particular delicacy the uprooting of the pin, which is the main stumbling block when disassembling the “master key” of the Polo sedan.
Sequencing:
- Carefully pick up the corporate logo with a knife and tear it off.
- We drill a tiny niche in the hole in order to get to the pin.
- Using forward movements, we push the end of the pin out and completely remove the iron “rod”.
- We insert a thin screwdriver between the two halves of the case and carefully push them apart.
- The key body is disassembled.
Then everything depends on the purpose of disassembling the “master key” of the Polo sedan. If the tip holder is broken, it can be removed from the blank and placed in its original socket. Just before this, you should sharpen the profile of the tip from the “dummy” so that it matches the broken key. Another option is to move the “brains” from the old exhibit to a blank.
The only negative: in this approach you will also have to make a hole in the groove using an engraver, since the principle of assembly and disassembly of the blank is the same as on the broken sample.
The main difficulty during assembly is to correctly place the button with the holder and align the spring with the grooves on the cover. In order for the case to slam shut, you need to slightly turn the lid counterclockwise, and then click the lid with a precise movement. Then we insert a pin into the hole and place the Volkswagen badge on the glue.
Those owners of the Polo sedan who decide to improve the key fob by converting a regular key into a folding one will have to work some magic with a new board and a soldering iron in their hands. As a basis for the “brains”, fiberglass laminate of type FR4 can be used.
In order for the material to easily fit into the body of the dummy keychain, the board must be filed down to a thickness of approximately 0.8 mm. You can design the board using the Splan 7 software interface.
0 is a very convenient utility for everyone who communicates with a soldering iron on a first-name basis.
Thus, if the tip of the key breaks or you decide to re-equip its filling, then the first thing you need to do is disassemble the “master key” body. With a regular engraver, even a beginner can do the procedure.
Table: comparison of battery life from different manufacturers, taking into account price
| Brand | Manufacturer country | price, rub. | Time of voltage drop to 2.7 volts, hour | Rating |
| Camelion | China | 25 | 208 | 1 |
| Renata | Indonesia | 50 | 190 | 2 |
| Duracell | Indonesia | 150 | 189 | 3 |
| Energizer | Indonesia | 90 | 185 | 4 |
| Maxell | Japan | 25 | 182 | 5 |
| Kodak | China | 40 | 170 | 6 |
| Smartbuy | China | 20 | 168 | 7 |
| Sony | Japan | 30 | 159 | 8 |
| G.P. | Japan | 40 | 159 | 9 |
| Varta | China | 65 | 158 | 10 |
| Rexant | Taiwan | 20 | 158 | 11 |
| Robiton | China | 20 | 151 | 12 |
| Panasonic | Japan | 30 | 135 | 13 |
| Ansmann | China | 45 | 124 | 14 |
| Unknown | China | 10 | 78 | 15 |
We recommend: Replacing the fuel pump mesh on Kalina
In first place by a significant margin is the Chinese Camelion battery, priced at 25 rubles. for one piece. Expensive Indonesian disk power sources Renata, Duracell and Energizer took the next three places. But their price is several times higher than that of the first brand. The Japanese Maxell, Sony and Panaconic, which are much inferior to the leaders, disappointed.
Review of batteries for Volkswagen car keys
The Volkswagen car key with buttons is powered by lithium batteries - a miniature battery, the size of which is comparable to a small button.
The VW button key uses a CR2032 lithium battery
The most common brand is CR2032. It is also called a tablet. It is this that maintains the functionality of the VW push-button key for a long time.
Marking of lithium disk batteries
The first two Latin letters indicate the electrochemical system that is used in this type of planar current source. CR are manganese-lithium cells enclosed in a steel case. Lithium is used as the anode, and heat-treated manganese dioxide MnO2 is used as the solid positive electrode. The next two digits indicate the diameter, which is a whole number in mm. The last numbers indicate the height of the disk battery in tenths of a millimeter. Thus, the CR2032 battery stands for this:
- CR - lithium battery with manganese-lithium electrochemical system;
- 20 - battery diameter equal to 20 mm;
- 32 - battery height equal to 3.2 mm.
This is interesting: Where is the coolant temperature sensor installed on the Passat B3?
The battery sockets in all car keys with Volkswagen buttons are the same and equal to 2 cm. Therefore, they use batteries from different manufacturers, the diameter of which is 20 mm.
Pros and cons of CR2032 lithium battery
Advantages:
- Provides excellent performance thanks to high energy consumption.
- It has good workmanship and, as a result, a long service life.
- Guarantees long storage time due to low self-discharge current.
- Does not lose performance over a wide temperature range: from –35 to +60 degrees.
- Complies with international quality standards: ISO 9001, UN 38.3, CE, RoHS, SGS.
Flaws:
- The price is higher than that of analogues with other types of elements.
- Requires careful handling due to the risk of fire if the integrity of the housing is damaged.
Rating of CR2032 batteries of different brands by endurance
The experiment involved 15 CR2032 batteries of different brands.
The testing involved 15 new CR2032 batteries from different brands.
To reduce test time, an extreme load of 3 kOhm was connected to each disk current source and the time during which the voltage dropped to 2.7 volts was measured. In reality, a key with VW buttons creates many times less load on the battery than during testing.
Volkswagen Polo replacing batteries in the key | auto part tc
Replacing the battery in the key for Volkswagen Polo, Golf, Caddy, Sharan, Passat, T5, Jetta, Touran, Tiguan
How to properly change the battery in a Volkswagen key.
Replacing the battery in the Touareg NF key. Replacing the battery in the key Touareg NF
How to open the key and replace the battery of Golf 7 / Skoda Octavia A7
Original flip key VW polo sedan
Replacing the battery in the ignition key of Volkswagen Tiguan Volkswagen Tiguan Polo Polo Skoda Yetti
Cadillac key battery replacement
how to replace the battery in a car key
Volkswagen Sharan key, remote control does not work
Replacing the battery in the key: Polo, Jetta, Golf, Beetle, Scirocco, Tiguan
Volkswagen Polo ignition key. recommendations, reviews, photos
Club Volkswagen Polo sedan. Those. When starting the car, not only the key must fit into the ignition switch, but also the chip and the “brain” must exchange a “signal.”
Volkswagen Polo Sedan Highline › Logbook › The ignition key is broken. I was looking for a way around it, you can buy a key to another polo on Avito and you can register it, but the OA refused (of course, the people there are greedy).
Volkswagen Polo Sedan › Logbook › New ignition key. I was traveling to the Moscow region and had the misfortune of losing the key to my car. I searched the entire field along which my walking route passed and found nothing.
The blade of the VW passat smart key is plastic. Previously My “first love”. Part of the ignition key for VolksWagen, with space for the chip. Additional equipment Polo sedan. We will be happy to answer your questions by mail:.