We carry out the work on an inspection ditch or overpass. We carry out work to replace the external and internal joints of wheel drives, their dirt-proof covers, drive seals, as well as when dismantling the gearbox or power unit. Remove the middle mudguard of the engine compartment (see “Removing the mudguards of the engine compartment”). Drain the oil from the gearbox (see “Changing the oil in the gearbox”). We unscrew the front wheel hub bearing nut (see “Replacing the front wheel hub bearing”) from the side of the drive being removed. We hang up the front of the car and remove the wheel. We unscrew the two screws securing the ball joint to the steering knuckle (see “Removing the ball joint”). When removing the right drive, turn the steering wheel to the extreme left position (when removing the left drive, to the extreme right position) so that the steering rod output has its maximum value. This will allow the outer joint housing shank to be removed from the wheel hub without disconnecting the tie rod end from the steering knuckle. When removing the right drive...
… using a wrench or a socket “10” we unscrew the nut securing the heat shield of the protective cover of the inner CV joint... . and two bolts securing it to the rear support bracket of the power unit (see “Removing the catalytic converter”).
We move the steering knuckle with the shock absorber strut to the side and remove the splined shank of the outer joint housing from the wheel hub. We place the drive on a stretcher. We install an adjustable stop under the gearbox housing by placing a wooden block under the housing.
Using a 19mm head, unscrew the top two...
...and with a “17” head one lower bolt securing the rear support bracket of the power unit to the clutch housing.
We press the bracket of the rear support of the power unit down and insert the mounting blade between the housing of the internal drive joint and the clutch housing...
...push the shank of the hinge housing out of the spline hole of the drive gear.
Do not damage the protective ring of the drive oil seal located on the inner joint housing. We remove the right drive, being careful not to damage the oil seal. When removing both drives, after dismantling the first one, it is necessary to insert a clamp, for example, a wooden or soft metal roller with a diameter of 20 mm and a length of 150 mm, into the hole of the drive gear. Otherwise, the differential drive gears may become misaligned and the drives may not be able to be installed. When dismantling the left drive...
…it is convenient to rest the mounting blade through the spacer onto the gearbox housing.
Remove the left drive. Before installing the drive...
... use a screwdriver to pry up the retaining ring of the shank of the internal joint housing, which secures the drive in the gearbox.
Replacing the CV joint on the Lada Grant. Service life and causes of malfunctions of the “grenade”
Causes of grenade malfunctions and its diagnosis
Usually the CV joint does not break right away.
You will feel the car accelerate jerkily and hear a knocking sound from somewhere in the front suspension. Over time, symptoms worsen. Diagnostics is very simple: put the car on a jack and swing the CV joint of the suspended wheel. Do you feel any play? It's time to change the part. There are 4 main reasons why CV joints fail prematurely:
1) The part itself is of low quality or defective;
2) The vehicle is used off-road;
3) The boot broke and dust and abrasive particles got inside;
4) Aggressive driving style.
If you turn to specialists for help, you will have to fork out money. Replacement service costs an average of 1,500 rubles. for 1 CV joint.
You can save money by doing your own repairs: the cost of a spare part in auto shops starts from 1000 – 1500 rubles. for 1 “grenade”, complete with drive components cost about 3000 – 4000 rubles. There are a lot of manufacturers, but it is better to take the original from AvtoVAZ.
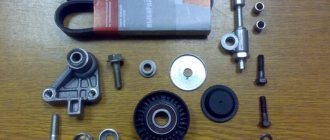
Tools and materials
- new CV joint (the grenade itself, without the drive) and lubricant for it;
- jack, hammer;
- wheel wrench, mounting, pipe of suitable diameter;
- a set of wrenches and sockets, a screwdriver;
- graphite lubricant.
What is needed to install a new CV joint
The CV joint, despite its strength, has parts that can wear out over time or if used incorrectly. Often, CV joint replacement occurs due to damage to the boots - during driving, cracks and holes appear that become clogged with dirt, water and dust. This way you can drive hundreds, or even thousands of kilometers, which will finally finish off the mechanism. Boot problems are expressed in a crackling sound when turning the wheels (when turning to the right, the left wheel cracks, when turning to the left, the right wheel cracks). Sometimes the CV joint has to be replaced due to incorrect actions by the driver. Acceleration of the engine with slipping, starting on the wheels turned out, braking by the transmission - often the cause of the malfunction lies in this.
Play in the ball joint has a negative effect on the CV joint. It occurs when the support itself is already severely worn out. If this problem is not identified in time, it will have a very negative impact on the CV joint. Thus, driving at high speed can tear out the support pin, which can cause the grenade to break.
It is extremely rare that CV joint failures are caused by factory defects in the mechanism parts or initially incorrect installation. Coupled with a worn boot, the problem can reach unimaginable proportions. Many reviews on automotive forums mentioned the poor quality of some parts - both basic functional elements and additional little things, like clamps.
Regardless of the source of the problem, a grenade that is not working properly will require replacement. Machine manufacturers claim that when parts wear out, the entire mechanism must be replaced, even those elements that were not damaged by failure. Considering the high quality of materials, the repair will cost quite a lot. In this regard, the car owner tries to replace the CV joint with his own hands. What will the driver need?
- pit or lift;
- hammer, screwdriver, pliers, jack;
- a set of keys or heads;
- bench vice;
- new clamps, lubricant (CV joint-4, for example), hub nut with stopper.
The latter (consumables) are often provided with a new grenade. All of the above are suitable for replacing outer and inner CV joints.
Replacing the “grenade” with the Lada Granta
1) First, you need to place the car on a hard, level surface so that you can jack it up.
2) Remove the wheel using a wheel wrench.
3) Loosen the hub nut with a 30mm socket. If it is difficult to turn, use an iron pipe as a lever.
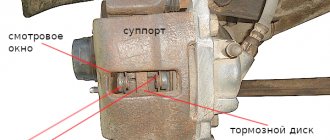
4) Remove the brake caliper.
5) Remove the 2 bolts from the ball joint.
6) Unscrew the hub nut completely, take the mounting tool and remove the hub from the CV joint (and from the ball joint).
7) Pull off the boot and remove the grease, otherwise there will be a lot of dirt.
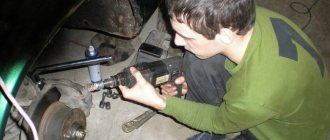
 Using a hammer, carefully knock out the “grenade”.
9) Don't forget to remove the retaining ring with a screwdriver.
10) On the left in the photo is a CV joint made by AvtoVAZ, and on the right is Belmag. As you can see, of these particular samples, the VAZ one is preferable, since it has better calcination.
11) Take the grease and fill the entire grenade bearing with it.
12) Put on a new boot and put lubricant in it. Then install a new retaining ring.
13) Screw the hub nut onto the CV joint.
14) Hitting the nut with a hammer, hammer the “grenade” into place. During the process, it is extremely important to keep the CV joint straight in relation to the drive.
15) Tighten the boot clamps.
16) Unscrew the nut, then reassemble everything in the reverse order of removal. We recommend coating all bolts with graphite to prevent them from souring.
17) Do not forget to move the ABS ring from the old CV joint if it is not on the new one, otherwise problems with its operation may arise.
Removing the left front wheel drive (outer CV joint) Lada Granta
2. Drain the oil from the gearbox.
3. Lift the front of the car from the left side and remove the wheel.
4. Unscrew the left front wheel hub bearing nut.
5. Remove the two screws securing the ball joint to the steering knuckle.
Note:
Turn the steering wheel to the extreme right position so that the steering rod output is at its maximum value. This will allow the outer joint housing shank to be removed from the wheel hub without disconnecting the tie rod end from the steering knuckle.
6. Using a mounting blade or a large screwdriver, remove the hub from the ball joint and at the same time from the CV joint.
7. Remove the boot from the CV joint and remove all possible grease so that there is less dirt.
8. Knock out the “grenade” with a hammer.
9. Insert a pry bar or large screwdriver between the inner drive joint housing and the clutch housing and push the joint housing shank out of the drive gear spline.
Note:
Do not damage the protective ring of the drive oil seal located on the inner joint housing.
10. Remove the left drive.
Note:
When removing both drives, after dismantling the first one, it is necessary to insert a clamp, for example, a wooden or soft metal roller with a diameter of 20 mm and a length of 150 mm, into the hole of the drive gear. Otherwise, the differential drive gears may become misaligned and the drives may not be able to be installed.
11. Before installing the drive, use a screwdriver to pry up the retaining ring of the shank of the internal joint housing, which secures the drive in the gearbox.
12. Remove the retaining ring.
13. Install a new ring into the groove of the inner joint housing shank.
Note:
Reuse of retaining rings is not permitted.
14. Before installing the drive, center the retaining ring in the shank groove using grease.
15. Insert the splined shank of the outer joint housing into the hole in the wheel hub, install the washer and tighten (do not tighten) the hub bearing nut.
16. Carry out further assembly in reverse order.
Do-it-yourself replacement of the Lada Granta windshield wiper drive - step-by-step instructions
1. First of all, remove the wipers. This is done in the following way: it is necessary to remove two decorative plugs, under which there are mounting nuts with a key size of “13”, they must be unscrewed, and the windshield wipers must be removed from the slots along with the brushes and leads.
Note: After removing the wipers, do not turn them on so as not to have to worry about adjustments during assembly.
2. Next, you need to remove the frill (decorative plastic trim), for this you will need an “asterisk” - TORX T20.
Note: Some mounting screws are hidden under decorative caps.
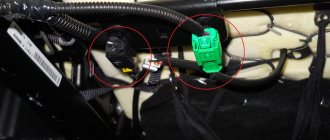
3. Using a “10” key, you need to unscrew the nut (on the right), as well as 2 bolts (on the left) securing the trapezoid.
4. Now you can turn off the power; to do this, disconnect the wire from the battery and disconnect the connector. Now you can safely remove the entire trapezoid assembly.
5. Next, everyone can do their own depending on the need, some will have to replace everything, and for others it will be enough to wash everything and lubricate it properly.
6. After completing all the necessary work, you can perform assembly; it is performed in the reverse order.
The new trapezoid works properly, while the cleaning area has increased (within the limits of what is permitted), it does not rub or touch anything anywhere
The “Kulibins” have not disappeared from Rus'. They happily spend the night in garages, replace the cables themselves, but they don’t guard the cooperative along with the dogs...
Those who are accustomed to “picking” a swallow on their own are probably familiar with the methodology for carrying out such work. They don’t just have to change the cables, they need to remove the Grants checkpoint every day. Less prepared motorists, having familiarized themselves with the equipment, will broaden their horizons and show off new knowledge. “Under the arm” of the service station master.
Tools and equipment
A good surgeon needs a sharp scalpel, a good mechanic needs a key to “13”. A small list of must-have items that will make removing the gearbox cables on the Grant as simple as possible.
- set of keys, heads;
- pliers;
- slotted screwdriver;
- socket head at “13”;
- gloves;
- additional lighting;
- lubricant, for example, WD-40;
- rags.
Grant gearbox cables close up before removal
A simple set of equipment for the tricky work of a handyman. Removing the Lada Granta gearbox requires a much more impressive amount of tools.
Safety precautions
Removal of the Grants gearbox cables is carried out without lifting the car: access from the cab and engine compartment is sufficient.
Compliance with safety regulations (which will at least keep your fingers intact) means:
- Availability of a first aid kit in case of injuries.
- The car is placed on a flat surface and the hand brake is applied. Wheel chocks are installed under the wheels.
- The work is performed with proper tools.
- Use the correct grip: hold the pliers so that the hand is positioned up to the safety stops of the handles.
- Do not use pliers as an impact tool or lever.
Procedure
Removing the gearbox cable on the Lada Grant is accompanied by a whole list. This, of course, is not replacing the clutch fork without removing the gearbox on a Grant, but still. Let the car gurus not be offended. This list is not for them, but for those who are already “on fire” to show off their knowledge:
- Preparing the car: turn off the ignition, disconnect the negative terminal of the battery;
- dismantling the tunnel lining;
- dismantling the bracket (by the bent edge) securing the cable sheath using pliers;
- disconnection of the cable tip and the rocker lever pin;
- removing the tip (by the spring cotter pin) from the hole in the rocker lever using pliers;
- dismantling the battery shelf;
- disconnecting the cable tip and the manual transmission lever (preliminarily compress the tip clamps with pliers);
- removing the end of the cable sheath;
- disconnecting the tip from the gearshift lever;
- removing the thermal shield of the additional muffler;
- removing the cable holder from the hole in the base of the body;
- Removing the gearbox cables on the Grant.
When to change the CV joint, signs of malfunction
As was said, the external grenade fails after about 40 thousand mileage. This is evidenced by crunching, creaking and knocking sounds in the area of the drive shafts. To determine which side of the CV joint requires replacement, you need to turn the steering wheel all the way and drive off. In 90% of cases, a worn drive will manifest itself as a crunching sound. For control, you can turn it first in one direction, and then in the other direction, and turn it back. If the CV joint is worn out, a crunching sound will be heard immediately.
New and worn CV joint
This is the case when there are no visual signs of wear:
- Lubricant leaks near the outer joint.
- Cracks, tears on the boot.
- Lost or misaligned clamps.
- There is obvious play when turning the suspended wheel.
If there are visual signs of wear, we replace the CV joint on the Grant as soon as possible.
FakeHeader
Comments 21
Gentlemen! By the way: Stopping at a crossing (RAILS) is strictly prohibited and is punishable by DEprivation of your licence! Where are the moderators looking? ) PS And do you want a like? )))
I already answered below that I work as a railway worker, this is a fire crossing, so there were no trains there)))
I liked it... it looks good... maybe even better. than with chrome... a lot of chrome is not for everybody... I also somehow don’t like a lot of chrome-nickel inserts and goodies...
thank you, I agree. Not all cars are decorated with chrome...)
I looked and didn’t see a single like from you, sir?! As a result, you don’t view the FEED at all!
Accordingly, what kind of likes are you waiting for?!
Are you saying that I didn’t like any of your posts? That’s strange...
Signs of failure of the outer grenade (CV joint).
There are two options here:
- signs that your grenade has already broken
- signs that the grenade will soon come out and break .
How to understand that a grenade will soon break.
Of course, the first sign of a malfunction of the external grenade is a crackling sound . If you hear a crackling noise while driving with the steering wheel turned, it is definitely a CV joint. The greater the angle of rotation of the wheel and the harder you press on the gas, the louder the clicks. Another sign that does not always appear is vibration on the steering wheel at speeds greater than 80 km/h. The vibration is only slightly similar to the vibration from an unbalanced wheel. It usually manifests itself as a slight twitching of the steering wheel.
How to understand that the outer CV joint has broken.
If the CV joint breaks, the car will stop moving. In any gear engaged, press the gas, the speed increases, but the car does not move.
How to understand that it is the outer CV joint that has broken, and not the internal one or the clutch in general (the first signs of failure are similar to the signs of a clutch failure)? First of all, start the car and put it in any gear. Next, open the hood and look in turn at each of the shafts going from the box to the wheels (one short, the other long). If any shaft is spinning, it means that the CV joint has broken on this side.
I recommend not just visually looking at the shaft, but touching it with some long, hard object, such as a stick. The main thing is that there is nothing on it that can wrap around the shaft !!! When you touch the shaft with a stick, if it is spinning, you will feel a slight vibration. This is usually done in the dark, because it is difficult to understand whether a cylindrical object is spinning, especially in the dark.
Replacing the inner CV joint on a grant
The expression “replacing a constant velocity joint” will probably cause confusion among most of you. But if you paraphrase and say - replacing a CV joint or a “grenade”, almost everyone will understand what we are talking about. But this is exactly what the abbreviation CV joint stands for.
Today I will share another excellent photo report on how to replace a CV joint at home, this time on a Lada Granta. The work has already been described several times on the pages of our website, but so that Grant drivers are not offended, we will tell you how to replace the outer CV joint on a Grant.
Tool:
A set of wrenches, a 30mm socket, a hammer and a mounting blade or pry bar.
Replacing the CV joint on a Lada Granta
In a car with front-wheel drive, it is not the driveshaft with the main gear and axle shafts that is responsible for transmitting torque from the gearbox to the wheels, but special parts - CV joints, they are also constant velocity joints, in common parlance - a “grenade”. They consist of a drive and a CV joint itself; there are 2 of them on each drive.
– external (closer to the wheel) and internal (closer to the gearbox). The “Grenade” is very durable, and with constant maintenance the car can withstand 100,000 km. and more. However, it does not last forever, and one day it may fail.
In this article we will talk about how to independently diagnose and replace an external CV joint using the example of the popular Russian car Lada Granta.
Causes of grenade malfunctions and its diagnosis
Usually the CV joint does not break right away. You will feel the car accelerate jerkily and hear a knocking sound from somewhere in the front suspension. Over time, symptoms worsen. Diagnostics is very simple: put the car on a jack and swing the CV joint of the suspended wheel. Do you feel any play? It's time to change the part. There are 4 main reasons why CV joints fail prematurely:
Assembly procedure step by step
We carry out the entire list of assembly operations in a Lada Kalina car in strictly reverse order. During the procedure, it is necessary to take into account some nuances.
- First, we put the boot on the axle shaft. If this is difficult, then its surface can be lubricated with the grease supplied with the new hinge kit.
- Now we fill the same grease into the CV joint bearing, and the remainder into the internal cavity of the boot.
- We install the hinge on the axle shaft. We also use a hammer, applying a shock load to the body. The retaining ring should be replaced.
- When the “grenade” “sits” in its place, we push the boot, after squeezing it with our hands to remove excess air. We install clamps.
- We do the same when replacing the internal hinge.
- Now we install the axle shaft into the transmission housing until the shaft engages with the side gear. Don’t forget to fill the unit with oil afterwards.
- We insert the outer joint into the steering knuckle until it fully engages with the splined race of the hub. Screw on the central nut (do not tighten it).
- We return the ball joint to its place.
- We hang the wheel and do not tighten its fasteners too much.
- We lower the car (we do not unload the jack completely). Tighten all fasteners to the required torques. We remove the jack and stops. Replacement of the outer CV joint is complete.
The owner of LADA Kalina will spend no more than 3 hours of his time to complete the full list of replacement actions. We check the correct installation of the hinges. To do this, we start driving the car with the wheels turned out as far as possible. We observe the absence of crunching and other characteristic sounds from the axle shaft. Now you know how to change a faulty CV joint.
Recommendations
- As a rule, the clutch “disappears” when the clutch fork breaks or the cable breaks. In such a situation, you can drive your car to the service center without using the clutch pedal. To do this, turn off the engine, engage first gear, then start with the gear engaged. To upshift, you need to re-gear, and to downshift, you need to wait until the engine speed drops to suitable values.
- If the Grant clutch is being replaced, the gearbox or engine is being removed, experienced car enthusiasts recommend replacing the clutch cable if the cable has traveled more than 30-40 thousand km. Also on the Granta, clutch adjustment and inspection are necessary if even minor problems appear with the clutch pedal or difficulties with gear shifting.
Checking the condition of the CV joint
- External (external) CV joints - two pieces, located on the hubs, transmit torque to the wheels. The steering angle is significantly higher than that of an internal CV joint. They also take on more load. Accordingly, they break down more often and require regular inspection and replacement if necessary. They have a smaller size.
- There are two internal CV joints that make the axle shaft move; they are located in the gearbox, one on each side. They are larger in size. They are less subject to stress and, accordingly, can work longer.
You can assess the condition of the CV joint yourself. The easiest way to inspect the external one is to turn the steering wheel all the way (to the right or left) and quietly move away. If there is a problem, a cracking or crunching sound will appear. The more damage is done to the CV joint parts, the louder the sound will be.
If problems with the external grenade are accompanied by a crash when turning, then problems with the internal grenade are accompanied by a crack when moving straight. The sound will intensify if you drive off-road - every bump, hole or ditch will clearly remind you of the problem. If you notice a crunching sound, carry out repairs immediately - problems with the internal CV joint are very dangerous. It's a little more difficult to inspect:
- We put the car on the lift.
- We turn on first gear, the wheels should rotate slowly (the car should be slightly raised).
- The presence of a distinct crunching sound is evidence of problems.
If you hear a cracking sound while driving - when turning, when overcoming off-road obstacles, or sudden acceleration - immediately fix the problem. Timely inspection and repair will help the car owner remain a driver and not a pedestrian. In addition, a problem detected in time will help to avoid critical situations on the road.
Replacement
Cars July 19, 2017
"Lada Kalina" is a front-wheel drive car in which the engine and gearbox are located transversely relative to the body. The drive to the wheels is carried out through the main gear.
Torque is transmitted through constant velocity joints (simply CV joints, or “grenade”). There are several of them - internal and external. Despite their reliability, these elements can fail.
Well, let's look at how to replace a “grenade” on a Kalina, what tools are needed for this and what are the signs of a malfunction.
Device
In terms of their design, the inner and outer CV joints are very similar. Thus, the design of the element includes:
Thanks to this device, the elements are capable of transmitting torque to the wheels at an angle of up to 45 degrees (not only in the horizontal, but also in the vertical plane).
How to determine a breakdown?
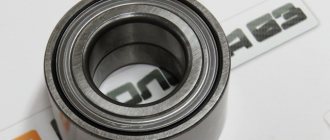
The grenade is a ball bearing, the cages of which have transverse grooves. Due to this, the angle between the driven and driven axle shaft changes. Thus, the CV joint not only transmits torque, but also changes the angle between the axle shafts. In view of this, over time, it develops.
In places where the parts do not fit tightly, backlash and extraneous noise are formed. In fact, this is accompanied by a characteristic crunch. It occurs due to large wear on the balls that move along the grooves. The crunch can appear both during straight-line movement and when turning. In the latter case, most likely, the external grenade of the Kalina requires replacement.
Repair and service of cars, engines and automatic transmissions
Front wheel drives of Lada Granta/Kalina cars
The front wheel drives of the Lada Granta/Kalina transmit torque from the gearbox to the front drive wheels, regardless of the angle of rotation of the wheels and the position of the suspension.
Each drive consists of two constant velocity joints (CV joints) and a shaft connecting the joints. The short shaft of the left drive is made of steel rod, the long shaft of the right drive is made of steel pipe.
Using a spline connection, the shank of the inner joint housing is connected to the differential side gear. The joint transmits torque to the drive shaft regardless of the angle between the joint body and the shaft.
The internal CV joint of the Lada Kalina/Granta VAZ-2190 is designed so that it not only transmits torque at different angles, but also allows mutual axial movement of the hinge body and the suspension drive shaft while driving.
The outer joint transmits torque from the drive shaft to the drive wheel hub, to which it is connected via a spline.
The splined end of the outer joint housing is secured to the hub with a nut. The hinges are protected from dirt and moisture by protective rubber covers secured with steel tape clamps.
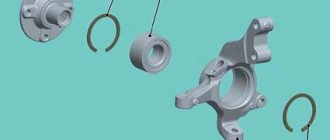
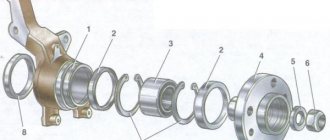
Fig.24. Left drive parts Lada Granta/Kalina
1 — hub nut; 2 — thrust washer of the nut; 3 — outer hinge body; 4 large clamp for outer joint cover; 5 — protective cover of the outer hinge; 6 — small clamp of the outer hinge cover; 7 — drive shaft; 8 — small clamp of the inner hinge cover; 9 — protective cover of the internal hinge; 10 — large clamp of the inner hinge cover; 11 — internal hinge body; 12 — retaining ring of the shank of the internal hinge; 13 — inner race of the inner hinge; 14 — balls of the internal hinge; 15 — internal hinge separator; 16 — internal hinge clamp; 17 — retaining ring of the inner hinge cage; 18 — thrust ring of the inner hinge cage; 19 — thrust ring of the outer hinge cage; 20 — retaining ring of the outer hinge cage; 21 — inner race of the outer hinge; 22 — outer joint balls; 23 — outer hinge separator
The right drive shaft is longer and made of pipe.
The service life of the drive depends on the condition of its joints. The hinges are quite durable and, provided the car is used carefully, can last more than 100 thousand km. As a rule, the external drive joints fail before the internal ones.
The service life of the hinges is reduced by an active driving style, interference with the suspension design of the Lada Kalina/Granta VAZ-2190 (installation of gaskets between the body and telescopic struts), but most of all, damage to their protective rubber covers.
When the cover ruptures, water and dirt enter the internal cavity of the hinge. As a result, lubricant is washed out of the joint and wear accelerates.
Rupture of the protective cover can occur as a result of natural aging of rubber and mechanical damage (when the car is driven in a deep rut; when the front wheels of the car “burrow” into the ground, sand or icy snow; as a result of ice freezing or clay hardening on the outer joint cover).
If the cover ruptures in unfavorable conditions (dirt, dust, snow), the hinge can become unusable several tens of kilometers away. A damaged protective boot can be replaced if the problem is discovered before the hinge fails. In this case, the hinge must be disassembled, washed and new lubricant applied.
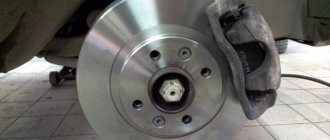
Wear of the outer CV joint of the Lada Granta/Kalina can be indicated by clicking noises in the area of the front wheel hub when driving in a sharp turn.
As the joint wears out, the clicking will intensify and quite quickly develop into a constant crunching sound, even when moving in a straight line. Untimely repair will lead to destruction of the hinge.
The technical condition of the hinges should be checked every 10 - 15 thousand km. It is best to combine this procedure with an oil change when the car is on an overpass or inspection pit.
Checking the wheel drive of Lada Kalina/Grant VAZ-2190:
— We prepare the car for the work by hanging the front wheels of the car on stands and turning on the neutral gear.
— We inspect the protective covers of the drive joints, make sure that they are intact and that there is no lubricant leakage from them.
— We install the wheels in the direction of straight-line movement. Mix by hand and rotate the drive shafts in different directions. This way we make sure that there are no backlashes between the drive parts.
— Rotating the front wheels by hand, check the drive shafts for the absence of runout.
— Alternately turning the front wheels in one direction or the other and rotating them, we make sure that there are no extraneous sounds (knocking and crunching) in the outer and inner joints.
— For a serviceable hinge, the presence of extraneous sounds during operation or play between parts is unacceptable. A faulty joint should be replaced (either separately or the entire drive assembly). A torn cover should only be replaced if the hinge is in good condition.
Replacement of front wheel drive Lada Granta/Kalina
Work on replacing the front wheel drive of a Lada Kalina/Granta VAZ-2190:
— Remove the engine splash guard.
— Drain the oil from the gearbox.
— Remove the hub cap and loosen the hub nut.
- Loosen the wheel bolts.
— Place the car on a reliable stand and remove the front wheel.
— Loosen the three self-locking nuts securing the upper support of the suspension strut and unscrew the nuts a few turns.
— Unscrew the two bolts securing the ball joint to the steering knuckle.
— We finally unscrew the wheel hub nut.
— We remove the shank of the outer hinge from the hub. If necessary, knock it out through a wooden block or press it out using a universal three-jaw puller.
— When removing the left drive, turn the steering wheel all the way to the right; When removing the right drive, turn the steering wheel all the way to the left.
— Remove the brake hose from the bracket on the suspension strut. Carefully, without allowing too much tension on the brake hose, pull the lower part of the strut outward, remove the shank of the outer joint from the hub and carefully lower the drive onto the wishbone of the suspension.
— Using the mounting blade as a lever (resting its end against the end of the internal hinge body), we move the hinge outward, overcoming the resistance of the locking ring.
— While carefully supporting the inner CV joint (trying not to damage the drive oil seal with the splines of the joint shank), remove the joint from the gearbox and remove the drive assembly from the Lada Granta/Kalina car.
— Replace the retaining ring of the splined shank of the internal hinge housing with a new one.
— Apply grease to the spline and smooth surfaces of the shank.
— Carefully insert the shank into the oil seal, trying not to damage the working edge of the oil seal with the shaft splines. At the same time, we direct the locking ring with the gap upward.
— We energetically insert the drive into the gearbox and make sure that the retaining ring of the inner joint shank is securely fixed and the drive does not move out of the gearbox housing.
— We carry out further work in the reverse order of disassembly.
— During assembly, it is necessary to install a new hub nut.
External CV joint of Lada Granta/Kalina wheel drive
Operations for replacing the external CV joint of the front wheel drive of the Lada Kalina/Granta VAZ-2190:
— Remove the drive assembly.
— The ends of all four clamps of the internal and external hinges on both shafts are directed in the direction opposite to the rotation of the drives when moving forward.
— To ensure correct assembly, if the clamps are to be reused, we use a marker to put marks on them indicating the direction of rotation.
— Using large sliding pliers or special pliers, we squeeze the large clamp and use a slotted screwdriver to disconnect the clamp lock.
— In the same way, remove the small clamp of the protective cover of the outer hinge.
— Use a slotted screwdriver to pry up and remove the protective cover from the body of the outer CV joint of the Lada Granta/Kalina.
— A damaged cover can be removed by cutting it with a knife.
— When performing the following operation, if the hinge is to be reused, do not strike the cage or the hinge body.
— We fix the drive shaft in a vice. By striking the inner race of the hinge through a soft metal drift, we press the outer hinge from the drive shaft.
— Using a slotted screwdriver, pry up and remove the retaining ring from the splines of the drive shaft.
— Using an external retaining ring puller, remove the thrust ring.
— Remove the protective cover from the drive shaft.
— We wash the Lada Granta/Kalina CV joint in kerosene, wipe it with a clean cloth and let it dry.
— In order not to damage the new cover during installation, we wrap the shaft splines with tape or insulating tape.
— We put a new protective cover on the shaft, move it to the center of the shaft and remove the tape.
— We fix the drive shaft in a vice vertically. Install a thrust ring on the splined end of the shaft.
— We install the retaining ring in the same way.
— Lubricate the shaft splines with lubricant for the Lada Kalina/Granta VAZ-2190 CV joint.
— We install the hinge on the splined end of the shaft. We press the hinge onto the shaft through a wooden block until it is secured with a locking ring. The outer joint requires 40 g of lubricant.
— Fill the joint with lubricant for constant velocity joints. The remaining part (from 40 g) of the lubricant is placed in a protective case.
— We move the protective cover towards the hinge so that the large sealing belt of the protective cover is completely put on the hinge body, and the small sealing belt fits into the groove of the shaft.
— By lifting the small-diameter sealing belt with a slotted screwdriver, we release air from the internal cavity of the cover.
— Using large sliding pliers or special pliers for installing clamps and a slotted screwdriver, install the large and small clamps of the protective cover.
— We install the clamps taking into account the direction of rotation of the drive. The outer end of the clamps should be directed in the direction opposite to the rotation of the drive when moving forward.
— Before installing the assembled drive on the car, be sure to install a new retaining ring on the splined shank of the inner joint.
— We install the drive assembly on the car.
Internal CV joint of Lada Granta/Kalina wheel drive
Operations for replacing the internal CV joint of the front wheel drive of the Lada Kalina/Granta VAZ-2190:
— Remove the drive assembly.
— We fix the drive assembly in a vice and use special pliers or sliding pliers to remove the large and small clamps of the protective cover.
— Use a slotted screwdriver to pry up and remove the protective cover from the internal hinge body.
— A damaged cover can be removed by cutting it with a knife.
— When performing the following operation, if the hinge is to be reused, do not strike the cage or the hinge body.
— We fix the wheel drive shaft of the Lada Kalina/Granta VAZ-2190 in a vice. By striking with a hammer through a soft metal drift on the inner race of the hinge, we knock the hinge off the drive shaft.
— Remove the locking and thrust rings, in the same way as shown on the outer hinge.
— Remove the protective cover from the drive shaft.
— We wash the hinge in kerosene, wipe it with a clean cloth and let it dry.
— We fix the drive shaft in a vice in a vertical position.
— We wind tape (or insulating tape) onto the shaft splines, put a new protective cover on the shaft, move the cover to the middle of the shaft and remove the tape.
— On the right drive, turn the cover inside out onto the shaft.
— We install a new thrust ring on the splined end of the shaft.
— Using a slotted screwdriver, install a new retaining ring on the shaft.
— We apply grease to the shaft splines for the Lada Granta/Kalina CV joint.
— We put the inner race of the hinge on the shaft splines. Align the joint body with the shaft axis. Using a hammer, press the joint onto the shaft using a wooden block until the locking ring is completely installed.
— The internal joint requires 80 g of lubricant.
— We fill the hinge with lubricant for the CV joint, and put the remaining part of the lubricant (from 80 g) in a protective case.
— We put the large sealing belt of the protective cover on the hinge body, and install the small sealing belt of the cover in the groove of the shaft.
— By lifting the small sealing belt of the cover using a thin slotted screwdriver, we release air from the internal cavity of the protective cover.
— Using special flares or large sliding pliers, we install the large and small clamps of the protective cover.
— Before installing the assembled drive on the car, be sure to install a new retaining ring on the splined shank of the inner joint.
Replacing the gear shift rod hinge boot and rod seal
We apply transmission oil to the working edge of the oil seal, and sealant to the outer surface of the race. We put the cage on the switch rod and press it into the clutch housing socket, resting it with a mandrel of a suitable size on the collar of the oil seal cage. We carry out further assembly in reverse order. We replace the damaged hinge cover. Before assembly, clean and degrease the threads of the hinge locking screw and apply sealant to the threads. Before tightening the screw, we ensure that the holes in the hinge and the gear selector rod match.