Removing the front seats of Lada Priora
Required tools : flat screwdriver, 13mm socket, Torx E-10 socket (or regular 8mm socket).
- Move the driver's seat back as far as it will go and disconnect the torsion bars using a flat-head screwdriver.
- Remove the torsion bars from the mountings and remove them.
- Unscrew the 4 nuts securing the pillow base strut brackets using a 13mm socket. Remove the brackets from the studs.
- Tilt the driver's seat back. Remove the 2 front bolts securing the seat slide to the body using a Torx E-10 socket.
- Tilt the seat forward and move it to the full forward position. Similarly, unscrew the 2 rear mounting bolts for the slide using a Torx E-10 socket.
- Remove the Priora seat from the car interior.
Installation of the front seats is carried out in reverse order.
Removing the interior trim of the Priora
Any parts of the car interior, in particular the ceiling, can be modified, for example, installing sound insulation. The ceiling can also be improved and re-stretched. Of course, the first step in any type of tuning is dismantling the product. How to remove the trim from the roof of a Lada Priora car yourself?
To carry out the operation of removing the car upholstery, you need a Phillips and flat-head screwdriver, as well as gloves, which must be clean, since the upholstery of the VAZ 2107 (Lada Priora) is very soiled and easy to get dirty. By the way, if you have your upholstery changed at a service station, but you need a car urgently, we recommend using the Kyiv car rental SVcar service. We assure you that you will be satisfied!
The procedure for removing the headliner:
- You need to open the glasses case and unscrew two bolts.
- The lampshade snaps off and is removed.
- It is necessary to disconnect all wiring harnesses from the lampshade.
- The plastic cover located near the interior mirror is removed, and the latches are snapped off with a flat screwdriver.
- Two bolts are unscrewed, the mirror and plastic box are removed.
- The side trims of the windshield pillars located on the driver's side are removed. To do this, you need to pry them off and snap off three clips.
- The pillar trim on the passenger side is removed in the same way.
- The pillar trim in the center (near the seat belts) on both the driver and passenger sides is removable.
- The plugs are removed and the bolts holding the upper handles are unscrewed.
- The three plugs near the rear window also need to be removed.
- The rear strut covers do not need to be removed; instead, it is recommended to snap off their upper part.
- If there is a central lamp used for interior lighting, it must also be removed.
How to remove the headliner of a Lada Priora?
After carrying out all the above work, only the seals hold the casing in place. Using a flat-head screwdriver, the headliner is removed from under the seals. As soon as the front part of the ceiling is on the seats, the trim needs to be moved forward, then the rear part of the trim is brought out from under the rear pillars.
In order to remove the trim from a VAZ 2170 (sedan), you need to lower its left edge between the door and the seats, and then pull it out through the rear door. This must be done very carefully so as not to break the upholstery.
If the car is a VAZ 2171 (station wagon) or VAZ 2172 (hatchback), then in this case the headliner can be pulled out through the trunk. The roof sheathing is installed in the reverse order of the above.
Found a mistake? Select the text with the mouse and press Ctrl+EnterVIP is a type of tuning that over time has become a car culture. The emergence of the VIP style is closely related to the emergence of the JDM scene.
During the operation of any car, the lamps in the headlights must be replaced, because they cannot work forever. Reupholstering the car ceiling with your own hands This article will help you learn more about how you can reupholster the car ceiling yourself at home. Attaching the inner door panel: Fig.
1Service life of the main muffler, which is used in the exhaust system of the Lada Priora (hereinafter referred to as pShow more
Removing the rear seats of Lada Priora
Required tools : 10mm socket, Phillips screwdriver.
- Release the latch by pulling the loop.
- Fold the right side of the seat back forward and unfasten the fastening buttons for the trunk trim.
- Pull the backrest hinges out of the body hooks and remove the right side of the backrest.
The left side of the seat back is removed in the same way.
- Press the latches on both sides of the seat cushion.
- Remove the pillow.
- Unscrew the 2 screws of the upper fastening of the plastic partition using a Phillips screwdriver.
- Unscrew the 2 nuts securing the armrest hinges to the body using a 10mm socket.
- Remove the armrest.
- Remove the plastic partition.
Installing the rear seat of the Priora is carried out in the reverse order.
Installation of torsion bars for the front seats of Priora
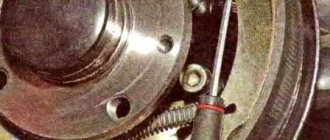
We place the taller plastic bracket (No. 1) closer to the threshold, and the less tall one (No. 5) to the floor tunnel. In this case, the hooks (No. 2) of the brackets should be directed towards the front of the car. We insert the short end of the torsion bar (No. 3) into the hole in the bracket (No. 5) and insert the torsion bar (No. 3) into the hook (No. 2) of the bracket (No. 1). Then use a mounting spatula or a powerful screwdriver to place the long end of the torsion bar (No. 3) behind the hook (No. 6) of the pillow base post. We install the torsion bar (No. 4) in the same way. The long ends of the torsion bars should be directed towards the front of the car.
Front seats
The front seats can be removed regardless of the Priora body type, that is, the seats will be removed the same way on all types of cars.
In order to get started, you need to prepare the tool.
To remove the front seats of the Priora you will need:
- Ratchet;
- Torx head E10;
- Head for 10 and 13 mm;
After preparing the tool, you can begin to work.
Removal process
- Initially, you need to disconnect all wires connected to the seat, such as heated seats and the seat belt indicator. We find these connectors under the seat and disconnect them.
- Remove the springs pushing the seat forward numbered 1 and 2 by pulling them up from the plastic retainer.
- Next, use a 13 mm socket to unscrew the 4 nuts securing the front part of the seat.
- Then, using a torx E10 head, unscrew the 5 bolts securing the slide.
- We take out the seat through the front door of the car.
Installation is carried out in reverse order.
Rear sofas - what to replace them with in the VAZ 2110?
If everything is approximately clear with the front seat options, then the rear sofas require a special approach. We are talking about an unconventional size and rather strange types of fastening of a sofa from AvtoVAZ. If you are far from automotive, it is better not to modify the rear seats yourself. For this you will need the help of specialists. It is important to find a car of the same size, as wider cushions and backrests will have to be redesigned. The installation process is quite complicated:
- you need to choose good rear sofas from models such as Volkswagen Polo, Hyundai Solaris, KIA Rio, Renault Logan, and you can also pay attention to Toyota Corolla;
- Next comes the dismantling of the seats of your car, which is not particularly difficult - just unscrew a few fasteners to get all the structural parts without any difficulties;
- Next, you should try on new seats, it is quite possible that you will have to order their re-upholstery at a studio, since it is very difficult, and sometimes impossible, to guess the size perfectly;
- the next step is the installation of fasteners, it is necessary to remove the fastening parts from the VAZ seats and rearrange them on the purchased pillows and backrests for high-quality fastening;
- after that, all that remains is to install the finished seats in place and enjoy the updated interior of your car, also don’t forget to take a photo and share it on the forums and in the logbook.
Of course, this sounds much simpler than it is done. The process may take more than one day, especially if the seats need to be altered, shortened or lengthened. When choosing seats for the rear of a car, it is best to buy a whole interior set. This will help significantly reduce the cost of further alterations. After all, if you install chairs of different colors, you will have to sew covers or change the upholstery and spend extra money.
Rear seats
The rear seats will differ in dismantling depending on the Lada body type. Therefore, we will consider each body type.
Sedan
- In a sedan, the rear seat can be removed much faster than in other body types. To remove the sofa, you need to press on the locks located on the edges of the sofa and lift it up. After which the sofa can be removed from the car.
- The backrests of the rear sofa can be removed by opening the lock located behind the rear headrest. To do this, you need to pull the lock loop and tilt the backrest forward. After which the back is removed from the hooks.
Hatchback and station wagon
- In these types of bodies, the sofa is divided into two parts, each part is attached to two hinges that are screwed to the body with an M6 bolt with a 10mm head.
- To dismantle, you need to pull the loop and open the lock securing the sofa. Then unscrew the 4 bolts and remove both parts of the sofa from the hinges.
Back
- The back of the sofa is also divided into two parts and is supported on hinges, access to which opens after removing the sofa.
- Pull the lock flag to open it and bend the back forward. Then unscrew the bolts on the backrest hinges and dismantle it.
Which seats are suitable for the VAZ 2110 - choosing the best
Many believe that the domestic manufacturer offers not so bad cars. In particular, there are many good reviews about the VAZ 2110, which has already been discontinued. Today this car is already quite old, but even models with 15 years of travel experience in Russia are in no hurry to disappoint owners with their reliability. Of course, there are many questionable components and moments in the car. The interior isn't very attractive, the materials aren't the most expensive, and the build isn't the best. But overall, this car can claim to be one of the best from AvtoVAZ. The car sold in millions of copies, so today a huge number of representatives of this model travel on the roads of Russia. It is also worth noting that the tenth VAZ family was sold in hatchback (2112) and station wagon (2111) body styles. The sedan turned out to be the most popular, but other representatives did not go unnoticed in the automobile market.
Main advantages of the car:
- good power plant
- indestructible gearbox,
- simple electrics,
- adequate suspension.
But the salon is not included in this list. Everything here is overly simple and somehow ascetic. One of the biggest disappointments for the owner will be the seats. They are somewhat shapeless and not very attractive in appearance. The seating position in the car is deep, so visibility is not the best unless you are 190 cm or taller. Not everyone can get comfortable behind the wheel. And the position of the steering wheel is quite strange, it requires a higher position for comfortable control. However, this problem can be solved quite simply - by purchasing, altering and installing seats from a good foreign car. Today we will determine which seats from foreign cars are suitable for the VAZ 2110 and the entire tenth family of domestic cars.
How to attach seat trims for Lada Priora pre-styling
The latest restyling of the Lada Priora brought many changes, one of them is a plastic cladding that is screwed to the front of the front seat cushions. With such an overlay, the car interior looks more aesthetically pleasing and modern. We are studying the question of how to install such a cladding on the seats of the Lada Priora before restyling.
You will need : buy seat trim (catalog number: 2170-6810066), a “10” key, a piece of plastic, clamps, glue, a file.
Seats from which foreign cars can be viewed for the Tens?
What seats are suitable for the VAZ 2110? You can install almost all seats from cars of a similar size. This could be a B or C class car, which is famous for its comfort. Thanks to the abundance of disassemblies, buying used chairs will not be a problem. All that remains is to choose the chair model directly. For such a selection, it is worth focusing on already successfully completed projects, which car owners are happy to brag about in in-flight magazines. Here are just some popular examples:
- BMW E60. The seats in these models of Bavarian cars were mostly leather, and also equipped with an electric drive and other additions that the car owner would obviously like.
- Hyundai i40 or Hyundai i30. The seats are very comfortable and well thought out, and the ones from the i30 are preferable, as they leave more space in the cabin. The appearance is good and the side supports also work very well.
- Skoda Octavia A5. The seats are very comfortable and compact, there are the necessary adjustments, and well-defined lumbar support. The quality of the upholstery in this model is also pleasing, so you will definitely be satisfied with these chairs.
- Ford Focus. The alterations will be quite complex, but nevertheless, you will get excellent results. Especially if you can find seats from more expensive trim levels of this car, they are very comfortable and beautiful.
- Recaro. Many sports style lovers would like to see Recaro seats in their car. The easiest way is to find Opel proposals, but there are also solutions from other models; altering them will not be difficult even with your own hands.
This list goes on with most compact models from Volkswagen, Mercedes and other brands. There are a lot of interesting ideas on the market. But before buying chairs, you should find out if anyone has performed such an operation on their Ten before you. This can be found on the Internet, since most owners will definitely boast about such a change. However, you can try something new by posting your experience on the Internet to help others.
Installing the trim on the driver's seat
Rear trim fastening:
- Unscrew 2 bolts.
- Remove the standard plastic trim.
- Cut off part of the plastic cladding along the intended contour.
Front trim fastening:
- Cut off both front trim fasteners, because do not allow the parts to fit tightly to the seat.
- Make a bracket (with a hole) from a suitable piece of plastic to attach the cladding. Glue it to the back of the cladding.
- We install the cladding, tightening the front part with a clamp (tie), which we insert into a homemade mount.
The seat coverings should be secured slightly higher from the floor so that the carpet can be pulled out without effort.
Installing the passenger seat trim
The installation process is similar except for one detail. Unlike the driver's side, on the passenger seat the lever handle rests against the trim, because turned the other way. To eliminate this, you will have to cut a hole for the seat lever handle.
Disadvantages of such seat coverings:
- installation will require a lot of time and effort to complete.
- It became more difficult to get rugs.
- there is no possibility to use the space under the seats for storing things (for example, a fire extinguisher).
Let us remind you that there are other seat covers for the Lada Priora, which will be much easier to attach.
Rear sofas - what to replace them with in the VAZ 2110?
If everything is approximately clear with the front seat options, then the rear sofas require a special approach. We are talking about an unconventional size and rather strange types of fastening of a sofa from AvtoVAZ. If you are far from automotive, it is better not to modify the rear seats yourself. For this you will need the help of specialists. It is important to find a car of the same size, as wider cushions and backrests will have to be redesigned. The installation process is quite complicated:
- you need to choose good rear sofas from models such as Volkswagen Polo, Hyundai Solaris, KIA Rio, Renault Logan, and you can also pay attention to Toyota Corolla;
- Next comes the dismantling of the seats of your car, which is not particularly difficult - just unscrew a few fasteners to get all the structural parts without any difficulties;
- Next, you should try on new seats, it is quite possible that you will have to order their re-upholstery at a studio, since it is very difficult, and sometimes impossible, to guess the size perfectly;
- the next step is the installation of fasteners, it is necessary to remove the fastening parts from the VAZ seats and rearrange them on the purchased pillows and backrests for high-quality fastening;
- after that, all that remains is to install the finished seats in place and enjoy the updated interior of your car, also don’t forget to take a photo and share it on the forums and in the logbook.
Of course, this sounds much simpler than it is done. The process may take more than one day, especially if the seats need to be altered, shortened or lengthened. When choosing seats for the rear of a car, it is best to buy a whole interior set. This will help significantly reduce the cost of further alterations. After all, if you install chairs of different colors, you will have to sew covers or change the upholstery and spend extra money.
Useful information about seats on the Prior
Welcome! What will be included in the list of useful information, you ask? Firstly, we will walk you through the basic everyday things that a person should know about car seats, namely, we will show you clearly how to remove the headrests from the seats, and we will also show you how to correctly fold out the rear seat of a car to transport large items. cargo and some more useful information will be given about the seats.
Adjusting the position of the front seat and head restraints on the car:
Note! In fact, adjusting the seats is an integral part of any car, since when buying a new car, all people are different and in order for each person to sit comfortably in the car, it is necessary to adjust the seat exactly to it (We are talking about the front seats), but remember once and for all , it is recommended to adjust the seat only when the car is stationary (Apply only to the driver), because when adjusting the seat, for example in length, you may lose control of the car because if you do not properly fix the seat on the car, there is a possibility that it will suddenly move backwards and thus you may lose control of the car, so be careful!
1) First, let's talk about how you can adjust the front seat of a car, so in order to adjust it, for example, in length (scientifically, longitudinally), you will need to pull up the locking lever with your hand as shown below in the photo and only after this, use your body movements to adjust the front seat as you need, but after you release the lever, move your body either forward or backward and thereby you will fix the seat and it will stand clearly in one place.
2) On the side of each of the front seats there is a handle that is made of a round shape, and thanks to this handle it will be possible to adjust not the front seat itself, but only its back, for this you need to rotate this handle in the desired direction and thereby achieve a position that is comfortable for you.
3) Now let’s talk a little about the headrests that are built into the front and rear seats of cars, so adjustment of these things is also necessary, because if, for example, a taller person is sitting in the back seat, then accordingly the headrest will need to be adjusted to his height, and in order to do this, you will need (regardless of whether the front or rear seat) grab the headrest itself with both hands and do exactly those actions that you need, for example, if you need to lower the headrest then press it from above with force and it will begin to fall a little, and if you need to lift it, then do the same operation only a little in reverse, namely, grab the lower part with both hands and, using force, lift the headrest up with your hands and it will lock itself.
Priora engine compartment photo
The small class car VAZ-2170 Lada Priora with a four-door sedan body (class C according to the international classification) is designed for operation at ambient temperatures from -40 to +50 °C on public roads with hard surfaces.
The Lada Priora is equipped with an injection 16-valve engine mod. located across the engine compartment. VAZ-21126-00 with a working volume of 1.6 liters. The engine is equipped with a distributed fuel injection system and an exhaust gas catalytic converter, structurally made in a single block with the exhaust manifold (catcollector).
The body is load-bearing, all-metal, of welded construction, with hinged doors, front fenders, hood and trunk lid.
The driver's seat of the Lada Priora is equipped as standard with an airbag, and in an optional version - with a front passenger airbag, as well as front seat belts with pretensioners and load limiters, which significantly reduces the likelihood and severity of head and chest injuries in a traffic accident.
The airbag only deploys when there is a strong impact to the front of the vehicle. In minor frontal impacts, vehicle rollovers, rear or side impacts, seat belts are the primary means of protection.
The transmission is made according to a front-wheel drive design with drive wheels of different lengths.
The front suspension is independent, spring, with anti-roll bar, with hydraulic shock absorber struts. The rear suspension is semi-independent, lever-spring, with hydraulic shock absorbers.
The front wheel brakes are disc brakes with a floating caliper, the rear wheels are drum brakes.
In a variant version, Lada Priora cars are equipped with an anti-lock brake system, which prevents wheel locking during braking and maintains controllability and directional stability.
The steering is injury-proof, with a rack-and-pinion steering mechanism, with an electromechanical booster that changes the transmitted torque depending on the speed of the vehicle.
Lada Priora cars are equipped with a remote control system for locking or unlocking door locks (in an optional version and locking the trunk lid lock) with simultaneous activation or deactivation of the vehicle security mode. In addition, remote activation of the alarm system in case of violation of vehicle security zones and blocking of all doors by pressing a button from inside the vehicle are provided.
This system also includes an electronic engine locking system (immobilizer), which provides additional protection against unauthorized engine starting.
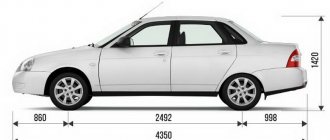
The overall dimensions of the car are shown in Fig. 1.4, technical characteristics are given in table.
Elements of the engine compartment of the VAZ-2170 Lada Priora are shown in Fig. 1.5, the location of the main components and assemblies is shown in Fig. 1.6 and 1.7.
Figure 1.4. Overall dimensions of the Lada Priora car (mm)
Figure 1.5. Engine compartment of the car:
1 - engine; 2, 14 — power unit supports; 3 — steering mechanism; 4 - throttle assembly; 5 — reservoir of the main brake cylinder; 6 — expansion tank of the engine cooling system; 7 — main fuse block; 8 — washer reservoir; 9 - battery; 10 — air filter; 11 — mass air flow sensor; 12 - alarm signal; 13 - generator; 15 — hood stop
Figure 1.3. Location of the main components of the vehicle components (bottom front view, engine splash guard removed): 1, 3, 13 — power unit supports; 2 - generator; 4 — radiator of the engine cooling system; 5 — electric fan of the engine cooling system; 6 - starter; 7 — cross member of the front suspension; 8 — front suspension extension bracket; 9 — front suspension stretch; 10 — shock absorber strut of the front suspension; 11 — stabilizer strut; 12 — left front wheel drive; 14 — gearbox; 15 — exhaust pipe of an additional muffler; 16 — engine oil sump; 17 — catalytic collector; 18 — right front wheel drive; 19 — anti-roll bar; 20 — front suspension arm; 21 — front wheel brake mechanism
Installing the trim on the driver's seat
Rear trim fastening:
- Unscrew 2 bolts.
- Remove the standard plastic trim.
- Cut off part of the plastic cladding along the intended contour.
Front trim fastening:
- Cut off both front trim fasteners, because do not allow the parts to fit tightly to the seat.
- Make a bracket (with a hole) from a suitable piece of plastic to attach the cladding. Glue it to the back of the cladding.
- We install the cladding, tightening the front part with a clamp (tie), which we insert into a homemade mount.
The seat coverings should be secured slightly higher from the floor so that the carpet can be pulled out without effort.
Installing the passenger seat trim
The installation process is similar except for one detail. Unlike the driver's side, on the passenger seat the lever handle rests against the trim, because turned the other way. To eliminate this, you will have to cut a hole for the seat lever handle.
Disadvantages of such seat coverings:
- installation will require a lot of time and effort to complete.
- It became more difficult to get rugs.
- there is no possibility to use the space under the seats for storing things (for example, a fire extinguisher).
Let us remind you that there are other seat covers for the Lada Priora, which will be much easier to attach.
Let's sum it up
The procedure for installing more comfortable seats in the VAZ 2110 is quite acceptable. This is a good opportunity for every car owner to make their vehicle more comfortable, beautiful and enjoyable to use. But for this you need to find smart products and a good craftsman. Seats on disassembly do not always inspire confidence. Many of them are smoked, some have broken plastic adjustment knobs, frayed fabrics or altered shapes. Therefore, you should buy seats carefully, checking all the factors. It is better to agree with the seller that you will return the seat if it turns out to be of poor quality.
The process of installing a new seat on a VAZ 2110 is quite complicated. But the most difficult process will be the digestion of the fastener. If you entrust this work to a specialist, you will not experience any significant problems with further actions. The choice of chair is important. Don't go for the width of the back and leather trim. It is better to buy simple and practical products from a reputable manufacturer. Such products will serve you for a long time and will not cause trouble in the future. What kind of seats would you like to put in your car?
How to remove the front seats on a Priora
Removing and installing the front and rear seats on a VAZ 2170 2171 2172 Lada Priora
Operations performed when removing and installing the front seat on a VAZ 2170 2171 2172 Lada Priora
The front seat in a Lada Priora car is attached at 4 points to the floor. The need to remove the seat arises in the event of its repair (welding of power frame parts, etc.), or the need to access the floor under the carpet of the seat.
Tools necessary for removing and installing the front seat on a VAZ 2170 2171 2172 Lada Priora
You will need: socket wrenches (heads) “13”, TORX E10, screwdriver.
Sequence of operations when removing and installing the front seat on a VAZ 2170 2171 2172 Lada Priora
1. Move the seat forward all the way, use a screwdriver to remove the ends of the torsion bars from the brackets and remove both torsion bars.
2. Move the seat all the way back and unscrew the two nuts securing the brackets using a 13mm wrench.
3. Remove both brackets from the studs.
4. Using a TORX E10 wrench, remove the two bolts that secure the front slide to the floor.
5. Move the seat forward all the way and, using a TORX E10 wrench, remove the three rear mounting bolts for the slide.
6. Remove the seat from the interior.
7. Install the Lada Priora seats
in the reverse order of removal. Please keep in mind that the upper ends of the torsion bars (1 – right torsion bar, 2 – left torsion bar) are mirror bent.
How to remove the front seats on a Lada Priora
How to remove the seats
on Lada
Priora
.
How to remove seats on a Priora (hatchback-station wagon)
INSTRUCTIONS Removing the rear seats is easy and quick. (10 x 13 regular keys and ratchet heads)…
8. It is more convenient to install torsion bars as follows: move the seat back, insert first the lower end of the right 1 and then the lower end of the left 2 torsion bar into the holes of the brackets and, moving the seat forward, place the upper ends of the torsion bars behind the hooks on the seat base post.
Operations carried out when removing and installing the rear seat on a VAZ 2170 2171 2172 Lada Priora
Tools necessary for removing and installing the rear seat on a VAZ 2170 2171 2172 Lada Priora
You will need: a 10mm wrench, a Phillips-blade screwdriver.
Sequence of operations when removing and installing the rear seat on a VAZ 2170 2171 2172 Lada Priora
1. Press the seat cushion lock handle...
2. ...and lift the edge of the pillow.
3. Similarly, release the second edge of the cushion... 4. ...and remove the seat cushion. The photo below also shows the rear seats from the luggage compartment side of the Lada Priora hatchback and station wagon. For these cars, all operations are similar.
Priora - analogues of heated seats. Installation of standard seat heating on LADA Priora
The set of standard seat heating for Priora should include:
- Heating elements (4 in total, two for each seat);
- Block for the control unit with wires;
- Priora seat heating unit.
With all this, the article number for heated seats for LADA Priora must certainly contain the numbers 2170 - this, as any Priora owner understands, is the model number. It is worth distinguishing the standard heating set for Priora 2 by catalog number - they are different in comparison with the set for Priora 1. It is better to outline the entire installation of heated seats on a Priora using a detailed step-by-step method, which has been tested by time and by other car owners:
- We remove the front seats. Remove the factory covers from the seats, which are secured with an iron spoke and 3 plastic latches. You can disassemble the seats without dismantling them, removing only the covers, but then the process will be a little more complicated - it will be awkward to deal with the wiring and laying out the heating parts;
- We attach heating elements to the seats - one on the lower part, the second on the backs, in the lumbar area. Some people recommend strengthening it with double-sided tape, but over time it can come off. It would be safer to sew the heating element to the pillow so that it does not move out of its place;
- Pull the wires from the heating parts through the hole in the mount under the cushion (run the wires from the lumbar heating parts to the place where the seat upholstery is attached). The piece of wire that passes through the hole can be protected from chafing using some kind of plastic tube. The power plugs for all 4 parts are out, all that remains is to connect them;
- Disassemble the central tunnel. Buttons for heated seats will be in place of the plug near the handbrake;
- The wiring is connected strictly according to the seat heating connection diagram. Before doing this, it is recommended to disconnect the battery from the network. We install a terminal block to the heating control unit. The dark-colored (-) wire is attached under the bolt near the handbrake. A gray-red wire (for aesthetes, it is responsible for illuminating the buttons) is connected to the lighting of the cigarette lighter rim. A reddish 12V wire is pulled to the mounting block. You can't do without a fuse. Then everything goes strictly “by the numbers”. Connect pin 87 to the reddish wire, pin 86 to the black wire. Connect the blue-black 12 V wire to pin 85, the pink wire to pin 30. You can connect to the mounting block through cut-in clamps so that the wires are held tighter;
- Assemble the tunnel back, install covers on the seats.
READ Kia Sportage 1 Heater Doesn't Heat Poorly
The standard seat heating on Priora is guaranteed to last for several seasons if it is connected correctly. And if the heating does not work immediately after installation, it means the wiring connection was incorrect.