What would the Priora be like if it had a 4x4 drive - would it have increased cross-country ability, the dynamics of the Lada Priora's engine would be enough for two drives, that's the question! Or rather, it would remain as dynamic as it is now, or the acceleration would become even worse. The chassis would be more expensive, there would be a transfer case, perhaps it would be like on the Niva. And this is not a reliable unit on the VAZ 2121. Of course, in nature there is a car with a 4wd drive, but it would be easier to say: the entire suspension has been redone - there is no other way to make an all-wheel drive Priora - it was designed that way.
Lada Priora is a standard city car with easy handling that even an inexperienced driver can handle in bad weather. What kind of drive is economical and safe in the city - front-wheel drive is correct. The Lada Priora, like all AvtoVAZ cars after 2107, has a front drive. But even such a car can be made even more manageable, but this operation will have the opposite, negative “side of the coin”.
The Lada Priora has always been produced by AvtoVAZ as a front-wheel drive car, but a car enthusiast could never dream of an all-wheel drive Priora. Someone may shake their head skeptically, but someone will say that this 4x4 drive formula for a Priora car is just right for Russian roads! Yes, we are not only talking about rural areas: in the city, on the slopes, a good roll of ice is created.
see also
Comments 38
thought it up? four-wheel drive
AleksG - this person sells an all-wheel drive kit for front-wheel drive cars. Money very good sane. Write to him, he will help.
there is the option of installing a second power unit on the rear axle, in the end there are two gearboxes and two engines, the advantages are double power and dynamics, there is no drive in the tunnel, if one breaks down you will get to the second one, variations are only in the front or only in the rear; the disadvantages of the car become a coupe are the rear doors can be boiled down) there is a problem with the synchronization of units, two engines consume twice as much gasoline, the cost of maintenance doubles, the traffic police won’t understand you, so you can experiment if you don’t mind the money and time, and flights of fancy haunt you)
Angular gearbox, driveshaft with viscous coupling from Ino, drive unit and suspension. The 2110 all-wheel drive was made exactly according to this scheme. Here's what we found on the drive: www.drive2.ru/cars/lada/2…urnal/288230376152571321/
www.drive2.ru/cars/lada/2108/21081/faststreetteam/ for example. But are you ready for the fact that it will be on a car, and cramps.
Yes, in that case, we’ll buy another one) but I would like it to remain a car)
The 2111 all-wheel drive was used on Autoplus for weeks. The price is more than a mullion. Is it nnnnada?
the eight is made on this site with all-wheel drive, read it, look... www.drive2.ru/cars/lada/2108/21081/faststreetteam/
At the turbo bazaar they put the 08 into disassembly, so the all-wheel drive kit costs 70 thousand.
all-wheel drive does not automatically guarantee comfort... let’s say there are synchro versions on the Trade Winds and 6 MPS on the Mazda, i.e. Conventionally, due to the connected rear axle, they can be called all-wheel drive, but this does not add much comfort. It’s good to start from traffic lights (all-wheel drive is connected), but it’s very funny to go into a turn on such units - you go in like a front-wheel drive, and somewhere at the moment the rear-wheel drive is connected))))) and it obviously takes a long time to get used to, since it connects it’s different every time))))) There is a symmetrical system from Audi - honest 50/50... I haven’t driven it myself))) In combat EVs and poems, all-wheel drive is permanent, but more intelligent. Often, more torque goes to the rear axle than to the front, and this is the key to good handling... It’s simply unrealistic to drive such systems on a VAZ... only plug-in rear-wheel drive, which, in principle, didn’t work out, since everything will have to be changed because of the transmission. ICE, gearbox, suspension, steering rack, etc. and so on. In general, it is hellishly unprofitable and impractical. ——– According to the layout of the Prior, as I see it, it’s realistic to install the engine longitudinally, install a gearbox from the classics (126 and the classic gearbox are compatible - there are such projects on the classics), the exhaust should be taken out on the side, the cardan is in the center, it’s possible to modify the fuel tank and stir up the full custom independent rear suspension from some foreign car with rear wheel drive. In terms of money, it will be much cheaper than all-wheel drive, in addition, you will leave the elemental base from the VAZ (engine, gearbox), perhaps even the cardan and gearbox, and the rear suspension from some foreign car of similar dimensions. The classic box handles a lot of torque, according to somewhere up to 200-250 Nm in steady states, and the corresponding peak ones. In addition, you will immediately have a ton of space under the hood (the engine is longitudinal, the gearbox is under the body) - you can install a huge snail, and install various kinds of pre-start heaters, and other generators... Most likely, such a rear-wheel drive Priora will not be particularly suitable for drifting good - the weight distribution will be more towards the front axle, but it will still be fun to cut nickels))))
Description of design
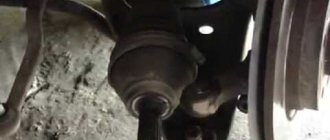
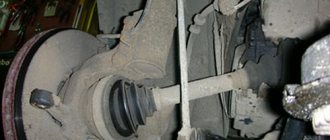
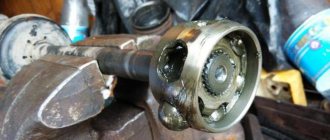
Wheel drives with constant velocity joints (CV joints) are used to transmit torque from the main gear to the drive wheels at different wheel rotation angles and suspension strokes. The car uses ball joints.
Front wheel drive : 1 — retaining ring of the inner joint housing; 2 — protective ring of the drive oil seal; 3 — internal hinge body; 4 - large clamp; 5 — protective cover; 6 - small clamp; 7 - shaft; 8 — outer hinge body; 9 — protective ring of the hub bearing; 10 — internal hinge clamp; 11 - thrust ring; 12 - separator; 13 - ball; 14 — clip; 15 — retaining ring
The wheel drive consists of internal and external joints of equal angular velocities, connected to each other by a shaft. The left drive shaft is made of steel rod, the right drive shaft is made of pipe. At the ends of the shaft there are splines on which CV joints are installed. The hinge consists of a body, a separator, a cage and six balls, which are placed in profiled grooves in the body and cage. In the body and the outer joint cage, the grooves are made along a radius, which ensures a rotation angle of the body relative to the cage of up to 42°. The grooves in the body and cage of the internal hinge are straight, which allows the hinge body to move relative to the cage in the longitudinal direction, lengthening or shortening the drive (compensating for the mutual movement of the suspension and power unit). The movement of the internal hinge housing is limited by a clamp installed in the hinge housing.
Drives of the right “A” and left “B” wheels : 1 - internal joint housing; 2 — large clamp for securing the cover; 3 — protective cover of the internal hinge; 4 — small clamp for securing the cover; 5 — right wheel drive shaft; 6 — protective cover of the outer hinge; 7 — outer hinge body; 8 — left wheel drive shaft
The hinge cage is installed on the shaft splines and is secured against longitudinal movement by thrust and locking rings. The hinge body has a splined shank. A thread is cut at the end of the shank of the outer hinge housing, and a groove is machined at the end of the shank of the inner hinge housing in which a retaining ring is installed. The splined shank of the outer joint housing is inserted into the front wheel hub and secured with a bearing nut. The splined shank of the internal joint housing is inserted into the drive gear installed in the gearbox and secured in it with a retaining ring. The hinge parts are manufactured with high precision. The inner surface of the hinge body is high-frequency hardened. Balls of one sorting group are installed in the hinge. When assembling the hinge, the balls are selected for each hinge individually, so it is impossible to repair the hinge by replacing parts in a garage or service station. A worn hinge is replaced only as an assembly. Before assembly, put 40 g into the outer joint and 80 g of CV joint-4 lubricant into the inner joint. The tightness of the hinge, an indispensable condition for its reliable operation, is ensured by rubber protective covers. The hinge cover is placed on the hinge body and the drive shaft and secured with clamps. When replacing the cover, its fastening clamps should also be replaced with new ones. It is allowed to use only special clamps with a smooth inner surface and without protruding parts. Replenishment or replacement of lubricant, as well as any other maintenance of wheel drives, is not required during vehicle operation. The car owner only needs to monitor the condition of the protective covers of the hinges and their fastening clamps. A damaged cover must be replaced as quickly as possible, since dirt getting into the lubricant causes rapid wear of the hinge parts and its failure.
How to replace a grant
The first question: “should I change it myself or at a service center?”
In principle, for most budget cars (VAZ, Chevrolet, Hyundai, etc.), if you have experience in repairing the vehicle's chassis and tools, replacing the hinge is not that difficult. You can even do without a hole. But you will have to sweat.
Typically, it is precisely these spare parts that make up a kit for replacing a grenade in a store: boot, lubricant, grenade, boot clamps, retaining ring for the axle shaft
For expensive cars, without experience and tools, for cars under warranty or insurance - definitely the way to service.
Modifications of Lada Priora 2171
The pre-styling station wagon model was sold on our market from 2009 to 2013.
| 1.6 l 21126 98 hp 145 Nm and 5-speed manual transmission VAZ 2170 |
The modernized station wagon model was offered here only from 2013 to 2015.
| 1.6 l 21126 98 hp 145 Nm and 5-speed manual transmission VAZ 2170 |
| 1.6 l 21127 106 hp 148 Nm and 5-speed manual transmission VAZ 21806 |
| 1.6 l 21127 106 hp 148 Nm and 5-speed gearbox AMT 2182 |
From 2014 to 2016, a version from Super Auto was produced with a 1.8-liter internal combustion engine VAZ 21128
We have a separate and very detailed material about all power units of the Priora
FORUM
A large amount of useful information on cars has been collected in the
ARTICLE
. All the pros and cons of a used car are described in an article from AutoNavigator
What is needed to replace the CV joint?
Are you planning to change the “grenade” (it doesn’t matter - external or internal) yourself? Stock up on the following tools:
- hammer, screwdriver, pliers, jack;
- a set of keys and sockets;
- bench vice;
- with a mount or a long enough pipe.
You will also need new cuffs, boots, a hub nut with a stopper and a lubricant. These consumables are usually provided with the new grenade.
Preparing for work
It is not always possible to find the necessary equipment for such work on hand, especially at home. You can use improvised tools that almost every owner has.
Before you begin to unscrew the bolt, cover the bolt with a rag soaked in kerosene.
The longer the rag lies on it, the easier it will be to unscrew.
If you don’t have time, you can treat the bolt with pure kerosene or WD-40 lubricant. It is necessary to tap the bolt with a hammer, then spray with WD-40 or kerosene.
After 1-2 minutes, you need to tap the bolt again and start unscrewing it. If there is no grease and kerosene, you can use brake fluid or ordinary vinegar.
Lada Priora, 1st generation (2007) - technical specifications
Car Lada Priora, 2016
| Automobile | Lada Priora, 2016 | |
| Modification | 1.6 8-cl. | 1.6 16-cl. |
| Body type | 4-door sedan | |
| Number of places | 5 | |
| Length, mm | 4350 | |
| Width, mm | 1680 | |
| Height, mm | 1420 | |
| Wheelbase, mm | 2492 | |
| Ground clearance (clearance), mm | 165 | |
| Curb weight, kg | 1163 | |
| engine's type | petrol, with distributed injection | petrol, with distributed injection |
| Location | front, transverse | front, transverse |
| Number and arrangement of cylinders | 4, in a row | 4, in a row |
| Working volume, cubic meters cm. | 1596 | 1596 |
| Number of valves | 8 | 16 |
| Maximum power, l. With. (kW)/rpm | 87 (64) | 106 (78) / 5800 |
| Maximum torque, Nm / rpm | 140 / 3800 | 148 / 4200 |
| Transmission | mechanical, | |
| Drive unit | front | |
| Tires | R13 | 175/65 R14 |
| Maximum speed, km/h | 176 | 183 |
| Acceleration time 0-100 km/h, s | 12,5 | 11,5 |
| Fuel consumption in the combined cycle, l/100 km | 7,3 | 6,8 |
| Fuel tank capacity, l | 43 | |
| Fuel type | gasoline AI-95 | |
Car Lada Priora, 2013-2015
| Automobile | Lada Priora, 2013–2015 | |||
| Modification name | 1.6 | 1.6 (106 hp) | 1.6 | 1.6 |
| Body type | sedan | 5-door hatchback | 5-door station wagon | |
| Number of places | 5 | 5 | 5 | |
| Length, mm | 4350 | 4210 | 4340 | |
| Width, mm | 1680 | 1680 | 1680 | |
| Height, mm | 1420 | 1435 | 1508 | |
| Wheelbase, mm | 2492 | 2492 | 2492 | |
| Curb weight, kg | 1163 | 1163 | 1088 | |
| engine's type | petrol, with distributed injection | petrol, with distributed injection | petrol, with distributed injection | |
| Location | front, transverse | front, transverse | front, transverse | |
| Number and arrangement of cylinders | 4, in a row | 4, in a row | 4, in a row | |
| Working volume, cubic meters cm. | 1596 | 1596 | 1596 | |
| Number of valves | 16 | 16 | 16 | |
| Maximum power, l. With. (kW)/rpm | 98 (72) / 5600 | 106 (78) / 5800 | 98 (72) / 5600 | 98 (72) /5600 |
| Maximum torque, Nm / rpm | 145 / 4000 | 148 / 4200 | 145 / 4000 | 145 / 4000 |
| Transmission | mechanical, | mechanical, | mechanical, | |
| Drive unit | front | front | front | |
| Tires | 185/65 R14 | 185/65 R14 | 185/65 R14 | |
| Maximum speed, km/h | 183 | 183 | 183 | |
| Acceleration time 0-100 km/h, s | 11,5 | 11,5 | 11,5 | |
| Fuel consumption in the combined cycle, l/100 km | 7,2 | 6,9 | 7,2 | 7,2 |
| Fuel tank capacity, l | 43 | |||
| Fuel type | gasoline AI-95 | |||
Car Lada Priora, 2008-2013
| Automobile | Lada Priora, 2008–2013 | ||
| Modification name | 1.6 l 8-cl. | 1.6 l 16-cl | Coupe |
| Body type | sedan/5-door hatchback/station wagon | 3-door hatchback | |
| Number of places | 5 | ||
| Length, mm | 4350/4210/4330 | 4210 | |
| Width, mm | 1680 | 1680 | |
| Height, mm | 1420/1435/1508 | 1435 | |
| Wheelbase, mm | 2492 | 2492 | |
| Curb weight, kg | 1088 | 1088 | |
| engine's type | petrol, with distributed fuel injection | petrol, with distributed fuel injection | petrol, with distributed fuel injection |
| Number and arrangement of cylinders | 4, in a row | 4, in a row | 4, in a row |
| Number of valves | 1596 | 1596 | 1596 |
| Working volume, cubic meters cm. | 8 | 16 | 16 |
| Maximum power, l. With. / rpm | 81 / 5200 | 98 / 5600 | 95 / 5600 |
| Maximum torque, Nm / rpm | 120 / 2700 | 145 / 4000 | 145 / 4000 |
| Transmission | mechanical, | ||
| Drive unit | front | ||
| Tires | 185/65 R14, 175/65 R14, 185/60 R14 | ||
| Maximum speed, km/h | 172 | 183 | 183 |
| Acceleration time 0-100 km/h, s | 11,5 | ||
| Fuel consumption in the combined cycle, l/100 km | 7,6 | 7,2 | 7,2 |
| Fuel tank capacity, l | 43 | ||
| Fuel type | gasoline AI-95 | ||
Technical characteristics of Lada Priora station wagon 1.6 l 16v 5-speed manual transmission
| Motor power | 98 hp |
| Torque | 145 Nm |
| Acceleration to 100 km/h | 11.5 s |
| Max. speed | 183 km/h |
| Fuel type | AI-95 |
| Consumption in the city | 9.1 l |
| Highway consumption | 5.5 l |
| Mixed flow | 6.9 l |
| Volume of the tank | 43 l |
| Trunk volume | 444 l |
Replacing the outer CV joint
An experienced car owner with practical skills will not encounter any problems when taking on the task of replacing the outer CV joint.
The list of tools necessary to carry out the “operation” has already been presented above. In addition to tools and supplies, there are a few other things worth doing. Before removing the wheel, drain a little oil from the gearbox - this will make it easier to work with. You will also need a pry bar - it will serve as a lever when removing the drive shaft. Let's assume that the problem is on the right. Replacing the right CV joint begins with removing the wheel. We unscrew the hub nut, remove the brake disc, caliper, ball joint and steering tip. We take a pry bar or crowbar and remove the splined drive shaft. Using light blows of a hammer (a support, such as a wooden block, will come in handy), we knock out the outer hinge. Next we perform the following steps:
- It is necessary to remove the hub nut and tear off the wheel bolts. We put stops under the rear wheels.
- We jack up the car, hang it up and then remove the wheel.
- Remove the bolts holding the steering knuckle to the ball joint.
- Turn the steering wheel all the way. Pulling back the steering knuckle, we pull out the outer half of the hub along with the old CV joint. If the grenade does not budge, hit it lightly with a hammer.
- We remove the old boot and clamps and throw them in the trash.
- We remove the CV joint with hammer blows, rotating it along the axle shaft.
- We fix the installed new hinges in the hub together with the boot.
Replacing the left CV joint is carried out in the same way. When returning parts to their place, the above procedures should be done in reverse order. When knocking down a CV joint with a hammer, hit it clearly - some models are equipped with an ABS ring, which does not like strong blows to it. Don't forget to add gearbox oil. When installing the wheels back, be extremely careful to avoid falling apart.
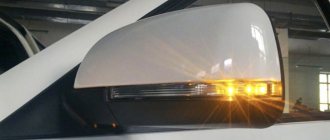
“Lada Priora” hatchback
The AvtoVAZ company presented the next version of “Lada Priora”. Two main innovations are the hatchback body and the luxury package, which has such useful functions as climate control, parking sensors, an additional airbag for the passenger, and ABS.
HERE IT IS - a real test for the domestic automobile industry - a Russian-made car in women's hands.
Once I got into the car, of course, the first thing I did was impatient to use the most important new feature for me – climate control, especially since the southern sun had managed to bake the interior quite a bit.
The Priora will be equipped with two air conditioning systems - one from Panasonic, and the other from the Korean Halla. AvtoVAZ explained that before their launch into production, a tender was held, as a result of which no obvious winner was identified among the suppliers. Both competing systems have equal performance and do not differ either in price or operating principle. The only difference is in the internal elements, which the average consumer does not need to know about (for example, the Panasonic air conditioner has a blade compressor, and the Halla has a piston compressor). Why were two identical systems from different companies needed? As they explained to me, this is a kind of safety net - if one of the systems subsequently does not show its best side, priority will be given to the other.
Why is there no factory all-wheel drive version?
The Lada 2170 was designed as a successor to the “tenth” family - a budget, urban, reliable car. All-wheel drive, of course, will have its advantages, but it will seriously increase fuel consumption, which in no way fits with the concept of a budget car. And servicing all-wheel drive is more difficult than servicing front-wheel drive. The 4x4 wheel arrangement is not used in all foreign cars in sedan, coupe, station wagon and hatchback bodies, because it is more suitable for premium cars and SUVs.
WE OPEN ACCESS TO THE TIMING BELT
- To get to the gas distribution mechanism drive, we need to unscrew the five bolts of the upper timing cover using a hexagon.
The location of these bolts is shown in the photo below:
FIG 6. Upper timing cover bolts
- Then use the same key to unscrew the two bolts of the lower timing cover and remove the cover.
FIG 7. Bolts of the lower timing cover
- Using a 17-point head, we turn the crankshaft toothed pulley until the marks are firmly in place according to Figure 4. You also need to check the alignment of the marks on the flywheel so that they are located as shown in Figure 3. The crankshaft must be turned clockwise.
And one more important point! It is the crankshaft that needs to rotate the entire timing mechanism. This cannot be done using the camshaft pulleys...
To ensure that the camshaft marks do not get lost during operation, they must be secured to each other. This is done in different ways. I once saw a mechanic insert a socket head between the teeth of a pulley. You can also take a pin and two thick plates with holes. We put plates on the stud, nuts on both sides and insert this structure between the pulleys so that the plates rest against the teeth of the pulleys and tighten the nuts.
It looks something like this! Here, however, is an engine from another car:
FIG 8. Device for fixing camshafts
We have completed the preparatory work and it is time to proceed directly to replacing the Priora timing belt.
- To remove the Priora timing belt, you first need to loosen its tension. To do this, use a 15mm wrench to unscrew the tension roller nut; the support roller must also be removed. Because when the timing belt is replaced, both rollers are also changed.
Then remove the timing belt and inspect it carefully. First of all, we pay attention to the presence of cracks, fraying of the edges of the belt, and, of course, we look at the condition of the teeth. There should be 137 of them, they should be round in shape. If you find at least one of these defects or the time has come for mileage in kilometers, then the Priora timing belt must be replaced with a new one. Next, you need to pay attention to the condition of the pump. Holding the toothed pulley of the pump, you need to tug it; if there is play in the pulley, then the pump must be replaced.
REPLACING THE PRIORA PUMP
- In order to replace the pump, we will have to drain the coolant. Using a 15 wrench, unscrew the nuts, remove the camshaft toothed pulleys and the rear timing drive cover.
It should be borne in mind that the camshaft pulleys cannot be mixed up; the exhaust and intake pulleys are placed exactly in their places...
To remove the back cover, you need to use a 10mm socket and unscrew the six bolts securing this cover.
The location of these bolts is shown in the following figure:
FIGURE 9. Bolts of the rear timing cover of the Priora
- This figure also shows the bolts for securing the Priora pump. These bolts are unscrewed with a 5mm hexagon. After unscrewing the bolts, you need to pry the edge of the pump with a flat screwdriver and remove it from its seat.
- Before installing a new Priora pump, you need to clean the surface to which it is adjacent. It is advisable to degrease it and cover it with a thin layer of sealant. The new pump should also be coated with sealant, the place where the gasket is installed. When installing the pump, pay attention to the inspection hole; it should be located at the bottom.
- We tighten the three bolts securing this unit and now you can install and secure the rear cover of the gas distribution mechanism.