Priora hood - article number and price
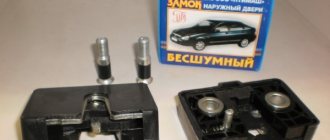
The catalog number of this body element is 2170-8402010. New parts are sold in two versions:
- As a rule, these spare parts are painted in black primer. Price – from 5000 rub.
- Painted in factory color. Price – from 10,000 rub.
Purchasing an element for painting will require you to additionally find a service that provides the appropriate services. But at the same time, the color is precisely selected to match the actual color of the body, which is especially important for old cars, because the shade of the color of body parts changes over time.
Body parts painted in a specific factory color allow you to quickly repair the car even with your own hands. When purchasing such a spare part, the main thing is to accurately indicate the color shade in the form of a three-digit code.
In what cases will adjustment help?
Let's list the main malfunctions that you can fix yourself by just adjusting the car hood lock:
- The hood has become difficult to close; it requires repeated slamming and significant force to close it
- It has become problematic to open it (we pull and pull, but the reaction is zero)
- Doesn’t “bounce” when the cable is pulled; when closing, an extraneous knock of metal on metal is heard
- Rattling when the engine is running, in the pits.
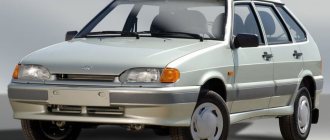
Since it is almost impossible to describe all the models in one article, let’s take as an example a masterpiece of the domestic automobile industry - the VAZ car. Whatever they say, Lada cars roam the expanses of the former CIS more often than any foreign car.
And, given their survivability, I think this will last for a long time... And based on the principle that this procedure, on almost all cars, comes down to similar actions (if you do not take into account the design features of the locks), you can derive a general adjustment formula.
Let's start adjusting the locks, for example, for VAZ 2108, VAZ 2109, VAZ 21099.
Tools
To adjust we need:
19mm wrench.
Open-end or spanner wrench
Screwdriver, I usually use a "magic" set.
Screwdriver with replaceable bits
Oil for lubricating the lock (only liquid oil is suitable; “solidol”, “litol” and other similar lubricants are not suitable, since they harden at low temperatures, which makes the mechanism difficult to operate).
Machine oil
Desire, some free time, a head and two arms (preferably straight).
That's all we need to work
The device of the hood lock VAZ 2108/2109/21099
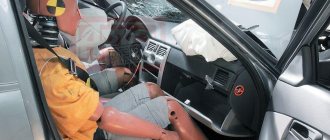
To begin with, open and fix the hood
Let's pay attention to the lock and try to understand the principle of its operation.
Hood lock device
The photo shows the main elements of the castle:
- Lock latch spring
- Lock-nut
- Latch
- Safety hook
- Safety hook handle.
From what we saw, it follows that after we pulled the opening handle in the cabin, the cable opens the latch, which releases the lock latch.
Thanks to the latch spring, the hood “jumps” up, but it is still held half-open by the safety hook.
And only by pressing the handle of the safety hook, we can fully open it and gain access to the engine compartment. Quite a reliable system. At first sight…
Adjustment, although not a very difficult operation, requires patience and accuracy. Sometimes you have to repeat the same jewelry movement many times until everything starts working as it should!
Vertical adjustment of the lock
If the hood does not want to close normally (you slam it, put pressure on it, but it still closes with difficulty, or does not lock in the closed position at all), or a rattling noise appears when driving on our perfectly smooth roads (sometimes it is noticeable even just when the engine), then adjustment in the vertical direction is necessary. Namely, adjusting the length of the lock latch.
To do this, use a 19 mm wrench to loosen the lock nut on the latch, holding the latch itself from turning with a flat-head screwdriver.
Latch length adjustment
If the hood is poorly or not at all fixed in the closed position, then you need to slightly increase the length of the latch, which we will achieve by unscrewing it with a screwdriver.
If the hood rattles, on the contrary, you need to shorten the latch by tightening it several turns inward. The required latch length is determined experimentally.
Got rid of the problem? Then tighten the locknut (don’t forget to hold the latch with a screwdriver), check it again and rejoice!
Horizontal adjustment of the lock
If there are problems with opening, or if there is a metallic knock when closing, the lock requires horizontal adjustment.
Adjusting the latch position
To do this, we also loosen the lock nut and slightly move (not twist, but move) the latch in the desired direction.
When adjusted correctly, everything should close and open well. Without any effort. Ideally, the hood should slam shut completely when released from a height of 20-30 cm and snap open when pulled by the drive handle in the cabin, only being secured by a safety hook.
Door structure: lock, gaps, handle, hinges
When there are preconditions for a malfunction of one of the doors, a visual inspection of the car is carried out. First with the doors closed, then with the doors open. The check will show whether there is skew, displacement or other changes in the streamlined shape of the vehicle. Nuances that require attention:
- When open, the height of both door fragments should be identical.
- The gaps are no more than 1–2 cm.
- Unnatural position of the loops. If this is caused by mechanical damage or shock, then simple adjustment will not help.
- The backlash is set incorrectly. The skew will tell you about this.
- The lock does not close well or the handle causes difficulty in operation.
Depending on the problem, an adjustment algorithm is determined. Serious sagging of the door after an accident will not be corrected by tightening the hinges, so it is necessary to straighten the automotive element.
How to open the hood if the cable is broken
But if you have free time, the necessary tools and are confident in your own abilities, you can try to open the hood yourself; below are tips from the experts of our technical assistance service on opening the hood. Of course, the design of the hood lock and the location of the cable differ on different cars, but most often the general sequence of actions for opening the hood remains the same.
It is necessary to figure out where the hood release cable broke.
In this case, in order to open the hood with a torn (torn from the fastening) cable, you need to grab the edge of the cable with pliers and pull it towards you, i.e. towards the car interior (as shown in the photo with the hood cable). To prevent the hood cable from slipping out, you can make a loop at the end of the cable and wrap it around the jaws of the pliers. That. you can open the hood if the cable inside the car breaks.
If you examined the hood lock handle in the cabin and did not find a torn or broken cable fastening, then the most likely cause is related to a broken cable in the area of the hood lock. Such a breakdown is quite complicated, because in order to open the hood, you need to get from the outside to the hood lock and force it open. We recommend that you seek the help of specialists who can open the hood and call a car mechanic from our technical assistance service.
Most often on modern cars the hood opens from the front, but there are exceptions when the hood opens forward and the hood lock is installed at the rear, near the windshield on all VAZs of the classic family (VAZ 2101 - 2107) and Nivas, see the video of opening the hood on a VAZ below.
Video on how to open the hood on a VAZ 2101-2107 and Niva
https://youtube.com/watch?v=KY6clFmLPqQ
How to open the hood if the cable breaks near the hood latch
On many cars, this can be done using an extended screwdriver or a wire hook (see photo of opening the hood), carefully insert the screwdriver or hook through the slots in the radiator grille and try to open the hood latch. On some cars, the radiator grille is solid, or does not allow you to get to the lock, in which case you need to try to remove the grille. If you can’t get to it with a screwdriver or remove the grille, there is another way to get to the hood latch - you need to jack up the car, remove the plastic or metal crankcase protection, and/or the lower elements of the bumper and try to get to the hood latch from below.
For example, this way the hood can be easily opened on front-wheel drive VAZ cars (2109, 2110, 2111, Lada Priora, etc.), as well as on our very popular Ford Focus car, which features an original hood lock with front opening.
If you can’t open the hood on your own, call our technical assistance service by phone, we’ll give you some advice, we’ll come and help.
Painting
Nothing lasts forever on Earth and over time, scratches appear on the hood and rust forms. Therefore, many motorists specially order it in plastic. But for those who have it made of metal, there is only one thing left to do - paint it.
Can't do the job without:
- Boards;
- Cotton gloves;
- Paints;
- Air compressor;
- Spray gun;
- Acidic soil;
- Degreaser.
Painting is carried out as follows:
- The car must be thoroughly washed with a special shampoo. Remove dust and dirt from all hard-to-reach places and it is advisable to use different brushes for this work. Wash the floor well and blow through all the walls with a compressor. It is important that there is no dust left anywhere. Before painting, douse the floor with water.
- Remove the hood. First you need to unscrew the bolts that hold the gas stops. Support the hood with a wooden stick. When the gas stops are removed, remove the hinges.
- Carefully inspect the places where stops and hinges are attached. Usually this is where corrosion always starts. If you come across places where the metal has rotted, then such pieces need to be cut out. Make a patch and weld it.
- Install the hood. To do this you need to use special sawhorses. You can do it yourself. You need to take several boards and nail them crosswise. All old paint from the surface of the hood is carefully removed. This work should be done using sandpaper or coarse sandpaper.
- Degrease the surface with a special solution and apply a thin layer of acidic primer. After drying, putty is applied. Let the hood dry again.
- The surface is degreased again. Then the paint is applied with a spray gun. The paint is applied in several thin layers. It is important to remember that each new layer of paint is applied after the previous one has completely dried.
- The dried paint is sanded. The surface is degreased. A layer of varnish is applied.
If the painting process was even slightly disrupted, the entire work should be done again.
This is interesting
Sometimes, if the wear on the Priora hood hinge is not too great, some craftsmen make do with improvised means. Without replacing the unit, various shock-absorbing materials made of rubber and plastic are installed under the mounting arms.
Locksmiths call this “fooling” the Priora. Also an interesting option. Sometimes it's worth considering it too. The video shows a way to “deceive” the Priora’s hood hinges for a while:
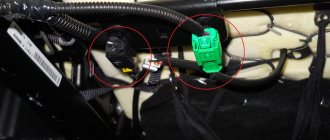
About a couple of months ago, with the arrival of warmer weather, I began to notice a knocking noise under the panel in the glove compartment area. At first I didn’t attach much importance, because... I thought it was stuff in the glove compartment! but the sound did not pass and infuriated me more and more! Lately, I was no longer happy about Mouzon, but just drove and listened to this rattling sound! It looked like some kind of iron ball was rolling around the stove! I glued all the parts under the panel where my hand reached, nothing has changed... None of my friends have encountered this, half of the donkey advisers simply said “it’s an AvtoVAZ!” So Drive can help us! It turns out that this is another Prior disease: the knocking of the hood hinge! I tried to press the corner of the hood while driving and OH MIRACLE! the sound is gone! It can be solved by either removing the hood or rubber banding under the fender! I had no desire to remove it, so I bought an elastic band from the rear stabilizer of a VAZ 2108.
I trimmed the edge a little and stuffed it between the wing and the hinge.
One of the problems with Lada cars is extraneous noise (crickets), which can occur after the first hundreds of kilometers. Have you encountered a knocking noise in the corner of the dashboard (panel)? Perhaps its source is not in the car interior, but in the engine compartment.
When driving on uneven roads (crushed stone, gravel), the hood shakes, resulting in a knocking sound from the hood hinge. Most often, a similar problem appears on Lada Priora cars, but it can also occur in other Lada models (Granta, Kalina, Vesta, Largus, Niva or XRAY). Foreign cars are no exception.
You can eliminate the rumble using a radical method - place a thick piece of rubber under the loop (a jet rod from a “classic” or a shock absorber strut bump stop). When the hood is closed, the hinge will tightly press the rubber damper and the knocking will disappear. Here is a video example on a Lada Priora car:
Owners of Renault Logan solve the problem of hood knocking in a similar way (put a piece of garden hose on the nut). By the way, they say on new Priors (after restyling) a standard rubber bumper is installed in this place.
If you fight the source of the knock, and not its consequences, then the hood hinge needs to be modified. It is not difficult to remove it; we unscrew the four nuts and support the hood with a stick or resort to the help of an assistant. We “modernize” the hinge design by hitting the hinge rivet with a hammer so that it stops dangling. That's it, we reassemble in reverse order.
It is pleasant to be in the car interior when no extraneous noise bothers you. Have you encountered knocks of a similar nature in a Priora? Let us remind you that the glove compartment can also rattle in the corner of the panel (dashboard).
Source
Methods of protection
In past times, regular masking tape was used for this purpose. But it's a bit silly and makes the car itself unattractive. Today there is a slightly different way - protection using anti-gravel film.
It is noted that thanks to this simple device, less dirt will get on the windshield. To make sure of this, you need to pay attention at stops at intersections. While the car is stationary, much more snow falls on the glass than when it is moving. The deflector not only changes the aerodynamics of the car, it is capable of changing the air flow. While driving, dirt flies past the car.
This is a small drawback of this device. Any changes always lead to increased fuel consumption.
There is another minus. The device must be fastened very well. Adhesive tape, even the thickest one, is not able to withstand it; it is not advisable to use self-tapping screws. The load will increase, vibration will appear, and the mounting points will quickly wear out.
There is another way to protect yourself. Use of anti-gravel and decorative films. It adheres in much the same way as window tint. In this case, the work is much easier. With its help, the hood will be reliably protected, and the appearance will not be spoiled.
Another way to protect your hood is with a protective polish. You should always use polish after washing. Let it wash off quickly, but as long as it is on the car, it is protected. Although the polish will not protect you from pebbles, it will fill the microcracks, which means there will be no corrosion. You just need to touch up the chips from time to time.
1 Topic by 4istoff 2015-12-15 20:40:30
Topic: Resolved: The hood latch latches on the first click but does not close completely
The hood latch latches on the first click but does not close completely((what should I look for the reason? Thank you
2 Reply from Denis Artyukhov 2015-12-15 20:48:13 (2015-12-15 20:48:43 edited by Denis Artyukhov)
4istoff, lift it up a little.
3 Reply from 4istoff 2015-12-15 21:50:29
4 Reply from klimashov.roman 2015-12-15 23:06:04 (2015-12-15 23:06:34 edited by klimashov.roman)
5 Reply from 4istoff 2015-12-16 05:07:00
Ok, I'll try it today, thanks
6 Reply from Denis Artyukhov 2015-12-16 10:30:27
4istoff, at the same time center the lock. Or maybe it goes sideways.
7 Reply from 4istoff 2015-12-16 12:50:12
Lada Priora Sedan SNOW WHITE › Logbook › hood stop technomaster
Today I started installing nishtyaks from Tolyatti, I started with the hood stop. I admired this stick for the last time
I’ll describe in detail how I did it - first you need to remove 19 of these pistons
old stop retainer
I tried to remove the casing but the lock didn’t work, I didn’t tear it, I unscrewed the two nuts by 10
for some reason I decided to glue it with a vibrator, washed the hood, degreased it and stuck on a little more than a sheet
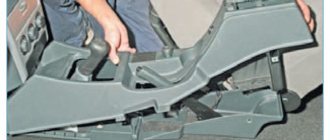
Through the hole in which there used to be a hood latch, we insert a bracket, after that we put the trim on and secured it to several pistons near the bracket. The second end of the bracket should come out through the hole in the hood a little to the right into which the piston was inserted, we secure with two nuts and washers the upper mount of the stop on the hood, the lower one I didn’t buy the mount, the brace was already on the brace, I screwed a bolt with a round head from the stop into the hole of the brace, the stop itself was securely packaged and instructions were included to install the hood stop on the fasteners, it’s best to use two people, since you first need to remove the standard stop, and then click the gas gas into the mount stop. now opening the hood is a pleasure
I can’t open the hood on the RAV4 '07 - TOYOTA - forums on diabloarea.ruVery often on…
Installing and setting up an electromechanical hood lock Many car enthusiasts who live in our vast country…
Lock for the hood of a VAZ 2109 car. At the moment, you can find different types of locks on the market...
How to make gills on the hood with your own hands? All actions in a step-by-step version. This is a rather difficult question...
Lada Priora Hatchback Legends were made about it › Logbook › Modernization of the engine cooling system More…
Good day! A problem appeared: the hood moves when driving, a knocking sound appeared in the panel along the edges. I didn’t pay attention to it, but the knocking became louder and louder. After reading the Internet, I saw the fastest way to treat this sore - to put a stabilizer rubber band from the classics in loop.
I drove like this for another six months, until the hood started to rumble with it too) I decided to fight this problem. I couldn’t find any new hood hinges in the city, so I took a different route. To do this, I need an assistant
We removed the hinges - they wobble like snot)) We hit the rivet with a hammer before the play disappeared
grabbed the rivet by welding to the hinge itself)))
We also saw that there was a crack where the hinge was screwed to the body (We welded the crack)
We collected everything, put the hood on, now it stands firmly, does not wobble even on a bad bumpy road. The knocking in the panel disappeared, a smile appeared on the face while driving) Let's see how long this modification will last. If this problem returns in the future, then only replace the hinges.
The stage of work is as follows: 1) Unscrew the leads with the wipers 2) Remove the Jabot 3) Remove the trim from the hood 4) Disconnect the washer tubes 5) Unscrew the hood hinge, 2 nuts on each side (you can mark the places with a marker where the hinges are adjacent to the hood or then align the hood according to the gaps when assembly)6) Remove the hood, put it to the side7) Unscrew the hood hinges from the body8) Replace the hinges with new ones, or hit the rivet with a hammer until there is no play. Reassemble everything in reverse order.
How many times has each car owner opened and closed the engine compartment lid of his Priora? But hardly anyone thought that the hinges connecting the hood to the body are not like the simple devices of an ordinary garden gate. This is a very serious mechanism that you need to be able to properly disassemble and replace if necessary.
It wouldn't hurt to know
What do most owners of new Lada Priora do?
Naturally, they treat the body with Movil or something similar against corrosion; they don’t have any more problems at the initial level. However, there were complaints about squeaking when pressing the clutch pedal; sometimes it was present when the engine was warm, sometimes only when it was cold - the essence is that there is a problem. Of course, everyone immediately starts reading the “primer book” on how to correctly adjust the clutch on their Priora, which sometimes helps, but the fact of the matter is that sometimes. After this, owners can try several more methods, after which the squeak may disappear:
- Replace the drive cable, some drivers praise the “tenth”.
- Check the presence of a spring in the automatic tension mechanism; sometimes the effect can be achieved after replacing the standard part with a spring with greater elasticity.
- A certain percentage of car enthusiasts get rid of the crackling noise by lubricating the fork and the plastic cable nut.
- Lubricate the installation site of the plastic bushing on the pedal bracket with lithol.
- Remove the boot from the fork lever and lubricate the gearbox input shaft with graphite grease from a can.
It is worth considering another effective method, shown in the video, which is used by experienced car enthusiasts. Its essence is as follows:
- Disconnect the mass air flow sensor and remove the air filter.
- Remove the clutch release rod plug.
- Release the cable from the clutch fork.
- Pour 30-40 ml of gear oil from a syringe.
- Move the fork back and forth 10-15 times.
- Reinstall the cable, plugs and filter.
Using the example of the second part of the article, it becomes clear that adjusting the clutch drive does not always bring the desired effect in the fight for acoustic comfort. Although, from a technical point of view, the procedure is necessary, since it ensures productive operation of the car.
Troubleshooting in a car service center
Car breakdown, like illness, always comes at the wrong time. Many types of damage are difficult to predict without regular diagnosis. If the breakdown occurred suddenly and you urgently need to repair your car, use the Uremont.com website.
It contains the addresses of more than 3,600 professional car repair shops capable of repairing any car of varying complexity. The smart map will automatically determine your location and display the addresses of the service centers closest to you. This is especially convenient during a business trip or traveling to unfamiliar cities.
The main problem drivers have when contacting a car service center is mistrust. They worry that they may receive low-quality services or encounter incompetent specialists. This problem is especially relevant if you are in a foreign city. On the Uremont.com website we have collected only trusted car services for you, to whom you are not afraid to entrust your car.
To have your car repaired, leave a request on the website, providing the necessary information:
- Car model.
- Year of manufacture of the car.
- Your contact details.
- Your location.
- The type of breakdown that needs to be repaired (for example, the hood is knocking).
After filling out the form, you will be able to get to the car service offered to you, where professional mechanics will quickly and efficiently fix the problem.
If necessary, you can order a tow truck by checking the appropriate box. The price of car repairs will pleasantly surprise you, and the quality of service will ensure a long and comfortable ride.
Uremont.com is a convenient assistant for fast and qualified repair of your car.
Why does the cable drive break?
A metal cable breaks for various reasons:
- grinding;
- strong tension;
- freezing of the lock and steel drive after washing;
- stretching the hood cable guides, as a result of which it can fly off the mount;
- damage to the spring and other elements of the hood lock.
Multicore drives break less often because they are more reliable and more resistant to bending, but many brands of cars are equipped with simple cables. Often the car owner himself is to blame for the fact that the hood cable has flown off or broken because he did not carry out maintenance of this unit in a timely manner. Like other working elements of the machine, the steel hood opening cable needs regular lubrication and cleaning from rust.
If the cable is broken and the hood does not open from the inside, the most reasonable solution is to contact the specialized service “Door Master” in Minsk or use your own resources.
Adjusting the position of the hood lock on the Prior
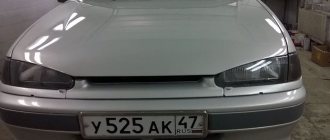
Welcome! The hood lock is the lock that snaps the hood and thanks to it it does not open; if the position of the lock is too much, the hood will either not close at all, or you will simply not open it anymore (If you continue to press on it with all your might , trying to close), in addition, the hood may close, but over time (Usually this happens at speed) due to the fact that the lock is displaced, the hood may open and therefore it deforms the windshield of the car (If this happens while driving), and the hood itself will also be damaged and the roof may even become deformed. Note! Adjusting the position of the lock is carried out in the presence of the following tools, namely in the presence of: A wrench size “10” and gloves (Instead of a wrench, various kinds of socket heads with a collar, or ring wrenches and something like the same tools are also perfect )
Where is the car hood lock located? Lada Priora is one of the few cars on which the lock is located under the front bumper, for example, if you take the classics, the Samara family, then the lock is in the most visible place and to adjust it, it will be enough to stock up on a minimum set of tools and a little time to carry out work, on the Lada Priora, in order to get to this lock, you will have to completely remove the front bumper (we will inform you about how to do this as you read the article) and only after that you can start making adjustments; for clarity, this lock is shown in bright arrow in the photo below:
When do you need to adjust the position of the lock that holds the hood? A little higher (at the beginning of the article) we already said that the hood may be due to an unadjusted lock, namely, it may open spontaneously, or not close at all, if the hood does not close, then there is only one conclusion, the lock is displaced in such a way that the latch that is located on the hood itself cannot enter the hole of this lock and lock into place (the latch hits the edges of the lock, for example), but if the hood suddenly opens spontaneously, this means that the lock is again displaced and the latch still gets into it , but very weakly, and thus when driving (at speed, mostly) the hood opens.
see also
Comments 90
There are rubber bands there on the right and left that can be unscrewed, you take them out of the screw and how you screw them in and see how the hood sits. I also had one side raised, so I twisted the rubber band and everything aligned
Well, they line up perfectly with the wings, but the gap still remains ((I completely tighten the gap on the wings, it’s not the same, but between the hood and the bumper it’s just excellent)) I think we need to adjust the hood latch, somehow do it lower, so that only the center drops
don’t f*ck your brains, everything is fine, the hood and the headlight and the bumper, this is a factory defect, I have the same garbage, and you can fix the bulging bumper near the headlight yourself, remove the bumper and adjust the bumper clamp and everything is OK!
Yes, it’s just not like that for everyone ((good)
remove the bumper, inspect the mounting points, maybe there is something bent somewhere, you can see that the bumper and headlight have come off, look, the fasteners break easily, maybe they glued everything on (tape) and held it until this moment (an autopsy will show)
the boys at the factory fucked her up, a friend works as a parking attendant, he said that every 10th one is broken, get them off the assembly line as best they can, and then we suffer,
stop joking already =
put eyelashes, the gap will decrease
know, eyelashes are not ice =
the same garbage, but smaller, but it seems to me that this gap is on the left when you look at the car from the front and it turns out due to the deformation of the hood while it is standing on the support in the open state (after all, that is where the support is located
he's like that on both sides)))
well, most often this is where the problem lies
I didn’t read what anyone wrote. But I’ll share mine) I removed the bumper and where the lock is attached, I sawed a file just below the bolt holes and now it sits fine. Only one thing... it rubs against the headlight and bumper where the hood release handle is)))
thanks for the advice :D
ADJUSTING THE HOOD LOCK)))
My gap wasn’t that big, I pressed it with my hands)))
I also noticed that the bumper is not in place. Take it off and a lot can be revealed. Most likely there is hidden damage under the bumper.
the main thing is to make you happy;) everything else, use your wits and it will work... Good luck!
makes me happy)) but since it’s a fret, it’s not always))))) it’s like a virgin, it also breaks: D thank you))
to the author of the question - look, your hood is positioned perfectly, the bumper does not sit in place, remove the bumper and align the headlight on the hood, then adjust the gap of the bumper to the hood and everything will be fine, it’s not AvtoVAZ that made mistakes, but the previous 2 owners who made their contribution your car is history... if the work bothers you, give 500 rubles to any painter and ask him to fit it and re-tighten the bumper...
ok, I’ll take it into account... but only then after installing the new bumper
to the author of the question - look, your hood is positioned perfectly, the bumper does not sit in place, remove the bumper and align the headlight on the hood, then adjust the gap of the bumper to the hood and everything will be fine, it’s not AvtoVAZ that made mistakes, but the previous 2 owners who made their contribution your car is history... if the work bothers you, give 500 rubles to any painter and ask him to fit it and re-tighten the bumper...
What is it about your native one that doesn’t suit you? we removed it and installed a regular one... put this money aside and slowly save for a new one;)
How to open the hood on a Lada Priora yourself
For experienced car enthusiasts, this task is not difficult. It’s another matter if the car owner is a novice or an inexperienced woman. The experts who prepared the article will help you understand this issue.
Anyone can do this job if they strictly follow the instructions. So, you need to act according to this algorithm:
- Find the hood release handle and then pull it towards you several times. Finding the handle is not difficult, since it is located to the left of the steering wheel, closer to the corner of the trunk, deep into the pedal.
- You need to open the hood from the street, that is, from the outside. To do this, you need to get out of the car, stick two fingers into the gap that is available after opening the lock.
- Next, you need to feel the metal handle with your hand and press up. In this case, you need to lift the hood up.
- Once it opens, it can be secured using a stop.
Closing the hood is very simple. It is enough to remove the latch and then lower the hood down by hand, where it will fall under the lock. Next you need to inspect it to make sure it is tightly closed.
How to detect a broken cable
If you have the right tools and mechanical skills, you can solve the problem of a broken cable in your car yourself. To do this, you need to open the hood according to the above instructions, and then find out exactly where the break occurred. You need to carefully inspect the place where the cable is attached. If you see that it has come off the fastening, then either it is broken or the problem is in the cable, that is, it is faulty. If the problem is not related to the fastening, it means that the cable has broken in the area of the hood lock. This is a very complex breakdown. In this case, to open the hood, you need to get from the outside to the lock itself and force it to open. Here you need to be careful not to break or damage anything.
Many modern cars have a hood that opens from the front. However, models from the VAZ automobile plant are equipped with a hood that opens forward, and its lock is located at the back, not far from the windshield.
If you have done all the above work, but the hood still does not open, then you need to contact the vehicle technical support service. The workers themselves will come and try to solve your problem.
Roof rack VAZ 2107
If the “seven” is often used to transport various cargoes, then, as a rule, the standard trunk is not enough. In this case, it is convenient to use a special roof rack. Oversized cargo can be secured on this structure. Before choosing a product, you need to find out the dimensions of the elements that can be placed on the trunk. Long materials such as boards, sticks, pipes, if their length is up to 4.5 meters, may not be marked with red flags. If the cargo exceeds the dimensions of the vehicle, i.e. protrudes beyond the front and rear bumpers, it must be marked with special red flags that inform other road users about the transportation of oversized cargo.
What types of luggage racks are there?
On the roof of the VAZ 2107 you can install a roof rack of both the old type and the modern type. The standard “Zhigulevsky” trunk has dimensions of 1300*1050*215 mm, and its load capacity is up to 50 kg. This structure is fastened to the roof gutters using bolts. In general, roof racks can be divided into 3 groups:
- open;
- closed;
- in the form of racks.
The first option is universal. The product consists of transversely and longitudinally directed metal beams with a square or round profile.
The classic type trunk consists of a metal frame that ensures structural strength and reliability of fastening
The closed trunk is a trunk (box). The main advantage of this design is the protection of the transported cargo from bad weather.
The trunk in the form of a box allows you to protect the transported cargo from bad weather
The product, made in the form of racks, is used for transporting bicycles and other equipment. This design is used less frequently, but the load can be fixed on it easily and reliably.
A roof rack made of racks and crossbars allows you to easily and securely secure the load.
Which manufacturer to choose
There are many manufacturers of roof racks for the VAZ 2107 on the Russian market. The most popular companies include: Mamont (Russia), Golitsyno (Russia), BelAZ (Belarus), Inter (Russia). The price range of products ranges from 640 rubles. up to 3200 rub.
How to install
Structurally, the roof of the “seven” has storm drains to which the trunk racks are attached. The installation of the structure for transporting luggage on the roof of the VAZ 2107 should be carried out at the same distance from the front and rear windows. Thus, the load on the upper part of the body and the pillars is distributed evenly. The rack fastenings are placed so that they do not create an obstacle to the doors when they open and close. On the Lada seventh model of recent years of production, there are special marks in the interior that indicate where the A-pillars are located. This makes it easier to install the product on the roof and position it.
When installing a roof rack, you need to ensure its positioning and install it in such a way as not to interfere with the doors
Before tightening the racks, you need to make sure that they are parallel to each other without distortion. If an installation error occurs, the roof surface may be damaged. After installing the racks, tighten the fasteners tightly so that the rubber elements are pressed well against the roof gutters. Having secured the luggage structure to the body, the product is considered ready for use. The main thing is to ensure that the load is securely secured, which will prevent its loss during sudden braking or maneuvers.
Today, a car trunk is increasingly used for its intended purpose, and in order to make its operation more convenient, you need to take care of the appropriate preparation. In the luggage compartment of the VAZ 2107, many people make a raised floor where the necessary things and tools are located. This kind of work is easy to do with your own hands, because it requires a minimum of tools and materials. Thus, it is possible to improve the condition of the luggage compartment and increase its functionality, which will ensure ease of use of the vehicle.
Replacing the cable and lever for opening the hood of a Priora
If you pull the Priora hood release handle and the hood lock does not open, then there are only two possible causes of the malfunction:
- the hood cable is broken or disconnected;
- The plastic hood release handle broke.
To troubleshoot the problem, it is not necessary to contact a service station. Replacing the Priora hood cable, like replacing the handle, does not require special conditions, skills or tools and can be done independently.
Necessary tools and spare parts
To replace the cable or hood handle, you will need:
- open-end wrench or socket 10;
- flat screwdriver;
- marker;
- wire or thin rope longer than the length of the hood cable;
- new hood cable or new handle;
- oil or grease.
Replacing the Priora hood cable
Before working on replacing the cable, you must disconnect the ground terminal from the battery. Otherwise, when working in the engine compartment, and especially under the instrument panel, you can create a short circuit. It is also necessary to remove the front bumper from the Priora. Replacing the Priora hood cable is performed as follows:
- Mark with a marker the position of the bolt washers securing the hood lock to the body panel (this will allow you to easily adjust the hood later);
- unscrew the bolts securing the lock to the body;
- remove the lock from its mounting location;
- remove the end of the rod (cable), having first straightened it;
- remove the metal sleeve from the cable;
- remove the cable from the slot in the lock by first sliding the end of the braid;
Important: adjusting washers are installed at the tip of the shell, which may be needed in the future. Therefore, they must be carefully removed and not lost.
- remove the end of the hood lock cable sheath;
- unscrew the nut securing the cable sheath holder;
- remove the holder from the stud and from the cable braid;
- press inward and remove the plastic hood cable holder;
- tie a wire or rope to the end of the cable (which will simplify the installation of the new hood cable);
- remove the mounting block under the dashboard to facilitate access to the hood release handle;
- press the hood handle located under the dashboard, then remove the hood cable from the slot in the bracket;
- remove the tip of the hood cable from the hole in the hood release lever;
- remove the braided cable into the interior so that the rope does not come out with it, but remains in its place;
- untie the rope from the hood pull rod;
- pull the new hood cable out of the braid and lubricate it, or pour a little oil into the braid for lubrication;
- tie the end of the rope to the new hood cable;
- by pulling the rope, blow the hood rod (cable) into the engine compartment.
- Installation of a new hood cable is carried out in the reverse order of its removal.
Replacing the hood handle of a Priora
The plastic of the hood handle is fragile and can break if you apply excessive force when opening the hood. The handle is inexpensive and is attached with just one bolt. However, its location greatly complicates the work. Replacing the Priora hood handle can be done either with or without removing the dashboard. The latter option is less labor-intensive, but requires the use of a drill and leaves a small hole in the dashboard.
In both cases, it is necessary to loosen the tension on the hood cable by unscrewing the clamp nut.
To remove the hood opening lever, you need to pull the cable end out of it and unscrew the fastening bolt. Access to it is complicated by a torpedo. If you do not dismantle it, you will have to drill a hole in it of such a diameter that a socket head with an extension can fit through it. The hole is completely invisible from the interior. but if desired, you can close it with a plastic plug.
After installing the new lever, you need to tighten the fastening bolt, insert the tip of the hood cable into it and tighten the latter.
ladaservice.info
practical guide
The hood can be removed as an assembly with the elements installed on it. To do this, simply disconnect the hose from the windshield washer pump. In this way, the hood is removed to dismantle the engine using a hoist or winch.
But if necessary (for example, to paint the hood or replace it), the work can be done with preliminary disassembly: removing the hood trim, windshield washer nozzles, and decorative trim.
We carry out the work with an assistant.
1. We prepare the car for work.
2. Remove the casing from the left hinge of the hood.
3. Disconnect the hose from the windshield washer pump.
To remove the disassembled hood, use a 10 mm socket wrench to unscrew the two nuts securing the safety hook and remove the hook.
We turn out the two hood buffers.
Using a screwdriver or a puller, we remove the hood trim holders.
Remove the hood trim.
Disconnect the hose from the windshield washer nozzle.
Using a screwdriver, press the two latches
remove the nozzle from the hood hole.
Similarly, remove the second injector and remove the hose from the hood.
We perform the following operations together with an assistant.
4. Holding the hood on both sides, use a 13 mm socket wrench to unscrew the two nuts securing the hood on each hinge and remove it.
Assembly and installation:
We assemble and install the hood in the reverse order.
We attach the upholstery to the hood with 19 holders.
Damaged holders must be replaced. If the hood closes poorly (you have to press hard) or moves to the side when closing, you need to adjust the position of the hood latch. The holes for the hood lock mounting bolts are made large, which allows you to slightly change the position of the lock.
1. To adjust, remove the front bumper.
2. Using a 10 mm wrench, loosen the two bolts securing the lock.
3. Close the hood and, by adjusting the position of the lock, ensure that when closing the hood, the lock latch (welded to the hood) fits into the groove of the lock without touching the edges of the groove.
4. The vertical position of the hood is adjusted by turning in or out the rubber buffers.
5. After completing the adjustment, finally tighten the hood lock bolts and install the front bumper.
Replacement process
To carry out this procedure you will need:
- screwdrivers - figured and flat;
- marker;
- a piece of fabric;
- set of socket wrenches.
This is a sufficient set for the procedure. Open the engine compartment cover (hood) and secure it well with the stop. Unscrew and remove the windshield wipers. Pull out the decorative plugs holding the air intake panel of the Priora heater. You will have access to the base of both loops. Carefully place the fabric on the glass, under the lower edge of the Priora hood. Now unscrew the nuts securing the hinge to the lid itself. The second person must fix it so that it does not fall. When all four nuts are unscrewed, remove and carefully set the hood aside to avoid damage. Now you can remove the hinges themselves for replacement or repair.
Be sure to use a marker to mark the points where the old hinges stood and dismantle them. Under them there are rubber gaskets that also need to be replaced. Remove any dirt that has accumulated under the base of the loop and wipe the area. The main thing is not to erase the marks. Install according to the marks and carefully fasten the new hinges. Lubricate moving parts well with grease
Now, together with your partner, carefully put the Priora hood back in place.
When the cover is in place, without large gaps and evenly, tighten all the nuts well. Reinstall the air intake panel and wipers. Close the decorative caps.
Removal
4. 10 mm socket wrench
Unscrew the two bolts securing the hood lock.
Warning! To avoid injury, perform the following operation carefully - the radiator fins have sharp edges.
5. Use pliers to straighten the end of the lock drive rod. Slide the locking sleeve from the end of the rod and disconnect the rod from the lock lever.
6. Remove the hood lock.
7. To remove the hood safety hook using a 10 mm socket wrench
unscrew the two bolts securing the hook bracket and remove the hook.
Other Possible Causes
If the problem is not a violation of debugging, it means that one of the parts of the locking system has broken. Let's not consider the option of the integrity of the lock: I think you checked it first.
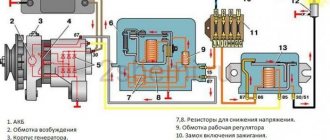
One of the most likely failures is fatigue of the metal from which the spring inserted into the radiator “TV” is made. As a result, it weakens and stops working as it should. Its weakening can often be easily detected by simply pulling on it: the resistance will be quite weak. The spring is changed, the hood fixation is restored.
The next element that quite often breaks or becomes loose is the support tins under the spring. In this case, you can close the hood, but this requires 2 people: one pulls the handle that opens the lid, the second slams the hood, and only after that it closes. The fact is that when installed, the spring should not close the entrance to the lock guide in the center; it should be shifted to the side and cover this sector by 30 percent, no more.
If the condition is not met, the support washer bends and there is no engagement. You need to straighten the tin and place a washer under it while tightening the cable.
A way to eliminate the last defect may be to shorten the cable. However, it is better for a non-professional not to do this: there is a high risk of damaging the cable itself. If you decide to go this route, it is better to go to a service station. We have listed the main reasons why the hood on a VAZ 2114 does not close; Let's hope that our advice will help you improve the situation. And it’s even better if they are not useful to you at all due to the absence of such a problem.
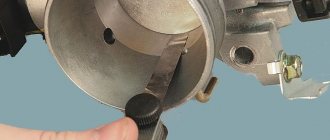
What causes an incorrect spark plug gap?
The result may not meet the standard, which will negatively affect the performance of the machine.
Increased clearance
The main danger is breakdown of the coil or spark plug insulator. Also, the spark may disappear, and the engine cylinder will stop working, causing the system to trip. Signs of a problem that indicate the need to check the clearance are misfire, strong vibration, popping sounds when combustion products are released.
Due to natural wear, the distance increases when the metal burns. Therefore, it is recommended to check single-electrode spark plugs after 10,000 km. Multi-electrode modifications should undergo diagnostics less frequently - checking is necessary upon reaching 30,000 km.
Reduced clearance
A smaller deviation of the distance between the electrodes leads to the fact that the discharge between the contacts becomes more powerful, but shorter in time. Normal ignition of the fuel in the cylinders does not occur. When the motor operates at high speeds, an electric arc can form. As a result, the coil shorts and the engine malfunctions.