Lock
The lock is designed to lock a car door; it is made according to a special design that ensures reliable engagement of the door with the car body.
When your car's door starts to close or open poorly, you should pay attention to the door lock.
Replacing this part is not a complicated process that even a person with no experience in car repairs can handle.
Its cost ranges from 100 to 200 rubles, depending on the type. There are several varieties of native and non-standard locks.
The original Priorov castles are “silent”, i.e. The lock tongue is covered with a plastic edging to ensure quieter closing of the door.
Non-standard locks have softer plastic, which ensures an even softer and more pleasant closing of the door. For example, Ptimash brand locks are quite high quality and inexpensive, and are a very good alternative to the original ones.
Silent castle "Ptimash"
Pre-installation preparation of silent locks
The installation of external silent locks is carried out for a long operational period, during which they will be exposed to various natural phenomena: the sun; rain; dust, etc. In order to extend the operating period, as well as “smooth out” the operating process of Priora, the locks are silent; all mechanisms must be treated with lock lubricant, for example Liqui Moly. Some of these mechanisms include:
internal locking mechanisms; children's castle; door handle mechanisms; loops; limiters.
Cheap replacement for a jammed lock on a Priora.
The old lock on the Priora is jammed
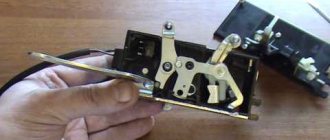
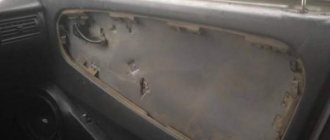
The door lock is stuck in the open position (the door will not close). I had to disassemble the door and get the internal door closing mechanism:
After a light wash in alkali and acid, it is clear that the lock is heavily corroded and the movement of the main levers is difficult. The main release lever was jammed, which was the reason why the door would not close. The advantage of the design is that the lock is more likely to jam from corrosion in the open position than in the closed position. I think there is no need to explain the advantages: if the lock is jammed in the closed state, then it is very difficult to disassemble the door
Based on the design, it is difficult to give advice on what to do if the lock on the Priora is jammed; you definitely cannot use increased effort to open the lock!
. When experimenting with the above rusty lock, the best results when using the lever to open are obtained by repeated, small, rhythmic blows on the opening mechanisms. That is, instead of forcefully pulling the inner opening handle, it’s better to easily pull it 10 times without applying significant force. You can try to unscrew the lock button inside the cabin and blow WD40 into the indicated hole so that at least a little gets on the internal lock and at least somehow lubricates the mechanism.
If the lock is jammed in the closed position without disassembling the door, you can try: 1) unlock the door as much as possible using the button, key, and key fob (it’s better to have more attempts with a little effort than one attempt with a lot of effort, when it will cut the cravings to hell), 2) try open the door using a mechanism inside the door (several light and sharp efforts), which IMHO provides greater travel and pressure on the internal unlocking lever. Or from the handle on the outside of the door. If it doesn’t work out, there’s no need to panic or be nervous. Try this a couple of times.
If this does not help, then, on the contrary, you need to block the door as much as possible; it is organoleptically better to block it by the button (pip) and press it in conveniently, then make several light and rhythmic efforts to open the door using the internal door opening handle, then pull the internal opening handle door and at the same time with the other hand pull up the lock button, the combination of these actions on an old worn-out internal lock provides a slightly greater stroke of the opening lever. You can try this several times. If all else fails, then remove the seat and disassemble the door in an awkward position.
—————————————————————— Repair of the Priory castle
It is economically unjustified to repair an old lock and buy a 2170 lock, because there is a cheap lock with a 2108, the installation of which was previously described www.drive2.ru/l/5487127/ I even found records about modifications to the lock www.drive2.ru/l/465001060646257535/ for blocking it if necessary.
Now 06/04/2021 the price tags for internal locks (right - left) in my city are as follows: LADA 21080610501210 (21080610501310) - 272 rubles LADA 21700610501200 (21700610501300) - on average 1,337 rubles, the cheapest 881 rub. The main difference in the locks is that the lock from the Priora has a slightly different shape of the lever and an electric locking drive with a separate rod and bar. Lock 2108 is successfully upgraded to 2170, welding, drill and grinder to help. Profit in (1337 - 272 =) 1065 rub.
The new one looks like this:
A very important feature of modifying the lock 2108 to 2170 = you need to drill out and very accurately attach the bar for the locking gear motor to the new lock. First, the bar from the old lock is drilled out:
Then drill and tighten with one bolt, try it on in place on the car, bend/turn as required under your door, mark, double-check and only then tightly weld/rivet/screw it with bolts
. Rivets are a more stable and reliable solution (the mechanical characteristics are more stable, they will not unwind or burst from vibration). The part is welded very poorly; you must first clean the galvanized layer and only then will it work out more or less.
The old 2170 lock had lasted over 10 years in harsh conditions and failed due to corrosion. The factory mechanism is galvanized, but this was not enough for a long period of operation. The simplest solution is to additionally coat the lock levers with any film-forming compound. I cleaned the lock (gasoline, alkaline degreaser), sandblasted the welding area of the strip and painted it with cheap NTs 132 gray. All costs for additional materials are covered by the difference in the cost of lock 2108 and 2170 (
1065 rub. difference) I painted in violation of technology: it is supposed to be matted first, then primed, and only then NTs132. But it’s just a Priora, more primer... still better than it was:
Source
Lock lighting
Illumination of the ignition switch in a Priora car is a convenient modification in the dark. There are ways to tune anything inside your Priora. One of the most practical ways is to help yourself find the ignition switch by highlighting it. But getting a flashlight or phone out takes a long time and is impractical. Instead, you can put a backlight on this part, which will also be aesthetically pleasing to the car owner.
Such an upgrade can be purchased on Chinese websites - preferably only for Priora. To connect, climb under the steering casing, place the LED strip, and the wire soldered to it needs to be “powered.” When connected to contacts No. 8 or No. 9, when the dimensions are turned on, the backlight turns on.
Priora door lock device
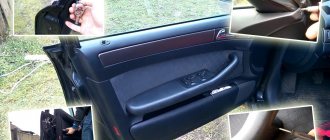
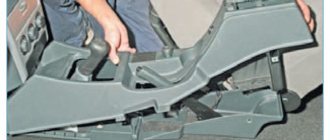
Slight frosts came and a little trouble happened, the lock of the passenger door jammed and no manipulations helped me with this problem, the car has central locking. There was nothing to do and had to disassemble the door trim. At first it seemed that this was almost impossible to do with the door closed, but with patience it is quite possible, everything is the same as with the door open, you just needed a little imagination on how to rip off the clips (I did it using an ordinary flat-head screwdriver with a wound rag and some mother ). Having opened the door trim I saw this picture, I apologize in advance for the quality of the photo, I had no time to mess around. I opened the door with pliers and removed the lock, by the way, immediately stock up on a TORX 40 key, if I’m not mistaken, if you have factory bolts. He's a pest
If I'm not mistaken, use a 3mm drill to drill out the rivets.
website about repair and tuning of your favorite cars
Lock installation
To install a new locking mechanism, you will need to remove the trim from the car door. This will take a lot of time, but it will be possible to carry out a preventive inspection of other systems located in it.
In addition, you can use a knitting needle or a hairpin of sufficient length if you don’t want to bother with the sheathing. Then the inner part of the mechanism, put on it, will not fall inward when the outer one is dismantled.
The new element is installed in place. To do this, it is strung on a stud and secured with a bolt from below. Then the knitting needle is lifted and the upper fastener is screwed in. The rest of the locking devices on other doors are installed in the same way.
As you can understand, this procedure is not at all complicated - almost any car enthusiast with minimal skills can handle it.
If necessary, upon completion of installation, adjust the mechanism. The last thing required is to replace the protective plastic housing.
How to remove and install the front door lock of a Priora
To perform the work of removing the lock, you will need a set of screwdrivers.
Squeeze the latch.
Video on the topic:
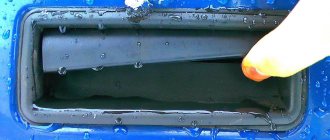
Priora's seal is single-chamber,
There is nothing inside the seal, an empty tube. The seal on the Priora looks like a ring; the two ends are soldered to each other, and the front seals on the Priora are longer than the rear seals. The Priora's seal has a wide internal overlap on the sills and plastic parts in the car interior. The set includes four o-rings, two of which are long and two are shorter. Seal on a Priora, a set of single-chamber seals consisting of four rings/seals costs 1,500 rubles.
Only after using the car, and more specifically the doors, do the front doors begin to whistle unpleasantly at high speeds and this undoubtedly infuriates. We have in stock two-chamber seals for Priora at a price of 350 rubles; one seal, it is not ring-shaped, but tape-shaped; the cross-section clearly shows the presence of two chambers/tubes, which guarantee silence in the cabin after replacing the seal. For example, nines have a three-chamber seal.
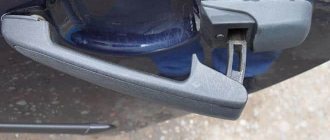
Doors and locks on Priora often have difficulty opening doors from the outside, handles or Euro handles are very difficult to open the door from the outside, the handle does not open the door well, the handle does not open the door - this is a common problem with new Prioras. This is due to the quality of today's factory locks and adjustments. Come to us, we will fix all problems in half an hour. Eliminated by grinding off burrs on the locking hooks of the door lock. This operation is carried out when installing silent locks; after such work, the doors are very easy and effortless to open. It is especially dangerous for Euro handles, since if the door is not opened properly, the factory Euro handle will break. If you have trouble opening the door locks on your Lada Priora, come and don’t put it off until another day. It will take 20 minutes to complete the locks. 1 year labor warranty.
Silent closing for four doors price 500 rubles, trunk adjustment as a gift. 89372817000 call right now.
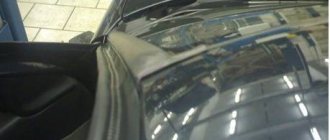
New Priors often have doors installed incorrectly from the factory. When closing the front door, its upper part (corner) touches the upper corner of the rear door. The door sags and due to a sharp bend of the door in the opposite direction from the lock, for example from a strong wind or when backing up with the door open, the lower part of the door hits a snowdrift; in such an unpleasant accident, the door usually lifts up. Due to incorrect installation after an impact, and due to too much soundproofing, after which the door becomes much heavier.
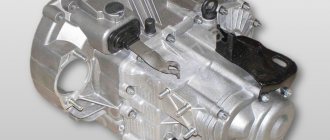
The outer ones are plastic (silent), the working surfaces are covered with a layer of white plastic 1mm thick. The internal mechanisms of the Priora are similar to the VAZ 2114, only from the factory an additional plate is welded to the mechanism to which the alarm drive motor is attached. After such modifications, the mechanism began to cost three times more.
For information about the window lifter, see the “ESP REPAIR” section on the main page.
Silent closing on Priora price 600 rubles. + door adjustment as a gift.
Door Removal Tools
Before starting the manipulations, you need to prepare the tools. To work you will need:
head extension;
adapter for nozzle;
In some places of the casing there are plastic holders, so-called clips. You can remove them without damage using plastic spatulas designed for removing plastic clips.
Trim Removal Tools
This is a highly specialized tool, not every car owner has it. In this case, you may have to purchase new upholstery fasteners, since the old ones may break if they are exposed to inappropriate tools. You can try replacing the blades with a shoe knife or similar tool, but a good result is not guaranteed, since you can, again, break the fasteners or scratch the upholstery.
How to replace a door lock cylinder on a Lada Priora
The first step is to perform the following procedure - remove the door trim. After this, from the inside you need to pry off the rod that goes to the cylinder with a screwdriver. This is clearly shown in the photo below:
As a result, we get the following result.
Now the larva is attached only with the help of one metal bracket, which is pryed up and removed using pliers.
Then we take out the larva assembly from the reverse side, as shown in the photo.
Now you can install the new cylinder in its original place and hook the door lock rod into place. It is worth considering that when replacing one cylinder you will have to constantly use a different key if you open the door manually without the help of a key fob. But, since practically no one uses this method, it is unlikely that anyone will have any special problems.
Lock installation
To install a new locking mechanism, you will need to remove the trim from the car door.
This will take a lot of time, but it will be possible to carry out a preventive inspection of other systems located in it. In addition, you can use a knitting needle or a hairpin of sufficient length if you don’t want to bother with the sheathing. Then the inner part of the mechanism, put on it, will not fall inward when the outer one is dismantled.
The new element is installed in place. To do this, it is strung on a stud and secured with a bolt from below. Then the knitting needle is lifted and the upper fastener is screwed in. The rest of the locking devices on other doors are installed in the same way.
As you can understand, this procedure is not at all complicated - almost any car enthusiast with minimal skills can handle it.
If necessary, upon completion of installation, adjust the mechanism. The last thing required is to replace the protective plastic housing.
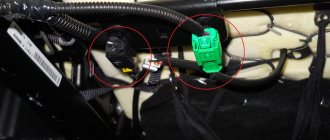
The driver's door central locking actuator on the Priora has failed. We need to change it.
I purchased a gear motor for the electric lock of the driver's door lock (4 wires) on a Priora in the store.
Article: 2170-6512110-10. Price 350 RUR
This is the culprit. Served for 4 years.
I'll take it apart later and post a photo report.
Tags: replacing the central locking actuator on a Priora, standard central locking actuator on a Priora, electric door lock motor gearbox on a Priora
To add comments you must log in or register on the site
I'm incredibly tired of activators that sound like a bolt is moving. I decided to change it to normal. I bought 3 2-pin activators (Phantom brand) for 100 rubles apiece for the passenger doors, but the problem with the driver’s is that it comes with 3-pin from the factory, but in stores there are only 5. (Hence the question: did anyone change the activators and how did they get out of this situation.
After the replacement, I’m as happy with the result as an elephant! everything is quiet and clear) Well, except for the driver’s)
As it turned out, my memory is bad or I can’t count...) In fact, the standard activator has 4 contacts, not 3)
The solution for the driver's door has been found: bite off the white wire, it is not needed, blue - yellow, red - green, brown - brown and black - black.
I bought a 5-pin activator for 150 rubles. I installed it, adjusted the lock in one go, and lo and behold! You can forget about the buzzing and the deadbolt!)
Removing and installing rear door lock of Lada Priora
Lock, drive rods and rear door .
You will need: an “8” wrench, flat-blade and Phillips-blade screwdrivers, and pliers.
Determining malfunctions of the central locking
Failure of the central locking system cannot occur spontaneously. There are harbingers indicating that the system is not working correctly or malfunctioning. They cannot be ignored. It is necessary to determine the cause of the malfunction as quickly as possible.
Reasons for failure of the car's central locking system:
1. Complete refusal.
Does not respond to pressing buttons on the key fob sending commands to the central control unit. Often the cause of the malfunction is trivial. A discharged key fob battery prevents sending a command to open or close locking devices.
2. Partial refusal.
It is characterized by alternating periods of normal operation in normal mode and a complete refusal to respond to remote control commands.
3. Malfunction of locks.
The malfunction manifests itself as chaotic operation of the locks. They can randomly close, open or be completely blocked without responding to incoming commands. The malfunction is dangerous because the doors can be completely blocked without the possibility of mechanical opening. You have to remove the door trim and open it manually.
Before you begin repairing the central locking system, you must determine the cause of the malfunction.
1. Alarm testing.
If the central locking is combined with an alarm system, it is necessary to inspect it first. The door locking devices do not respond to signals from the control panel; they must be checked mechanically using the ignition key.
If the central locking operates in manual mode, you need to check the electrical and control circuits of the alarm. One of the common options is that the battery in the key fob may have run out.
2. The central locking does not work completely or partially.
When testing the central locking system, it refuses to work or operates irregularly in manual mechanical mode using the ignition key. It is necessary to clarify the nature of the manifestation of the malfunction.
If there is a complete system failure on the vacuum central locking system, the compressor operation cannot be heard. The electric central locking responds with weak, barely audible clicks of the operating relay. The locking device buttons remain stationary.
It is necessary to locate the central locking circuit fuse. If it is burnt out, replacing it will solve the problem of mechanism failure. Depending on the car model, there may be more than one fuse.
3. The system fuses are intact and undamaged.
If it is determined that the fuses are safe and sound, you must continue to persistently examine the system to determine the cause of the malfunction.
The driver's door drive cannot transmit the signal received by it from the control panel to the other doors. Similar symptoms appear when the driver's door actuator limit switch is faulty. The control signal is not detected.
Repair work on the central system must begin with checking the power supply and control signal. It is necessary to visually check the system wires for damage. The limit switch must be checked. It is installed inside the drive.
4. Arbitrary opening or closing of door locks.
Often, after pressing the key fob button, the door locks close and after a few seconds randomly open. The opposite sign of a malfunction also appears when the locks close without giving a signal.
The cause of the malfunction is a violation of the fixation of the rod fasteners. Located between the drive and the driver's door lock mechanism. There is a violation of the process of unlocking and locking doors.
Removing the interior lock, lock cylinder and outer front door handle
We carry out the work when replacing the lock, its cylinder mechanism and the outer door handle. Remove the front door trim (see “Removing the front door trim”).
Use a slotted screwdriver to disconnect the rod from the cylinder mechanism of the lock.
Use a slotted screwdriver to pry up the mounting bracket for the cylinder lock mechanism...
We take out the cylinder lock mechanism along with the rubber sealing ring. Disconnect the lock rod from the outside door handle.
Read more: Cylinder head gasket material
Using a 10mm socket, unscrew the two nuts securing the outer door handle...
Using a slotted screwdriver, unfasten the clamp securing the wiring harness of the electric locking drive.
By pressing the latch... ...we disconnect the wiring harness blocks of the electric locking drive.
Using a Phillips screwdriver, unscrew the three screws securing the base of the inner handle...
...and the screw for securing the internal lock. We remove the external lock (see “Removing the external door lock”).
We remove the internal lock of the front door with rods and an electric drive for locking the lock through the technological opening of the internal door panel.
Front door lock with electric locking, external and internal door handles
Use a slotted screwdriver to disconnect the rod end of the outer handle from the lock lever.
In the same way we disconnect the rod of the cylinder mechanism of the lock.
Using a slotted screwdriver, we open the spring bracket that secures the rod of the inner handle...
...and remove the bracket. There is a spring washer under the bracket; remove it, and then the rod.
Using a slotted screwdriver, press out the plastic locking rod lock of the lock button, turning the lock around its axis.
In the same way we remove the locking electric drive rod.
Using a Phillips screwdriver, unscrew the two self-tapping screws securing the electric drive to the lock bracket and remove the electric drive.
We remove the rod from the hole in the electric drive rod of the lock.
Front door internal lock mechanism
We install the internal door lock, the lock cylinder mechanism and the external door handle in the reverse order.
Before installing the door trim, we check the functionality of the door lock mechanism. If the outer door handle or lock cylinder mechanism does not work correctly, the length of the rod should be adjusted by rotating the plastic tip of the rod.
Operations performed when removing and installing as well as adjusting the front door lock rod on a VAZ 2170 2171 2172 Lada Priora
The following is the design of the lock installed on the doors of the Lada Priora car, recommendations for removing and installing the lock.
Tools necessary for removing the lock rod on a VAZ 2170 2171 2172 Lada Priora.
You will need flat and Phillips blade screwdrivers.
Read more: The digital signal of the TV antenna disappears
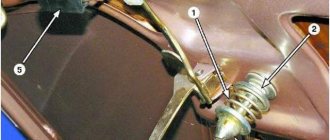
The lock, its drive rods and the front door handles of the Lada Priora are shown in Fig. below
Lock, drive rods and front door handles of Lada Priora: 1 – lock switch rod; 2 – lock switch; 3 – lock button rod; 4 – rod of the outer handle; 5 – external handle; 6 – Lada Priora (Lada Priora) inner handle rod; 7 – internal handle; 8 – internal lock; 9 – external lock; 10 – external lock escutcheon
VAZ 2170 | Removing, installing and adjusting doors
Removing, installing and adjusting doors
Car doors have significant weight, so it would be wise to enlist the help of an assistant.
REMOVAL AND INSTALLATION
1. Remove the interior trim panel and the film insulating screen (see Section Removing and installing interior door trim panels). Disconnect the contact connectors and push the electrical wiring through the technological holes in the door frame, thereby ensuring the possibility of free dismantling of the latter. 2. Open the door all the way and support it with a jack or wooden blocks. Note: To avoid damage to the paintwork, place a layer of rags between the jack head and the edge of the door.
Lada Priora rear door activator replacement without removing rods and lock
This video shows that if you fixed something in a Russian car, it does not mean that everything is fine. Love yours.
7. Tighten the drive rod end clamp...
8. ...and disconnect the rod end from the inner handle of the VAZ 2171 lock.
9. Replacement of the driver's door lock electric drive. Using a screwdriver, remove the lock lock intermediate rod holder from the door.
10. Unscrew the screw securing the intermediate locking lever.
11. Lower the intermediate lever down and remove the lock lock from the bracket hole.
13. ...and remove the guide
14. The electric door lock drive does not work. The electric lock motor is to blame. Use a screwdriver to pry the end of the rod of the outer handle of the VAZ 2172 and disconnect the rod.
15. Lada Priora hatchback Rock and Roll Antares › Logbook › Repair of electric door lock drive. Remove the cover.
16. Replacing the side glass of the front door of a VAZ 2110-2112, Priora. The procedure for removing and installing front door glass on VAZ 2110-2112 and Lada Priora cars. Remove the two mounting screws...
17. ...and pull out the lock.
18. screw securing the internal lock.
Replacing and adjusting locks on VAZ 2110 and 2112
Often, the reason for a poorly closing door is the displacement of the main part of the lock relative to the receiving part. In this case, you simply need to adjust the position of the latch. To do this, use a Phillips screwdriver to loosen the screws securing the clamp. This will allow you to move it in the desired direction. Tighten the screws and check the door operation.
If you cannot adjust the lock, then perhaps its parts are simply worn out. In this case, you will have to replace it. This is done in the following order:
First you need to remove the casing, it’s not difficult, so we won’t focus on this; The outer door handle rod is disconnected from the lock; The lock lever is disconnected from the lock cylinder rod; The lock handle (inside) is removed from the rod; Use a Phillips screwdriver to unscrew the screws securing the outer part of the lock, after which it can be removed; The inner part of the lock is removed together with the blocking rod, as well as the handle rod; Disconnect the locking rod. To do this, remove the plastic rod holder
Be careful. It can be easily broken; The outer handle rod is disconnected by removing the lock washer.
Assembly is carried out in reverse order. If necessary, adjust the length of the rods; this is done by unscrewing or twisting their tips. When assembling, do not forget to lubricate the lock mechanism.
Removing door locks of a Lada Priora car
We remove door locks for replacement or repair.
Removing and installing the front door lock
You will need flat and Phillips blade screwdrivers.
Rice. 1. Lock, drive rods and front door handles
1. Disconnect the wire from the negative terminal of the battery.
2. Remove the front door trim.
3. Squeeze the pad retainer
4. Disconnect the door lock gear motor wiring harness connector.
5. Remove the three screws securing the interior door handle.
6. Use a screwdriver to pry and disconnect the rod of the outer door handle from the lock.
7. Use a screwdriver to pry and disconnect the rod from the lock switch.
8. Remove the external lock escutcheon.
9. Using a Phillips screwdriver, remove the two screws securing the external lock.
10. Remove the outer lock.
11. Remove the screw securing the internal lock.
12. Remove the interior lock along with the interior door handle and rods.
13. Remove the plastic holder from the lock lock rod and disconnect it from the lever.
14. Remove the locking bracket and disconnect the inner handle rod from the lever.
15. The length of the rods is adjusted by unscrewing or wrapping the plastic tips.
When replacing the rod end, unscrew it from the rod, counting the number of turns.
Screw in the new tip the same number of turns, this will maintain the required length of pull.
16. Remove the lock switch retaining bracket
17. Remove the lock switch from the door.
18. Install the lock in the reverse order of removal, having first lubricated all rubbing parts with grease.
Removing and installing the rear door lock
Rice. 19. Lock, drive rods and rear door handles
1. Disconnect the wire from the negative terminal of the battery.
2. Remove the rear door trim.
3. Squeeze the pad retainer
4. Disconnect the door lock gear motor wiring harness connector.
5. Remove the three screws securing the interior door handle.
6. Move the handle away from the inner door panel.
7. Squeeze the drive rod end clamp
8. Disconnect the rod end from the inner handle of the lock.
9. Using a screwdriver, remove the lock lock intermediate rod holder from the door.
10. Remove the screw securing the intermediate locking lever
11. Lower the intermediate lever down and remove the lock lock button rod from the bracket hole.
12. Remove the bolt securing the glass guide
13. Remove the guide from the door.
14. Use a screwdriver to pry the end of the outer handle rod and disconnect the rod from the lock lever.
15. Remove the outside door lock trim.
16. Remove the two screws securing the external lock
18. Remove the screw securing the internal lock.
19. Remove the internal lock with locking rods and internal handle
20. Install the lock in the reverse order of removal, having first lubricated all rubbing parts with grease.
Check the ease of opening and the reliability of closing the door lock.
Adjusting the trunk lock "Priora" hatchback
Adjustment of the installation position and length of the trunk lock mechanism rods must be performed in the following cases:
- the lock does not open electrically, although the gear motor works;
- the lock does not close well or does not close at all;
- The trunk door knocks while driving.
In the first case, it is necessary to adjust the length of the rod. In a couple of others, you need to correctly set the position of the trunk lock on the lid.
Also, if the lock is not working well, it would be a good idea to lubricate its moving parts with oil or grease that does not harden in the cold (which is important in winter). Adjusting the trunk lock of the Priora hatchback is performed as follows:. Adjusting the trunk lock of the Priora hatchback is performed as follows:
Adjusting the trunk lock of the Priora hatchback is performed as follows:
- Using a flat screwdriver, carefully, so as not to damage the surface of the trunk lock lining and the plate of the fastening pistons, remove the pistons;
- remove the trim covering the trunk lock mechanism;
- loosen the screw tightening the lock opening rod;
- straighten the end of the rod, if it is bent, with pliers;
- loosen the three nuts securing the lock to the trunk lid;
- move the lock in the desired direction so that it fits well with the latch;
- lubricate the lock mechanism;
- tighten the screw securing the rod;
- tighten the nuts securing the lock on the trunk lid;
- make sure that the lock closes well (if it does not, repeat the adjustment);
- finally tighten the nuts securing the lock to the trunk lid;
- install the cladding in place and secure it with pistons. Another adjustment option is to change the position of the lock latch. If the lock knocks on the latch when closing and the lid closes with considerable force, it is necessary to change its position. To do this you should:
- loosen the bolts holding the clamp;
- move the lock forward or backward, depending on the required position;
- tighten the fastening bolts;
- check whether the trunk lid can be easily buried;
- if necessary, repeat the adjustment of the lock position;
- Finally tighten the bolts holding the clamp.
Another adjustment option is to adjust the length of the rod coming from the electric locking drive to the mechanism. To do this, you need to remove the lock from the car, as described above. The drive rod is screwed to the mechanism, so to change the length it must be turned several turns in one direction or another. After changing the length of the rod, the lock mechanism must be reinstalled and checked whether it opens electrically. If necessary, the rod length adjustment must be repeated.
If everything works fine, all that remains is to install the trunk lock in place.
Replacing the ignition switch is a fairly rare procedure. However, like any seemingly simple repair, it forces even experienced specialists to treat this type of repair scrupulously.
Traditionally, replacement of the ignition switch is carried out in case of damage, wear and tear, when the car simply does not start, but more often in the event of a malfunction of the electrical circuits of the car, the starter of which the lock is. For example, by turning the key to one of the positions, we alert not only the engine ignition system, but also other functions:
- external (including side) lighting;
- instrument lighting;
- low and high beam headlights;
- fans for interior heating and engine cooling systems.
Replacing the door lock of Lada Priora (VAZ Priora)
Priora's seal is single-chamber,
There is nothing inside the seal, an empty tube. The seal on the Priora looks like a ring; the two ends are soldered to each other, and the front seals on the Priora are longer than the rear seals. The Priora's seal has a wide internal overlap on the sills and plastic parts in the car interior. The set includes four o-rings, two of which are long and two are shorter. Seal on a Priora, a set of single-chamber seals consisting of four rings/seals costs 1,500 rubles.
Only after using the car, and more specifically the doors, do the front doors begin to whistle unpleasantly at high speeds and this undoubtedly infuriates. We have in stock two-chamber seals for Priora at a price of 350 rubles; one seal, it is not ring-shaped, but tape-shaped; the cross-section clearly shows the presence of two chambers/tubes, which guarantee silence in the cabin after replacing the seal. For example, nines have a three-chamber seal.
Doors and locks on Priora often have difficulty opening doors from the outside, handles or Euro handles are very difficult to open the door from the outside, the handle does not open the door well, the handle does not open the door - this is a common problem with new Prioras. This is due to the quality of today's factory locks and adjustments. Come to us, we will fix all problems in half an hour. Eliminated by grinding off burrs on the locking hooks of the door lock. This operation is carried out when installing silent locks; after such work, the doors are very easy and effortless to open. It is especially dangerous for Euro handles, since if the door is not opened properly, the factory Euro handle will break. If you have trouble opening the door locks on your Lada Priora, come and don’t put it off until another day. It will take 20 minutes to complete the locks. 1 year labor warranty.
Silent closing for four doors price 500 rubles, trunk adjustment as a gift. 89372817000 call right now.
New Priors often have doors installed incorrectly from the factory. When closing the front door, its upper part (corner) touches the upper corner of the rear door. The door sags and due to a sharp bend of the door in the opposite direction from the lock, for example from a strong wind or when backing up with the door open, the lower part of the door hits a snowdrift; in such an unpleasant accident, the door usually lifts up. Due to incorrect installation after an impact, and due to too much soundproofing, after which the door becomes much heavier.
The outer ones are plastic (silent), the working surfaces are covered with a layer of white plastic 1mm thick. The internal mechanisms of the Priora are similar to the VAZ 2114, only from the factory an additional plate is welded to the mechanism to which the alarm drive motor is attached. After such modifications, the mechanism began to cost three times more.
For information about the window lifter, see the “ESP REPAIR” section on the main page.
Silent closing on Priora price 600 rubles. + door adjustment as a gift.
Replacement
The replacement process will take you no more than 10 minutes; the most difficult thing will be to unscrew the bolts securing the lock to the door. There is no need to adjust the lock after replacement, since the adjustment is made only on the hinge, and during operation the hinge will not unscrew and, therefore, will not change its position.
Step-by-step instruction
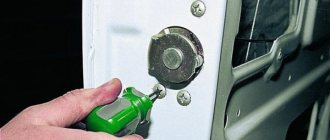
Using a T40 socket wrench or a key, loosen the two bolts securing the lock to the door.
Attention: Under no circumstances unscrew both bolts at the same time; if you unscrew two bolts at once, the inner part of the lock (drive) will fall into the door and then you will have to remove the door trim to get it out. Unscrew one bolt and remove it
Unscrew one bolt and remove it
Then unscrew the second bolt, but not all the way, pull the lock towards you and turn it to the side, or use a pin as shown in the picture.
We screw the previously unscrewed bolt into an empty space and then unscrew the bolt securing the lock. This will prevent the lock drive from falling into the door.
We install the new lock in the reverse order, avoiding unscrewing both bolts at the same time.
Replacing a door lock on a Priora
Introduction
The Lada Priora lock is a reliable mechanism that can withstand a huge number of door openings and closings. There are times when the door lock needs to be changed. This is due to various kinds of problems that will be discussed in this article.
Lock
The lock is designed to lock a car door; it is made according to a special design that ensures reliable engagement of the door with the car body.
When your car's door starts to close or open poorly, you should pay attention to the door lock.
Replacing this part is not a complicated process that even a person with no experience in car repairs can handle.
Its cost ranges from 100 to 200 rubles, depending on the type. There are several varieties of native and non-standard locks.
The original Priorov castles are “silent”, i.e. The lock tongue is covered with a plastic edging to ensure quieter closing of the door.
Non-standard locks have softer plastic, which ensures an even softer and more pleasant closing of the door. For example, Ptimash brand locks are quite high quality and inexpensive, and are a very good alternative to the original ones.
Silent castle "Ptimash"
How to care for locks
First of all, care should be taken to ensure that no water gets inside. This usually happens during the car wash process. In winter, moisture in the mechanism can freeze and then it is difficult to get inside the car. It is not difficult to avoid this - it is enough to regularly treat the external parts with silicone lubricant made in the form of a spray.
In addition, approximately 4 times a year, it is necessary to lubricate the internal parts of the locking device - this allows all elements to operate smoothly and extend their service life.
How to replace a door lock cylinder on a Lada Priora
The first step is to perform the following procedure - remove the door trim. After this, from the inside you need to pry off the rod that goes to the cylinder with a screwdriver. This is clearly shown in the photo below:
As a result, we get the following result.
Now the larva is attached only with the help of one metal bracket, which is pryed up and removed using pliers.
Then we take out the larva assembly from the reverse side, as shown in the photo.
Now you can install the new cylinder in its original place and hook the door lock rod into place. It is worth considering that when replacing one cylinder you will have to constantly use a different key if you open the door manually without the help of a key fob. But, since practically no one uses this method, it is unlikely that anyone will have any special problems.
Lock installation
To install a new locking mechanism, you will need to remove the trim from the car door. This will take a lot of time, but it will be possible to carry out a preventive inspection of other systems located in it.
In addition, you can use a knitting needle or a hairpin of sufficient length if you don’t want to bother with the sheathing. Then the inner part of the mechanism, put on it, will not fall inward when the outer one is dismantled.
The new element is installed in place. To do this, it is strung on a stud and secured with a bolt from below. Then the knitting needle is lifted and the upper fastener is screwed in. The rest of the locking devices on other doors are installed in the same way.
As you can understand, this procedure is not at all complicated - almost any car enthusiast with minimal skills can handle it.
If necessary, upon completion of installation, adjust the mechanism. The last thing required is to replace the protective plastic housing.
Replacing the door lock cylinder
On Lada Priora cars, the door lock cylinders are changed in exceptional cases, since most owners almost never use the “mechanical” door lock. In 99% of cases, drivers use a standard key fob, which locks and unlocks the door locks. But there are times when the key fob does not work, or it is simply lost, and then you have to use the cylinder in the door. If it fails, to replace this part you will need the following tool:
How to replace a door lock cylinder on a Lada Priora
The first step is to perform the following procedure - remove the door trim. After this, from the inside you need to pry off the rod that goes to the cylinder with a screwdriver. This is clearly shown in the photo below:
As a result, we get the following result.
Now the larva is attached only with the help of one metal bracket, which is pryed up and removed using pliers.
Then we take out the larva assembly from the reverse side, as shown in the photo.
Now you can install the new cylinder in its original place and hook the door lock rod into place. It is worth considering that when replacing one cylinder you will have to constantly use a different key if you open the door manually without the help of a key fob. But, since practically no one uses this method, it is unlikely that anyone will have any special problems.
Video review of replacing the door cylinder on a Lada Priora car
Since the design of the doors, as well as the larvae themselves, is the same, the replacement with a VAZ 2110 will be no different from the Priora. Below is a video review using the tenth family as an example.
I hope that after reading both the photos and video reviews, there should be no problems when performing this repair. If there are any unclear points, you can ask questions below in the comments, or under the video on the channel!
If you replace the cylinders as a whole set, then these parts for the door and trunk lid, as well as the assembly with the ignition switch, will cost you 1,800 rubles.
Leave a reply Cancel reply
You must be logged in to post a comment.
When does it become necessary to replace a car lock cylinder?
Larvae
for locks VAZ 2110
First you need to objectively understand that the larva is inside the lock
, therefore, as many locks there will be as many larvae. In practice, the need for replacement arises if there was an unsuccessful hacking attempt. Objective traces of hacking:
- unsteadiness and unreliable fixation of the lock to the base fastening structure;
- the key began to fit poorly into the keyhole;
- the lock does not open at all with the key;
- mechanical traces of a break-in attempt, etc. are visually visible.
Vital reasons that require replacing
car lock cylinder :
- loss of a lock
; - accidental unintentional damage to the lock , during which it failed;
- there was a desire or need to increase the degree of security of the keyhole, etc.
Replacing the Priora Door Lock Electric Drive
Remove and install back door lock Lada priority
Lock, traction drive and rear door .
You will need: "8" wrench, flat-blade and cross-blade screwdrivers, pliers.
4. ... and disconnect the cable block of the door lock gear motor.
5. The lock on the car door has stopped working. Up to dozens of replacements. Remove the three screws that secure the interior handle.
6. Slide the handle from the inside of the door tab panel.