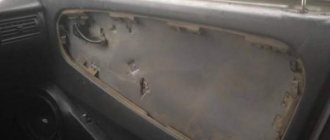
Removing the rear door trim
The sequence of actions for dismantling, or how to remove the rear door trim on a VAZ 2114 and mount it back.
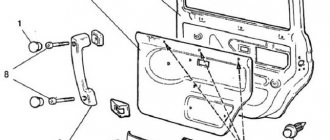
- Using a flat-head screwdriver, press out the decorative molding of the door handle and remove it.
- Remove the door handle.
- Using a flat-head screwdriver, press and remove the door handle trim.
- After unscrewing the fastening screws, remove the inner part of the handle.
- Using a flat-head screwdriver, remove the door lock handle trim.
- Unscrew the cap of the door locking mechanism (lock) and remove it.
- Use a flat-head screwdriver to disconnect the 10 door trim fastening studs.
- Carefully remove the trim, evenly moving it away from the door .
Installation of the casing occurs in the reverse order.
After removing the trim, it is recommended to carry out anti-corrosion treatment and check the condition of the internal cavities of the door .
If the door does not close, after removing the trim, you need to lubricate the rod of the central locking electric drive with silicone spray.
Sometimes you need to remove the trim from a door when it is jammed. In this case, space is made in the cabin for trim parts and work is carried out from the inside.
To improve sound and heat insulation, foil foam rubber is installed inside the casing. The pattern is made according to the pattern of the old casing. The material is cut with a margin of a few centimeters so that it can be folded. A hole is cut out for the handle. It should be slightly smaller in size than the handle itself. Insulation adhesive is selected depending on the type of material.
Sometimes, after removing the trim, decorative inserts are replaced. Typically, leatherette, Alcantara, carlet and tapestry fabrics are used for replacement.
Information on how to remove a VAZ 2114 door or door is required not only to change decorative panels or install sound insulation, but also to replace a power window or glass.
Purpose of the cladding
To understand how to remove the door trim of a VAZ 2114, you need to find out the purpose of this automobile fragment. The fabric insert enhances the appearance of the interior. If stains, mechanical damage or abrasions appear on it, you will need to disassemble the inside of the door, remove the panel, and attach a new lining. Thanks to this element:
- the interior becomes more attractive;
- additional sound insulation is created;
- a speaker is installed in the facing fragment;
- electrical wiring and fasteners are hidden;
- The corners of the closed plastic panel and iron parts are softened.
Glass replacement
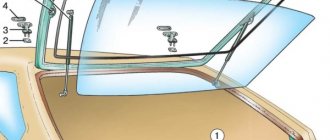
It is better to buy glass and a glass holder as a set for replacement.
To replace, you need an extension, a wrench, an 8 and 10 mm socket and an assistant.
The side glass is blocked with a screwdriver to prevent it from falling out. trim is removed . A felt-tip pen marks the places where the glass frame is attached to the door on the frame and on the door. The bolts securing the glass frame to the window regulator are turned out.
how to remove the door trim of a VAZ 2115 2114
The window regulator bar must be fully raised. The cable on the roller from the bottom of the glass is dismantled. Then the seals (velvet covers) are carefully removed.
Hold the glass during this time so that it does not fall out. After removing the seals, the glass is lowered down about 10 cm, tilted to the side and removed from the groove.
The new glass is installed in the reverse order. Apply WD-40 or a similar lubricant to the glass frame, insert the glass and leave to dry. After the grease has dried, the glass is installed in the door. New glass is installed in the seals.
If the seals have become unusable, new ones are cut out of rubber, while the old ones are used as patterns.
The glass with seals is inserted into the groove, aligned and lowered into the stopper. The window lifter handle is lowered to its lowest position. The glass is fixed with bolts and the cable is installed in its original place.
The operation of the window regulator is checked and, if necessary, the cable tension and the position of the seals are changed.
Lada.Online | Topic author: Noam
How to remove the door trim of a Lada Vesta
Door trims (cards) are dismantled to repair the elements that are located under it (window lifters, locks), or to modify the car. For example, to install additional sound insulation or more powerful speakers. Let's look at the features of replacing Lada Vesta door trim. You will need: a TORX T20 wrench (asterisk) and a plastic spatula, or a flat-blade screwdriver (to avoid scratching the surface, you can wrap it with a rag/electrical tape). New fasteners (like on Renault) in case they break during work. Remove the plastic triangle of the side mirror: Pry the part from above with a flat-head screwdriver and unclip the latch; Disconnect the block with wires. How to remove the Vesta casing is also shown in the video:
If you are interested in tuning or modifications, then after removing the door trim, we recommend installing additional sound insulation. This will not only reduce road noise and eliminate squeaks, but also significantly improve the sound quality of music.
https://lada.online/do-my-self/repair/repair-lada-vesta/902-kak-snyat-obshivku-dveri-lada-vesta.html #LadaVesta How to remove door trim Lada Vesta Door trim (maps) are dismantled to repair the elements that are located under it (window lifters, locks), or to modify the car. For example, to install an additional Lada.online
How to remove the trim. VAZ 2114 – YouTube
Remove the front door trim. Group . How to remove the trim. VAZ 2114. Auto Repair and Not. I'm filming my latest videos with it.
How to remove and install the rear door trim of a VAZ 2114 – Repair 2114
How to remove and install the rear door trim of a VAZ 2114. Video on removing the rear door trim: . How to change the front door lock on a VAZ 2114.
Removing the front door trim
Plastic spikes or “herringbones” for fastening may break during the process of removing the skin. We purchase in advance a quantity sufficient for the update. It is better to buy double white-orange or transparent clips.
- Open the door and remove the 3 screws securing the podium. The screws are unscrewed with a Phillips screwdriver. The podium carefully turns down and detaches from the body.
- Using a knife with a thin blade or a flat screwdriver, press the latch through the special hole and, pulling the block, remove it.
- Use a Phillips screwdriver to remove the screws from the speaker mounts.
- Remove the column and disconnect the power wires.
- Use a screwdriver to pry off the outer trim of the door handle.
- Turn the cover 180 degrees and remove it completely.
- Using a sharp knife, lift the door handle trim. Remove the cover and unscrew the 2 screws under it.
- Remove the door handle.
READ How to check the speed sensor of a VAZ 2115
Do not remove the casing with jerks or sudden movements. The sockets that attach the trim to the door can be damaged.
- We remove the wires from the locking mechanism from under the top of the casing. We remove the door trim of the VAZ 2114, evenly moving it away from the door.
- After removing the trim, you can replace the glass, the trim itself, repair window regulators, install acoustics, etc.
Installation of the casing occurs in the reverse order.
Do-it-yourself repair work to replace the casing
First you need to carefully familiarize yourself with the design features of the door and the fasteners used. Then, using a special tool, dismantle the panel. If cracks or chips are detected, it is recommended to eliminate them using sealant or other adhesives. After completing the repair work, the panel is installed in place.
Replacing the window regulator
To replace the window regulator, you need an extension, a wrench and a 10 mm socket.
Having freed the front door from the trim, remove the 2 bolts securing the glass to the bar. Usually they are tightened tightly, so it is more convenient to use the head as a lever.
Remove three nuts securing the electric motor, one nut under the glass, two in the center and one nut at the bottom of the door.
After removing all the nuts, disconnect the power plug from the electric motor.
The window regulator is removed from the studs and taken out of the cavity into the technological hole in the center of the door. Installing the window regulator occurs in the reverse order.
After removing the structure, the electric motor is first checked. If it is faulty, it is replaced. If the cause of the breakdown is not obvious, replace the window regulator.
How to remove
The disassembly process is the same for all doors, including the driver's door.
To replace the casing, you will need to remove interfering structural elements and remove old material. You need to prepare a set of screwdrivers. Initially, the podium is dismantled. There are three screws underneath, which can be easily removed with a standard Phillips screwdriver. You need to remove it carefully and with feeling. Otherwise, you may break the wires supplying the power windows. After dismantling the podium, you will need to disconnect the terminal from them.
Next, remove the inner handles. The pads must be carefully pryed off with a flat screwdriver or knife. The bolts are hidden behind them. After unscrewing them, the handles themselves are removed.
Then it will be necessary to dismantle the lining of the closing mechanism. It is pryed off with a flat screwdriver. Then comes the turn of the stoppers - these are plastic pins located on top. Unscrew with a Phillips screwdriver.
We should not forget about the speakers, usually located in the front doors. They are secured with screws. It is worth noting that if they were not installed at the factory, the latches may be non-standard. Having pulled out the speakers, you need to disconnect the wires leading to them. You shouldn't pull them sharply, as they are quite thin and tear easily.
After this, remove the lever that moves the side mirrors. Then you can remove the decorative moldings as well. Only after this will it be possible to remove the old cladding material. It is held in place by plastic caps. They are attached directly to the metal of the doors. The casing is pryed off with a knife or screwdriver, after which it is detached from the base. There is no need to worry about breaking the caps - they cost mere pennies and are sold everywhere.
There is no point in replacing Euro screws with self-tapping screws in the future if they reliably fix the upholstery. On average, one door takes about half an hour. If you have minimal experience, you will have to spend significantly more.
The procedure for removing and installing the front door trim on the VAZ 2114 and 2115
First, open the car door and use a Phillips screwdriver to unscrew the three screws securing the lower podium (pocket).
After this, carefully move it down and disconnect it from the upholstery body, as shown in the photo below.
We turn it over with the outer side facing us and see the plug for connecting to the power window control buttons.
Using a thin screwdriver or the sharp edge of a knife, press the latch through a special hole and pull the block, thereby disconnecting it.
The result of the work performed is shown below.
Now unscrew the screws securing the front speakers, if they are installed on your car.
We take it aside and disconnect the power wires.
Now use a screwdriver or hand force to pry up the inner lining of the door handle:
Having turned it almost 360 degrees, we remove it completely.
Now we need a sharp knife. With its help, we adjust the door handle, as shown in the photo below.
We take it out and unscrew the two fastening screws under it.
Then you can remove it, since it is not attached to anything else.
Now unscrew the top cap from the rod that locks the door lock and remove it:
Carefully, starting from the bottom corner, we begin to pry the door of the VAZ 2114-2115 , and carefully try to tear it off the clips on which it is attached to the base of the door. You should not make sudden movements, so as not to damage the mounting points.
Carefully moving the trim to the side along the entire perimeter, we remove it, having previously disengaged the door lock rod from above, I think that everyone understood what we were talking about.
Now you can begin the work that was planned, be it repairing power windows, replacing glass, locks, or just simply replacing the trim with a new one. Regarding the price of new upholstery, it is worth saying that a set of new ones will cost from 3,500 to 5,000 rubles, depending on the type and manufacturer. Installation occurs in reverse order.
Installation
Install a new door in the reverse order of removal. Using the bolts securing the hinges, adjust the position of the door relative to the body, not allowing it to hang down and avoiding various gaps.
How to eliminate rattling sheathing
While driving, the trim panel may rattle due to vibration. To eliminate this unpleasant sound, you need to replace the fasteners with similar ones. You can do the repair yourself at minimal cost by replacing the clips with threaded fasteners. The main thing is not to overtighten the thread.
Rattling also occurs as a result of long-term use of the car. Over time, the plastic used to trim the interior dries out and becomes harder, which leads to extraneous sound. The problem can be resolved by creating one or two more attachment points. Before drilling, you need to make sure that there are no significant nodes at the location of future holes, under the casing.
Replacing a door on a VAZ 2113, VAZ 2114, VAZ 2115
During a side impact, the door is primarily affected. The fender and bumpers of the car may also be damaged, but you can still drive with a broken bumper or fender, but hardly with a badly dented driver’s door. A severely deformed door must be replaced immediately, especially since if it is hit a second time, the likelihood of more serious injury increases.
Note! You will need the following tools: a wrench with a socket head of approximately “13”, a screwdriver, a marker, a bit and a hammer for it. We recommend taking an assistant.
Removing the rear trim
There is no point in repeating the main points; they are almost identical.
The handle is also disassembled and the plug and the upper locking “latch” are removed. But there are no shelves or speakers here.
READ How to remove the clutch cable of a VAZ 2110
There is also no power window, that is, there is no wiring that needs to be disconnected. But here there is a regular window handle, as people call it – “oars” or a “muscle power” drive. In order to disassemble it, you need to bend it slightly towards yourself with a screwdriver - pull out the lower locking ring. After which the handle will simply come off on its own.
We repeat the same procedure with the upholstery as on the front door, just gently pull. Remember about rivets.
What else I would like to note is that if you read the instructions, it recommends completely changing the rivets every time you remove the upholstery - they simply lose their characteristics, the antennae fall off, if my memory serves me correctly, there are 8 of them on each upholstery. This threatens to cause rattling on bumps and uneven roads.
Lada.Online | Topic author: Noam
How to remove the door trim of a Lada Vesta
Door trims (cards) are dismantled to repair the elements that are located under it (window lifters, locks), or to modify the car. For example, to install additional sound insulation or more powerful speakers. Let's look at the features of replacing Lada Vesta door trim. You will need: a TORX T20 wrench (asterisk) and a plastic spatula, or a flat-blade screwdriver (to avoid scratching the surface, you can wrap it with a rag/electrical tape). New fasteners (like on Renault) in case they break during work. Remove the plastic triangle of the side mirror: Pry the part from above with a flat-head screwdriver and unclip the latch; Disconnect the block with wires. How to remove the Vesta casing is also shown in the video:
If you are interested in tuning or modifications, then after removing the door trim, we recommend installing additional sound insulation. This will not only reduce road noise and eliminate squeaks, but also significantly improve the sound quality of music.
https://lada.online/do-my-self/repair/repair-lada-vesta/902-kak-snyat-obshivku-dveri-lada-vesta.html #LadaVesta How to remove door trim Lada Vesta Door trim (maps) are dismantled to repair the elements that are located under it (window lifters, locks), or to modify the car. For example, to install an additional Lada.online
How to remove the trim. VAZ 2114 – YouTube
Remove the front door trim. Group . How to remove the trim. VAZ 2114. Auto Repair and Not. I'm filming my latest videos with it.
How to remove and install the rear door trim of a VAZ 2114 – Repair 2114
How to remove and install the rear door trim of a VAZ 2114. Video on removing the rear door trim: . How to change the front door lock on a VAZ 2114.
How to disassemble the door of a VAZ 2114 and remove the trim? Do-it-yourself front and back – EASY
Since VAZ cars are very popular in our country, I often receive questions from motorists regarding maintenance. Especially from owners of 2114, 2115 and sometimes 2113! For some reason, young people choose these particular options. And often very often, owners are interested in the following question - how to disassemble a door or remove the trim? For example, install acoustics, repair a window regulator, or simply glue it to improve sound insulation. Since I also had a VAZ 2114, and also disassembled the front and rear doors, today I want to “throw out” a small instruction that will help you in this matter...
I will try to answer all the questions at once, that is, removing both the front and rear door trims. In fact, there is nothing complicated here, the main thing is to strictly follow all the instructions.
Recommendations
When the front right door trim requires dismantling, this procedure can be done with your own hands if you adhere to the clear algorithm described above and with basic caution. But today there are people who don’t even know which side of the door the trim is on. Especially for such citizens, there are car services and service stations, where all the necessary procedures will be performed efficiently, quickly and at a reasonable price. There are few such places and one of them is Uremont.com. So far, not a single car enthusiast has regretted visiting this site. Here everyone will receive high-quality car repair services.
Removing the rear trim
There is no point in repeating the main points; they are almost identical.
The handle is also disassembled and the plug and the upper locking “latch” are removed. But there are no shelves or speakers here.
There is also no power window, that is, there is no wiring that needs to be disconnected. But here there is a regular window handle, as people call it – “oars” or a “muscle power” drive. In order to disassemble it, you need to bend it slightly towards yourself with a screwdriver - pull out the lower locking ring. After which the handle will simply come off on its own.
We repeat the same procedure with the upholstery as on the front door , just gently pull. Remember about rivets.
What else I would like to note is that if you read the instructions, it recommends completely changing the rivets every time you remove the upholstery - they simply lose their characteristics, the antennae fall off, if my memory serves me correctly, there are 8 of them on each upholstery. This threatens to cause rattling on bumps and uneven roads.
Sheathing installation
You need to assemble the cladding along with the other parts in the same sequence as it was disassembled. After the fragment has completely dried, you must:
- Insert the column into the hole and mount it into the iron frame of the door.
- Connect the electronics.
- Secure the lining with clips to the card.
- Secure the handle with two bolts.
- Replace the plug.
If, before dismantling work begins, contamination is found inside the structure, it is cleaned out. At the same time, it’s worth checking the condition of the wires and tightening the window lift nuts to prevent the door from being disassembled in the near future.
Disassembling the front door
1) First, we need to remove the main handle with which the door closes. We press out the decorative trim with a screwdriver, but be careful not to damage it. Next, unscrew the bolts, there are two of them in total, and remove the handle.
2) Then we remove the decorative trim of the unlocking handle, you know that kind of black plastic, we also pick it up with a screwdriver and pull it out, there are two latches there, be careful.
3) Then you need to remove the lower shelf, in which the window lift buttons are installed, there are two or three bolts there. The shelf comes out together with the power window cable, disconnect them and remove them.
4) Next, as a rule, comes the speaker, it is fastened with 2 - 4 bolts, to be honest, I have seen only one. We unscrew, there are cross-shaped bolts from the factory. Let's remove it.
5) In the upper part, unscrew the locking “latch”; it simply unscrews like a bolt.
6) Everything is removed, now we need to detach the upholstery itself, this is a little more complicated. You can pull the corners, or you can pick it up with a screwdriver and pull it towards you - the main thing is not to break it, we carefully try to separate it. If some rivets are broken (and this will be 100%), don’t worry, we bought new ones
At this point the “analysis” is completed, as you can see, there is nothing complicated and it is also considered that the front part is complex. Let's watch the video.
READ How to remove the heater radiator on a VAZ 2112
Withdrawal procedure
As a rule, the front left door trim is secured with reliable fastening bolts. However, they are made of plastic. When dismantling, you can accidentally break the clips, so before doing anything, you need to make sure that you have spare parts on hand. You should take this especially seriously if the front left door trim is dismantled in cold weather. The fact is that plastic in such a situation becomes the most fragile.
Before starting work, you need to prepare two screwdrivers, namely a flathead and a Phillips.
In no case should we forget that the negative cable should be disconnected from the battery. When working, you need to keep the tools close to the bolts and holders, otherwise there is a risk that the front left door trim will be damaged. You also need to wrap the sacrum of the screwdriver with electrical tape. If this is not done, you may accidentally damage the paintwork on the top of the door. To complete the entire procedure correctly, you must strictly follow the algorithm:
- You need to unscrew all the screws that are located near the door handle. We must also not forget about the bolts that act as clamps for the window lifter module.
- Next, you need to dismantle the module responsible for raising the glass.
- You need to disconnect the wires connected to the power system. This must be done by removing the clamp.
- After all the wires are disconnected, you can begin to dismantle the handle trim holders.
- Then you should unscrew the fixing bolts and remove the upholstery. The front left door trim is secured with three screws located below. Unscrewing them is mandatory.
- The next step is to remove the special button responsible for locking the door.
- Next, remove the external finishing element, namely the cladding. The front left door trim must be carefully lifted using a flat-head screwdriver, after which you must carefully remove the plastic holders securing the body element.
When all procedures are completed without damaging parts, then the main part of the work can be considered done.
The procedure for removing and installing the front door trim on the VAZ 2114 and 2115
First, open the car door and use a Phillips screwdriver to unscrew the three screws securing the lower podium (pocket).
After this, carefully move it down and disconnect it from the upholstery body, as shown in the photo below.
We turn it over with the outer side facing us and see the plug for connecting to the power window control buttons.
Using a thin screwdriver or the sharp edge of a knife, press the latch through a special hole and pull the block, thereby disconnecting it.
The result of the work performed is shown below.
Now unscrew the screws securing the front speakers, if they are installed on your car.
We take it aside and disconnect the power wires.
Now use a screwdriver or hand force to pry up the inner lining of the door handle:
Having turned it almost 360 degrees, we remove it completely.
Now we need a sharp knife. With its help, we adjust the door handle, as shown in the photo below.
We take it out and unscrew the two fastening screws under it.
Then you can remove it, since it is not attached to anything else.
Now unscrew the top cap from the rod that locks the door and remove it:
Carefully, starting from the bottom corner, we begin to pry the door of the VAZ 2114-2115 , and carefully try to tear it off the clips on which it is attached to the base of the door. You should not make sudden movements, so as not to damage the mounting points.
Carefully moving the trim to the side along the entire perimeter, we remove it, having previously disengaged the door lock rod from above, I think that everyone understood what we were talking about.
Now you can begin the work that was planned, be it repairing power windows, replacing glass, locks, or just simply replacing the trim with a new one. Regarding the price of new upholstery, it is worth saying that a set of new ones will cost from 3,500 to 5,000 rubles, depending on the type and manufacturer. Installation occurs in reverse order.
Self-tapping door cards. VAZ 2114.
Hi all. I decided to put the door cards on self-tapping screws, I saw a couple of bulletin boards about it, and I did the same. I purchased the necessary things, namely: Gazelle air intake pistons 3302-5301245; Pistons for fastening the trunk trim 21080-5402270/71; Self-tapping screws 4.9x38.1 with cylindrical heads.
Then you need to drill holes for the pistons, they are 13 mm, but I drilled with a 10-m drill and flared them. Some of the fasteners for the Christmas trees fell off, so as not to make extra holes, I soldered them back, this is done easily, usually with the help of a lighter.
We just take it, burn the plastic on the mount until it lights up a little, which means it’s melted enough, and then we press the mount into place, that’s all. )
Now some tips.
The mother pins of the trunk fastenings (they will be inserted into the holes in the door, and the screws will be screwed into them) must be wrapped with one (or one and a half maximum) layer of electrical tape, otherwise they will scroll a little in the hole and will not allow the screw to be tightened. Well, that’s basically all, the main thing is that the holes drilled in the card coincide as much as possible with those holes in the door, it will be much easier to screw in.
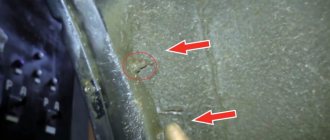
When I removed the handle from the rear right passenger door, I discovered that there was some trouble with the rod.
I decided to buy a plastic one. I visited all the big and several small shops in the city and found nothing. One suggested buying a assembled viburnum handle and removing the plastic from there. I decided to check if it was available on the market and if not. go to disassembly. ) In general, I was lucky. For the Smolenskys, who need some small cartoons that are not available anywhere, try to look there, the Kolkhoz Market, pavilions, what is left of the car market, pavilion No. 94, there is such a strange old man there, but he has a lot of all kinds of small things.
crimea storm rent a one-room apartment
The only negative is that the handle is not yet brought all the way back when opening, I think that the plastic has not yet developed or something else is in the way, we will see over time, if everything is not ok, I will remove the card and have a look. That's all for today. Until we meet again, beaver everyone! )
Source
Removing the rear trim
There is no point in repeating the main points; they are almost identical.
The handle is also disassembled and the plug and the upper locking “latch” are removed. But there are no shelves or speakers here.
There is also no power window, that is, there is no wiring that needs to be disconnected. But here there is a regular window handle, as people call it – “oars” or a “muscle power” drive. In order to disassemble it, you need to bend it slightly towards yourself with a screwdriver - pull out the lower locking ring. After which the handle will simply come off on its own.
We repeat the same procedure with the upholstery as on the front door, just gently pull. Remember about rivets.
What else I would like to note is that if you read the instructions, it recommends completely changing the rivets every time you remove the upholstery - they simply lose their characteristics, the antennae fall off, if my memory serves me correctly, there are 8 of them on each upholstery. This threatens to cause rattling on bumps and uneven roads.
A little advice from me
Guys, if they were just disassembling it about repairing a window regulator or installing speakers. My advice to you is that you can improve the design a little, namely, reduce its airflow. I advise you to read this article.
If you are not ready for such insulation, then you should apply ordinary thick cellophane to the metal, 0.3 mm is enough. We directly cut out the door according to the stencil and glue it to the metal (you can use double tape), after making holes for the handles and bolts. I have seen this on many foreign cars, they have it as a must!
What does this give us:
1) The door will not blow out as quickly during the cold period, which will give us a little more heat. The interior will warm up faster.
2) There will still be fewer crickets, because this layer will not allow plastic and metal to interact directly.
Personally tested on my former VAZ 2114, the interior is really warmer in winter.
I’ll finish here, I think it was useful for you, read our AUTOBLOG.
( 3 votes, average: 4.33 out of 5)
Source: avto-blogger.ru
About the tool
What we need are screwdrivers, preferably one Phillips and the other straight. Also buy “pistons” for trim, they are universal and suitable for the entire VAZ family. Many people also call them “Christmas trees.”
They cost pennies, but they break when disassembled. Therefore, it is advisable to have them, otherwise the door will rattle. We won't need anything more.
Sources:
https://avtorazbor59.ru/stati/kak-snyat-obshivku-dveri-vaz-2115.html https://sarterminal.ru/remont-avto/kak-snyat-obshivku-dveri-na-vaz-2114-i -2115.html
Stage 3. Pouring resin
Now begins the most interesting and tedious task
It is best to use small disposable containers for mixing the resin; I used the proportions for 100g of resin: 1g of hardener
It is best to use plastic cups for beer, they have thick plastic, which is what we need. When the resin reacts with the hardener, it generates heat that can melt our container.
!Attention! Use resin only in well-ventilated areas, wear a respirator and gloves.
I usually spray the outside twice with drying intervals of 2-3 hours.
Now we pick up a grinder or any other tool for cutting our cards.
Here you can clearly see the bars for rigidity
We cut out the entire inside of our cards, leaving space for the clips.