The VAZ-2115 vehicle is considered a Russian car. The bumpers of such cars are usually made of plastic, and their color does not differ from the color of the vehicle itself. Since this body element has a very low location, it is subject to various loads in the form of clinging to the curb and so on. Because of this, the developers have created a design that makes it easy to replace it yourself at home. This article will tell you how to remove the rear bumper on a VAZ-2115 yourself.
During the operation of the vehicle, the bumper of the car may be damaged by stones flying off the wheels, roadsides, curbs and other troubles. This happens especially often in winter, when car skidding is not excluded. Some troubles can easily be eliminated on the spot without removing the rear bumper, but a number of moments arise when replacing it is simply inevitable.
When purchasing a domestic car, the advantage is the availability of all necessary materials, and there will be no problems with a new bumper. Almost all auto stores sell rear bumpers for the VAZ-2115. The average cost of a bumper ranges from 2.8-3.0 thousand Russian rubles. This pricing policy is available for parts that subsequently require painting, but if a car enthusiast wants to purchase an already painted spare part, then the price of such a bumper starts from 3.5 thousand rubles and above. The cheapest bumpers for this car are made in black. If we are talking about an improved and new bumper model intended for styling, then such an unpainted part starts at 4 thousand rubles. And if the work is done in the author’s style according to an individual order, then its cost is significantly higher.
Let's consider a number of points in which drivers are forced to replace or remove the rear bumper of a VAZ-2115 car:
- planning vehicle styling, in which old parts are thrown away and new ones, of a more modern type and pattern, are installed;
- painting the vehicle, including the bumper;
- in case of bumper breakage, scratches or other damage;
- when repairing parts located behind the bumper.
In practice, two types of bumpers are applicable:
- black shade;
- in the color of the car, while the driver independently selects the shade in which the part will be painted.
An unpainted bumper is purchased only when a complete, rather than partial, color change of the car is planned.
What you need to know when buying a new rear bumper for a VAZ-2115:
- The plastic from which the bumper is made must have good elasticity. Otherwise, when purchasing a part made from recycled materials, you run the risk of soon going to the store for a new bumper.
- Please pay attention to all sizes. It is important that the part fits your car as closely as possible. It is not advisable to buy a bumper for a VAZ-2115 from another vehicle, since in the end a couple of centimeters of deviation from the dimensions may prevent you from installing a new element.
- The bumper is supported by the amplifier, so it is recommended to check its quality. Otherwise, the new bumper may simply not be installed on the damaged amplifier.
- Check the new bumper for any openings so you don’t have to drill them yourself later.
- Inspect the external characteristics of the selected item, since during transportation chips, abrasions and blistering of the paint could have formed, which in the future will quickly spoil the appearance of the spare part and the car as a whole.
- Try to purchase a rear bumper for a VAZ-2115, which contains additional internal reinforcement.
How to remove the rear bumper on a VAZ-2115: step-by-step instructions
Removing the rear bumper of the VAZ-2115 is quite simple without the presence of an inspection ditch. To do this, you will need a 13mm socket, a jack, a wheel wrench, and a wooden stand for the rear wheel hub in the amount of 2 pieces. If there is dirt or rust on the nuts, a metal brush will come in handy. Let's look at the step-by-step instructions for removing the rear bumper:
- Remove the rear wheels of the car, installing wheel chocks in front, and place both rear axle hubs on stands.
- Remove the protection from the wheel arches and unscrew the screws. Do this on both sides of the machine.
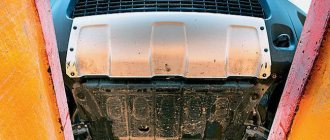
- From the bottom of the arch, unscrew the 4 studs with nuts, having previously treated them with VD-40 lubricant and brushed them over the metal. Remove the plastic cover.
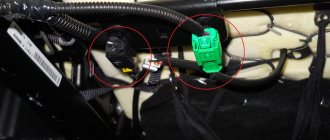
- Unscrew the nuts located under the canopy connecting the amplifier to other elements of the machine.
- Carefully remove the bumper, removing the pins of the side fastenings.
In this way, the rear bumper is removed along with the amplifier. To remove just the bumper, you will need to remove additional mounting screws under the car that connect the booster to the bumper.
10.12.2020
Many car owners consider the bumper to be a consumable item - the element is easy to damage, but replacing it with a new one is not difficult. However, the procedure must be carried out carefully, since the part is made of thin plastic and can crack, especially after repair. If you don’t want to contact a car service center, you can remove the rear bumper on the VAZ-2115 yourself and put it back or install a new one.
Removal stages
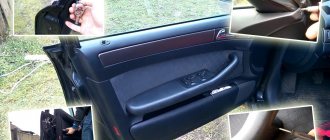
To carry out dismantling, you do not need to resort to the services of specialized lifts. Ordinary jacks can easily cope with the assigned task. Removal of the rear bumper of the VAZ-2114 begins by placing the car on a flat surface. Then you should support the front wheels with stops and raise the rear part of the body with jacks.
The next item is removing the wheels. This opens up access to the fender liners, which will also need to be removed. This is also a good opportunity to clean out the dirt that has accumulated there. Therefore, it will not be superfluous to additionally stock up on a brush.
After this, you can begin to directly dismantle the spare part itself.
- Removing the 2 linings that secure the spare part (a 10 mm wrench is required).
With regard to the first point, it becomes clear why it was necessary to remove the fender liners - the nuts securing the linings are located in the wheel arch, and it will not be possible to get to them without removing them. Do not forget to lubricate all fixing elements.
Upon completion of the dismantling work, you will have a bumper in your hands with an amplifier screwed to it. If desired, these two elements can also be separated, since they are held on by ordinary screws.
Important! Do not rush to throw away the reinforcing beam if there are no signs of damage on it; perhaps in your situation, repairing the device will be preferable to replacing it.
How to remove the rear bumper on a VAZ-2114, 2115
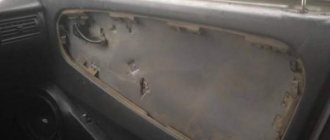
First you need to dismantle the fender liners. They are usually attached to self-tapping screws that need to be unscrewed with a screwdriver.
Removal occurs in several stages:
- Unscrew the 2 nuts (key “10”) securing the left cover.
Left pad fastening nuts
Attention! On Lada-2114 and 2115 cars, dismantling is identical, but on the sedan, in addition to all the steps, it is necessary to disconnect the license plate illumination terminals so that they are not damaged.
- Unscrew the screws on the left trim.
Left trim screws
- Dismantle it, first removing the studs.
Remove the left trim
- Removing the right one occurs in the same way.
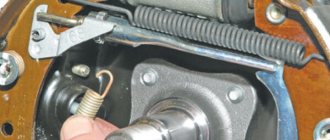
- See which beam is installed. If it is made of metal (reinforced), you need to unscrew 3 nuts with a socket head “10”; on a plastic one, remove 2 screws that secure the product to the body, and 2 that hold the license plate.
Attaching the bumper to the body
- Carefully dismantle the part without damaging it.
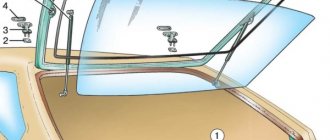
Rear bumper parts
The bumper is removed together with the beam to install a new spare part. If the amplifier is made of plastic, you need to unscrew 6 screws and remove it, then on each side, using a socket head set to “13”, unscrew 3 nuts to remove the brackets. On a metal beam, the brackets are secured only with nuts.
Damage analysis
Regardless of whether the rear protective element is damaged in an external emergency, it is important to inspect the element for internal damage. Analysis of the damage will allow you to quickly find out whether problems will arise with the further operation of the car.
An inexperienced motorist may think that a small dent has appeared on a plastic element, then there is no reason to worry, but this is not always the case. Minor damage leads to the appearance of rust on metal automotive elements.
Putty and painting will help disguise minor damage and cracks. If the damage is more significant, then it is more cost-effective to replace the rear bumper.
Reinstalling the rear bumper
Regardless of whether the product is being replaced with a new one or an old one is being installed, it must be adjusted. Vertically, this is done by screwing it into the fasteners, then the gap from the lights is reduced. Horizontal adjustment is made by changing the number of shims.
Attention! Before you begin installation on the “tag”, you need to install the terminals for the license plate illumination. There is a fine for driving without illuminated license plates.
The installation itself is carried out in the reverse order of removal.
Welcome! The rear bumper is one of the main things that is the very first to be hit when any passenger car hits from behind, so the bumper as such is a consumable item in almost any accident, because basically it’s always only the bumpers that suffer, but not many people know how to replace them . Today we have prepared an article especially for you that will describe in detail the process of replacing the rear bumper on cars of the Samara family.
Note! To replace the rear bumper, you will need to stock up on: A basic set of wrenches, and also need a screwdriver to unscrew the bumper covers and license plate if you have one (Applies only to the VAZ 2115 car), and also take a rag with you to wipe completely bumper and work with clean (At your discretion)!
Summary:
How to attach the bumper? On Samara 2, the bumper seems to be installed on the same cars, but in fact it can be mounted completely differently on the same cars, the whole point is that there are two types of protection with which the rear bumpers are installed on the car , let's look at it in more detail:
The first type of protection is the rear bumper with a plastic beam, it is secured with two bolts at the end of which there are nuts.
The second type of protection is a rear bumper with a reinforced metal beam, its fastening is almost the same as that of the first type of protection, namely, it is attached to the sides of the car body using three fastening bolts.
Downloading a book
After successfully completing the payment (by any method) and returning to the KrutilVertel store from the payment system website, you will be taken to the successful payment page:
On this page you need to indicate your e-mail, where access to download the book will be sent.
If you are already registered on our website, then simply follow the link to your personal account.
The book you purchased will be in your personal account, from where you can always download it.
Please note that after making the payment, you need to return back from the payment system website to the KrutilVertel website.
If for some reason you did not return back to the site and closed the payment system tab with a message about the successful completion of the payment, please let us know - we will send you a letter indicating access to download the book.
How to replace the rear bumper on a VAZ 2113-VAZ 2115?
Note! Before you begin removal, be sure to remove the fender liners from the car! (For information on how to remove them, see the article entitled: “Replacing wheel arch liners on a VAZ”)
Removal: 1) First, be sure to disconnect the wires from the light that illuminates the car’s license plate, and after disconnecting the light, unscrew the screws that secure the license plate and remove it from the car’s bumper.
2) Next, using a wrench, unscrew the two nuts that secure the bumper trim to the car body. (These fastening nuts are located in the wheel arch, so after removing the wheel arch liner, look there and unscrew these nuts)
Note! There are three fastening bolts on a bumper with a metal reinforced beam, so unscrew all of them and then remove the rear bumper from the car!
3) Now, putting the wrench aside, take a screwdriver in your hands and use it to unscrew several screws that secure the same trim to the rear bumper.
4) After all this, carefully remove the trim from the side of the car bumper, but after this trim is removed from one side part, move to the other side and remove the same trim there in the same way.
5) Then pull the bumper to the rear and thereby completely remove it from the car.
Note! When the rear bumper is removed from the car, it will be removed together with the beam, because it comes assembled with it, so if you want to disconnect this beam and install it on the old bumper, then take a wrench in your hands and unscrew all the nuts that attach the beam to the car bumper!
Installation: Installing a new bumper on the rear of the car occurs in the reverse order of removal.
Note! When you install the bumper, be careful not to damage it, otherwise you will have to either change it, paint it, or leave everything as is!
Additional video clip: You can find out more about how to change the bumper on the rear of the car in the video clip located just below:
Home / Catalog / Lada / Lada / VAZ 2113 / VAZ 2114 / VAZ 2115 with 1.5i liter and 1.6i liter engines, repair book in color photos in electronic form / ...Show book contents
Content
Introduction
Emergency procedures
- Wheel replacement
- Actions in case of engine overheating
- Starting the engine from an additional power source
- Circuit breakers
- Emergency pressure drop in the engine lubrication system
- Turning on the low battery indicator
- Turning on the engine system malfunction indicator
- Turn on the brake warning light/parking brake warning light
Daily checks and troubleshooting
Operating a car in winter
A trip to the service station
Operation and Maintenance Instructions
- Technical information
- Controls, instrument panel and interior equipment
- Car care
- Vehicle maintenance
- Fuels and lubricants
Warnings and safety rules when working on a vehicle
Basic tools, measuring instruments and methods of working with them
- Basic set of necessary tools
- Methods of working with measuring instruments
Engine and its systems
- General information
- Servicing the engine without removing it from the car
- Engine disassembly and assembly
- Ignition and engine control system
- Supply system
- Lubrication system
- Cooling system
- Intake and exhaust system
- Chapter Appendix
Transmission
- General information
- Clutch
- Transmission
- Drive shafts
- Chapter Appendix
Chassis
- General information
- Front suspension
- Rear suspension
Steering
- General information
- Steering wheel
- Steering gear
- Steering rods
Brake system
- General information
- Car service
- Front wheel brakes
- Rear wheel brakes
- Parking brake
Body
- General information
- Front bumper
- Rear bumper
- Hood
- Front door
- Rear door (VAZ 2114/2115)
- Body dimensions
Gas equipment
Car electrical equipment
- General information
- Generator
- Starter
- Egnition lock
- Replacing steering column switches
- Replacing the power window switch
- Outdoor lighting devices
Fault codes
- Controller JANUARY-4
- GM Controller (IFSI-2S, ITMS-6F)
- OBDII protocol controllers
Electrical circuits
Dictionary
Useful tips for car owners
How to pay and download
Problems when paying with bank cards
Sometimes difficulties may arise when paying with Visa/MasterCard bank cards. The most common of them:
- There is a restriction on the card for paying for online purchases
- A plastic card is not intended for making payments online.
- The plastic card is not activated for making payments online.
- There are not enough funds on the plastic card.
In order to solve these problems, you need to call or write to the technical support of the bank where you are served. Bank specialists will help you resolve them and make payments.
That's basically it. The entire process of paying for a book in PDF format on car repair on our website takes 1-2 minutes.
Source
Rear bumper
1. Using a Phillips screwdriver, unscrew the screws (self-tapping screws) securing the fender liner to the rear bumper (on each side).
2. Disconnect the fender liner from the bumper.
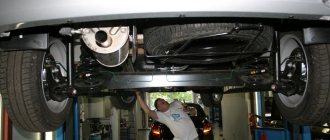
3. From the bottom of the car, using a 10 mm socket wrench and an extension, unscrew the two side nuts securing the rear bumper (on each side).
4. Then slightly pull the left and right sides of the bumper to remove the mounting studs from the holes in the bumper brackets.
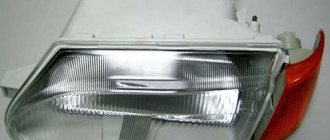
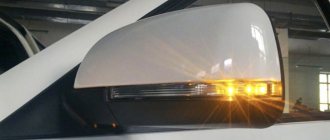
5. Then remove the rear combination lights.
6. Remove the rear license plate of the car.
7. After this, unscrew three more bolts securing the central part of the rear bumper, while holding the nuts from the inside with a second spanner from turning.
8. After we have unscrewed all the fastening nuts/bolts, we pull off the rear bumper and carefully pull it towards ourselves.
9. Use a Phillips screwdriver to unscrew the fastening screws and then remove the license plate lamps.
10. Then we finally remove the bumper from the car.
Note:
In order not to damage the paintwork of the rear bumper, immediately after removal, place it on a soft surface (for example, on a blanket).
11. When replacing the rear bumper, we reinstall the side brackets from the old bumper to the new one.
12. Install the rear bumper on the car in the reverse order.
Note
: When installing, pay attention to the fact that the holes on the side bumper mounting brackets have the shape of slots, which allow you to adjust the gap between the bumper and the fender.
What tools are needed?
To dismantle the bumper and further attach a new element to the body of the VAZ-2115, you need to prepare simple tools that should be in the arsenal of every car enthusiast. To replace a rear car bumper you will need the following equipment:
- Two jacks;
- Phillips screwdriver (you can use a screwdriver with a Phillips head);
- Wheel supports;
- 10, 13 and 15 mm wrenches (open-end and box-end wrenches are suitable);
- Lubricant (solid oil or something similar) or aerosol.
A motorist may also need a simple clean brush (a toothbrush or a small shoe brush), since during the process of disassembling the protective element, one can simultaneously clean the car parts from accumulated dirt.