Hi all.
Last fall I noticed drops of oil in cylinder 4 and leaks around the entire perimeter of the valve cover.
I've been through the winter and it's time to fix the problem. I change everything together as usual. What we need:
1) Anaerobic sealant “Locktite” 20 ml - 150 rubles 2) Camshaft oil seal BRT (cat. number 21080-1005034-00) 2 pieces - 240 rubles per pair 3) Camshaft plugs 2 pieces (cat. number 21120-1003290- 00) - 100r pair 4) Crankcase ventilation pipes for engine 21126 (21126-1014240-00 (E-gas) - thin long, 21124-1014058-00 upper small, 21120-1014056-00) lower large - 3 pieces - 250r set 5) Filter “Knecht” KL23of - 150r 6) Carburetor cleaner - 150r 7) Intake manifold and throttle gaskets - 150r BRT set Oil dipstick seal (cat number 21120-1009078-00) - 30r 9) Torque wrench
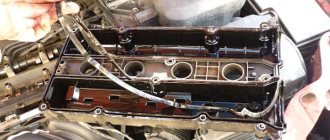
I don’t see any point in describing the entire process of disassembling the valve cover. There are plenty of manuals, I’ll only focus on the moments that cause difficulties
Remove the decorative cover
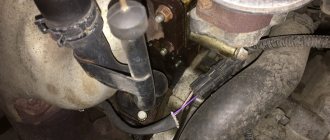
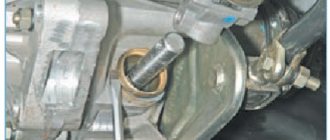
We remove all wires, ventilation hoses, and throttle. The receiver is secured with 2 bolts and 3 nuts. The nuts with the left bolt unscrew easily, you can crawl up. But there is a problem with the right bolt; the generator does not work.
I have a car with air conditioning, the pipes are in the way. There are two bolts near the gene; we remove them (the bolts are visible in the photo). When you remove the intake manifold, you need to bend the tubes, don’t be afraid to bend them, there are rubber inserts there. We remove the generator belt, unscrew the top fastening and carefully move the gene towards the radiator with a pry bar.
Hatchbacks of the 2112 family were produced with different 16-valve engines - 21124 and 21120. Before removing the valve cover, on the VAZ-2112 you will need to disassemble the intake module mount, as well as remove all the brackets attached to the top of the cover. The high-voltage wires are also disconnected, and the ignition module is removed from the 21120 engine. Let's look at all the steps in more detail.
Why is a gasket between the cylinder head and the valve cover needed?
The valve cover is necessary to protect the cylinder head mechanism from dust and dirt; the seal also performs other functions:
- Provides tight installation of the cover to the cylinder head flange;
- Seals the volume that the lid closes and prevents oil leakage.
The part is not critical for the operation of the internal combustion engine - the engine will work quite normally without it. But it serves to clean the power unit, increases fire safety, and improves the ease of maintenance of the motor. In addition, the sealant makes a significant contribution to maintaining the technical characteristics and purity of motor oils.
In the modern automobile market, there are many engine models with different cylinder heads. However, all internal combustion engine gaskets are designed in fundamentally the same way. This is a flat-shaped sealing element that follows the shape of the plane of contact with the cylinder head.
Requirements
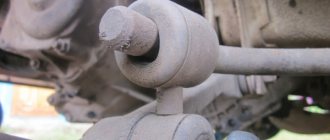
Lada Priora Sedan Snezhka Logbook Replacing the support bearing
When choosing a high-quality sealant intended for engine repair, valve cover connection and oil pan installation, you should pay attention to its performance characteristics and capabilities. It is in this category of sealing agents that one of the key factors is considered to be performance under conditions of high temperature loads
The greater the thermal load the composition can withstand, the better.
It is in this category of sealing agents that one of the key factors is considered to be performance under conditions of high temperature loads. The greater the thermal load the composition can withstand, the better.
There is also another important factor. It consists in resistance to the effects of various aggressive components. These include brake fluid, solvents, motor oil, gearbox lubricants, antifreeze, etc.
The third requirement is resistance to mechanical loads and vibrations that occur, which are integral companions of any internal combustion engine during its operation, even on the most ideal roads. If the composition does not have such properties, after a short period of time the active process of destruction of the frozen sealing layer will begin. We present to your attention the 1xSlots promo code for 100 free spins for registration. Here you will find more than 90 providers, live dealers, regular tournaments and a convenient status system for players. 1xSlots promotional code upon registration Gives a bonus on the first deposit in the form of free spins to new players.. Registration at the casino (BONUSES)! Each gaming club strives to take care of its client in the form of monetary rewards of various kinds. Users of 1xSlots casino experience the pleasant and friendly atmosphere of this gaming club.
The last but not least important requirement is ease of use. Here you need to use the appropriate type of packaging. The motorist should not have any problems applying the composition to the surface of the valve cover or the same internal combustion engine crankcase.
When to replace
This gasket must be replaced immediately after a leak is detected. If you do not replace it on time, then soon the entire surface of the engine, as well as all units near the internal combustion engine, will be covered in oil.
Then dust and dirt will certainly stick to the oily elements. Dust not only significantly spoils the appearance of the engine, because the valve cover is the first thing that catches your eye. A layer of oil and dust on the surface of the internal combustion engine greatly worsens heat exchange processes - the engine temperature will rise.
During operation of the engine with a leaking valve cover, oil will inevitably get to the sensors and other electronic devices - the sensors may fail. If the leak is quite severe, the oil level will quickly drop - driving without oil leads to very sad consequences.
This is interesting: Symptoms and signs of crankshaft sensor malfunctions and checking it
Most often, the cover is changed in the following cases:
- Engine overhaul;
- Determination of oil leaks at the seal installation site;
- Cylinder head repair, timing belt repair, unit maintenance.
The frequency of replacement differs on different car models - it all depends on the gasket material. Original products are of higher quality, non-original and cheaper ones are most often a low-quality copy from the Middle Kingdom.
The service life of the gasket depends entirely on the quality of the product and the material. The average price of an element is small, so everyone tries to buy something inexpensive, because the element is insignificant. Many people do the same. As a result, oil leaks under the hood. There is no need to do this.
Among the reasons for replacing the valve cover gasket, the first thing to highlight is the low quality of consumables for the car. It happens that you buy a product at an average price, but after a few days of intensive use of the car, the leak appears again.
When choosing, you should carefully examine the surface of the gasket and its materials; it is important to make sure that the part is elastic. Hard gaskets will not provide the required tightness, and gaskets that are too soft will certainly be pressed through during installation.
Another popular reason that leads to replacement is improper installation. The gasket is destroyed during its installation.
Packaging Features
Foreign manufacturers often use plastic or aluminum tubes as packaging for medications. The tubes are equipped with a dispenser cap and are filled with 40 or 90 grams.
- Products with a dispenser are convenient to apply;
- the product does not dry out after opening the tube;
- Excess from the dispenser is easily removed with a match.
Russian drugs are usually offered in aluminum tubes with a plastic cap.
Professional sealants require the use of a special gun; without it it is impossible to apply the product.
It is recommended to purchase large-volume tubes for frequent repairs - for car service specialists
, For example. For one car, it is more practical to take a small volume, although it is somewhat more expensive, it will not have time to dry out until the shelf life expires.
Foreign manufacturers are trying to more often use tubes made of plastic or aluminum. These tubes are offered with a dispenser cap, which has valuable advantages:
- convenient application to the surface;
- protects the product from drying out after opening the tube;
- Excessive amount squeezed out from the dispenser can be removed with a match.
The volume is 40–90 grams.
Russian manufacturers usually use aluminum tubes complemented by a plastic cap.
Professional sealants require the use of a special gun. Otherwise, application of the product will no longer be possible. In this case, the volume of tubes may be larger, since the product is used more often than in other situations.
Preparing for work
The valve cover gasket can be replaced in any convenient place - in an open area or in a garage. There is no need to drain engine lubricant or antifreeze. What tools will be needed for disassembly:
- a head with an extension and a knob, suitable in size to the cover mounting bolts;
- flathead and Phillips head screwdrivers;
- pliers;
- rags.
Work is carried out with the power unit cooled down to a comfortable temperature. If you don’t have time to wait for the engine to cool down, perform disassembly wearing cloth gloves that protect your hands from burns.
Before replacing, prepare the following consumables:
- a new gasket element selected according to the car model;
- O-rings for bolts (installed on certain brands of cars);
- high temperature sealant and degreaser such as white spirit.
The use of sealants to treat the seal before installation is not necessary. For example, on engines of classic VAZ 2101–07 models, the gasket does not require additional sealing. On 16-valve engines with a wider flange, the use of sealant is desirable, but not required.
Advice. Take your time to buy and change a gasket that leaks a little oil at one point. First, check and tighten the threaded connections - perhaps the seal has sagged and the bolts have become loose. If the operation does not help and drips still appear, the gasket element will have to be replaced with a new one.
Let's move on to the cylinder block
We remove the pallet. Rotating the crankshaft as it is convenient for us, unscrew two bolts on each connecting rod cap. We use a TORX E10 head for this.
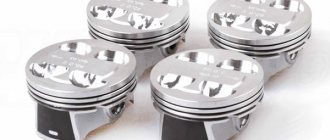
We take out the pistons along with the connecting rods. To do this, use the wooden handle of a hammer to press the connecting rod from below and lightly tap it to knock it up. We remove the old liners and buy new ones of the same size according to the markings on them. Here is another stone in AvtoVAZ’s garden, the owner has never climbed into the car from the interior or into the engine, but three pistons were of group “B” and one was “C”. It turns out that at the factory they re-sharpened one cylinder a little and simply put an enlarged piston there, no words. There are no options, we take group “C”, don’t sharpen the engine because of this. We will not touch the main liners either.
We buy a new piston group that does not bend the valves, connecting rods and connecting rod bearings.
Eliminating longitudinal play of the crankshaft
It was noticed on this motor. To eliminate it, replace the thrust half-rings. Standard and repair sizes are available. We take the first repair size, if they are too tight we sand them down a little. We unscrew the middle main bearing and gently push it with a screwdriver and move the half rings. The mark on it is in the form of three serifs, shown below.
When the half ring comes out a little, turn the crankshaft, it will push it out. There are two types of half rings: white at the front and yellow at the rear; the grooves on them should point towards the crankshaft cheeks.
We install them as we removed the new half rings; if they go in with great effort, you can grind them a little on a small abrasive stone, but not from the side of the grooves. Checking the play. We tighten the main bearing with a torque of 8 kgf*m.
Assembling the piston
There is an arrow stamped on the top of the piston; it should be directed towards the front of the engine. And there are marks on the connecting rod that should look the same way. Don't get confused!
We insert one retaining ring into the groove on the piston. We insert the connecting rod into the piston and, having lubricated the connecting rod and the piston pin with oil, insert it into place. Insert the second retaining ring. Although this operation seems simple, it will take some pains. We inspect the assembled structure; all retaining rings must be clearly in their grooves, otherwise a ring that has jumped out while the engine is running can cause a lot of trouble.
After assembly, you need to break off the connecting rod bearing cap, since the connecting rod is made in one piece. It's like that on our cars. First, unscrew the bolts. We insert the connecting rod into the cleats at the level of the mark shown in the figure with the black arrow and lightly clamp it, then break it off with a slight movement of the hand. The first time is very scary. We put the cover in place and tighten the bolts so as not to mix it up in the future.
Do-it-yourself replacement of the internal combustion engine valve cover gasket
If we don’t talk about a specific car model, the gasket is changed as follows.
First of all, I disconnect all the hoses and pipes that are connected directly to the valve cover. Next, I unscrew the gas pedal drive cable. Then I unscrew the bolts and remove the cover. Then I remove the old gasket.
Note: How to check the pressure in a car's air conditioner yourself
In order for the sealing element to work effectively and to avoid leaks in the future, it is important to thoroughly clean the surfaces of oil. You also need to thoroughly degrease both surfaces - both the cover and the cylinder head. Gasoline or carburetor cleaning fluid is suitable for degreasing.
Next, you can install the cylinder head cover and tighten the bolts. Here it is better to use a torque wrench - it is important not to overtighten.
Cleaning SVKG in Lada Priora
After prolonged use, gas deposits accumulate in the crankcase ventilation system. This deposit makes it difficult for gases to pass into the cylinders. As a result, the gas pressure in the engine increases, which leads to oil leakage. Timely cleaning of the SVKG will help prevent this. The manufacturer of Lada Priora recommends carrying out this procedure after every 60 thousand kilometers. This service manipulation can be performed in a car workshop or independently.
To do this, you need to have tools (narrow pliers, 8mm nut wrench, Phillips screwdriver).
When cleaning the SVKG yourself, you need to perform the following steps:
- Remove the decorative engine cover.
- Remove the air filter.
- Carefully loosen the clamp on the ventilation hose clamp on the engine.
- Remove the crankcase ventilation hose (CVH) from the air supply sleeve.
- Loosen the clamp on the air supply sleeve.
- Disconnect the air vent hose from the throttle assembly.
- We loosen the clamp of the clamp and disconnect the ShVK of the large branch from the cylinder head cover (cylinder head).
- Using the same actions, we remove the small branch shvk, disconnecting it from the cylinder head cover and the throttle fittings.
- Loosen the clamp of the inlet ShVK clamp.
- We remove the supply ventilation hose and remove it from the cylinder head cover.
- Disconnect the supply ventilation hose from the cylinder head pipe.
- We wash all the hoses with gasoline, blow them out and dry them with a hairdryer. We also clean and dry all pipes and hose connections.
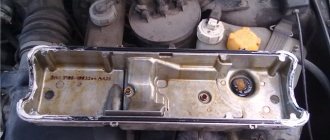
- Unscrew the cylinder head cover.
- We remove the separator by tightening its fastening in the form of 6 bolts, which are located inside the cylinder head cover.
- Using pliers, squeeze the oil deflector clamps and pull it out.
- Using a screwdriver, pull out the ring-shaped rubber seal. If it has lost its shape, then replace it with a new one.
- We clean the cylinder head cover and all mating surfaces from the sealant and degrease it with gasoline. Before installing the cylinder head cover, apply new sealant.
- We assemble the SVKG in reverse order.
This will lead to the release of toxic substances into the environment and disruption of the crankcase.
Removing the valve covers on engine 21124 (16v 1.6)
Remove the filter box and decorative trim (see Chapter 1). Next, remove the ignition coils: disconnect the plugs and use a “10” key to unscrew the fastening screws.
Customized ignition coils
What to do with the damper drive cable: remove the rubber holder from the bracket, cut the plastic clamp.
The throttle cable needs to be released
Now remove the throttle assembly according to the instructions from the previous chapter.
How to remove a plastic intake module
A wiring harness is attached to the front of the intake module. The cables go to the DPKV, DPRV (DF) sensors and to the adsorber valve. All connectors must be disconnected, then the wiring harness is removed.
The photo shows how the brake system hose is disconnected, as well as the crankcase ventilation hose. It is also necessary to remove the oil dipstick and tube by unscrewing screw 1.
Plastic part attachment points:
- Key “10” : two nuts 1;
- Key “13” : three nuts 2, two bolts 3.
All elements are shown in the photo.
Dismantling, basic operation
Using a 10mm wrench, unscrew the bolts on the brackets: one of them secures the injector cables, the second secures the throttle assembly wires.
Two “extra” brackets
Both brackets are removed. Using an “8” socket wrench, unscrew the 14 or 15 screws on the cover. This completes the dismantling, but the cover can be held in place with sealant.
Final action
During installation, the sealant is applied to the lower edge of the part. And the recommended screw tightening torque is 2.0-4.6 N*m.
Mistakes that novice mechanics make
Errors in installing the gasket are another reason for replacement. As mentioned above, during the replacement process it is necessary to thoroughly clean the contact planes. If this is not done, the seal will soon leak and will have to be replaced.
Novice mechanics often rush and forget about this point.
Another common mistake is neglecting the torque wrench. The fasteners are tightened sufficiently. In this case, the sealing element is pinched, squeezed out, and there can be no talk of any kind of sealing.
Also, due to improper tightening, the seal is pressed unevenly onto the planes.
Why are guide bushings needed?
Before installing the cylinder head, perform the following steps: clean the threaded holes, as well as all holes for the bushings (photo 1). Each bushing is installed in place, and only then a gasket is placed on top.
Metal parts adjacent to the gasket must be degreased. We looked at the cylinder head tightening diagram, but the cylinder head itself must be installed correctly:
- We place the cylinder head on the cylinder block;
- By moving the part in different directions, we ensure that the bushings fit into the recesses.
After “step 2” the screws can be tightened.
Sealant
No sealing compounds are used when installing the gasket! Solidol, CIATIM and other lubricants are not even needed. The main thing is that the metal must be degreased. And the cylinder head gasket must be new.
Cylinder head cover and tightening order of its bolts
The metal cover installed on the cylinder head must not allow air to pass through. At points of contact with other parts, tightness must also be maintained. Therefore, sealant is applied to the edge of the lid. An example is shown in the photo.
Here you need to use materials: Loctite-574, ANACROL, etc. The screws on the cover are tightened with an “8” key.
Recommended screw tightening torque
The recommended screw tightening torque is only 3-4 N*m. Don't be surprised: the sealant will do its job. You just need to let it dry after putting the cover in place.
You can unscrew the screws in any order. Their number is 15 or 14. When installing, it is better to follow the sequence shown below.
There is usually no need to replace the screws - the load is too small. We wish you success.
Common Misconceptions
If the bolts are pulled out too much, they are tightened in four steps. At “step 2” the tightening torque will be 70-85 N*m. All of these are common misconceptions that do not apply to 16-valve internal combustion engines.
All steps in one video: replacing the cylinder head gasket
If you find an error, please select a piece of text and press Ctrl+Enter.
We recommend reading:
Privacy Overview
This website uses cookies to improve your experience while you navigate through the website. Out of these cookies, the cookies that are categorized as necessary are stored on your browser as they are as essential for the working of basic functionalities of the website. We also use third-party cookies that help us analyze and understand how you use this website. These cookies will be stored in your browser only with your consent. You also have the option to opt-out of these cookies. But opting out of some of these cookies may have an effect on your browsing experience.
Necessary cookies are absolutely essential for the website to function properly. This category only includes cookies that ensures basic functionalities and security features of the website. These cookies do not store any personal information.
Cylinder head repair
We mark all hydraulic compensators with numbers using an ordinary clerical touch and put them away. An ordinary magnet will help you pull them out. We dry out the valves and remove the oil seals (valve seals), the valves into scrap metal, the oil seals into the trash. We clean all channels. We take the head for grinding, just in case. After washing it again with kerosene after sanding and blowing it with air, we begin to assemble it.
We arrange the freshly purchased valves in the sequence in which they will stand in the cylinder head and begin to grind in one by one. Lubricate the valve stem with clean oil and apply lapping paste to the edge.
We insert the valve into place and put a valve grinding tool on the valve stem. The stores sell a device for manual lapping, but since this is the twenty-first century, we are mechanizing the process. We take the old valve and cut off the rod from it, select a rubber tube for it of such a diameter that it fits tightly. The rod is in a reversible drill, one end of the tube is on it, the other is on the valve being ground in. At low speeds we begin to grind the valve, constantly change the direction of rotation and periodically press it to the seat or weaken the force. On average, the valve takes about twenty seconds. We take it out and wipe it. The valve is considered ground in if a uniform gray strip of at least 1.5 mm wide appears on the chamfer.
The same stripe should appear on the valve seat.
Video of manually grinding valves
For a sixteen valve head, everything is the same, only there are twice as many valves. After lapping, all valves and seats are thoroughly wiped and washed with kerosene to remove any remaining lapping paste. We check for leaks. We tighten the old spark plugs and put all the valves in place. Pour kerosene and wait three minutes, if the kerosene does not run away all is well, otherwise we grind the valves on this cylinder.
We had to grind four valves again, after which the kerosene stopped flowing.
We stuff new valve seals.
We put the valves in place and dry them. Before doing this, lubricate the valve stems with clean oil. After lubricating it with clean oil, we put the hydraulic compensators in place and, covering them with a clean cloth, remove the head out of sight. We're done with the cylinder head.
Diagnosis of gasket condition on a Chevrolet Lacetti
The service life of the valve cover gasket on a Chevrolet Lacetti, as a rule, barely reaches 15–20 thousand.
An oil leak can occur as a result of engine overheating , then the cover becomes deformed and loses its seal. This is rare, but mostly oil oozes from under the cap and penetrates into the spark plug wells simply due to the gasket losing its elasticity and the sealant losing its properties.
Oil leakage occurs as a result of loss of elasticity of the valve cover gasket.
At the first appearance of traces of oil, and even more so when oil appears in the spark plug wells, you should not wait, but look for a new gasket as soon as possible.
Huge variety of articles
The market offers about a dozen gaskets for the cover of Lacetti engines; they are the same for 1.4 and 1.6-liter engines .
The original GM gasket bears article number GM96 353 002. It has a simple square profile, lasts quite a long time, but costs about 450 rubles.
There is a very inexpensive analogue of Parts Mall with the same index at a price of about 180–200 rubles . Many people prefer the Victor Reinz 155345601 . Its price is approximately 600 rubles , the gasket has a T-shaped profile and works no worse than the factory one. It is not recommended to buy cheap analogues, since they harden quickly, even a good sealant will not save you.
Valve cover gasket GM 96 353 002.
What are valve stem seals
Lada Priora Sedan Logbook Replacing valve seals
The working name used by all repairmen is valve seals. These are special rings, belts, made of rubber and metal, placed on the valve neck. Their task is to prevent the engine oil that lubricates the Priora engine from getting into the working cylinders and into the air supply system into the receiver. That’s why they are “oil scraper”.
Tools and materials needed to replace valve stem seals
This work requires a separate set of devices. Of course, a normal service station has them in its “arsenal” initially. But the owner of a Priora who decides to replace the valve stem seals himself will have to purchase or rent them:
- A set of spanners (spanners).
- Set of heads with a knob.
- Valve spring compressor.
- Set of hexagons.
- Screwdrivers.
- Mandrel.
- A device for removing and replacing valve stem seals and crackers.
- Magnet.
- Marker.
- Sealant for gaskets when replacing.
- A set of head gaskets to replace old ones.
This is the minimum required kit to carry out such an operation.
Important! It is better to carry out any engine repair work with the battery removed from the Priora. To avoid both short circuit and battery damage.
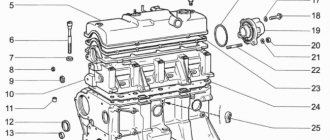
The procedure and torque for tightening the cylinder head on a VAZ-2112 with 16 valves: tightening the cylinder head bolts
VAZ cars of the 2112 family were produced with two 16-valve valves: 21120 and 21124. The cylinder head of these engines has different intake ports. In theory, there are no other differences. And therefore, the tightening torque of the bolts on the VAZ-2112 cylinder head will be the same if we talk about any 16-valve internal combustion engine. Tightening is performed in three steps, although repair books give another option (it is for 8-valve engines).
The following video shows how the cylinder head is installed in 5 minutes:
Installation and dismantling procedure
The part called the cylinder head is attached to the cylinder block with 10 screws. They are unscrewed with a 10mm socket wrench. The procedure for dismantling the cylinder head is shown in the first photo.
Reversal sequence (1-10)
The standard screw length is 93 mm. If the screw has been pulled out to at least 95 mm, it is replaced with a new one (AvtoVAZ requirement).
During installation, a different scheme is used (photo 2). Each screw is lubricated with machine oil, otherwise the efforts will be reduced to nothing.
The order of tightening the head is indicated in this photo
Tightening torque for cylinder head cover bolts
For VAZ-2112, the cylinder head tightening torque is standardized:
- First pass – the force is 20 N*m;
- Each screw is turned 90 degrees to the right;
- Wait 20 minutes, then turn the screws another 90 degrees.
At first the effort is very small. But at “step 3” it will be difficult to cope with the work. Use the lever.
Removing camshafts and replacing valve lifters
We carry out work to replace camshafts and valve lifters.
Remove the plastic engine cover. Using a Phillips screwdriver, loosen the clamp securing the main crankcase ventilation hose... ...and remove the hose from the cylinder head cover fitting. We remove the intake pipe (see “Removing the intake pipe”) and cover the channels in the cylinder head with a rag to prevent objects from getting into the engine. We remove the ignition coils (see “Checking the condition and replacing spark plugs”). Using a Phillips screwdriver, loosen the clamp securing the crankcase ventilation idle circuit hose... ...and remove the hose from the cylinder head cover fitting.
Using a 10mm socket, unscrew the bolt securing the block bracket for the wiring harness of the engine management system... ...and remove the bracket with the blocks from the cylinder head cover. Squeezing the petals of the plastic holder of the engine management system wiring harness with pliers...
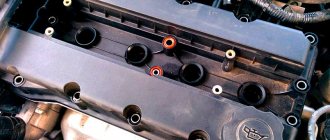
...remove the wire harness holder from the bracket secured to the cylinder head cover. Using a “8” socket, unscrew the 15 bolts securing the cylinder head cover.
Location of the cylinder head cover bolts The cover is installed on a sealant, so...
... use a screwdriver to pry the lid off the tide...
...and remove it. To check the serviceability of the hydraulic pusher...
... use a screwdriver to press on the hydraulic pusher (when checking, the camshaft cam corresponding to the hydraulic pusher should be facing the pusher with the “back of the head”, that is, do not put pressure on the pusher). In normal condition, the hydraulic tappet should move in the cylinder head socket with significant force, compressing the valve spring. If the hydraulic pusher itself is pressed with little force, then it must be replaced. We check other hydraulic pushers in the same way. Remove the camshaft gear pulleys (see “Replacing camshaft seals”). We disconnect the wire block from the sensor for the low (emergency) oil pressure warning light in the engine (see “Removing the low oil pressure warning light sensor”). Using the “8” head, unscrew the 20 bolts securing the camshaft bearing housing.
Location of the camshaft bearing housing bolts
Remove the camshaft bearing housing (A - housing alignment pins). In order to remove the camshafts from the supports in the cylinder head, you do not need to remove the rear timing belt cover, but only unscrew the three upper bolts securing the cover (see “Removing the coolant pump”). By pressing the rear timing belt cover...
...we take out the camshafts with oil seals.
To distinguish the shafts, a belt is made on the intake valve camshaft near its first neck.
Remove the two plugs from the cylinder head and the camshaft bearing housings. To remove the hydraulic pusher from the cylinder head socket, wipe the end of the pusher with a rag...
…and using a suction cup (you can use a suction cup to attach car accessories to the windshield)…
...take out the hydraulic pusher. When removing the hydraulic pusher, it is better not to use a magnet to avoid magnetization of the pusher parts and “sticking” of iron-containing wear products to them. Before assembly, we clean the mating surfaces of the cylinder head, bearing housing and cylinder head cover from the remains of old sealant and oil. Lubricate the bearing journals and cams of the camshafts with engine oil and place the shafts in the cylinder head supports. On the mating surface of the shaft bearing housing, mating with the cylinder head, we apply flange sealant of the Loctite type No. 574 with a bead about 2 mm thick.
Places for applying sealant to the bearing housing
We install the bearing housing along the centering pins and evenly tighten the fastening bolts crosswise, starting from the middle supports. We press in new camshaft oil seals (see “Replacing camshaft oil seals”). On the other side of the cylinder head, we press in the plugs using a mandrel. We carry out further assembly in reverse order. Before installing the cylinder head cover, apply Loctite No. 574 flange sealant to its surface mating with the bearing housing.
Places for applying sealant to the cylinder head cover
Why oil leaks from under the valve cover, all the reasons
A dirty engine, oil leaks on the cylinder block, hoses and attachments are covered with a disgusting layer of a mixture of oil and dust... This picture is familiar to many Chevrolet Lacetti owners. The valve cover gasket may be the cause of an oil leak, but not the cause. And the reasons need to be looked deeper
A correctly and carefully installed gasket will never leak oil
There can be many reasons for an oil leak, but the main one is improper installation of the gasket. Regardless of whether we use sealant or not, the technology for installing all parts with a large contact plane is basically the same. It is very important to observe a number of points. Any experienced mechanic will tell you that in order to prevent oil from escaping from under the cap, you must:
- Clean thoroughly .
- Make sure that they are geometrically infallible - the plane must be perfectly flat. This can be checked with any metal ruler, special template or level.
The lid must be perfectly level
- The aluminum valve cover on 1.8-liter Lacetti engines can become deformed due to overheating or other reasons, mechanical damage, etc. It is very important to check the flatness of the cover .
- valve cover bolt tightening diagram must be strictly followed.
Of course, we will not store the tightening algorithm on the garage wall, but you need to know the pattern - we pull the bolts from the center to the edges, crosswise. Lacetti valve cover bolt tightening diagram - The tightening torque of the bolts is of great importance. For a 1.8 liter Chevrolet Lacetti cover it is a maximum of 10 Nm . Moreover, it is advisable to clamp the lid in two or three steps, gradually increasing the clamping force to a maximum of 10 Nm.
- The cover fastening bolts GM catalog number ) also, oddly enough, have their own resource and can lose their properties over time, that is, stretch. It is highly advisable to install new bolts each time the valve cover is removed. It's not that expensive, there are only a dozen and a half bolts, but you won't end up in trouble with old elongated threads.
- O-rings . Motor mechanics advise not to install branded GM rings GM 96353007 or 904 11 826 , they quickly lose their elasticity and begin to sweat.
KamAZ silicone sealing rings performed much better. They are cheaper and available in any general store or car depot. Original (right) and non-original rings - Sealant . Not every sealant is suitable for the Lacetti valve cover. The fact is that many of them necessarily contain vinegar. What does vinegar have to do with it? Very simply, its vapors enter the first oxygen sensor and slowly but surely kill it. For this case, we will use sealants marked on the SensorSave label: Permatex RTV Silicone High-Temp, Permatex Ultra Black, Loctite 5699, ABRO GRAY.
The sealant should read Sensor Save.
Sealant again. In addition, you need to know how to use sealant. It is not enough to read the instructions for use.
It seems that this is enough to responsibly approach the replacement of the Lacetti valve cover gasket or, in the end, entrust this task to a handy mechanic.
Review of sealants by popularity
Knowing the most popular sealants for the valve cover, you don’t have to worry about choosing and buy a quality one. Remember that such a trifle affects the tightness of the internal combustion engine. Usually, drivers who have used very bad or very good products leave reviews.
So, what are the best valve cover sealants:
- DoneDeal.
- ABRO 11-AB.
- Victor Reinz.
- Dirco.
- Permatex Anaerobic Gasket Maker.
- CYCLO HI-Temp C-952.
- Curil.
- MANNOL 9914 Gasket maker RED.
DoneDeal
DoneDeal (Don Dial) is a black heat-resistant automotive sealant. Made in the USA. It has good performance characteristics, temperature range from -70 to + 345 degrees. It has low volatility, that is, it does not evaporate and is not blown up by air flow, so it can be used in engines with oxygen sensors. The properties of Don Dial sealant protect against the effects of oils, antifreeze, antifreeze, water, and brake fluid. The cost for 2018 is 300 rubles.
ABRO 11-AB
ABRO 11-AB (ABRO 11 AB) - this sealant has good qualities and is not a high price. Just like the previous option, it has a wide range of applications for car repairs.
Characteristics of ABRO 11 AB:
- Maximum temperature +343 degrees.
- Resistant to oils, antifreeze, antifreeze, water, brake fluid.
- Withstands mechanical loads: vibrations, shifts.
- Thanks to the elongated tube spout, it is convenient to apply a thin layer.
There is a Chinese analogue ABRO RED, which has worse characteristics.
Victor Reinz
Victor Reinz is also a popular universal sealant. There is Reinzoplast (Reinzoplast), there is Reinzosil (Reinzosil). Reinzosil silicone grey. For the valve cover you need to use Reinosoplast, it is blue.
Operating temperature range: from -50 to 250 degrees. Also, it is resistant to aggressive substances.
Victor Reinz sealant dries quickly - this is an advantage. Basically, the instructions for use say to apply the sealant in a thin layer, then wait 10-15 minutes, then install the gasket. When using valve cover sealant of this brand, the car can be started within half an hour after repair.
What is she?
This spare part can be seen immediately after you open the hood. The purpose of this element is to seal the neck of the gas distribution mechanism (so that oil does not penetrate into unnecessary places). The cover itself is secured with several bolts or nuts. And the VAZ valve cover gasket is made from special rubber, which does not lose its properties even with prolonged heating. However, nothing in the world is eternal, and even such material loses its elastic properties over time.
Let's start to disassemble
First, drain the oil and antifreeze. We remove the protective cover, the air filter with pipes, disconnect the ignition coil connectors, the throttle cable and the throttle assembly.
We remove the thermostat housing and simultaneously disconnect all the available connectors and pipes. We remove all the wiring that was in our way towards the battery.
We remove the generator. We unscrew the eight thirteen nuts holding the intake manifold and remove it. We unscrew all the bolts securing the valve cover, as well as the side engine support.
Unscrew the eight nuts and remove the exhaust manifold.
Remove the timing belt, camshaft pulleys and pump.
In three passes, so as not to deform the part, we first loosen and then unscrew twenty bolts of the camshaft bearing housing, the head is eight. Be sure to follow the sequence shown in the photo.
Remove the bearing housing. We remove the camshafts; there is a distinctive lip on the intake camshaft.
Also, in several passes, we first loosen and then unscrew the ten cylinder head mounting bolts. Be sure to follow the sequence shown in the photo.
Remove the cylinder head. All sixteen valves are replaced.