The body of this device is made of plastic. Polyethylene and polypropylene are used for this purpose. The first material is used to make budget batteries. More expensive models are made from polypropylene.
This is due to the high density of the material. Polypropylene is considered harder and has good abrasion resistance. In addition, this material is characterized by high heat resistance. It becomes soft at a temperature of 140 degrees. In this case, the melting parameters reach 175 degrees. The material almost does not suffer from corrosion cracking.
Moreover, both substances are resistant to chemical elements. In room conditions, high concentration sulfuric acid has an unexpressed effect on them. Moreover, prolonged contact with this substance at temperatures of 60 degrees or more provokes destruction of materials.
It is also advisable to prevent gasoline from penetrating into the heated battery case. At elevated temperatures, hydrocarbons provoke dissolution of the casing.
How to repair a cracked battery yourself
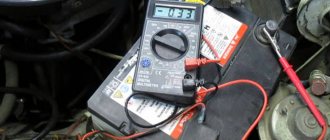
A hole—a crack in the battery case—is a very negative thing: the electrolyte leaks out, corroding everything in its path, and the power inside the battery drops.
In general, everything is bad: you need to go and buy a new battery. But here comes another moment of truth: what if there is no money?! Then you need to repair the crack in the battery! How? Read below and find out everything. By the way, if you don’t want to bother with repairs, I recommend purchasing a new battery here https://magazun.com/akkumulyatori/. Firstly, if you discover that the battery case is depressurized, you should immediately remove it. But this should be done very carefully, since acid, which easily corrodes metal, will eat your hands without remorse (the author tested it on himself: it really hurts). Therefore, be sure to wear thick rubber gloves, a respirator and goggles: this will protect you from acid. And don't ignore the advice! Acid is like oil in a frying pan: you don’t know exactly how it will behave in a second! After removing the battery from the car, place it on the floor and leave it for now: you should start removing the effects of an acid attack! The acid that is spilled inside the hood remains a very aggressive substance: you can’t wipe it off with a rag. First you need to neutralize the effect of the acid. We remember from the chemistry course that alkali serves as a neutralizer for acids. Where can I get lye? Gentlemen: yes, it is in every home - it’s baking soda. Just sprinkle baking soda on the acidic areas and wait a few minutes. Then take a scoop and remove the neutralized acid. Now we return to the battery again. Lay it on its side and, with some sharp object, lightly scratch the path of the crack. This measure is necessary in order to create adhesion for the substance that will serve as a patch on the battery case. Degrease the treated surface with some solvent or acetone and wipe dry with a rag. Now we move on to making the patch mixture. Take epoxy glue and mix it with some of the sawdust that you sawed when cleaning the crack with a sharp object (knife, nail, etc.).
The resulting mixture will perfectly close the crack in the battery case. The main thing: evenly distribute the glue with sawdust over the surface of the crack. The patch mixture dries within an hour. Also. as an alternative. You can use a regular soldering iron: move the hot soldering iron along the crack, directing the melting plastic inside the battery.
In general, the soldering iron is easy to understand. Attention: before you begin repairing the housing, all electrolyte must be drained from it. And after the repair is completed, the battery should be filled with new electrolyte and charged. But if you don’t want to repair the old battery, but buy a new one, then you need to select the battery according to its size so that you don’t have to make an extra trip to the store.
Another problem that sometimes occurs with batteries is a broken positive terminal. Of course, the solution to such a problem would seem to be within the capabilities of only service station technicians: welding is indispensable. But this is only at first glance. Take a drill and a bit. Drill a hole through both terminal elements to be fastened together. Hole diameter 4 mm.
Now take a conductive lubricant and treat the joining surfaces of the elements. This way you will reduce the resistance of the joint and protect it from the oxidative process. And then you can fasten the split contact (terminal) with a regular self-tapping screw! In general, during the restoration process you will understand everything yourself: if you have the desire.
Car battery repair
It often happens that the battery fails due to non-compliance with operating rules or due to mechanical damage. The main task of the battery is to supply power to all electronic devices of the car.
Battery types
Modern batteries are divided into several types:
Acid-type batteries are used in automotive production. The battery is the most important element for the operation of the car, and its breakdown will not make it possible to continue using the vehicle. The battery breaks down due to improper use or improper maintenance. Its malfunction is conventionally divided into two options:
- mechanical breakdown that can be repaired with your own hands;
- damage to internal elements that cannot be repaired with your own hands.
To put the device in order, you need to understand its design, and only after that you can begin to repair it.
Battery device
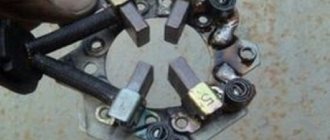
The battery consists of a sealed case, into which 6 sections are inserted, they are called banks. The jars contain lead plates with the active mass applied to them. These plates are divided into positive and negative, all of them are arranged alternately. A separator is placed between them, which isolates them from accidental contact.
The plates form blocks, each of which is connected to the bridge using a bridge called a barette. The brackets connect all the banks to the bridge, which has access to the terminals of the car battery. All jars are filled with electrolyte, which promotes the formation of a chemical reaction. The battery is not capable of generating electricity on its own, it is its storage, so a generator is installed in the car.
Manufacturers provide two options for car batteries:
- the first of them is a serviceable one, on the body cover of which there are screw caps for each can;
- the second is maintenance-free, where the housing cover does not have plugs, only a release valve designed to relieve excess pressure.
In the event of a malfunction, only serviceable batteries can be repaired. They can be repaired in case of slight damage.
Malfunctions and methods for their elimination
Several parts of the battery are susceptible to breakdown, namely:
- its terminals, the damage of which consists of excessive oxidation;
- formation of housing cracks, they occur due to poor fastening;
- internal damage to the plates and bridges that connect to the battery terminals.
Almost all of them can be repaired with your own hands and the battery can be restored to functionality. Faults are visible by simple inspection and do not require additional diagnostics. Having examined and identified the breakdown, you can begin repairing the car battery.
Due to weakened contact with the wires, the terminals begin to oxidize heavily. Eliminate oxidation by removing the wires and thoroughly cleaning each terminal.
To do this, take sandpaper and use it to clean the car battery terminals until they are completely shiny.
The crack in the case is repaired using a soldering iron and a piece of plastic.
Before soldering begins, the electrolyte is drained from the battery. Having sealed the crack, the tightness of the battery is checked by pouring distilled water into it.
For reliability, it is worth soldering a piece of plastic over the sealed crack.
Severe internal damage to the plates, such as sulfation and shedding, cannot be eliminated. In mild cases, the battery must be fully charged with a current of 10% of its total capacity. During the procedure, you will need to add distilled water, the level of which should cover the top of the plates.
Sulfation of electrodes
Research statistics from the Battery Council Int. says that in 80% of cases the cause of battery failure is sulfation of the plates.
One of the available types of do-it-yourself car battery repair is eliminating sulfation of the battery plates. The surface of the electrode becomes covered with a whitish coating, preventing the normal flow of current. The battery capacity, even after a full discharge-charge cycle, is an order of magnitude less than the serviceable charge.
Any experienced car enthusiast knows how to repair a battery with his own hands. With a low degree of sulfation of the electrodes, the sediment on the surface of the plates still has a loose and porous consistency.
Experts suggest repairing a car battery using simple and effective procedures:
- replace the electrolyte in the battery with warm distilled water. For several hours, a chemical reaction will occur in the battery to dissolve salts from the surface of the electrodes. Distilled water, as the salts pass into solution, will turn into an electrolyte, and a potential of 7-10 volts will arise at the terminals;
- drain the resulting solution and rinse the battery several times, first with distilled water and then with clean electrolyte;
- fill the battery capacity with fresh low-density electrolyte and charge it with a charge current limit of no more than 116 times the nominal capacity for 10-12 hours;
- Using a regular car light bulb, discharge the battery within 7-8 hours. The charge-discharge cycle must be repeated at least 4-5 times.
If there are no problems with short circuits, warping of plates, or repairs, the battery capacity can be restored to 80-85% of the initial one.
Advice! Use asymmetrical current to charge the battery; its effectiveness has been proven in practice, and many manufacturers of specialized chargers implement a similar function in their products.
If the sulfation of the plates has reached 30-40% of the electrode surface, it is still possible to repair the battery with your own hands, but using chemicals:
- drain the electrolyte from the charged battery and replace it with a 2% aqueous solution of the drug “Trilon B” with the addition of 5% ammonia;
- after 60 minutes, the solution is drained and the jars are washed with distilled water;
- after washing, fill in the electrolyte and charge with a current of 1/10 of the battery capacity. If necessary, the procedure is repeated two to three times;
- This technology allows you to simply and effectively repair batteries not only for automobiles, but for any similar ones, most importantly - with your own hands and strength;
How to seal the battery
How to seal the battery. (the hole is about 5x15 mm) I tried this, it fell off
its body is made of such cool plastic that it is impossible to seal it (and even acid). If the hole is below the waterline, then change the battery.
The fact of the matter is that it’s higher, the top edge (corner). On the bumps it little by little splashes out anywhere(
you need to make something like a clamp around the entire case, close the hole itself with a thick rubber band that will be pressed like a rectangular ring around the entire battery
The battery case is usually made of impact-resistant, heat-resistant propylene or polypropylene.
I sealed mine with cold welding and nothing fell off. Both winter and summer have passed. Try a different weld.
I soldered it on the shistik and kept it. A really big soldering iron, which is used to tin radiators.
Advertisements on NN.RU - Auto
Manufacturing of a broken-type platform with retractable ramps on the GAZ-33023 Gazelle-farmer chassis. Technical characteristics of the tow truck.
Lengthen Gas 331043, 331063 Valdai-farmer for installation of a body 5.1/6.5 m. The chassis is lengthened by increasing the wheel size.
A specialized company for the conversion of trucks produces extensions for man man, iveco and iveco truck tractors.
Lengthen Kamaz under a body 7.5 m Lengthen Maz Zubrenok, Maz under a body 9 m Re-equipment of the chassis of an extended truck.
What material is used in the manufacture of car batteries?
The body of this device is made of plastic. Polyethylene and polypropylene are used for this purpose. The first material is used to make budget batteries. More expensive models are made from polypropylene.
This is due to the high density of the material. Polypropylene is considered harder and has good abrasion resistance. In addition, this material is characterized by high heat resistance. It becomes soft at a temperature of 140 degrees. In this case, the melting parameters reach 175 degrees. The material almost does not suffer from corrosion cracking.
Moreover, both substances are resistant to chemical elements. In room conditions, high concentration sulfuric acid has an unexpressed effect on them. Moreover, prolonged contact with this substance at temperatures of 60 degrees or more provokes destruction of materials.
It is also advisable to prevent gasoline from penetrating into the heated battery case. At elevated temperatures, hydrocarbons provoke dissolution of the casing.
Is it possible to solve the problem in the long term?
Before repairing a car battery, it is recommended to establish the reasons that caused cracks to appear in the case. If, due to careless removal of the battery, the fixation area with the cover is damaged, repairs will help increase the life of the device. If damage to the case is caused by a fall or impact of the battery, you should make sure that the plates and other battery elements are intact.
It is advisable to start repairing the battery if the costs are at most half of a new device. It will not be possible to give a second life to the battery. As a result of such repairs, it will be able to work for a maximum of 1.5 years. At the same time, in the winter season the device may fail.
Before starting repairs, be sure to read the safety rules. The electrolyte is a solution of sulfuric acid. This liquid is considered very aggressive. To neutralize it, it is permissible to use soda. It is recommended to carry out any repair work with gloves, glasses, and protective clothing.
Battery repair helps to slightly increase the life of the product. There are several ways to fix cracks in a device. To achieve good results, you should choose the appropriate option and strictly follow the rules of the procedure. Strict compliance with safety requirements is of no small importance.
Source
DIY ways to solve the problem
To eliminate cracks that have appeared in the body of the device, it is recommended to prepare a number of tools and devices. To do this you will need the following:
- construction hair dryer - it must be equipped with a function of gradual regulation of temperature parameters and a narrow slot-shaped nozzle;
- electric soldering iron - it must have a power of 100 watts and a flat tip;
- staples - their length should be 20-25 millimeters, and the height of the sides should be 2 millimeters;
- several strips of thin propylene - you can take it from an old battery or use special soldering material in the form of tape or rods.
See also
Description and characteristics of Loctite glue, instructions for use
To carry out repair work, it is recommended to do the following:
- If the crack is located on the device below the electrolyte, it is recommended to drain it. This procedure can be carried out using a large medical syringe. It is recommended to attach a piece of polyvinyl chloride tube to it. Its length should be 20-25 centimeters. Draining the electrolyte by simply tipping the battery over is strictly prohibited. If the device is turned over, lead oxide deposits can cause the plates to short out and completely disrupt the operation of the device.
- Using a sharp knife, make a groove along the length of the damage. It is recommended to give it a V-shape. Make small holes at the ends using a thin drill. Their diameter should not exceed 1 millimeter. The holes also help prevent the subsequent development of the defect.
- Heat the staples to a temperature of 400-450 degrees. This can be done using a soldering iron or a candle. Then carefully fuse the resulting fragments into the edges of the crack. This should be done at intervals of 12-15 millimeters. This will help keep the edges of the crack in contact.
- Make a heat shield from a heat-resistant material. Paronite measuring 10x15 centimeters is suitable for this purpose. It is recommended to make a gap in the sheet, which in size and shape matches the geometry of the damage. Then match the cutout to the shape of the groove and secure it well to the device body.
- For soldering, you can use a special rod or tape. If this is not possible, it is permissible to make the solder yourself. To do this, it is recommended to cut thin strips from prepared polypropylene. In length and quantity, they must correspond to the volume of material required to fill the V-shaped defect. Then roll them into a thin and tight rope.
- Heat part of the crack with a hair dryer, melt the edge of the soldering material and press it to the beginning of the crack, applying force. As the polypropylene solder and crack warms up, seal the entire crack. It is recommended to do this sequentially.
- In addition to soldering, it is permissible to seal cracks with polystyrene, dissolving it in dichloroethane. It is also permissible to use the KR-30 solvent. To apply the patch, the surface in the area of the crack at a distance of 20 millimeters should be sanded and wiped with acetone.
See also
Composition and scope of application of casein glue, how to make it yourself
It is also permissible to use “Positive” epoxy glue to fix cracks and other damage to the device body. This sealant is often called cold welding. It helps achieve excellent results because the acid does little to damage it. In order for the sealant to ensure reliable fixation and last a long time, it is recommended to clean all surfaces from dirt before use. Degreasing and drying of materials is of no small importance. To achieve the most reliable fixation, it is recommended to sand the surface.
The glue acquires a solid consistency in just 10 minutes. It is possible to achieve complete fixation of materials after 2 hours. In this case, it is recommended to wrap the device body with electrical tape, which will reliably compress the glued fragments. After this, you should proceed to filling the electrolyte. It is definitely recommended to charge and discharge the device twice.
Acid-resistant adhesive sealant for battery repair
I still agree with Reindeer Breeder - the problems from leaking acid can be much greater than the cost of a new battery. A video about how and with what you can solder a broken battery case, using the example of repairing a new broken one. In terms of gluing cracks and other damage to the battery case, it is recommended to use epoxy adhesives, this is an adhesive sealant popularly called cold welding, when using it we achieved good results, its acid practically does not corrode. Clarification: in order for the glue to stick everything tightly and last for a long time, before applying it, it is necessary to clean the surfaces to be glued from dirt, degrease and dry the surface; for better adhesion, it is advisable to clean the surface with sandpaper. The glue hardens within ten minutes, and full adhesion of surfaces occurs after two hours. There is only one drawback in this repair: mast
Search for data based on your request: WATCH THE VIDEO ON THE TOPIC: how to solder a broken battery
What causes the battery to fail?
All reasons can be roughly divided into three categories:
- manufacturing defects;
- natural wear and aging;
- violation of operating rules.
That is, in the third case, the battery could still serve, but it was artificially destroyed. Fortunately, it is not always irrevocable.
External faults
The battery case is quite durable, but it can also be destroyed by impacts and falls. The electrolyte begins to flow out, reacting intensely with the surrounding metal and paint coatings. The losses can be much worse than just the cost of a new battery.
The tightness of the housing can be restored by using adhesives, compounds or welding plastic. But the decision to make such repairs must be made with caution; the consequences have already been mentioned. Whether it’s worth the risk is something everyone decides for themselves, but in the most general case, it’s better not to get involved with repairing a cracked case.
Battery terminals can also be a source of trouble. A layer of dielectric lead oxide forms on them, and in case of poor sealing, also the same salts that cause sulfation of the electrodes.
All this breaks contact, and even a serviceable, charged battery will not be able to rotate the starter shaft. The terminals require regular cleaning with wire brushes, sandpaper and detergents. After drying, they must be coated with a multi-purpose lubricant; this will protect the lead from oxygen and electrolyte vapors.
Damage inside the battery
Defects associated with electrodes, separators and electrolyte are much more diverse:
- sulfation, that is, the process of formation of insoluble salts of sulfuric acid on the electrodes, preventing the occurrence of chemical reactions during charge and discharge;
- mechanical breakdowns of electrodes associated with their thinning after a long service life;
- reduction in volume and violation of the strength of the active mass of the electrodes;
- destruction of separators and short circuits in banks;
- sludge accumulation and electrolyte contamination;
- gross polarity reversal of the battery when it is connected incorrectly.
Not all problems are irreversible. Sometimes even a maintenance-free modern battery can be revived. Not to mention old batteries, where sets of electrodes were inserted into ebonite cans and filled with bitumen mastics on top. If desired, such a battery could be made to last forever by performing regular repairs.
DIY car battery crack repair
Some materials in this section may contain information prohibited for children. Full version. The main auto forum. How to seal the hole on the battery? Repair, maintenance, tuning. Show comments. Andrey Ryrikovich March 31 Copy link to message.
A hole was formed as a result of the crookedness of the installer. The hole is on the corner of the battery, on the side, just above the middle. Should I fuse it with a soldering iron and mesh or is there some kind of miracle glue? Or maybe coat it with glass sealant? I don't want to buy a new one, this one is fresh. Andrey Ryrikovich. BCT March 31 Lord Elektronoff March 31 Lord Elektronoff.
Gogi March 31 Throw it out and buy a new one Or is it exclusive? Then solder the patch. Would you recommend, pyromaniac, a patch and a soldering iron.
But I would throw it away. Adad March 31 Cold welding? Andrey Ryrikovich wrote: A hole was formed as a result of the installer's cranky hand. Give him this one, let him buy you a new one. Screw12 March 31 The shavings are made of the same material as the battery case. Perhaps I was just guessing. Cherdak March 31 Dokhtur March 31 If PE hadn’t gotten into the topic, then it would have been possible. And now just to throw away, damn it:. Screw12 wrote and the old new body is not the same as before, you need to look at what it is made of Jeaman March 31 Thermal glue, sold together with the gun at Fix Price, or melted.
Fierce Harry March 31 Dental technicians have plastic to repair dentures. It grabs tightly. I took it from medical equipment. I have been using it at home for many years. I wrapped a self-tapping screw with an elastic band in the battery with super glue, after a couple of weeks it wouldn’t start, I couldn’t find the self-tapping screw, all the acid leaked out, I took one battery out of the handle and also made a bolt, cut a thread in the hole, tightened it from the terminals, had no problems for three years with a battery, and then sold the car with it. Most likely the metal screw was corroded by acid and it flew out.
Antimony solders POSS
Here's how to restore a battery terminal using other materials. You can use solder, or you can use old sawed-off current collectors from worn-out batteries. Apply solder slowly with a soldering iron; this is preferable to pouring molten alloyed lead. In the first option, there is a possibility that the remnants of the factory current collection will melt and a metal-to-metal connection will occur. If you quickly pour lead, then what is left of the old terminal will not have time to heat up and again you will end up with a fragile decorative repair.
How to solder a car battery
Modern batteries are made in non-separable cases, sometimes without even the ability to add water to the electrolyte. Broken batteries are not repaired in production. Defective or broken items are immediately sent for recycling. There are no companies in Kyiv that perform battery repairs. The reason is the lack of profitability. Then the likelihood that the battery will require repair will become extremely low. In Kyiv there are also craftsmen who restore broken terminals, glue cracks in the case, change the electrolyte, and charge the jars separately.
“How to seal a crack in a car battery case?” Battery cases are made from plastics: polyethylene or.
Explosion theory, or why electrolyte boils
The car battery constantly operates in discharge-charge mode. For example, when starting, the starter consumes a large amount of energy, but after starting, the generator comes into operation, which restores the charge consumed by the battery, and this happens constantly.
At the same time, during the release of charge, redox chemical processes take place in the battery, as a result of which lead sulfate is formed from ordinary lead.
In this case, the reduction of lead oxide occurs on the positive electrodes, and the oxidation of lead on the negative electrodes.
All these processes are accompanied by the consumption of sulfuric acid, due to which the density of the electrolyte decreases (the mass fraction of the acid decreases relative to the distillate).
When charging, the same processes occur, but in reverse order. As it charges, the lead sulfate formed as a result of reactions during discharge breaks down into its component parts.
And when it is completely consumed, the reaction does not stop, but another component of the electrolyte, the distillate, already participates in it.
After the complete charge is received, when there is no sulfate left, the process of electrolysis of distilled water begins, accompanied by its separation into its component components - hydrogen (released on the negative electrode) and oxygen (formed on the positive electrode).
But these components are already explosive, and their ignition is a consequence of a battery explosion.
Visually, the electrolysis process looks like boiling electrolyte. Many motorists are guided by this – if the battery is bubbling, it means it is charged.
But in fact, the boiling of the electrolyte is the active release of flammable gases. There is no escape from these processes; they are needed for the normal operation of the battery. And if all safety measures are followed, the release of flammable gases will not pose any threat.
What material is used in the manufacture of car batteries?
The body of this device is made of plastic. Polyethylene and polypropylene are used for this purpose. The first material is used to make budget batteries. More expensive models are made from polypropylene.
This is due to the high density of the material. Polypropylene is considered harder and has good abrasion resistance. In addition, this material is characterized by high heat resistance. It becomes soft at a temperature of 140 degrees. In this case, the melting parameters reach 175 degrees. The material almost does not suffer from corrosion cracking.
Moreover, both substances are resistant to chemical elements. In room conditions, high concentration sulfuric acid has an unexpressed effect on them. Moreover, prolonged contact with this substance at temperatures of 60 degrees or more provokes destruction of materials.
It is also advisable to prevent gasoline from penetrating into the heated battery case. At elevated temperatures, hydrocarbons provoke dissolution of the casing.
What car battery repairs can you do yourself?
We will try to answer the question: repairing a cracked car battery with your own hands according to the recommendations of a genuine master with the most detailed description. When a car battery stops working, the first thing many people want to do is find out what happened. Often, even with proper operation, any breakdown or interruption in its operation can become an unpleasant surprise for the car owner. There can be many reasons for battery failure. However, it is not advisable to rashly replace the old battery with a new one.
The best thing, of course, is to buy a new battery. If this is not possible, be careful - the vapors of the liquid leaking from the battery are toxic, you can be quite poisoned by inhaling them, so work on sealing the battery should be carried out in a well-ventilated area.
Reasons for battery failure
The main reasons for battery failure are as follows:
- damage to the battery case and plates for various reasons;
- short circuit of battery plates of different polarities for various reasons;
- rupture of the internal battery circuit;
- plate sulfation.
Damage to the battery case and plates
One of the main causes of such damage is mechanical impact on the battery. This could be a strong blow, a fall, and so on. In addition, freezing of the electrolyte in the battery can lead to destruction of the case and damage to the plates (link to material). As expansion occurs when freezing, it causes cracks in the housing and warping of the plates.
Today on forums you can find questions about how to disassemble a car battery. Modern low-maintenance or maintenance-free car batteries cannot be disassembled. More precisely, it can be disassembled, but this is an irreversible process that destroys the battery. Only serviceable old-style batteries, which are no longer available, can be disassembled for repair and replacement of cans. Return to content
Closing the plates
Short circuit of the plates can be caused by the following reasons:
- manufacturing defects;
- mechanical deformation or freezing of the electrolyte;
- shedding of the active mass of the electrodes;
- separator damage.
In case of manufacturing defects, there is a warranty for car batteries. This is definitely a warranty case, which usually manifests itself in the first six months of battery operation. Everything else is not covered by the warranty and in most cases cannot be repaired.
Open battery internal circuit
If this happened during normal operation of the battery, then the battery can be returned under warranty. At the same time, it should not have any damage (traces of impacts, cracks, melting, etc.). If the battery is used correctly, then such a malfunction in most cases is a manufacturing defect. Repairing this fault is either impossible or very problematic. So, in this case, you will have to exchange the battery under warranty or buy a new one. Return to content
Sulfation of plates
Plate sulfation is the process of deposition of lead sulfate (PbSO4) on the surface of positive and negative electrodes. As this substance accumulates, it clogs the surface of the active mass of the plates, which leads to a significant decrease in battery capacity.
Lead sulfate is formed during battery discharge and dissolves during charging, but the process is not completed. As a result, part of it remains on the electrodes in the form of a white coating.
A common method for reconditioning nickel-cadmium batteries
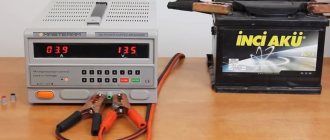
To restore cells, a technique is used to supply current pulses that exceed the battery capacity by 20-40 times. Pulses are applied for 5-7 seconds; the method is suitable only for nickel-cadmium type devices.
A power supply and a multimeter are mandatory tools for reconditioning Ni-Cd batteries.
It is possible to restore devices with leaked electrolyte (with a small degree of probability) and for elements after a discharge to zero. It is recommended to connect each section of the battery bank to the power circuit, which reduces the required power of the power source.
Required materials and equipment:
Battery from a screwdriver in disassembled form.
Sequence of actions when restoring a nickel-cadmium battery:
The method provides a short-term restoration of the battery's performance characteristics, but after several dozen cycles of discharging and charging, the capacity decreases and the voltage drops at the terminals.
When an increased current is supplied, the process of destruction of cadmium filaments occurs, causing short circuits and self-discharge, but the required chemical composition of the electrolyte is not restored. It is also necessary to bring the working fluid level to the factory value (applies to sections with leaked electrolyte).
Source
how to restore a car battery with soda
For modern maintenance-free car batteries, the word repair can only include repairing a damaged case; lead plates in such batteries are not replaced; even manufacturers now do not carry out repairs; they recycle old batteries. If you really want to repair your battery, then there are several options. Basically, problems with the battery can arise as a result of wear or mechanical stress on the plates, the conclusion is that you need to change the plates, in principle, from two non-working batteries you can assemble one by taking good plates and putting them in one building. To perform this operation, you will need to carefully cut out a rectangle in the body along the contour of the can from the top, separate the contact jumper holder from the adjacent can, assemble the good plates into the can and install it in its original place with the contact line connected. The contact line can be connected using a lead plate bolted on both sides or soldered, then install the cut out part of the body, glue it or seal it hermetically. The case is sealed by heat welding, the intended connection is heated until the plastic softens and pressed tightly, wait for 2 to 5 minutes, if the gap is large, then add a strip cut from another battery.
Improved recovery method
Distilled water is poured into the hole drilled in the battery with a drill.
There is an additional way to repair a screwdriver battery:
The method of restoring Ni-Cd batteries by adding distilled water takes 2-3 weeks. The method does not require the owner to have knowledge of electronics and is one of the most gentle on battery design. A hole in the element casing allows for periodic water refilling, which further increases the service life of nickel-cadmium DC sources.
An additional method for restoring cans is to replace failed elements. After removing the cover of the current source, the voltage of each section is measured, then the battery is discharged. Repeated measurements make it possible to identify elements with increased degradation (voltage is 0.5-0.7 V less), such products are desoldered and disposed of.
Modern generators
Despite the high performance characteristics of nickel-cadmium batteries, devices are gradually being replaced by lithium-based batteries. Products with polymer electrolyte provide high discharge current, but high cost and explosion hazard limit the scope of application of current sources.
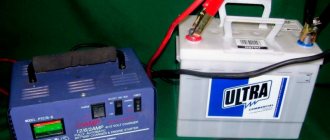
Battery repair, car battery repair, car battery case repair.
Posted by ilian32, December 23, in Electrical Equipment. Accidentally split the battery! Epoxy and cold welding don’t really help. What other options do you recommend? At a minimum, I think you need to drain all the electrolyte first, I think if you apply the epoxy correctly, everything will be fine, you probably just smeared it on top, but you need something to get into the crack, you can also put a patch on top from a plastic plate Well, and make a tightening bracket, like a clamp , which would prevent the movement of the Akum body in the plane of the crack. Depending on where the crack is. It happened that the new battery cracked. It’s plastic. It doesn’t really stick to it. Lil and smeared it right into the crack, apparently it doesn’t hold, it’s getting wet little by little, but the battery is alive, after gluing and filling with electrolyte, I charged it, everything is good, it holds voltage!
How to seal the battery
How to seal the battery. (the hole is about 5x15 mm) I tried this, it fell off
its body is made of such cool plastic that it is impossible to seal it (and even acid). If the hole is below the waterline, then change the battery.
The fact of the matter is that it’s higher, the top edge (corner). On the bumps it little by little splashes out anywhere(
you need to make something like a clamp around the entire case, close the hole itself with a thick rubber band that will be pressed like a rectangular ring around the entire battery
The battery case is usually made of impact-resistant, heat-resistant propylene or polypropylene.
I sealed mine with cold welding and nothing fell off. Both winter and summer have passed. Try a different weld.
I soldered it on the shistik and kept it. A really big soldering iron, which is used to tin radiators.
Well, it’s just a problem in Russia with signs; money is getting cheaper, travel money is getting more expensive.
Otherwise it cannot be.
Thanks ER. As an additive; There are a lot of words, there is no talk.
as an option: dissolve polystyrene foam and/or celluloid (photo/film film) in good acetone until a viscous mass is obtained and glue the patch to it, sanding and degreasing the surface
I'll try to get some tomorrow (at the hay) and see if he takes it or not.
Maybe you had a small hole.
Maybe you had a small hole.
The problem is that there is a hole in the coal, i.e. you will have to look for a patch at an angle of 90 degrees
the actual question is whether anyone has glued an acc with such a hole, maybe there are bourgeois gadgets on sale for these purposes
It’s a pity 2.5 rubles for a new one because... Apart from the hole, the old accom doesn't bother me in any way
namely, only by taking the same irrelevant elements from him as a donor
The hole was bigger than yours, broken after the accident. I soldered it this way and drove with it for another 1.5 years without leaking.
Well, it’s just a problem in Russia with signs; money is getting cheaper, travel money is getting more expensive.
Otherwise it cannot be.
Thanks ER. As an additive; There are a lot of words, there is no talk.
I don't have a big soldering iron
dichloroethane does not dissolve(((((
Last edited by support; 06/04/2009 at 10:18. Reason: Edit
I don't have a big soldering iron
dichloroethane does not dissolve(((((
a soldering iron costs a penny compared to a new battery, an inexpensive Chinese one will do just fine
By the way, an inexpensive Chinese soldering iron works much longer than more expensive analogues, tested
how did you solder it and with what (what did you use to make the patch)
Why are you scaring someone by buying a new battery? If there is a hole, then you simply cover it with sealant for aquariums (transparent, silicone and smelly), it is resistant to all aggressive environments, elastic, and moisture-proof.
I sealed it with heated bitumen, kept the battery for a year, then sold the car
The glue stick holds this problem very well. And it adheres perfectly to the polyethylene/polypropylene of the battery case. First wash with water and dry, then glue.
In terms of gluing cracks and other damage to battery casings, it is recommended to use epoxy adhesives; this is an adhesive sealant popularly called cold welding; with its use, good results have been achieved; acid practically does not corrode it. Clarification: in order for the glue to stick everything tightly and last for a long time, before applying it, it is necessary to clean the surfaces to be glued from dirt, degrease and dry the surface; for better adhesion, it is advisable to clean the surface with sandpaper. The glue hardens within ten minutes, and full adhesion of surfaces occurs after two hours. Ask around for sale Acid-resistant adhesive-sealant for battery repair
I haven't tried it myself.
Causes of battery explosion
The main reason for a battery explosion is the accumulation of a large amount of flammable gases and the occurrence of factors that lead to their ignition. And the release of gases begins to occur when the lead sulfate formed during the discharge is completely consumed.
That is, as soon as the battery restores its charge (consumes sulfate), the process of water decomposition begins. It turns out that the main cause of the explosion is battery overcharging.
And overcharging can occur in two cases - long-term charging of the battery (set it to recharge and forget) and incorrect operation of the generator voltage regulator.
As for the first reason, this will not happen if the charger is automatic, and after the charge is completely restored it stops supplying voltage.
And even with such a charger, it is necessary to fully observe all precautions when carrying out maintenance work.
The second case is more common. The fact is that the maximum voltage that should be supplied from the generator to the battery should not exceed 14.2 V. If the regulator is faulty, then a higher voltage is often supplied to the battery.
And since a car battery operates in a cyclic mode, it is recharged systematically, and hence a large amount of gases are released.
Combustible gases accumulate under the top battery cover. To prevent this from happening, a housing ventilation system is provided (holes in the roofs of the cans, a ventilation tube), which should remove the formed gases.
But careless operation of the battery is often accompanied by blockage of the ventilation holes, as a result of which the flammable components have nowhere to go and accumulate inside the battery.
The amount of these gases depends on the internal empty volume. Although the battery banks contain packages of electrodes and electrolyte, they do not occupy all the space; there remains space reserved just for gases, which should be removed.
If the battery is not maintained, then the splitting of water leads to a decrease in the volume of electrolyte, as a result, the unoccupied volume increases, which is why more gas can accumulate inside the can, and the more of them, the probability of an explosion is higher, and its strength increases.
Battery case repair
VIDEO ON THE TOPIC: How and with what to solder a broken battery case In most cases, lead plates become unusable, which wear out and wear out over time. To assemble one working battery, take several good plates and weld them into one body. To do this, clean the top surface of the battery case, cut a rectangular hole in the center and separate the contact jumper. After this, rearrange the plates, connect the contact line using solder and seal the battery. In this situation, the main thing is to achieve complete tightness. Of course, it is better to use heat welding, during which the heated parts of the body are pressed against each other and held in this position for minutes.
Battery Case Repair Translucent plastic battery cases are usually repaired at home.
Accelerated battery recovery option
For those for whom time is too valuable, the following battery recovery option is suitable:
- Fully charge the battery;
- Drain the filler;
- Rinse the internal cavity of the battery with distilled water;
- Pour a solution of Trilon B (2%) and ammonia (5%) into the battery;
- After an hour, drain the mixture, rinse the “insides” again with distilled water;
- Pour in fresh acid solution;
- Fully charge the device.
It is possible that the solution with Trilon B and ammonia will have to be poured an additional 1-2 times. The process is considered complete if no gas is released when the mixture enters the device.