Replacing the CV joint on a VAZ 2109, detailed instructions
Welcome, friends, to the DIY car repair website.
The operation of VAZ models with front-wheel drive has a number of features related to the repair and maintenance of the chassis. The CV joint (constant velocity joint) is a very important, loaded component of the VAZ 2109 car, its resource was initially designed for long-term operation, the duration of which is comparable to the service life of the car as a whole.
Replacing the CV joint on a VAZ 2109
However, even though the service life is designed for a long time, replacing the CV joint of a VAZ 2109 car is a procedure that must be performed relatively often and much depends on the operating conditions of the car.
Causes and malfunctions of the CV joint
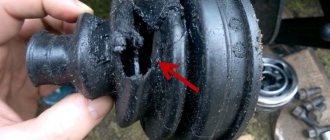
The reason for replacing the “grenade” (as motorists nickname the CV joint due to its external similarity) is usually the ingress of sand and dirt through a torn boot (cover).
A damaged boot can often not be detected immediately, and when operating a unit with this fault, 200 km of run is enough before it completely fails.
The nature of the malfunction is probably familiar to all motorists; it is a strong crunching sound when turning, while simultaneously accelerating. If you discover such a symptom, it is necessary to repair the drive as soon as possible.
The constant availability of spare parts for domestic cars in stores, as well as their affordable price, makes it possible to make CV joint repairs not too costly in financial terms.
But you should know that, for example, replacing a CV joint boot on a VAZ 2109 in terms of the scope of work is practically no different from replacing an internal or external drive.
Therefore, in practice, in terms of labor intensity, repairing a CV joint cannot be called easy; moreover, skills in working with metalwork tools and compliance with all safety regulations when performing such work are required.
A little about the device
Two VAZ 2109 drives consist of four CV joints, two of which transmit torque to the axle shaft directly from the gearbox and are called “internal”.
The other two are installed at the ends of the axle axles and transmit torque directly to the wheels, being called “external”.
This scheme allows the rotation of the wheels when turning and simultaneous (constant) operation of the car’s suspension, so we can simply say that the external drives are responsible for transmitting torque during turns, and the internal drives are responsible for the vertical movement of the wheel (hitting an obstacle, roll, etc.) .P.).
Replacing the CV joint on a VAZ 2109, removing the drive
Despite the vulnerability of the rubber boots of the drives, it is often enough to replace them, while simultaneously washing the “grenade” with gasoline and adding a new portion of lubricant. Carrying out such repairs, with minor wear, allows you to do without replacing the drive.
Before starting work, you need to set the car to the handbrake and install wheel chocks.
First of all, you need to unscrew the hub nut using a socket and a suitable wrench. In this operation, it is necessary to remove the punching elements on the nut using a punch; this will allow the threads on the CV joint to be preserved during dismantling (the nut must be replaced with a new one).
An important point in this operation is to unscrew the nut (apply force) with the car wheels lowered to the ground, otherwise there is a risk of damaging the differential or other transmission elements.
Next, you need to jack up the car on the side needed for repair, after loosening the wheel nuts, and remove it.
At this stage, or earlier, it is necessary to drain the oil from the gearbox. The next task is to release the steering knuckle at the bottom from the ball joint by unscrewing two bolts securing it.
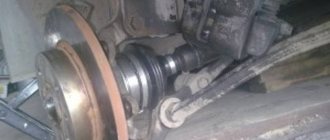
Since the hub nut is turned out and the ball joint is unscrewed from the steering knuckle, you can try to remove the splined part of the CV joint by pushing the brake disc and strut assembly towards you (it has sufficient travel, the main thing is to turn the steering wheel so that the tie rod end protrudes as much as possible).
Next, we remove the inner CV joint by prying it with a pry bar and pull out the drive. When you have pulled out the inner part, pay attention to the oil seal in the gearbox; if it was leaking before, it will have to be replaced.
In practice, replacing the outer CV joint of a VAZ 2109 is the most common drive repair. Since the internal drive operates at smaller angles and is less susceptible to damage to the boot, replacing the internal CV joint of the VAZ 2109 is quite rare.
Let's consider further actions that involve replacing the outer CV joint with a minimum number of operations. According to the repair rules, it is necessary to remove the entire drive and dismantle the CV joint in a vice, in a garage.
Attention! You cannot remove two drives from the gearbox at the same time, as the gears may move; dismantling occurs one at a time or a special insert is inserted instead of the hinge.
We remove the outer part of the CV joint without removing the drive
Having certain skills, it is possible to remove (knock out) the outer CV joint on the spot (under the car). This will significantly save time and effort. In addition, not everyone has a large bench vise. This operation requires care and knowledge of the drive structure.
It is necessary to limit the axial movement of the axle shaft, which will occur from hammer blows on the outer CV joint race, otherwise the internal drive may come out of contact (disassemble) inside the boot, and in this case, the entire drive will need to be removed.
You can hold the axle shaft with your hand, but it is better to use a light hand vice as a device, or a gas wrench of a suitable size; the help of a second person will not be superfluous here.
The hammer must be heavy, with a short handle; blows on the CV joint cage should be applied sharply (you must first pull back, unscrew or cut and remove the damaged cover).
Usually, in this way, it is possible to overcome the force of the locking ring and remove the outer drive from the axle shaft. Then all that remains is to rinse with gasoline and fill the joint with new lubricant. The new boot must be placed on the axle shaft and the repaired or new CV joint must be installed (snapped into place).
Further assembly work must be performed in reverse order. As elements for fastening the boot to the axle shaft and to the CV joint body, plumbing clamps of a suitable size are often used, which are more convenient than standard ones during installation.
Causes and breakdowns
In reality, the resource of the CV joint turns out to be significantly less, which is caused by operating conditions, poor quality of roads, driving habits and other factors.
The CV joint is popularly called a “grenade,” which is due to the external similarity of the element to this explosive device.
Here's what you should know about grenade malfunctions:
- Practice shows that the most common cause of CV joint failure is dirt, dust, and sand that enter the mechanism through a damaged boot;
- Sometimes the problem of a non-functioning grenade can be solved by replacing the boot. This is possible if the CV joint itself has not yet worn out due to exposure to contamination;
- If the damaged boot is not detected in time, the grenade will be completely worn out within literally 200 kilometers;
- If the CV joint fails, a strong crunching sound appears when cornering and accelerating. Such a symptom indicates the need to urgently replace the CV joint;
- The cost of new grenades is quite affordable; they are available at any auto parts store. But you should purchase those that meet the technical requirements of the VAZ 2109;
- If you have at least a little experience in repairing cars yourself, it is quite possible to replace a grenade with your own hands.
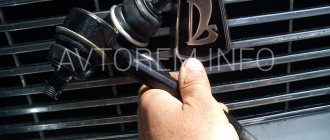
Lada 2109 Doll › Logbook › Replacing the outer CV joint without a hole or overpass
This article applies to all front-wheel drive VAZ cars (ninth family VAZ 2108-2109 2113-2115, tenth family VAZ 2110-2112, Lada Kalina, Lada Priora).
Unfortunately, not each of us has the opportunity to use an overpass or pit to repair our car, and we have to go to a service station to repair even simple car components. However, prices and quality of service in these services very often force you to postpone repairing your car until “better times.” Therefore, I recommend reading an article that will allow you, using some techniques, to replace a unit that requires a hole - without it. The drive of each wheel consists of two constant velocity joints (CV joints) connected to each other by a shaft. The CV joint located closer to the gearbox is called internal, and the one located closer to the wheel is called external. The outer CV joint ensures rotation of the wheel to the required angle, and the inner one provides angular and axial movement of the drive shaft.
As can be seen in the figure, the outer CV joint allows you to change the direction of rotation at a much larger angle than the inner one. But in addition to changing the direction of rotation, the internal joint compensates for the axial movements of the shaft caused by the steering geometry of the front wheels. Despite the fact that the outer and inner hinges are links of the same chain, the outer one fails much faster. This is explained by the fact that the dynamic loads on the wheel are much higher than on the gearbox. The outer joint is replaced when there is obvious wear, namely a characteristic crunch in motion when the wheel is turned at a large angle. A crunch when starting the car indicates wear on the inner joint.
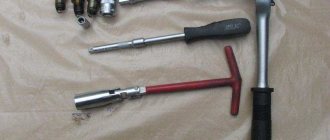
Tool
The necessary tool for replacing the outer CV joint: - a “30” socket with a long handle (for unscrewing the hub nut); — head on “19” (for unscrewing wheel bolts); — head at “16”; - jack; — bricks or hemp (for hanging the front of the car); — WD-40; - flat (slotted) impact screwdriver; - wire cutters; - hammer; — a new set of outer CV joints.
Note:
Contrary to popular belief, to replace the outer CV joint it is not necessary to drain the oil from the gearbox.
Signs of failure of the outer grenade (CV joint).
There are two options here:
- signs that your grenade has already broken,
- signs that the grenade will soon come out and break.
How to understand that a grenade will soon break.
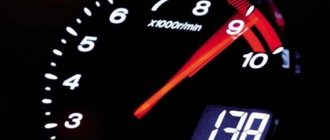
Of course, the first sign of a malfunction of the external grenade is a crackling sound. If you hear a crackling noise while driving with the steering wheel turned, it is definitely a CV joint. The greater the angle of rotation of the wheel and the harder you press on the gas, the louder the clicks. Another sign that does not always appear is vibration on the steering wheel at speeds above 80 km/h. The vibration is only slightly similar to the vibration from an unbalanced wheel. It usually manifests itself as a slight twitching of the steering wheel.
How to understand that the outer CV joint has broken.
If the CV joint breaks, the car will stop moving. In any gear engaged, press the gas, the speed increases, but the car does not move.
How to understand that it is the outer CV joint that has broken, and not the internal one or the clutch in general (the first signs of failure are similar to the signs of a clutch failure)? First of all, start the car and put it in any gear. Next, open the hood and look in turn at each of the shafts going from the box to the wheels (one short, the other long). If any shaft is spinning, it means that the CV joint has broken on this side.
I recommend not just visually looking at the shaft, but touching it with some long, hard object, such as a stick. The main thing is that there is nothing on it that can wrap around the shaft!!! When you touch the shaft with a stick, if it is spinning, you will feel a slight vibration. This is usually done in the dark, because it is difficult to understand whether a cylindrical object is spinning, especially in the dark.
Replacing the outer CV joint of a VAZ 2109 (2108, 21099)
You can replace the outer CV joint (angular velocity joint, “grenade”) on a VAZ 2109 (2108, 21099) without removing the wheel drive.
Necessary tools, accessories and spare parts
Soft metal drift
Key "30" (knob with head)
Key "17" (head or socket)
Pliers (preferably extendable)
Slotted screwdriver or circlip remover
New outer CV joint (they are the same for both wheel drives of the car)
New CV retaining ring
CV joint lubricant (CV joint-4 or equivalent) 40 g
New hub nut
If necessary, CV joint boot and clamps for it
Preparatory work
Place the car on a level surface and securely fix it (handbrake, wheel chocks)
Using a thin chisel, we bend the edges of the wheel hub nut (they are bent to fix the nut in the groove of the CV joint shank)
We loosen the tightening of the front wheel hub nut (where the replacement will be made) using a “30” wrench
We jack up and hang both front wheels of the car (this way we remove the clamping force of the anti-roll bar on the suspension and thereby make it easier to dismantle the necessary parts)
We clean the parts of the front suspension and wheel drive from dirt
The procedure for replacing the outer CV joint of the front wheel drive of a VAZ 2109 (2108, 21099)
Unscrew the wheel hub nut
We use the key at “30”. Remove the nut and washer underneath.
Unscrew the wheel hub nut using a “30” wrench
Disconnect the ball joint
It is attached with two 17mm socket bolts to the bottom of the steering knuckle. Unscrew and remove the bolts.
Disconnect the front suspension ball joint
Disconnect the outer CV joint shank from the wheel hub
We move the front strut towards ourselves, and pull the shank out of the hole in the hub. At the same time, we try to prevent the inner CV joint from being pulled out of the gearbox (we try not to move the drive towards ourselves too much). At this stage, it may be difficult to remove the shank from the hub since there is a splined connection that “sours” over time. To facilitate dismantling, you can hit a couple of times with a hammer through a wooden spacer (block) at the end of the shank.
Remove the CV joint shank from the hole in the wheel hub by moving the front strut towards you
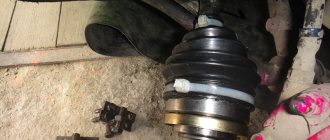
Removing the CV joint boot
Both clamps from the CV joint need to be removed - large and small. We use a screwdriver and pliers to disconnect the clamp lock. After removing the clamps, move the boot up along the “stick” of the drive (so as not to interfere).
Remove the CV joint boot clamp using a screwdriver
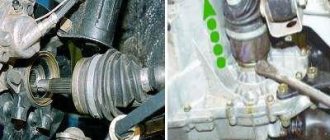
We remove the outer CV joint (“grenade”) from the drive shaft
We turn the CV joint so that its inside is visible. We knock it off the drive shaft using a soft metal drift. We strike the clip. At the same time, we try to hold the drive so that it does not jump out of the gearbox. The separator and the balls inside it cannot be hit. Usually a couple of blows are enough, since the CV joint is attached to a spring retaining ring, which is easily compressed.
We knock the CV joint off the drive shaft using a soft metal drift and a hammer
Use a screwdriver or puller to pry up and remove the retaining ring. There is no need to remove the thrust ring.
CV joint thrust and retaining rings 2108, 2109, 21099
Installing a new CV joint
We put new lubricant 20 grams into it. We install a new retaining ring on the drive shaft. We place the CV joint straight and hammer it onto the shaft with a hammer through a drift. We install the boot in place by first putting the remaining 20 grams of lubricant into it. We install clamps. We tighten the clamp locks with pliers. Before tightening, squeeze the air out from under the boot by squeezing it a little.
Notes and additions
The reason for replacing the outer CV joint on a VAZ 2109 may be the appearance of a crunching sound from the suspension when driving at low speed and simultaneously turning left (right). This suggests that, as a temporary measure to eliminate the crunching noise, you can try to wash the cavity of the CV joint (“grenade”) with diesel fuel or gasoline, dry it and apply new lubricant.
For more details about the malfunctions of the CV joints of the VAZ 2108, 2109, 21099 and how to diagnose and eliminate them on your own, see the page: “Signs of a malfunction of the CV joints of the wheel drives of the VAZ 2108, 2109, 21099.”
Installing new hinges
And the final stage remains - installing new hinges on the drive. You already know almost everything about how to change a grenade on a VAZ-2109. All that remains is to install a new element.
First, wash the shaft, get rid of dust and lubricant residues, then put on a new boot. Next, perform the following manipulations:
- Install a new retaining ring.
- Carefully, trying not to damage it, place the grenade on the shaft. To make it sit down, you need to apply several sharp blows through the wood spacer.
- Apply lubricant under the boot and on the inside of the hinge. By the way, the kit comes with a small amount, it is recommended to add a little more.
- Secure the boot with two clamps.
Once you have assembled the entire drive, you can begin installing it on the car. The work is done in reverse order. First put the inner CV joint in place, then the outer one.
Tighten the nut and secure it with a chisel. To prevent corrosion, you can apply a small amount of Litol to the nut and close it with a cap. Now you know how to change a grenade on a VAZ-2109 yourself. The procedure will not take much time, but you can save a lot of money. Workshops will charge about the same amount for repairs as a set of hinges costs (about 1,000 rubles).
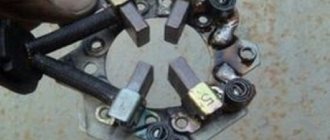
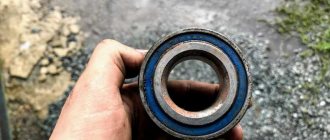
When is it necessary to replace the outer CV joint on a VAZ 2109
General view of the outer CV joint of the VAZ 2109 car
The constant velocity joint (CV joint) is designed to transmit torque to the drive wheel of the vehicle from the gearbox. This indicates that it is very important to maintain the unit in good condition; if its parts wear out, it is necessary to install new elements or completely replace the outer CV joint on the VAZ 2109. The VAZ 2109 car is equipped with two types of CV joints:
- Internal, which transmits torque from the transmission to the shaft.
- External, engaging with the wheel hub.
On a VAZ 2109 car, the outer element often fails, so it needs to be changed much more often than the inner one. This article suggests that you get acquainted with the rules and procedure for carrying out work to restore the normal operation of the outer CV joint with your own hands.
CV joints in a VAZ 2109 car
After front-wheel drive cars began to be produced, the question arose about effectively ensuring equality of angular velocities of the shafts - driving and driven. Further use of a crosspiece with four needle bearings in the cardan drive led to an increase in the dimensions of the unit, the price of the structure increased, and the torque began to be transmitted with great vibration; the greater the angle between the shafts, the stronger it was. Initially, the intended service life of CV joints is similar to the service life of a car, but after the start of operation it was revealed that wear still exists and the outer part of the unit wears out more. The use of a moisture- and frost-resistant material with good flexibility for the manufacture of the CV joint boot made it possible to protect the CV joints from rapid wear. But, nevertheless, the action of external factors, such as moisture, abrasive, constant deformations lead to a limitation of the service life of CV joints. In addition, there is a possibility that during operation and repair the boot may be damaged. Cracks may form on the protective rubber band, which is unacceptable for normal operation of the unit. The defect of the shaft and its curvature are less noticeable to the naked eye, but the use of the part in the future is unacceptable. Therefore, it is periodically necessary to monitor the condition of the outer CV joint on a VAZ 2109 vehicle, and, if necessary, carry out its timely repair or replacement.
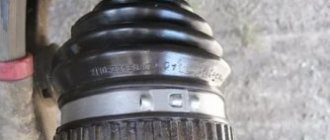
How to disassemble the outer joint of a VAZ 2109 car
If you hear knocking noises in the front-wheel drive when cornering, you need to check the constant velocity joints. The presence of play when shaking the drive shaft by hand, or a torn boot indicates that the outer CV joint of the VAZ 2109 needs to be replaced. The design of the unit is quite complex, the parts are not interchangeable; when the boot breaks, dirt gets into the joint and renders it unusable. Therefore, the best option would be to replace the external CV joint of the VAZ 2109. However, if the protective cover is damaged, the lubricant needs to be replaced, and the joint is disassembled to assess the condition of the parts. To do this, the CV joint is disconnected from the car, and then:
- Using a special device, remove the clamps in the photo, positions 5 and 9, holding the protective cover pos. 8, which then moves on the wheel drive shaft. If the right wheel drive needs to be tightened or unscrewed.
Outer CV joint for VAZ 2109
- The joint is knocked off the shaft using a drift or hammer. In this case, force is applied to the clip pos. 3.
Advice: Do not attach pos. 2 load.
- The hinge is washed.
Elements of the outer CV joint of the VAZ 2109
Positions: 1 – body; 2 – hinge separator, 3 – outer CV joint cage; 4 – balls.
Tip: Before you start disassembling the product, you need to note the relative position of all parts of the assembly, except for the balls. For this, paint or touchstone is used.
- The outer hinge is secured in a vice.
- The cage and separator are tilted so that one ball comes out of the groove of the CV joint housing as much as possible.
- The soft metal ball is squeezed out of the separator using a screwdriver.
- All parts are rotated so that the adjacent ball is in the same position.
- All the balls are pulled out. They can be pulled out in a different sequence - through one.
Advice: Do not allow too much force to rotate the separator. This can lead to blocking of the balls and difficulty in further disassembling the assembly.
- The separator with the cage is installed so that the elongated windows of the separator are located against the protrusions of the structure body.
- The separator is pulled out along with the holder.
- The clip is removed from the separator. To do this, a clip protrusion is placed in the elongated window of the separator, which is then rolled out.
Tip: If the separator has identical windows in the outer hinge, then for its removal it does not matter which window to use.
- All CV joint parts are washed again.
- Their condition is visually inspected. There should be no cracks on the separator bridges, there should be no deep holes on the race tracks, large scuffs, or corrosion on all working surfaces of CV joint parts. The maximum wear on the working surfaces of the elements should not exceed 0.1 millimeter.
- If it is not possible to replace the outer CV joints of a part on a VAZ 2109 car, the entire assembly is replaced.
Assembling the outer CV joint of a VAZ 2109 car
The order of work is the reverse of disassembly, taking into account the following operations:
- All parts must be lubricated with CV joint grease before assembly.
- When installing a separator with a cage into the hinge body, ensure that the marks that were made before disassembling the unit match.
- Installation of balls into the separator must be done by tilting the cage approximately at an angle twice as large as the separator.
- The hinge is filled with CV joint-4 lubricant, volume 40 cm3.
- A new retaining ring is installed strictly in the center of the shaft into the groove. The groove is filled with grease.
- The shaft rests against the cage, while it is necessary to maintain the alignment of the ring relative to the cage and the shaft.
- The end of the shaft is sharply hit with a hammer so that the retaining ring is compressed and slips through the hole in the cage.
- “Excess” air is released from the cover. To do this, use a screwdriver to pull the seating belt of the cover away from the drive shaft.
- Mounting clamps are installed.
- The presence of cracks in the area of fixation and tightening with clamps, deformations, and traces of contact of clamps with the road surface are checked. If they are present, the clamps are replaced with new ones.
- After completing the work, the CV joint should turn without jamming, smoothly with hand effort.
Replacing the outer CV joint of a VAZ 2109 car
The instructions for car care for the VAZ 2109 suggest removing the outer CV joint on the raised part of the car and the removed wheel on the VAZ 2109. So:
- The hub nut needs to be unscrewed.
- Remove crankcase protection.
- Disconnect the ball joint from the lower suspension arm. If it is pressed in, both the support and the lever are unscrewed at the same time.
- Remove the ball joint.
The ball joint is removed
- The rack is moved to the side, while the CV joint must be bent. The pulley that enters the hub bearing must be at an angle to the drive shaft.
- The hinge shaft on which the splines are located must be knocked out of the bearing from the outside of the wheel. A metal spacer is used for this.
- The boot is removed.
- The grenade gets knocked off the drive shaft.
- All old grease is removed. An aerosol like WD-40 will help make this operation easier.
Advice: Replacing the outer CV joints of the VAZ 2109 is carried out simultaneously with replacing the rings - the retaining and thrust rings located inside the grenade. The entire assembly is lubricated generously with lubricant.
- Having installed the new CV joint on the drive shaft, it must be centered so that the fork fits in smoothly without jamming.
- Perform final pressing of the drive shaft.
- Install the hinge into the seat.
- Squeeze the boot with a clamp.
- Reassembling the entire assembly is done in reverse order.
How the outer CV joint is replaced on a VAZ 2109 car can be clearly seen in the video. Timely work to ensure the normal operation of CV joints will ensure reliable operation of the VAZ 2109, and the cost of subsequent repairs will be reduced.
Tools for repairs
The procedure for replacing VAZ grenades is quite simple, but you will have to suffer a little, since knocking the old element off the drive is problematic. You need these tools:
- Set of sockets and keys. In particular, you will need a socket wrench or a “30” socket.
- Jack (it is best to use a hydraulic one paired with a support).
- Hammer.
- Chisel. Before replacing the grenade on the VAZ-2109, it must be removed; to do this, you will need to loosen the nut.
- Capacity 4-5 liters.
- Puller for retaining rings.
- Vise.
You will also need a new repair kit. It consists of a grenade, a locking ring, lubricant, a nut, a boot and two clamps.
Replacing the CV joint on VAZ cars with your own hands
How to replace the CV joint on a VAZ 2110, 2114, 2108, 2109, 2115 and any others - step-by-step instructions with pictures
Rotation from the gearbox is transmitted to the front wheels of the VAZ 2108-2115 through 2 drive shafts, which use CV joints - constant velocity joints. They are capable of transmitting rotation without loss even at an angle between the shaft elements of up to 70°.
CV joint device
This unit consists of balls, a separator, outer and inner races. The hinges are held on the shaft by splines and retaining rings.
When to replace
In order for this part to work long enough, sand, dirt and dust should not get into it. Contamination significantly accelerates wear and reduces the service life of the unit. But to protect against this, a boot is provided, which can become unusable relatively quickly. Therefore, timely replacement of the boot will keep the CV joint in working condition for a long time.
The wear of the CV joint is indicated by a noticeable crunch and extraneous sounds when turning the steering wheel. In this case, it is recommended to replace the unit.
Necessary tools and spare parts
Before repair work, you need to purchase a new CV joint, boot, clamps and CV joint-4 lubricant. You also need to prepare the following tool:
- keys and sockets of the most popular sizes;
- special remover of ball joints and steering rods;
- wooden or rubber hammer;
- jack;
- knife;
- WD-40 lubricant;
- dry rags.
Types of auto parts
Various types of CV joints are sold. Among all the diversity, it is worth highlighting the following types:
- Twin cardan joints (these are two cardan joints mated to each other).
- Tripod (allow large axial movements).
- Ball ones (are the most common).
- Cam-disk (KrAZ-255B, Ural-4320).
- Crackers (prone to overheating at high shaft rotation speeds, installed more often on cargo vehicles).
A grenade can also be:
- Internal (connects the axle shaft and gearbox).
- External (connects the wheel hub to the axle shaft).
Depending on the condition of the CV joint, you can purchase:
- New.
- Old, in working order.
- Used, requiring replacement of individual components.
Different factories can produce grenades for the VAZ 2109. Based on this, parts are classified into two types:
According to the manufacturer, CV joints can be of the following brands:
Grenades for VAZ 2109 are sold at various sales points. Therefore, you can buy a car part:
How to replace a CV joint on a VAZ-2109
Any experienced car mechanic is ready to say that replacing the VAZ-2109 CV joint may be necessary for a large number of reasons.
CV joint - constant velocity joint. The need for replacement requires immediate action at the slightest suspicion, because the safety of passengers depends on the integrity of this unit.
Determining the malfunction
First of all, when driving, there may be extraneous noise from the front. First you need to make sure that the CV joint boots are not torn and there are no cracks or oily marks on the surface. To check, just turn the steering wheel all the way and carry out a visual inspection behind the wheel.
Found any damage? Change the boot immediately so that stones, small particles, and water do not subsequently get into the CV joint mechanism. Otherwise, the hinge will quickly become unusable.
It is quite easy to determine the need to replace the hinge itself - during turning maneuvers the driver notices characteristic knocking noises. The presence of play during swinging of the drive shaft will help confirm this fact.
Before starting work
First of all, put the car on the handbrake and place wheel chocks under the rear wheels. While the car is not raised, unscrew the hub nut and first remove the protective cap. Keep in mind that this knot is quite tightly tightened, and it will take a lot of effort to unscrew it. Already at this step you can slightly loosen the wheel bolts.
Actually, replacing the CV joint
Now, in a step-by-step diagram, we will look at the entire work process:
- Raise the front of the car and place the body on supports. The bolts are unscrewed and the wheels are removed, and the hub nut stop washer is also removed.
- The stage of disassembling the steering tip is suitable. The bolts are removed from the bottom of the steering knuckle, the steering wheel is turned to the side where the part is changed until it stops.
- Now you need to pull out the spitz end of the outer CV joint from the VAZ-2109, only after the strut and steering knuckle have already been pulled out. Next, push out the inner CV joint, which is attached to the gearbox. To do this, it is better to use a mount.
It is important to note that if work is performed on all CV joints, after removing one drive, place a lock in the box. An old internal CV joint can serve as a device. This is done to ensure that there is no displacement of the gears. Otherwise, it will not be possible to put the new part in its place.
- Check for traces of oil in the gearbox area - if there are any, then the CV joint seals will need to be replaced.
- Clamp the drive shaft with a vice, remove the clamps from the hinges and remove the boots if they are still intact. Torn covers are simply cut off with a knife.
- Take a hammer and a drift. Knock the joints off the shaft, applying all your force to the joint cage. The same steps are performed for the outer CV joint.
- After dismantling the part being replaced, installing the new hinge is done in the reverse order.
If you only need to change the boots, do not forget to wash the joint (gasoline is suitable for this). This way you will get rid of dirt and old grease. The new protection must be placed on the shaft, but remember that the length of the left and right is different. It is important to place the anthers as intended. When replacing the protection, it is advisable to replace the lubricant in the hinge and also check that there is enough of it there.
Possible malfunctions
In common parlance, many VAZ owners call the unit in question a “grenade” - this is exactly what it looks like in appearance.
Most often, CV joints break after the boots are damaged. In this case, dirt, sand, etc. begin to get into them. Foreign particles quickly destroy the assembly, and, of course, it has to be replaced.
If a damaged boot is detected in a timely manner, then in most cases serious trouble can be avoided. After replacing it, all that remains is to wash the CV joint and return it to its place. When the problem remains out of sight of the VAZ car owner, then there is a high probability that the grenade will become unusable literally after 2-3 hundred kilometers.
Also check out
- Install a new CV joint.
- Put on a new boot, fill the shaft with grease, and drive the CV joint onto the splines.
- Using pliers, clamp the boot clamp on the drive shaft, use a screwdriver to remove the outer edge of the boot, and clamp the outer clamp.
- Place a new retainer on the splines and install the drive into the gearbox. To ensure that it is tightly fixed in the side gear, you need to hit it with a hammer (using a wooden attachment) several times along the entire axis of the shaft.
It is better to replace the old hub nut with a new one.
Assembly is performed in the reverse order as written.