Hello to all car enthusiasts! Many car owners prefer to repair their vehicles themselves. And one of the fairly frequently performed tasks is working with the CV joint boot. As you understand, the topic of our conversation today will be replacing the CV joint boot without removing the CV joint.
This may seem like an impossible task to some. In fact, this is quite possible. No fancy device is required for the job. But the normal operation of the axle shaft, drive and other components will be restored.
If anyone is interested, you can read about the CV joint, its structure, and types in this material. Here you will also learn about the concept of external and internal joints of different angular velocities, for example. We will focus on the issue of replacing the boot. After all, it is precisely because of this that grenade failures mainly occur. This is often called a CV joint.
Lada Priora Hatchback “Priorka” › Logbook › Replacing the boots of external CV joints
Even when replacing the right-hand drive oil seal in the gearbox, this picture appeared to my eyes.
This is the right outer one. I changed it today. 8 years and 128440 km. Quite a hemorrhoid task. I immediately bought original 154RU BRT kits in Avtopiter. Inside were truly original BRT 2110 anthers. They were glossy on both sides.
I didn’t use the lubricant from the kit - VMP-AUTO started putting its dubious slurry here too. And there’s not enough of it there.
I started with the right CV joint - the most problematic one.
Surprisingly, it was quite easy to remove with the remover.
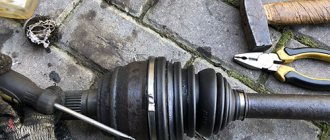
When trying to gently pull off the original boot, it immediately tore at the site of the ring crack near the small clamp - which means it was just in time.
There was very little lubricant there from the factory.
I disassembled the CV joint and washed it in white spirit (I spent 1 liter in total) until the pig squealed. It also took a very long time to clean the CV joint from rye along the large diameter of the boot. The photo shows that moisture penetrated under the rubber. I used a file and a saw blade. It took me a long time to clean it to an acceptable condition.
We injected lubricant into the CV joint straight from the tube. I didn't regret it. And installed the home kit from the kit. I lightly lubricated the CV joint housing under the boot and the boot under the clamp with grease. At the same time, the clamp compressed the boot very well along its entire diameter.
I moved to the left side... Here the boot was a little better.
There was very little lubrication. The same rust on the CV joint body under the large boot diameter. And here the most interesting thing began - the CV joint did not want to be removed. I fooled around with him for an hour. At some point, one of the bolts on the puller simply broke off... That is. The CV joint has not yet come off the ring and the puller is hanging tightly on the drive...
Considering that the puller ring was still secured, I once again centered the second horseshoe ring on the inner race of the CV joint and began to pull the extrusion bolts... And the CV joint came off! I orgasmed for about 10 minutes. But the puller ring was still firmly attached to the drive... I was lucky that my neighbor in the parking lot had an angle grinder, and I was next to the guard’s booth, who had 220V. I was also lucky that I threw a 5-meter extension cord into my bag. Whack! The bolt was sawed off and the puller ring fell to the ground like winter crops...
If you look at the photo carefully, you can understand why I had problems removing the left CV joint. I secured the locking horseshoe on the wrong side!
After the right CV joint, I really got confused and didn’t notice the error. The extrusion bolts were not centered in the recesses of the mating horseshoe and had increased friction when rotating.
Next, wash again, clean off the rye and install a new boot.
Source: www.drive2.ru
Which one is better to choose anther?
When choosing a part, you should focus on the manufacturer and the material from which the case is made.
The quality of a product is usually clearly dependent on its price, unless, of course, it has been verified by several suppliers.
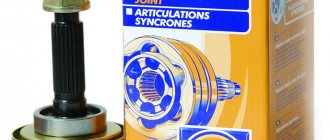
Some of the best and most widespread manufacturers in the spare parts markets are the brands GKN (Loebro, Spidan), Maruichi , SKF . They are also the most expensive, which indicates the best materials used. Such boots will never suddenly break, will last a long time, are very durable, and the repair kits contain everything you need, including high-quality specialized lubricant in the right quantity.
How to replace a grenade on a Lada Priora car?
According to the manufacturer's recommendation, replacing a grenade on a Priora means installing a new front wheel drive assembly - 2 CV joints and an axle shaft on each side. Since a new unit costs a lot of money, the cost of the work is too large. Therefore, in practice, only the worn part of a given unit is replaced - the outer or inner grenade, or even both at once. If you know how to change these parts yourself, you can save a lot on car service costs.
Repair or replacement of CV joint?
If a car owner, without regularly inspecting the CV joint, has caused significant damage to the main elements, then, continuing on the wave of “savings,” he begins to think about repairs, in the hope of avoiding such expensive repairs. However, even car service specialists often shrug their shoulders in such cases. And the point here is not at all about the desire to sell an expensive service to a motorist with all his might.
The elements of the CV joint are very closely connected to each other, as a result of which conditions arise that provide significant wear in sectors where significant loads are present. Lubricant leakage and debris accumulation on surfaces increase the abrasive effect, exacerbating corrosion and accelerating wear.
Thus, motorists with little driving experience should not think about repairing the CV joint, but replacing it. The complexity of the design and technology of their production negates the chances of carrying out repairs yourself - this is the price of lack of attention to the car.
New CV joint
Replacing a CV joint or its components on your own is a rather labor-intensive and time-consuming process, and a person who does not have experience in this matter may have difficulties. To replace components, you will need the most common set of tools:
- Complete CV joint, new boots, grease and clamps;
- A regular jack, or a special lift;
- Box with keys.
When is replacement required?
The hinge mechanisms of the Lada Priora, which transmit rotation from the engine to the front wheels, are considered quite reliable and in some cases last 100-150 thousand km. Grenades should be replaced in the following cases:
- The car's mileage is more than 100 thousand km;
- the parts of the unit have become unusable, as evidenced by crunching sounds when turning the front wheels.
The first type of replacement is preventative. Recommended for motorists for whom a car is a tool for making money, which must be constantly in combat readiness and serve without fail. Replacement due to wear is a more common option; it is practiced by most Priora owners.
In order to change expensive CV joint parts as rarely as possible, it is important to promptly detect torn boots, through which dirt and dust enter the mechanism. Grenades cannot be repaired; they only need to be replaced. It is much easier and cheaper to replace leaky anthers so that the assembly lasts as long as possible.
Repair methods
We have already found out that the main malfunction of the grenade is associated with a torn and damaged boot.
Accordingly, in order to fix the problem, you need to do something with this casing, which is shaped like a cone.
In the case of doing the repair yourself, there are 2 options:
- Emergency
. It is carried out when a breakdown catches you on the road. Literally in the field, it is necessary to partially reanimate the CV joint and its boot. In this case, the CV joint boot is not even fully replaced without removing the CV joint. But the method is still useful for emergency situations; - Garage
. Here you are already in the garage, you have a set of tools, a pit or even a lift at hand. Some are sure that there is no way to do without removing the hinge. It's a delusion.
Now we will talk about each repair method separately.
Both options can be used on various vehicles, be it:
- VAZ 2110;
- Lada Kalina;
- Renault Logan;
- VAZ 2114;
- Lada Priora;
- Chevrolet Niva (Shniva);
- VAZ 2115;
- Lada Granta, etc.
Yes, it is generally better to conduct such experiments on domestic cars, as well as on budget foreign cars. Their design is simpler, and spare parts are not so expensive if you suddenly need to correct your own mistakes.
But the price of a professional service for replacing the boot is quite impressive. This is another reason to do everything yourself.
Preparing for work
To replace the grenades, you need a car lift or an inspection ditch, since some of the disassembly work is performed from below. The following tools and devices will be required:
- standard set of socket heads with a knob;
- mount;
- open-end wrenches;
- metalworking tools, which include screwdrivers, hammer and pliers;
- a device that helps press the steering rod ball pin out of its socket in the strut.
If you don’t have a steering rod puller, then it’s easy to find one from fellow car enthusiasts or just buy one; it’s inexpensive. This is a steel cylinder with a slot and a bottom into which an extrusion bolt is screwed. To carry out the replacement in the inspection hole, you will also need a jack with a wheel wrench to lift the car. To completely disassemble the unit, it is advisable to have a vice and purchase CV joint-4 thick lubricant.
Disassembling and removing the outer CV joint boot
Drive the car into a viewing hole or overpass and put on the handbrake. Be sure to install chocks under the wheels. For maximum safety, you can set it to first gear.
The next step is to loosen the nuts that tighten the CV joint, and also remove the cap that ensures reliable fastening of the drive. We jack up the car and install supports under the sills. Remove the wheel and press out the tie rod ball assembly. Unscrew the two bolts securing the lower ball joint to the hub.
We assess the condition of the lower support. Remove the hub from the splines on the drive shaft. There are two ways to disassemble the drive, used exclusively in relation to the external CV joint:
The first method is to knock down the outer grenade without pulling out the CV joint located inside:
- Remove the clamps on the boot of the outer hinge, cut and wipe off the excess grease present on the hinge.
- Firmly clamp the shaft with a gas wrench.
- Knock out the CV joint with a hammer.
Disadvantages of this method:
- It is unacceptable to drain oil from the box;
- knocking down a grenade is a very inconvenient operation.
The second method involves completely removing the drive :
- Drive a pry bar between the transmission housings and the inner joint.
- We pull out the shaft, which is part of the gearbox. This is done using simple forward and backward movements.
- We completely remove the drive.
Disassembly procedure
The first operation is not removing the wheel, but unscrewing the large wheel bearing nut. It is caulked, so it will be much more difficult to loosen when the car is raised. After this, the wheel bolts are loosened and the car is raised with a jack.
Do not forget to place reliable supports under the rear wheels to secure the car.
If the Priora has a metal sump protection installed, then it also needs to be removed in advance. In addition, it does not hurt to partially empty the gearbox oil sump to avoid liquid lubricant leaking through the open hole after removing the drive.
What to do if the boot ruptures on the road
It is absolutely unacceptable to move with a torn boot. The hinge will not tolerate even the slightest contamination. Mixed with lubricant, these abrasives will quickly wear out its precision-made and polished grooves and render the CV joint unusable. But it is not always possible or willing to use a tow truck or carry out road repairs.
Temporary protection can be provided in a variety of ways, from wrapping the remaining boot with tape to cold vulcanizing holes and cracks.
Even a simple cloth wrapped and secured around the cover will help filter out dust. The main thing is to do this reliably and control the condition of the patch to the point of repair. And when replacing the cover, be sure to disassemble the hinge, rinse it thoroughly and fill it with new grease as required.
Dust will definitely get there, even if it is not visible. During operation, the temperature of the unit changes; it literally works like a pump for dirty air under the car. It is easy to check the tightness by simply squeezing the case with your hand. You can also check the condition in doubtful cases of the presence of surface cracks, although usually the problem area is immediately noticeable by the grease protruding outward.
Installation of new hinges
After disassembling the drive, it is necessary to install new parts and reassemble the transmission in the reverse order. Replacement is done as follows:
- The small clamp is put on the axle shaft first, followed by a new boot. The clamp must be placed around the end of the casing and tightened. It is better to turn the boot in the other direction so as not to interfere with the installation of the hinge.
- Add SHRUS-4 lubricant to the hinge mechanism. According to the instructions, there should be at least 40 cm³ in the outer grenade, and 80 cm³ of thick lubricant in the inner grenade.
- Place the grenade on the shaft, making sure the splines match. Using a wooden adapter, press it as far as possible with gentle hammer blows.
- Pull the boot onto the grenade, apply a large clamp and tighten it. In the same order, the operation is performed on the other side of the axle shaft.
Now the drive assembly can be put into place. In order not to confuse the hinges, you should follow the mark placed on the axle during disassembly. The assembly is mounted into place from the inspection ditch, the splined part of the internal grenade being inserted first. To seat it in the slots all the way, you will have to rest the axle on the lower lever and apply several blows with a hammer through a piece of wood from the other side. Further assembly proceeds in reverse order.
Source: korchim.ru
Garage repair
Now let's get straight to replacing the boot without removing the hinge itself, that is, the CV joint.
It is quite possible to replace the anthers without dismantling the drive. After all, the main task is to release the outer end from the hub. Then all that remains is to simply pull the new seal, like a contraceptive (condom), across the entire shaft.
Before tightening, be sure to turn the boot inside out correctly.
After this, you will need to cut the old element, install new clamps, and add high-quality lubricant. Since the new boots are highly elastic, you can tighten them without any problems. In this case, reliability will not be affected.
Step-by-step instruction
If you decide to do everything yourself, then you need to follow a certain sequence and follow the instructions.
The whole process roughly looks like this. Here it is worth making allowances for design differences between different cars.
- First, place the car on a pit or lift. The vehicle must be securely secured and prepared for work;
- Unscrew the drive nut first. There is a possibility that it will have to be changed;
- If you have a MacPherson type suspension, you will need to unscrew the ball joint nut;
- After this, you can pull the hub to the side. This will allow you to pull out the outer part of the drive;
- Armed with a pry bar or large screwdriver, pry up the inner CV joint and pull out the drive;
- The drive is in front of you. Place it where it is convenient for you. Dismantle the old clamps, remove the retaining ring;
- Now carefully pull on the new boot;
- Connect the 2 parts of the drive until you hear a characteristic click;
- Return the locking ring to its place and fully tighten the fresh boot;
- All that remains is to tighten the clamp and return everything to its place.
The only problem is that this method is not suitable for everyone and not always. First you will need to purchase a special elastic boot. Many commercially available parts are extremely hard.
Therefore, in the case of their use, there is no need to talk about any possibilities of twisting and pulling, like a condom.
Special devices are also used to tighten the anthers. But they are not so easy to get, plus the price is high.
In what cases is it necessary to replace the inner CV joint?
Replacing the internal CV joint on front-wheel drive VAZ vehicles is required if the following symptoms are present:
- Crunching and knocking noises when driving and accelerating in a straight line;
- Vibration and shock when changing gears;
- Significant play when testing by hand;
- If the “grenade” fails completely, the vehicle cannot move further.
” alt=””> The main reason for the malfunction of the VAZ “grenade” is the entry of water and dirt through the hole in the torn boot. The second possible cause of failure is a sharp press on the gas with the wheels fully turned, although in this case you risk killing the external rather than the internal grenade.
In addition to the above, replacing the internal CV joint on VAZ-2110 and other models may be necessary if the quality of the previously installed joint is poor.
Removing the ball joint
It is necessary to disconnect the stand from the lever. To do this, you need to unscrew the ball joint. Either from the lever or from the stand. It is more convenient to unscrew the two bolts from the rack. Which secure the ball joint.
If you unscrew the nut from the lever, the ball joint will not come out. The finger is a cone. A puller is required for removal. Or you will have to apply strong blows to the junction of the lever and the finger. The boot may be damaged. After the bolts are unscrewed, it is imperative to pay attention to the ball joint. It shouldn't be loose. If you crank. It should sit tightly in the ball. If it dangles and there is play. The ball joint must be replaced immediately. To do this, unscrew the nut and use a puller to remove the ball joint pin. You can simply apply a few sharp blows with a hammer to the side of the lever. Where is the pale inserted?
Since the connection is conical. As a result of the impact, the hole will be deformed and the finger will be squeezed out. But this is a rough option. And it doesn’t always help to use a special puller. After the strut is disconnected from the lever, you can pull the CV joint out of the hub.
Replacing the inner CV joint with your own hands
” alt=””> The procedure for replacing a “grenade” is the same for the entire front-wheel drive VAZ line, starting with 2108 and ending with VAZ-2115, “Kalina”, “Priora”, “Grant”. Before removing the inner CV joint, the oil is drained from the gearbox. Then proceed according to the following algorithm:
- Unlock and unscrew the hub nut. To make the work easier, a piece of pipe about 1 meter long should be put on the key.
- The desired side of the car is hung on a jack or lift.
- Remove the wheel.
- Remove the washer located under the hub nut installation site.
- Disconnect the steering tip.
- The CV joint is removed from the hub.
- Using a pry bar, remove the drive and internal joint from the gearbox.
Note: when removing both drives at the same time, a suitable mandrel should be installed in their place.
How to change the “grenade” with the drive removed? To do this, clamp the shaft in a vice, loosen the clamps and remove the boot. After this, the hinge is knocked off the splines with hammer blows.
The new CV joint should be hammered by applying light blows to its end with a hammer. For this it is better to use a wooden mallet. The “grenade” is first filled with a special lubricant.
Before installing a new constant velocity joint, it is necessary to clean its seat from old grease and install a new boot. Assembly is carried out in reverse order.
The repair is considered complete after successful sea trials. In this case, there should be no extraneous sounds from the drive side in all modes of vehicle movement.
Disassembling the drive and replacing the boot
The car is driven into a pit, chocks are placed under the wheels, and the car itself is left in first gear.
Before completely removing the wheel, loosen all the wheel nuts.
The protective cap of the nut securing the drive to the hub is also removed.
To prevent the nut from unscrewing from the shaft, it is centered around the circumference, which is why it has bends that fit into a groove made in the shaft.
These bends need to be aligned, this is done with a thin screwdriver or a drift and a hammer.
After aligning the bends, using a socket and a powerful wrench, the nut is unscrewed, and the washer located under it is also removed.
Next, the car is jacked up and wooden stands are placed under its sills.
The wheel nuts are unscrewed and the wheel is removed.
Next, work is done under the car.
If there is a crankcase protection, it can be unscrewed. Then the oil from the gearbox is drained through the drain plug into the prepared container.
Next, you need to unscrew the two bolts securing the lower ball joint to the hub.
This will make it possible for the latter to move sideways. At the same time, you can check the condition of the support itself.
The steering wheel must be turned all the way to the left so that the drive is completely shifted in the inner CV joint, ensuring its minimum length.
After this, the hub is removed from the splines of the drive shaft.
The outside of the drive will be removed.
Then you can go in two ways.
Knock down the outer “grenade” without removing the inner CV joint.
To do this, you need to remove the boot clamps, and then cut the boot, and then wipe off the existing grease on the hinge.
Then you need to prevent the drive from moving on the internal hinge.
To do this, take a small vice or a butt wrench, clamp the shaft in them and hold it firmly in your hands.
An assistant, using a soft metal spacer and a hammer, knocks down the CV joint, striking the inner race of the hinge.
With this method, there is no need to drain the oil from the box. But there is a possibility that when striking, the inner race will jump out of the outer inner CV joint.
Also, shooting down a “grenade” in this way is not very convenient, since this work will be done in a limited space.
Complete removal of the drive from the vehicle. To do this, a pry bar is driven between the gearbox housing and the internal joint and the shaft entering the gearbox is pulled back and forth.
After this, the drive is completely removed.
The advantage of this method is also the ability to assess the condition and replace the gearbox seal, through which oil often leaks.
In the future we will consider work with the drive completely removed.
Boot replacement and repair
The boot can be changed without removing the grenade if you have special equipment. His work is demonstrated on video. ” alt=””> If you do not have such a device, to remove and replace it, you must perform the above-described procedure for removing the drive and dismantling the hinge. The procedure is necessary if there is even minor through damage on the boot.
Temporary repairs to the CV joint boot can be made without removing it from the vehicle. To do this, you need to thoroughly clean and degrease the damage, then seal it with a piece of rubber and cyanoacrylate-based glue (superglue).
Temporarily update the CV joint boot
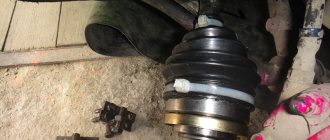
The CV joint boot broke. Before replacing it, I wrapped it in film and secured it with electrical tape. I walked more than one thousand kilometers on duct tape until the long-awaited boot arrived and everything was “OK”.
For temporary use, enough to get to a workshop or garage.
You can use a bag or a glove instead of film. This makeshift is used to avoid losing the hub and bearing later.
In theory, if the boot is torn, there is already water and sand there. It is necessary to remove, wash, new grease and a new boot.
In general, the road repair of the boot is described. Only with cling film is it much more convenient, faster and, in principle, really lasts for a long time. Jeepers and ATV riders know.
CV joint repair
As mentioned above, the hinge cannot be repaired. Conventionally, one of the repair measures includes washing the “grenade” after driving with a damaged boot.
Washing is carried out at the same time when the damaged boot on the pomegranate is replaced. The hinge is carefully knocked off the shaft, inspected for damage and thoroughly washed to remove any dirt and grease in gasoline or kerosene.
After washing, the assembly is filled with lubricant and mounted in place, having previously installed the boot. The procedure makes sense only if there are no obvious signs of a joint malfunction.
A crunchy or knocking part definitely needs to be replaced, since wear forms on the working surfaces of the inner race, and it is no longer possible to stop the destruction. Continued operation of the vehicle may be dangerous for the driver and other road users.
Source: znanieavto.ru
CV joint diagnostics
First, let's introduce a little theory and say that there are two types of CV joints - internal and external. The inner CV joint is located in the gearbox, from where the mechanism transmits rotating motion directly from the transmission to the outer CV joint. External is a mechanism whose elements are connected to the wheel hub, from where the process of transmitting rotational motion to the wheel from the hub itself is carried out.
External and internal CV joints
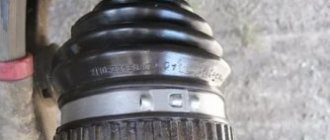
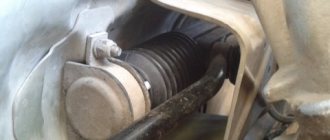
At first glance, it may seem that they have the same service life, but, despite the similarity in design and components, this is not the case. For example, the outer CV joint directly interacts with the wheel, from which it receives energy from impacts received during the trip. The CV boot, which is in “relative” safety, is made of soft rubber, to a greater extent than other elements of the unit, subject to wear from various climate influences, be it excessive dryness or humidity, temperature influences, contacts with processed petroleum products, etc. If the tightness of the rubber boot is broken, then sand and dirt that gets into it will quickly lead to a malfunction of the outer CV joint.
External CV joint with boot
A motorist can know that the CV joint is faulty by the following signs:
- A rich crunch heard at every turn of the car. At the same time, the crunching sound is not heard every time you turn the steering wheel, but only when you turn left or right during a trip;
- The sound of a “crunch” makes itself felt during the clutch. First of all, the sound appears when starting from a stationary state;
- If during diagnostics play was detected at the hinge joints. The play becomes clearly visible during the inspection of the CV joint when the wheel is in a suspended state;
- Presence of jerks during acceleration.
Diagnostics of CV joints is carried out in the following “simple” ways:
- Method number 1. The driver turns the steering wheel in one direction or another all the way, after which the gear is engaged and an attempt is made to quickly start from a place. The presence of a characteristic crunch during this operation indicates a significant degree of wear on the “grenade” as a whole, or its individual elements, or that it is already in a faulty state and requires replacement.
Method number 2. Using a special lift (sometimes this can be done with a jack), the car is raised on one side, or the wheel is hung from the side of the expected breakdown. In this condition, a visual inspection of the condition of the vehicle components is carried out, and the presence of possible play is also detected. Usually, play is not detected unless it is minor.
Method No. 3. Using a lift, the front of the car is raised. Next, the driver should go to first gear, or on some cars, turn on “D”. The manifestation of a CV joint malfunction in this condition will not take long to occur: a distinct crunching sound should be heard when the wheels rotate.
Even at the “initial inspection” stage, with the car raised, some conclusions can be drawn. For example, as soon as the CV joint becomes visible, you should pay attention to its appearance. The integrity of the corrugated rubber usually indicates the absence of malfunctions. If there is a violation of the tightness of the CV joint, and traces of leaked lubricant from the boot are visible everywhere, this indicates a missed moment for a possible repair, since dirt and sand could have already worn away the moving elements of the structure, which led to problems while driving.
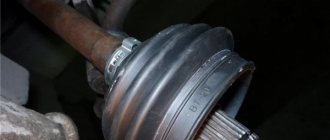
Torn CV boot
Sometimes you can only get by by replacing the boot, but, in any case, the best solution would be a trip to a car service center for a comprehensive diagnosis.
Replacement of Priora Inner CV Joint Boot
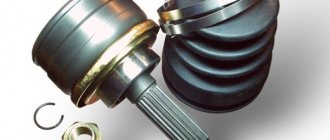
CV joint (constant speed coupling). This is a mechanism that allows torque to be transmitted between shafts off-axis. The device is actively used in front-wheel drive cars. There are two of these on each shaft coming out of the gearbox. internal and external. Repair is not possible; If the device fails, it is replaced as an assembly.
When is it necessary to replace the internal CV joint?
Replacing the CV CV Joint with VAZ Front Drive is necessary if there are the following symptoms:
- Crunching and knocking when moving and accelerating in a straight line;
- Vibration and shaking when changing gears;
- Significant play during manual test;
- When the “grenade” completely failed. inability to move the car further.
” alt =””> The main reason for the failure of VAZ grenades. water and dirt entering through the hole in the torn saw. The second possible cause of failure. sudden throttle pressure when the wheels are fully unscrewed, although in this case you risk killing the external rather than the internal grenade.
In addition to the above, it may be necessary to replace the CV CV-21 with a VAZ-2110 and others if the hinge is of poor quality.
Do internal joint repair summary
” alt =””> The procedure for replacing grenades is the same for the entire line of front-wheel drive VAZ cars, starting with the VAZ 2108 and ending with the VAZ-2115, Kalina, Priora, Granta. The oil is drained from the transmission before removing the inner joint. Then proceed according to the following algorithm:
- Unlock and unscrew the hub nut. A pipe about 1 meter long should be installed to facilitate the operation of the wrench.
How to change the boot on a Priora grenade?
CV joint (constant velocity joint) is a mechanism that allows you to transmit torque between misaligned shafts. The device is actively used on front-wheel drive vehicles. On each shaft coming out of the gearbox there are two of them - internal and external. Repair is impossible; if the unit breaks down, it is replaced as an assembly.
Replacing the outer CV joint boot of VAZ 2109, 2110, 2114, photo, video
For front-wheel drive cars of the VAZ family, from model 2108 to model 2115, as well as more modern Kalina and Priora cars, maintenance of the drive wheels comes down to periodically checking the condition of the CV joint boots, both external and internal.
Otherwise, the ball-type constant velocity joints with guide grooves used on these machines do not require maintenance.
Reasons for replacing the boot
The service life of CV joints can be reduced very quickly due to damaged boots. Dirt and dust that gets inside the “grenade” act as an abrasive.
And since the hinge elements are heavily loaded and are constantly in contact with each other, the trapped dirt very quickly damages them and the “grenade” fails.
Even if you do not check the condition of the boot, the hinge itself will signal that it is damaged.
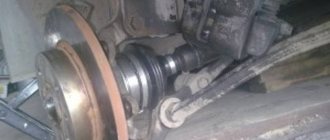
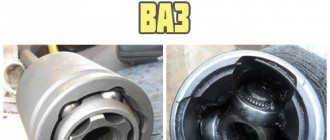
For example, as shown in the photo below, the CV joint turned.
When making turns, the CV joint with dirt trapped in it will begin to crack loudly. If the damage is not quickly repaired, the “grenade” will soon simply disintegrate and will have to be completely replaced.
But replacing a CV joint will cost much more than a boot. Therefore, upon discovering damage to the boot, or hearing a cracking sound from the CV joint, it is better to immediately begin troubleshooting the problem.
And such a malfunction is eliminated by replacing the boot, washing the CV joint and adding new lubricant to it.
Next, we will consider the sequence of actions for replacing the external CV joint boot of front-wheel drive VAZs using model 2199 as an example.
We choose the outer boot because it is damaged much more often than the inner one, since it is located near the wheel hub and the impact on it is more intense, therefore the chance of a crack appearing on it is greater.
Preparation
So, damage to the boot on the VAZ 2199 has been identified. You can replace it and wash the CV joint itself in the garage, the main thing is that there is an inspection hole.
Tools you will need:
- Set of wrenches (socket wrenches, open-end wrenches);
- Set of heads and collars;
- Metal brush;
- WD-40;
- Mount;
- Hammer;
- Jack;
- Wheel chocks;
- Wooden coasters.
You will also need a new boot, CV joint grease-4, a container for collecting oil, a container with gasoline for washing the CV joint, and rags.
It is better to do all work together with an assistant.
For convenience, we will describe the process of replacing the external boot on the left side. The replacement work on the right side is identical.