A constant velocity joint (abbreviation CV joint) is installed in all VAZ models, including 2114. The main function of this unit is to transmit torque when turning the front wheel pair. We change the CV joint and its boot on a VAZ 2114 with our own hands. Many motorists call this device a “grenade”. The chassis design contains two CV joints:
- Internal – transmits moment during axial displacement.
- External – transmits torque when changing angles of rotation.
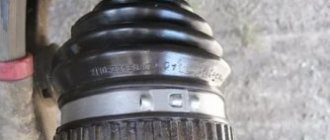
The VAZ 2114 operating manual states that this unit needs to be changed every 100 thousand kilometers. Replacement may be needed earlier if the owner of the VAZ 2114 does not regularly check the anthers. In this case, they tear, and dirt gets into the mechanism, interfering with the normal functioning of the unit. Crunching and knocking when turning are the main signs of a CV joint failure. In the design of modern cars, two types of joints are used: ball and tripod.
Types of CV joints
- Ball. The most efficient and proven type of CV joints.
- Tripoid. It is used not only in cars, but also in trucks and so on. Instead of balls, it uses rollers.
- Paired. This type has stronger material and smoother movement.
- Cam. Designed for heavyweights: trucks, buses, vans, etc. The structure consists of 2 forks that can withstand enormous loads, and a couple of shaped disks.
Prices for internal CV joints of VAZ 2114
| Manufacturer | Price, rub) |
| LADA (AvtoVAZ) | 1500 |
| BelMag | 1200-1250 |
| Loebro (GKN) | 2000 |
| Hola | 1600-1650 |
| Kraft | 1600 |
| GLO | 1500-1600 |
| FINWHALE | 1800 |
| Phoenix | 1250-1300 |
| PILENGA | 1100-1150 |
| TRIALLI | 1600 |
Location
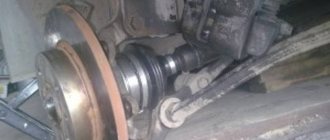
It will be impossible to replace the CV joint on a VAZ 2114 if you do not know where exactly these elements are located. Their location is easy to determine - on both sides of the front suspension at the bottom of the car. They are oblong elements and fit into the hub of each wheel.
That is, getting to the node is not difficult, but this will require certain conditions.
When do you need to change the VAZ 2114 CV joint?
According to the website provaz2114.ru, the hinges mostly operate under heavy loads. Even though CV joints have a very long service life, sooner or later they wear out. Clicking sounds may be heard while driving. They report a hinge defect. That's when you need to change them. In order to make sure that the joints are faulty, it is enough to turn the steering wheel in different directions until it stops and release it. If you hear a creaking sound, it’s time to change the grenades.
Methods for repairing CV joints
- Replacing hinges (in cases where nothing can be fixed, you have to buy new spare parts);
- Replacement of separator and bearings;
- Changing the sides of the grenade (if only one side of the hinges is worn, then they can be changed, however, when driving in reverse gear, cracking sounds will be heard);
Symptoms of malfunction and part replacement
So, the following signs will indicate that it’s time to change the element:
- crackling noises when turning wheels;
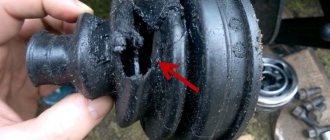
- visual inspection: it has ceased to be elastic, has torn, cracks, smudges, etc. have appeared on it.
It should be changed as soon as the problem is identified. Otherwise, constantly falling dust and dirt will soon completely destroy the assembly and lead to damage to parts.
The replacement algorithm will be as follows:
- Remove the wheel. To do this, drive the car into the inspection hole, install supports, and unscrew the bolts.
- Remove the hub. The steering wheel is turned all the way.
- Remove the outer part of the drive.
- Knock off the duster from it. Depending on its condition, additional effort and tools may be required.
- Wash the part with gasoline.
- Lubricate and put on a new boot.
For the inner CV joint, the crankshaft will need to be disassembled and attached to the body. Also, the VAZ-2114 has two boots on the steering rack. They should also be changed periodically. The work just looks complicated. However, if you do not have enough time, it is best not to replace the boot on the VAZ-2114, but to leave this task to the craftsmen.
The importance of CV joints
The internal hinge is larger than its brother, and therefore more expensive, since it plays a more important role. It transmits rotation to the shaft from the gear. It is also installed inside the gearbox housing. The maximum rotation angle of the internal grenade is 20 degrees.
The outer hinge serves to rotate the wheel hub, and therefore it has mounting splines. The external grenade does not have much free space, so it is inferior in size. Installed next to the wheel.
Purpose and location of the part
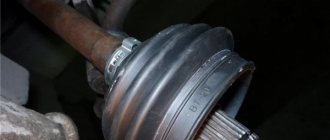
A CV joint is a special part that is involved in transmitting torque from the engine to the wheels. The boot is a corrugated tip that protects working units from rapid wear. It does this by sealing the working fluid. The oil, without leaking, continues to provide the necessary conditions under increasing frictional force from the operating mechanism.
The CV joint boot is located in several places, there is an outer and an inner one. One can only be changed by removing the wheel, while the other requires a little more effort. In any case, you can change the CV joint boot in a VAZ-2114 car even without a workshop.
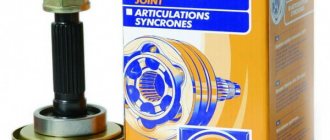
By the way, because of its shape, the hinge is often called a “grenade”, so it is possible to use this definition further.
Why do you need to change CV joints?
If you find defects in the boot, or it is dirty, you must replace it. Otherwise, as we have discussed more than once on the website provaz2114.ru, this element will break, and you will need to buy a new part. For the future: it is unlikely that it will be profitable for anyone to buy other spare parts when you can simply care for and control the old ones. However, if a breakdown does occur, you need to know that CV joints cost approximately from 1000 to 2500, and you will still have to change them. If the car becomes unusable, then when you turn the steering wheel, the hinges may fall apart into two parts. In this case, oil may leak out, and then you will no longer be able to continue your journey.
ball CV joint
Causes of failure
- Low amount of lubrication (wear of joints);
- Damage or contamination of the boot (rupture of the boot);
- Heavy loads.
- Bad roads with holes, bumps, uneven surfaces;
- Too aggressive behavior of the driver on the road, sudden movements;
Try to lubricate the hinges as often and as abundantly as possible, because for the most part it all starts with them.
Determining the malfunction of a specific CV joint
An unpleasant sound, in the form of a crunching sound at the outer joint, is heard when the steering wheel is turned sharply and pressure is applied to the gas.
If you are driving on a rough road full of potholes and hear a crunching sound, then you have problems with the inner joint.
What to choose?
To replace the inner or outer CV joint on a VAZ 2114, a new element will be required. To be fair, we note that the most suitable and high-quality CV joints for the VAZ 2114 model are produced by the manufacturer, that is, AvtoVAZ.
But here comes the most important disappointment - they are not for sale. The only option is to go to a specialized VAZ official car service center. But from the point of view of financial costs, it is not the most reasonable decision.
In addition, there is now a fairly wide range of analogues on the market. Judging by the reviews of VAZ 2114 owners, special attention should be paid to CV joints produced by such companies as:
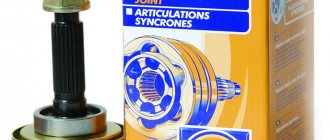
Photo of GKN CV joint for VAZ 2114
Let's move on to replacing the CV joint itself.
Tools you will need.
To replace the outer hinge we will need:
- 30mm socket;
- 19mm socket;
- 16mm socket;
- Jack;
- Wire cutters;
- High quality knob;
- Wood block;
- Multifunctional tongs and pliers;
- Assistant (in case you can’t handle it on your own).
Replacing an external grenade
- Remove the artificial hub nut cap and expand it;
- We hide the nut;
- Unscrew the wheel;
- Unscrew the two ball fastening bolts;
- Completely remove the hub nut;
- Remove the rubber band that secures the brake hose from the groove;
- We pull the hub in our direction (the hinge should come out of it);
- If the boot is already damaged, we point the pipe at the inside of the grenade and knock it out of its seat;
- Remove the metal ring on the drive shaft. The ring will also need to be replaced;
- Partially fill the hinge with lubricant;
- We put the ring on the drive shaft;
- Lightly coat the boot with grease and place it on the drive shaft;
- We put the shura on the splines on the drive shaft and stuff it through a wooden block;
- We move the boot against the hinge and secure it on one side with a clamp. Tighten the clamp with pliers;
- You also need to do the same with the other side;
- We mount the CV joint into the hub, install the washer and tighten the hub nut;
- We fasten the two ball bolts. It is best to use a pry bar to make it easier to press the lever and align the ball mounting holes;
- We install the rubber in the groove that secures the brake hose;
- Install the wheel and remove the car from the jack;
- Tighten the hub nut;
- Raise the car and remove the wheel;
- Roll up the nut and tighten the wheel completely.
Replacing the internal grenade
- First, remove the nut from the drive;
- Take the 30mm socket and partially unscrew the wheel;
- Raise the car (can be done as the second or first point);
- Unscrew the wheel completely;
- Unscrew the steering rod;
- Take the 19 nut and unscrew the steering rod;
- We insert a crowbar, make a tension and try to knock it out, the rod comes off;
- We unscrew the two bolts on both sides with a 17 key;
- Unscrew the drive nut completely;
- We remove the washer and stand to the side;
- We pull out the drive (before pulling it out, you need to completely drain the oil from the box);
- We remove the old clamps, simply knock down the old grenade;
- Wash the drive well with gasoline;
- Remove the old O-ring;
- Let's lubricate the leather a little so that it fits on the drive easier, put it on the drive;
- We insert a new grenade, fill it with lubricant, and insert it into place.
- Fill it thoroughly with lubricant, then put everything back together in reverse order.
The drive is removed, what next?
The drive surface is cleaned with a metal brush and rags.
Then the clamps securing the boot are removed, and it is cut or removed using a screwdriver.
The CV joint is wiped clean of grease and then becomes loose.
To do this, it can be clamped in a vice or held suspended with the outer “grenade” down, and an assistant knocks it down with a drift and hammer.
After this, you need to check the condition of the retaining ring at the end of the shaft and replace it if necessary.
The removed hinge is thoroughly wiped and placed in a container with gasoline for washing.
The new boot is placed on the shaft.
The washed CV joint sits on the shaft splines and is then driven onto the last one.
It needs to be hammered through a wooden spacer.
Before pulling the boot onto the CV joint, CV joint-4 lubricant is placed inside it, as well as inside the hinge. After this, the boot is put on the “grenade” and secured with clamps.
Which company is the most profitable to buy grenades from?
Since the VAZ-2114, our “four”, is considered more for young people, the companies that stand out most among them are:
- Lorbo
- Hola
- Kraft
Consequences of replacement
Careless handling of machine parts often results in consequences. Contamination of the boot, rapid wear of spare parts and two grenades. If you do not start replacing the boot and CV joints in time, the car can no longer be used for its true purpose. If the owner of the car constantly checks the condition of the anthers and hinges, then the likelihood of dirt getting in will be small.
If you notice rips and holes on the boot, you won’t be able to sew them up; you’ll have to buy new ones. When changing covers, you should also inspect the hinges to make sure they are working. This procedure will not take much of your time, but will preserve the integrity of the grenades and save your money.
After installation is completed, it is recommended to drive the car to check the serviceability of all parts. After making a couple of turns, if you don't hear any squeaking sounds, congratulations, you did it right!
Do not forget to monitor the parts from time to time and sometimes lubricate them, and then they will serve you for a very long time and with high quality.
How to replace the outer CV joint boot on VAZ cars
For front-wheel drive cars of the VAZ family, from model 2108 to model 2115, as well as more modern Kalina and Priora cars, maintenance of the drive wheels comes down to periodically checking the condition of the CV joint boots, both external and internal.
Otherwise, the ball-type constant velocity joints with guide grooves used on these machines do not require maintenance.
Factors influencing price
To buy a profitable, high-quality grenade for a VAZ 2114, you need to go to many places that sell auto parts. When comparing the cost of this spare part, novice drivers wonder why the price range for CV joints is so wide. The fact is that sellers take into account the following factors when forming prices:
- State.
- Variety.
- Quality.
- Originality.
- Place of purchase.
- Popularity of the selling company.
- Brand.
- The need for delivery or replacement of auto parts.
Source
Approximate prices
In Russia, purchasing a new CV joint for a VAZ 2114 will cost from 1,100 to 3,000 rubles .
Approximate prices depending on the type of auto parts:
- External grenade - from 1200 to 1500 rubles .
- Internal - from 1500 to 3000 rubles .
Estimated cost of a grenade depending on the brand:
- AvtoVAZ - from 1400 rubles .
- TRIALLI – from 1200 rubles .
- TORQUE – from 1200 rubles .
- LOEBRO - about 1900 rubles .
- HOLA – about 1200 rubles .
- FINWHALE – from 1100 rubles .
A used, but in good condition, grenade can be bought in Russia for 800-1200 rubles .
Signs of failure of the outer grenade (CV joint)
There are two options here:
- signs that your grenade has already broken
- signs that the grenade will soon come out and break .
This is interesting: Will replacing the valve stem seals save you from oil leaks or is it a waste of money?
How to understand that a grenade will break soon
Of course, the first sign of a malfunction of the external grenade is a crackling sound . If you hear a crackling noise while driving with the steering wheel turned, it is definitely a CV joint. The greater the angle of rotation of the wheel and the harder you press on the gas, the louder the clicks. Another sign that does not always appear is vibration on the steering wheel at speeds greater than 80 km/h. The vibration is only slightly similar to the vibration from an unbalanced wheel. It usually manifests itself as a slight twitching of the steering wheel.
How to understand that the outer CV joint is broken
If the CV joint breaks, the car will stop moving. In any gear engaged, press the gas, the speed increases, but the car does not move.
How to understand that it is the outer CV joint that has broken, and not the internal one or the clutch in general (the first signs of failure are similar to the signs of a clutch failure)? First of all, start the car and put it in any gear. Next, open the hood and look in turn at each of the shafts going from the box to the wheels (one short, the other long). If any shaft is spinning, it means that the CV joint has broken on this side.
I recommend not just visually looking at the shaft, but touching it with some long, hard object, such as a stick. The main thing is that there is nothing on it that can wrap around the shaft !!! When you touch the shaft with a stick, if it is spinning, you will feel a slight vibration. This is usually done in the dark, because it is difficult to understand whether a cylindrical object is spinning, especially in the dark.
Advice from experienced motorists
There are some useful tips on this matter that are worth listening to.
- If you hear a characteristic crunch while driving in a straight line, it means the CV joint has failed. If this crunching noise is heard only when turning, then the problem lies in a faulty joint.
- Before installing a new CV joint, treat the grenade landing site with lubricant. This significantly extends its service life.
- To adjust the CV joint and seat it properly, use wooden attachments. If this is not done, the risk of damaging the new element is very high.
- The boot should be installed as tightly and efficiently as possible. If you don't do this, dirt and dust will soon get there. These components will quickly render it unusable, and repair work will have to be carried out again.
- The lock nut on the hub is tightened with a special torque tool. Moreover, tightening is carried out strictly with the parameters specified in the instruction manual for your VAZ 2114 modification.
- During a routine inspection of the technical condition of your car, be sure to pay attention to the condition of the clamps and rubber elements to ensure their integrity. Such seemingly insignificant components can lead to serious consequences and significant financial costs.
- The purchase of spare parts, including CV joints, should be made only from trusted sellers, certified distributors. If you buy a bad, low-quality part, just trying to save money, you will have to pay even more to eliminate the consequences that the use of such elements led to.
The CV joint is an important component of any car, and replacing it even on your own is not particularly difficult.
Source
Installation
1. Replace the retaining ring of the splined shank of the inner joint housing with a new one.
2. Apply grease to the spline and smooth surfaces of the shank.
3. Carefully insert the shank into the oil seal, trying not to damage the working edge of the oil seal with the shaft splines. At the same time, we direct the locking ring with the gap upward.
4. We vigorously insert the drive into the gearbox and make sure that the retaining ring of the inner joint shank is securely fixed and the drive does not move out of the gearbox housing.
5. We carry out further work in the reverse order of disassembly.
Warning! During assembly, a new hub nut must be installed.
Source
What brand of grenade should I choose and what boots should I install?
Almost all motorists who are faced with a breakdown of this element are wondering - which CV joint is better for a VAZ 2114 - domestic or imported? The answer to this question can be completely unambiguous - the best CV joints are the original ones, produced by AvtoVAZ itself.
The only difficulty that exists here is that such grenades have not been and are not on sale, so it is very difficult to get them.
You can either try to look for them at auto repair shops (however, here you can unknowingly buy used ones, which is not very good - after all, the part may already be damaged) or go to an official AvtoVAZ service center (but the price will be very high). For these reasons, it would be best to look at products from other manufacturers.
The first three companies on this list are especially popular among domestic car enthusiasts, so if there is a choice in a car store, it would be better to give preference to them. Also, when buying new grenades, you should not forget about buying new boots (mounting new CV joints with old, albeit “working” boots, would be a very big mistake).
It’s not worth talking in detail about which CV joint boots are best for the VAZ 2114. All anthers can currently be divided into two types - ordinary, almost no different from the anthers installed at the factory, and the so-called “reinforced”.
When buying the latter, it is worth remembering that along with them you should also buy mounting clamps of an increased size, since clamps from ordinary boots will not fit. All of these anthers have approximately the same quality, regardless of the manufacturer (some believe that silicone anthers last a little longer, but, as practice and reviews from many motorists show, the difference between silicone anthers and conventional ones in terms of service life is minimal).
The most important thing to do when buying anther is to check its quality. It must not have cracks, tears or other damage. The CV joint boots should be replaced with new ones at the first signs of wear.
Instructions for disassembling the unit
Before removing the wheel from the side of the faulty unit, it is necessary to loosen the hub nut using a 30 mm socket, having first pulled the metal boot out of the socket. Further steps according to the instructions:
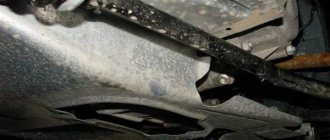
- Use a wheel wrench to loosen the wheel bolts, jack up the car and remove the wheel. Unscrew the hub nut completely and remove the washer with a screwdriver. If your vehicle has engine oil pan protection installed, it will need to be removed. Some experts recommend draining some of the oil from the gearbox (1.5-2 liters) before removing the drive so that it does not start flowing through the spline hole when the unit is removed.
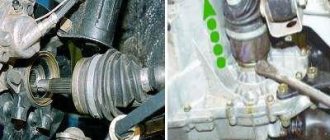
- Loosen and unscrew the tie rod ball pin nut and use a puller to press the pin out of the socket in the front suspension strut. Having turned the entire assembly by hand for convenience, unscrew the 2 bolts securing the ball joint. Holding the brake disc with both hands, carefully pull the CV joint shaft out of the mating splined part of the hub and move it to the side.
- The second end of the VAZ 14 CV joint must be removed from the splined part in the gearbox, being in the inspection ditch. To do this, you will need to place a mounting spade between the box body and the grenade, and then with a sharp jerk pull the assembly out of the socket, using the pry bar as a lever. If the part does not give in, it is allowed to tear it out of place with gentle blows of a hammer on the mounting blade. Before pulling it out, it is advisable to place a container under the gearbox, as some oil may leak out. Then the entire assembly is removed manually. A vice will be required for subsequent disassembly.
The assembly shaft is securely clamped in a vice closer to the outer grenade if the outer CV joint is being replaced. Here you should check the condition of the boot. If there are no cracks or damage, and the rubber continues to remain elastic, then you only need to unlock one clamp that holds the boot on the grenade body.
Then it is turned outward or simply moved so that it does not interfere. Next, holding the slotted part of the grenade with one hand, apply gentle blows with a hammer along its edge from the inside. In the case when the grenade needs to be replaced, there is nothing special to worry about; you can safely hit it until it comes off the shaft splines. The boot on which defects are found is turned back out, the second clamp is loosened and the part is removed from the shaft. The inner CV joint is disassembled in exactly the same way as the outer one, you just need to clamp the shaft in a vice near the grenade itself.
Removing and installing front wheel drives
You will need: a screwdriver, keys “17”, “19”, socket head “27”, wrench.
1. Drain the oil from the gearbox.
2. After removing the protective cap, loosen the hub nut.
3. Loosen the wheel bolts and hub nut. The hub nut is tightened with a large torque, so it is recommended to use, for example, a piece of pipe as a lever.
When unscrewing the hub nut, the vehicle must be placed on the ground!
Loosen and tighten wheel bolts only with the vehicle on the ground. The tightening torque of the bolts is 65–95 N m (6.5–9.5 kgf m).
4. Brake the car with the parking brake, install traction bars under the rear wheels and lift the front of the car, installing reliable supports.
5. Remove the front wheel and finally unscrew the hub nut.
7. Remove the cotter pin from the tie rod ball joint nut to the swing arm.
8. Unscrew the nut securing the steering rod ball joint.
9. Using a puller, press the tie rod ball joint pin out of the strut swing arm.
10. Remove the two bolts and disconnect the ball joint of the front suspension arm from the steering knuckle.
11. Move the steering knuckle with the stand to the side...
12. ...and remove the splined shank of the outer joint from the hub.
13. Using a pry bar, press the drive inner joint shank out of the transmission.
If you intend to remove both drives, after removing one of the drives, insert a technological plug into the gearbox instead (for example, an old internal joint) and only then remove the second drive. Otherwise, the differential side gears will move and the drives will not be able to be installed.
15. Install the front wheel drive in the reverse order of removal.
Source