When to change the timing chain?
The manufacturer does not give clear recommendations regarding the timing of replacing the timing chain on the Niva. Experts assure that the need for replacement may arise no earlier than after 100,000 km. But it is very important to periodically carry out diagnostic procedures for chain transmission. It may well happen that the chain weakens. This will be noticeable by the characteristic sound that the running engine will make. First you need to try to tighten the chain. If this cannot be done in the usual way, replacement becomes necessary. In this case, you can contact a service center, where this repair will be carried out by professionals, or you can try to change the chain yourself. The latter option is preferable in terms of savings and gaining the necessary experience.
If the mark on the camshaft gear does not match the mark on the bearing housing, it's time to take action. The chain drive also needs to be replaced if chips or cracks appear on it. All this suggests that your chain has served its intended life and it is time to replace it.
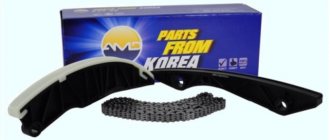
So, you have decided that you will make the replacement yourself. What do you need to do next? First of all, go to the store and buy a new chain there. You can check the quality of the chain you are purchasing. We take the chain and place it flat on our palms. If its sagging exceeds 1 cm, you better look for consumables elsewhere. In addition to the chain itself, you will also have to buy a set of oil seals, a tensioner, dampers, and a set of gaskets. Then we prepare the tools that will be useful in the work and begin the repair.
Replacing the chain drive
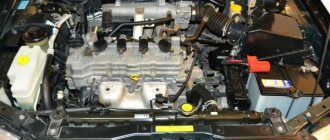
- Place the car on a level surface. Open the hood. Disconnect the battery. Remove the air filter.
- The choke cable should be disconnected and moved away. It is also necessary to disconnect all electrical drives and pipes.
- Remove the fan, generator belt and pump roller. The belt should be thoroughly examined. If deep cracks or other damage is found on it, it must be replaced with a new one. Remove the tray protection and thoroughly clean its cover.
- Remove the valve plug. Unscrew the camshaft sprocket screw.
- Take a wrench and unscrew the ratchet nut.
- Now we begin to rotate the crankshaft until the marks on it and on the engine casing completely coincide. Make sure that the marks also match on the bearing housing and camshaft sprockets.
7. Then remove the casing covering the motor. To do this you will have to remove several bolts. We remove the sedative. Unscrew the screw securing the oil supply pump. There is no need to remove the screw. It should only be loosened and left in place.
Now let's check the operation of the mechanism. To do this, start the engine and listen to how the engine operates. By hearing it is quite possible to determine whether everything was done correctly or something went wrong. If the sound is familiar, rustling, then everything is done correctly. If there is a characteristic grinding sound, the procedure must be repeated.
Timing chain - why is it important and what problems does its wear cause?
The timing belt or chain connects the camshafts and the crankshaft. A belt drive has a specific number of teeth to synchronize the operation of the shafts. A chain is a more reliable option as you can adjust the length in an emergency. In addition, it wears out much more slowly.
This element affects all components of the car and its overall performance. Incorrect operation of the gas distribution mechanism can lead to engine malfunctions and even the final destruction of the power plant. Typically, the initial replacement of a part is caused by its stretching. Because of this deformation, it begins to rattle loudly when the engine is running (clearly audible at medium speeds and variable loads)
Procedure for replacing the timing chain Niva 21214 injector
It is logical that a new spare part will be required. The secret of choice is quality control. You need to place it flat on your palm and look at the sagging. If it is more than 1 cm, then you need to look for another part. Additionally, a tensioner, a set of gaskets and seals, and dampers are purchased. Then the hood is opened, the battery is disconnected and the part is changed in the following order:
- Remove the air filter, disconnect the electric drives, the pipe and the choke cable (and move it aside). Remove the pallet protection.
- Remove the fan, pump shaft and alternator belt.
- Remove the valve plug and unscrew the camshaft sprocket screw.
- Unscrew the ratchet nut.
- Rotate the crankshaft until the mark matches the marker on the engine casing (the marks on the camshaft sprockets and bearings must match).
- Remove the engine cover and damper.
- Loosen the screw securing the pump.
- Remove the MM line, pressure sensor and tensioner.
- Remove the camshaft gear and then the timing chain.
- Replace the seals with new ones.
- Lubricate the timing chain.
- Put on in the indicated order: crankshaft gear, oil pump, camshaft (be sure to ensure that the marks match).
- Secure the tensioner by carefully tightening the nuts.
- Fix the stars.
- Check that the marks match by turning the shaft to the right.
- Put on the alternator belt and then reassemble all the elements in the reverse order.
It remains to check the correct assembly. You need to start the engine and listen. If there is a grinding noise, the procedure will have to be repeated. The sound itself should be standard (rustling).
installation of automatic chain tensioner “Pilot” — logbook Chevrolet Niva on DRIVE2
All that remained was to disconnect the oil line tube from the opposite end, where it enters the splitter installed between the oil pressure sensor and the engine itself.
Chevy Niva chain tensioner which is better
It was quite obvious to me that the oil line tube had become a superfluous element, but it absolutely did not want to get out of the splitter. And then logic and the design approach completely abandoned me, replacing all sensible thoughts with demonic ones.
I had the brilliant idea to start the engine and see what happened. After starting, the engine really began to run quieter - the chain rattling disappeared. But when I looked under the hood, I saw that oil was running sluggishly from the end of the line where I unscrewed the tensioner.
Replacing the hydraulic tensioner with a mechanical Chevrolet Niva
Even in my condition it was clear that this was bad. But the degree of inadequacy only increased. I decided to screw the old automatic chain tensioner for the Chevrolet Niva chain into place so that it would just stop the flow of the automatic chain tensioner for the Chevrolet Niva and I could drive home and figure out what was what. Here the Darwin Prize is very close. No sooner said than done.
Starting the engine in the hope of a miracle... ... and it happened - from a small hole in the tensioner housing, oil began to gush out in a steady thin stream and, falling on the attachment belt, spread throughout the entire engine compartment. I was so saddened by this fact that I simply went home on foot, leaving Shniv alone so as not to ruin him with my brilliant ideas. However, I was not going to give up and, already at home, I put the kettle on and, in order to brighten up the wait, wrote to my favorite drive about my problem.
The plan was to get some tea with some goodies and watch some crap on YouTube. But simply by expanding the page in the browser, I saw with awe that I not only received a couple of replies, but the Drivers managed to write back with advice, discuss the situation, argue among themselves, quarrel a little and make peace. And this was while the automatic chain tensioner for the Chevrolet Niva was greasing the sandwich... From everything written, I extracted the necessary information, namely, you need to unscrew the oil pressure sensor, remove the adapter and splitter for the oil rail, and screw back the oil pressure sensor.
Timing chain replacement time for Niva 21214 injector
There are no specific recommendations from VAZ on replacing the chain. Professionals recommend doing this after approximately 100,000 km. However, you need to check the condition regularly. It is likely that problems may arise much earlier. The most common reasons for replacing the timing chain:
- sagging that cannot be resolved by lifting;
- mismatch between the camshaft gear mark and the mark on the bearing housing;
- chips or cracks along the length of the chain.
These problems are the main reason to change the part. A part that scatters while driving will not only send the car to the parking lot until it is replaced. It is likely that other elements of the power plant will be damaged while driving. And this will logically increase the cost and time of repairs.
Replacing the chain and sprockets of the VAZ-21214 camshaft drive
The main reason for replacing a chain is overextension. When the camshaft drive chain is strongly stretched, the chain begins to “rattle” when the engine is running.
This is noise in the front part of the engine, which intensifies at medium speeds and variable loads (the noise is clearly audible when releasing the gas from 2500 to 1000 min-1).
Of course, in this case it is necessary to change not only the chain, but also the sprockets, shoe and chain guide.
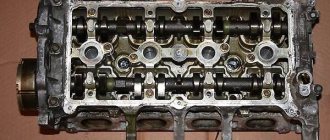
Remove the cylinder head cover (see the article - “Replacing the cylinder head cover gasket”).
Rotate the crankshaft until the mark on the camshaft sprocket matches the mark on the camshaft bearing housing.
We remove the crankshaft pulley (see the article - “Replacing the front crankshaft oil seal”).
We disconnect the camshaft sprocket with the chain from the camshaft (see the article - “Removing the camshaft and valve drive levers”)
Remove the chain from the sprocket. For clarity, we show the chain removal operations on a dismantled engine.
We unscrew the three bolts securing the oil pan to the camshaft drive cover.
Using a 10mm socket, unscrew the three nuts and six bolts securing the camshaft drive cover to the cylinder block.
A “ground” wire is secured under one nut (on the left side).
Removing the camshaft drive cover
Remove the sealing gasket.
Using the “17” head, unscrew the axis of the hydraulic chain tensioner shoe.
...and remove the axle.
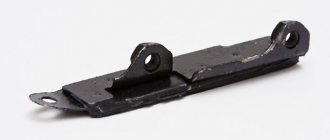
We take out the tensioner shoe.
Remove the chain from the crankshaft sprockets and the oil pump drive shaft.
We take out the camshaft drive chain.
Using a puller, press the sprocket from the toe of the crankshaft.
...and take it off
The sprocket is fixed on the crankshaft with a segment key.
To remove the key, carefully, trying not to damage the key and the shaft, use a chisel to knock it out of the groove of the crankshaft
...and remove the key.
Using a chisel, loosen the bolt securing the oil pump drive shaft sprocket.
Using a 17mm spanner, unscrew the sprocket mounting bolt.
We hold the sprocket from turning with a screwdriver resting through the hole in the sprocket on the head of the bolt securing the thrust flange of the roller.
We remove the washers.
Remove the oil pump drive shaft sprocket
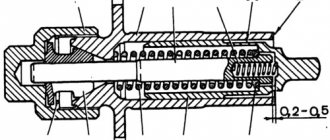
Location of camshaft drive and oil pump parts
Install the drive mechanism parts in reverse order.
Having installed the key in the groove of the crankshaft, put on the sprocket and press it onto the crankshaft, tightening the pulley mounting nut with a wrench.
Having unscrewed the nut, we press the sprocket with a tool head of a suitable size (a piece of pipe).
Before installing the chain, align the mark (mark above the keyway) on the crankshaft sprocket with the mark (protrusion) on the cylinder block
And we combine the mark on the camshaft sprocket with the mark on the shaft bearing housing
Having installed the chain and hydraulic tensioner, turn the crankshaft clockwise two turns and check that the alignment marks match.
We install the removed parts in reverse order.
We invite you to read the detailed instructions:
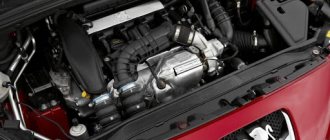
This sound is similar to a running diesel engine and occurs during a cold start. The tensioner is located under the hood, on the passenger side. You can find it under the cooling pipes, in front of the cylinder block. The tensioner has the shape of a cylinder, which is screwed on top with a lid, with a hole for oil supply.
Without this device, the engine will not operate. Over time, rotating parts weaken and stretch, and may even break.
The timing chain wears out, and this is natural, you just need to correct the situation in time. An unsuitable gas separating mechanism chain will make it impossible for you to operate a normally functioning vehicle. Holidays on the Black Sea. Search for gold, search for treasures.
Screwed in with two fastening nuts.
The tube is inserted and secured. It is simply impossible to make a wrong replacement. The device is located on the passenger side under the hood of the car.
NIVA CHEVROLET replacing hydraulic timing chain tensioner with pilot
Having opened the hood, you need to find the cooling pipes in the area of the front of the cylinder head, under them the hydraulic tensioner itself is located. A photo of the device that is installed on the Chevrolet Niva is located below. Location of the part in the car Components and principle of operation of the hydraulic tensioner As can be seen in the photo, the device has a cylindrical shape, and is screwed on from the outside with a lid with a small hole through which oil flows. Inside the device there is a small ball and a spring, which ensures free flow of oil in one direction and does not release it in the opposite direction.
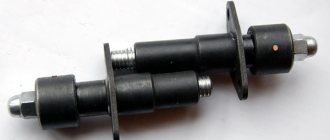
Hydraulic chain tensioner for VAZ 21214 device and principle of operation
Content:
general information
It has long been known that the quality of car parts produced at the AvtoVAZ plant is not of a high level. And timing parts are no exception. The chain has to be constantly tightened, almost every thousand kilometers. A hydraulic chain tensioner will help get rid of this problem. It is this device that we will talk about in this article. Let's look in detail at the operation scheme and replacement of the device.
Scheme of work
Replacing the drive chain hydraulic tensioner
Detailed instructions with photos for replacing the hydraulic chain tensioner: The hydraulic tensioner is located under the cooling pipes in the front of the cylinder head.
Using a “10” wrench, which has five edges, we unscrew the tube fitting that supplies oil to the hydraulic tensioner. we take out the phone. Using a 10mm socket, unscrew the two nuts that press the tensioner to the cylinder block. Then remove the hydraulic tensioner. At the same time as replacing the tensioner, it is recommended to replace the sealing gasket.
Prices for hydraulic tensioner VAZ 21214 range from 400 rubles. up to 900 rub. Depending on the region. But there is no shortage of this device on store shelves.
Similar news
Product added to bookmarks!
- Description
- Reviews
APPLICABILITY: VAZ 21214 (Niva), 2123 (Niva-Chevrolet) engines.
Automatic chain tensioner "RUSMASH" "PILOT"
The automatic chain tensioner (ANT) “Pilot” is designed for installation instead of the standard chain tensioner on VAZ cars of the classic family. ANC “Pilot” does not require maintenance after installation and fully automatically tightens the car chain as it stretches. It differs favorably from its analogues in that it does not require an oil line, which eliminates its chafing and loss of oil pressure. There are no plunger elements in the design, which eliminates jamming of the tensioner! The tensioner moves in increments of only 1 mm, allowing optimal chain tension monitoring. Due to the adjusted spring tension force, the ANC “Pilot” practically does not wear out the chain tensioner shoe. As a result of the installation, engine noise is significantly reduced, and the service life of all timing components is increased due to correct chain tension.
Service
During operation, the Pilot operates automatically and does not require adjustment operations or maintenance.
Guarantee
The warranty period for the product is set for the entire service life of the vehicle.
The result of using an automatic tensioner
– The service life of all timing drive parts is increased several times due to constant monitoring of chain tension and eliminating the possibility of increasing parasitic loads in free chain branches. – Improved engine performance due to precise valve timing. – The chain is tensioned regardless of whether the engine is running or not.
How to tension the chain on a Niva 21214 injector?
For this, there is a special device located between the camshaft sprocket and the crankshaft sprocket, called a hydraulic belt tensioner. If you have a question about how to tighten it, then perhaps it is broken. The layout and repair diagram is presented in more detail in this article.
Check the timing chain tension through the hydraulic tensioner hole 406?
Here is a detailed discussion of the issue of chain tension: https://www.drive2.ru/l/2809112/, and here is a video about diagnosing and replacing the chain https://www.youtube.com/watch?time_continue=20&v=QY28Xlp2r3s
How to get the lower chain guide mounting bolt on a power-assisted field?
If your bottom bolt has fallen off, then the damper itself is not far from breaking. You can change these parts yourself.
What you will need for this:
First, use tweezers to remove the damper itself, and then get to the bottom bolt. Otherwise it won't work.
Why are there failures in the 406 engine?
Most often, this problem is caused by the timing belt and its hydraulic tensioners, especially for 406 engines. On them, weakening the timing chain tension will lead to severe failures in the engine itself. To remove the dips, you should examine the timing chain and its hydraulic tensioner and replace them, as they are out of order and are not working correctly.
The procedure for installing the ISAI tensioner on Gazelle, Volga and other cars with ZMZ engines.
- Remove the air filter and anything that interferes with access to the tensioners.
- Unscrew the aluminum cover of the lower tensioner, first placing a container under it to drain the oil. Remove the factory tensioner.
- Unscrew the aluminum cover of the upper tensioner and remove the standard tensioner. Wipe the planting area.
- Try on the ISAI upper tensioner. It should sit in place until the flange stops.
- If this does not happen and the tensioner does not reach the end, then turn the shaft a little until the chain sag on the tensioner side.
- Secure the upper tensioner.
- Following the same rules, install and secure the lower tensioner.
- Unscrew the cap nuts, remove the fasteners (pieces of duralumin wire) from them and screw them into place until they stop by hand.
- Turn the shaft approximately 1 revolution as the motor moves.
- Start the engine.
Tensioners on ZMZ engines can be installed either simply with a gasket or slightly lubricated with sealant, taking into account that excess sealant can clog the oil groove.
READ How to Bleed ABS Brakes on a Mercedes W124
When reloading the ISAI tensioner, be sure to keep it clean, as Any dirt that gets on the propeller can damage it. If, nevertheless, dirt gets under the screw and the tensioner begins to jam, then this can be corrected using the following method: in the place where the screw is jammed, you need to fix it with a cap nut with a lock (if it is lost, you can replace it with an M4 nut) and then tap it with the nose screw against some powerful object (vise, hammer, sledgehammer, etc.), and then twist the screw in different directions. Any debris caught between the threads will be destroyed and the screw will become mobile. You can also wash the tensioner (kerosene, diesel fuel) under pressure from the cap nut side, immediately unscrewing the screw.