VAZ-2108 is the first car produced by AvtoVAZ, equipped with front-wheel drive. This type of drive has a less metal-intensive design, since the need to use a cardan transmission and a drive axle with a gearbox has completely disappeared.
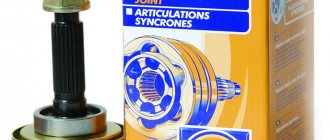
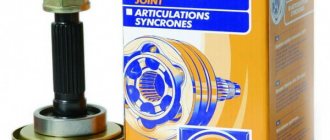
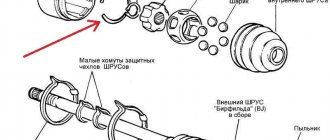
The transmission of rotation from the gearbox to the drive wheels is carried out using two drive shafts. Since the drive on front-wheel drive cars operates in difficult conditions (they not only transmit rotation, but also do not interfere with the suspension to do its job, and also allow the wheels to turn), constant velocity joints (CV joints) are used in the drive device.
When to replace
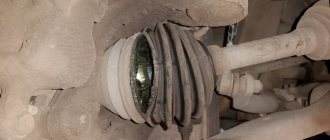
In order for this part to work long enough, sand, dirt and dust should not get into it. Contamination significantly accelerates wear and reduces the service life of the unit. But to protect against this, a boot is provided, which can become unusable relatively quickly. Therefore, timely replacement of the boot will keep the CV joint in working condition for a long time.
The wear of the CV joint is indicated by a noticeable crunch and extraneous sounds when turning the steering wheel. In this case, it is recommended to replace the unit.
How to Check All-Wheel Drive on a Captiva ~ AVTO-MELVIN.RU
Four-wheel drive
"Chevrolet Captiva"
The Chevrolet company produces cars for various purposes. Among them are comfortable passenger cars, business class cars, SUVs and small cars. "Chevrolet Captiva" is intended for off-road travel and public roads.
This car is positioned as a jeep. The all-wheel drive version of the car is supplied to the Russian Federation. Let's look at the principle of operation of the drive device.
How the Chevrolet Captiva all-wheel drive works
In ordinary driving conditions (highway, asphalt, dry and hard soil), the Captiva moves only thanks to the front drive. The rear axle does a passive function. If you drive onto a road with a difficult surface (mud, melted snow, etc.) and the front wheels begin to slip, the wheels of the rear axle of the car are automatically connected. Activation occurs by means of a special clutch lock.
The transmission of torque from the engine to the tire is carried out through a gearbox and transfer case, which in turn distributes power flows along the axles. The rotational motion is supplied to the wheels using axle shafts or CV joints. In the Chevrolet Captiva, torque is distributed equally between the front and rear axles.
Climbing with and without ESP.
Captiva - all-wheel drive - motherfucker.
Four-wheel drive does not work
preconditions
The all-wheel drive system in most cases has three locking devices:
- front interwheel differential;
- coupling;
- rear interwheel differential.
When the front wheels slip, a signal is sent to the clutch control module that blocks it. After which the rear-wheel drive is engaged, which helps to drive well off-road.
The clutch works as follows. When the drive axle shaft begins to spin rapidly (wheel slipping), the pressure of the rotating discs increases in the clutch, which is transmitted to the discs of the disabled axle. As a result, the coupling is rigidly locked onto the body and both axles are put into operation. When the rotation speed of the driven shaft is miniaturized, the all-wheel drive
turns off.
In the Chevrolet Captiva, the clutch is locked and unlocked automatically, without the driver's role.
Additional features and connection with systems
The all-wheel drive system in the Chevrolet Captiva interacts rather closely with the driving assistance assistants (ESP, Abs).
The car is equipped with ESP, which subsequently affects the operation of the chassis and gearbox. The brake system control unit monitors the speed of rotation of all wheels of the car. From it, information is sent to the clutch control module.
When entering a turn, when the rear wheels are spinning faster than necessary, the directional stability system automatically disengages the rear axle and the clutch is unlocked. In this case, ESP will brake one of the wheels to align the trajectory of the machine. When the front wheels slip while turning, the clutch is blocked and the clutch engages fully
drive unit. At the same time, ESP brakes one of the rear wheels.
Electrical adjustment of all-wheel drive on Captiva
» allows you to improve the off-road properties of this car.
Automatic all-wheel drive
widely used on modern cars. This greatly simplifies the operation of the car, which leads to greater driving comfort. In addition, such a system increases road safety and vehicle cross-country ability.
Removing the drive, boot and CV joint
To replace the outer CV joint, follow the following procedure:
- We place the car on the inspection hole and support it with wheel chocks.
- Using a 30mm socket, loosen the hub nut. If the nut does not break off, then you can extend the key with a pipe.
- Raise the car with a jack in the right place and remove the wheel.
- We unscrew the bolts securing the ball joint of the lower arm to the hub.
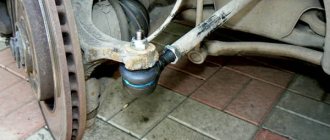
- We squeeze out the tie rod end with a puller.
- Unscrew the drive shaft nut completely.
- We pull out the hub by grasping the brake disc and pulling the shock absorber strut towards us.
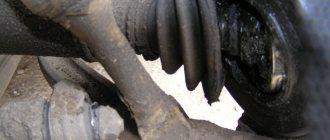
To change the boot and hinge, you will have to climb into the inspection hole. To remove the CV joint, remove the clamps that hold the boot. Next, we get rid of the old boot, which is easier to do with a knife. Use a rag to remove grease from the hinge. Then you need to knock down the inner race, for which we lightly hit the attachment with a hammer, which must be rested against the end of the hinge. Next, we thoroughly clean the CV joint from dirt, sand, dust and grease.
Tool for work
Replacing the hinge or its boot is relatively easy, and no specialized tools are required. All you need is:
- A set of keys of the most common sizes;
- A set of heads (a 30 head is required);
- Puller of ball joints and steering tips;
- A rubber or wooden hammer (mallet), or a regular one, but with a wooden handle;
- Jack;
- Knife;
- WD-40 product;
- Rags;
You will also need a new CV joint (if you plan to replace it), a new boot and mounting clamps, CV joint-4 lubricant or similar. Having stocked up with everything you need, you can start disassembling.
Build process
When assembling the outer CV joint, you must perform the following steps:
- We put a rubber part on the shaft.
- We stuff the CV joint (new or cleaned) onto the shaft until the part is secured with a retaining ring.
- We place fresh lubricant in the hinge and boot.
- We put the boot on the outer race.
- We remove excess air from the boot by pressing it with your hand.
- We secure the boot with clamps.
Then the drive is put in place, the hub is clamped with a nut. It is also necessary to put back the tie rod end, support and wheel. Next, you can lower the jack and tighten the nut securing the drive. To prevent it from unscrewing on its own, the nut should be capped.
How to independently diagnose the unit?
At first glance, it may seem that diagnosing an ECU is a difficult task that not everyone can handle. Indeed, checking your block is not so easy, but having theoretical knowledge, it is quite possible to apply it in practice.
Required tools and equipment
To check the functionality of the module yourself, you will need to perform a number of steps to connect to the ECU.
To perform the test you will need the following devices and elements:
- Oscilloscope. It’s clear that not every car enthusiast has such a device, so if you don’t have one, you can use a computer with the necessary diagnostic software pre-installed on it.
- Cable for connecting to the device. You need to select an adapter that supports the KWP2000 protocol.
- Software. Finding diagnostic software today is not a problem. To do this, just monitor the network and find a program that is suitable for your vehicle. The program is selected taking into account the car, since different control units are installed on different cars.
Algorithm of actions
The diagnostic procedure for the electronic control system is discussed below using the Bosch M 7.9.7 module as an example. This control unit model is one of the most common not only in domestic VAZ cars, but also in foreign-made cars. It should also be noted that the verification process is described using the example of using the KWP-D software.
So, how to check the ECU at home:
First of all, the adapter used must be connected to a computer or laptop, as well as the ECM itself. To do this, connect one end of the cable to the output on the unit, and the other to the USB output on the computer. Next, you need to turn the key in the car's ignition, but you do not need to start the engine. By turning on the ignition, you can launch the diagnostic utility on your computer. After completing these steps, a window with a message should pop up on the computer screen, which confirms the successful start of diagnosing malfunctions in the controller. If for some reason the message does not appear, you need to make sure that the computer successfully connected to the controller
Check the quality of the connection and connection of the cable to the unit and laptop. Then a table should be displayed on the laptop display, which will indicate the main technical characteristics and operating parameters of the vehicle. At the next stage, you need to pay attention to the DTC section (it may be called differently in different programs). This section will present all the faults with which the power unit operates
All errors will be displayed on the screen in the form of encrypted combinations of letters and numbers. To decipher them, you need to go to another section, which is usually called Codes, or use the technical documentation for your car. If there are no errors in this section, then you now don’t have to worry, since the vehicle’s engine is working perfectly (the author of the video at home is the AUTO REZ channel).
But this verification option is most relevant if the computer sees the block. If you have problems connecting to it, then you will need an electrical diagram of the device, as well as a multimeter. The tester or multimeter itself can be purchased at any specialty store, and the electrical circuit diagram of the ECM should be in the service manual. The diagram itself needs to be studied most carefully; this will be required for verification.
In the event that the ECM points to a specific block, and does not show erratic data, then in accordance with the diagram it needs to be found and called. If there is no accurate information, then the only way out is to diagnose the entire system; as we said above, breakdowns are considered one of the main faults.
After the breakdown is found, it is necessary to check the resistance and determine exactly where the cable is fixed. You will need to solder the corresponding new wire parallel to the old one; if the reason lies in the breakdown, then these actions will eliminate the problem. In all other cases, only qualified specialists can solve the problem.
Features of repairing the internal CV joint
To replace the inner CV joint, it is necessary to completely remove the drive, for which the outer joint is first disconnected without subsequent dismantling. Next, using a pry bar, remove the hinge end from the gearbox. To do this, we insert the flat part of the tool between the outer frame and the box, and then move it like a lever.
Further, the procedure for replacing the unit will be similar to the actions when repairing the external hinge. The inner CV joint must be correctly inserted into the transmission. It is recommended to insert the part into the hub, with the help of which the unit is brought into place by pushing movements. But it is also possible to drive the already assembled shaft with a mallet or a wooden pointer and a hammer. The hinge must be secured with a locking ring.
At the final stage, all removed parts are installed back. At this point, the replacement of CV joints is considered completed.
Didn't find the information you are looking for? on our forum.
Functionality check
The condition of the inner and outer CV joints should be examined separately, since the procedures and symptoms are somewhat different.
External grenade
The most obvious and main sign of wear of this element is the appearance of a sound similar to a crunch. It appears because the grooves have worn out and the balls do not move along them as well as before. The crunching becomes noticeable when entering turns, sharply pressing the gas pedal or passing difficult road sections.
Grenade
If you want to verify that the outer CV joint is faulty, do the following:
- When starting from a standstill, deliberately create jerks, but not strong ones;
- Try to accelerate sharply and slow down;
- Move the shaft transversely between the CV joints. If you feel any play, then the grenade is definitely worn out.
Internal grenade
It is noteworthy that the internal hinge is more durable and less subject to wear. Most often, the inner CV joint declares its malfunction when simply driving in a straight line or when passing through difficult sections. A check for play, similar to an external grenade, will allow you to verify problems.
But to understand whether an element really needs to be replaced, do this:
- Raise the drive wheels, which will allow you to bring the inner CV joint to its maximum angle;
- Start the engine;
- Turn on first speed;
- If the hinge is at the limit of wear, you will hear a characteristic crunch. This is a signal that you need to change the grenade.
What to choose?
To replace the inner or outer CV joint on a VAZ 2114, a new element will be required. To be fair, we note that the most suitable and high-quality CV joints for the VAZ 2114 model are produced by the manufacturer, that is, AvtoVAZ.
But here comes the most important disappointment - they are not for sale. The only option is to go to a specialized VAZ official car service center. But from the point of view of financial costs, it is not the most reasonable decision.
In addition, there is now a fairly wide range of analogues on the market.
Judging by the reviews of VAZ 2114 owners, special attention should be paid to CV joints produced by such companies as:
Basic faults
The most common failures of a grenade include: failure due to contamination and due to wear of the part (end of service life or defect).
A faulty grenade can itself reveal its unsatisfactory condition in the form of crunching sounds, crackling sounds when turning wheels, and body vibrations. But in this case, you will have to buy a new part, but you can notice the malfunction much earlier (at the stage of damage to the cover) and prevent serious repairs.
There are several ways to identify a breakdown:
- shake the drive shaft with your hand. If play is detected, the element should be replaced;
- Turn the steering wheel all the way to the left, and then to the right, and at each stage assess the condition of the anthers. If damage (cracks, breaks) is detected, replace them.
The CV joint is protected by anthers from getting dirt into it, which disables the part. But their service life does not last forever; regular inspection of these parts is necessary (as described above) to prevent more serious damage to the grenade.
When operating a car with a faulty joint, also known as CV joint, there is a high probability of it breaking in half. In this case, the vehicle will not be usable. This means repairs will be required and most likely (if this happens on the road) expensive tow truck services.
It is recommended to replace the grenade in a timely manner to avoid unpleasant situations.
Price
An internal CV joint will cost an average of 1,500 rubles, an external CV joint will cost 1,300 rubles. For the anthers they will ask about 150 rubles each. Replacing anthers will cost much less.
Replacing CV joints at a car dealership will cost 1,200 rubles (600 rubles each).
It is recommended to buy a new part using an old one, so the likelihood of an incorrect purchase is minimized. In addition, the purchase of CV joints should be carried out in trusted stores. You should not buy these parts at a disassembly site; it is possible that a breakdown will occur within a few meters.
Fix the breakdown without the help of a specialist
Replacing the CV joint on a VAZ 2110 with your own hands
In order to determine whether it is worth going to a service station or doing it yourself, it would be good to know how to replace a CV joint on a VAZ-2115. What is better - to overestimate your strength or underestimate? Some people like to repair their cars; in the old fashioned way, they don’t trust this activity to anyone; others consider it a relic of past years. Many people used to understand mechanical engineering. Both adults and children wanted to create a robot. Having bought a car, we traditionally explored it with pleasure.
The CV joint is completely changed. So there’s not much to tinker with: you don’t need to take it apart, examine the device, or look for any element. Buying a CV joint, both external and internal, is not a problem. The boot is also easy to find, but that’s not what we’re talking about now.
- Secure the vehicle using the parking brake.
- Place locking bars under the rear wheels.
- Remove the protective cap and unscrew the hub nut.
- Loosen the wheel mounting bolts.
- Now the car should be raised with a jack.
- It is necessary to remove the bolts that secure the ball and steering knuckle.
- The drive must be pulled out of the hub; the steering wheel must first be turned to the left.
- Cut off the old boot and remove the CV joint.
- Put on a new CV joint, carefully treating it with lubricant, which will help extend the life of the part.
- Put all the parts back in the reverse order.
The procedure is not complicated. But physical strength is needed here. You will also need ingenuity - only an auto mechanic, to whom experienced craftsmen and teachers have revealed their secrets, knows how best to do all this. But if you repair a car for your own pleasure, without knowing absolutely anything about the CV joints and the nuts that hold them together, fantasy and imagination will come in handy, as well as confidence, clarity of movements, good emphasis, and reliable fixation of the car.
Damaging adjacent parts and aggravating the situation is difficult and yet real - we must remember the risks and potential threats. There is a possibility of injury
Caution comes in handy when repairing your car yourself, no matter how simple or complex the procedure. When replacing a CV joint, it is better not to rush, prepare for the fact that the process will take several hours, have time
The replaced CV joint will work properly for a long time if you monitor the road and the condition of the boot.