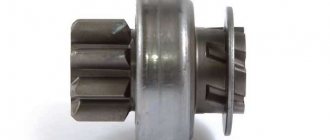
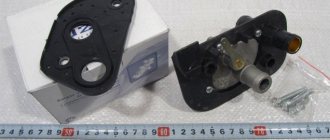
The internal constant velocity joint is designed to transmit torque from the transmission to the outer CV joint. It differs from the external one in size (increasingly) and cost, although it consists of the same parts:
- Bowl-shaped housings with a driven shaft.
- The inner race is a spherical fist with a drive shaft.
- A separator in the form of a ring with holes to hold the balls.
- Metal balls.
The roller type of hinge is characterized by the presence of a support, which, using three rollers, moves along tracks cut into the inside of the body. The balls or rollers are located in the grooves of the housing and are held by a cage, which is connected to the drive shaft by a splined joint. When the angle of the drive and driven shafts changes, the balls move along the grooves, continuously transmitting force.
Inner CV joint VAZ 2110
To begin with, it is worth noting that the inner CV joint of the VAZ 2110 is more massive in comparison with the outer joint, which is observed on almost all car models. This size ratio is explained by the fact that the outer hinge is located near the wheel where, as a rule, there is always little space and it is more compact.
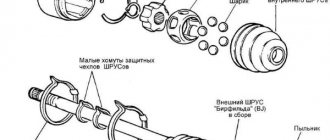
The inner CV joint consists of a body, popularly called a “grenade” because of their similarity, in the front of which there is a splined shaft. The shaft has a groove for a locking ring, which is necessary to secure the joint in the gearbox while driving.
Inside the hinge housing there are three recesses “tracks” for a three-beam bearing - tripoid. A tripoid bearing consists of three supports and the same number of cages, between which needle rollers are located. In the inner part of the tripoid there are splines for connection with the drive shaft, at the second end of which an outer CV joint is installed.
The bearing has freedom of movement along the length of its tracks forward and backward in the hinge body. It also rotates at a small angle of 20-25 degrees relative to the body. This condition is necessary when driving, since when the steered wheels rotate, it changes its angular settings, reducing or increasing the distance from the gearbox to the wheels of the car.
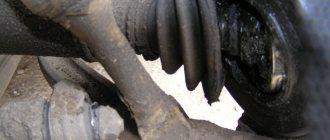
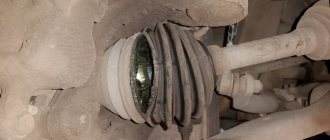
The CV joint can be used for a long time in working condition, provided that the protective covers of the “boots” are sealed and their fastening clamps are intact.
Signs of a faulty internal joint:
- Vibration under load when accelerating from 0 to 30 km/h;
- Severe wear of the rollers, outer races and wear in the housing itself in the working area.
Outer CV joint VAZ 2110
The external CV joint is protected in the same way as the internal one by an elastic boot, which protects the joint from moisture, dirt and other elements from the road surface.
The outer hinge consists of a housing with a splined shaft, the end of which is threaded. The CV joint is inserted into the wheel hub, on the inner surface of which there are also splines. The hub nut is screwed onto the thread and tightened to a certain torque.
The outer joint housing is essentially the outer race of the bearing. The bearing itself also has an inner race, a separator and balls, in the amount of 6 pieces. Inside the inner race there are splines for connection to the drive shaft from the inner CV joint.
At the end of the shaft there is a groove for a locking ring, which prevents the hinge from disengaging with the drive.
Inside the hinge housing there are six tracks according to the number of bearing balls. Thanks to these tracks, the inner race of the bearing has greater freedom of movement at different angles. This makes it possible for the hinge itself to transmit torque to the wheel as it rotates in different planes relative to its axis.
- When one ball wears out, when turning the steering wheel, first a single clattering, clicking sound appears, then a double one when two balls are worn out and a continuous crunch when all the balls are worn out;
- Beating in the steering wheel when turning the wheel at low speed, biting the inner race by the outer part, with a feeling that the wheel is beating, as if the rim had been hit;
- When checking, the drive shaft should ideally have no play around its axis in the hinges; it feels like the shaft and hinge are welded together except for longitudinal movement, which is acceptable;
- Traces of grease on the boots are a warning to check and replace them.
Grenade maintenance
In most cases, premature failure of the CV joint is caused by a rupture of its cover or loss or weakening of the clamps. Water and dirt getting inside act as an abrasive and quickly damage the expensive unit.
When assembling a new hinge, lubricant is added to it, some of which is also applied to the inner surface of the boot.
In cases where a torn boot is replaced, the hinge is disassembled, cleaned and washed. A separator with balls is installed, new lubricant is put inside, as well as in a new cover.
"CV joint" lubricant is applied only to the outer joints; it should not be used for the inner CV joints. A special “polyurea lubricant” is produced for them.
Disassembling the grenade bearing
If washing is necessary, the hinge is disassembled. To do this, the separator is raised to the upper position until 1 ball is released. The ball is taken out, and then, turning the separator up, another 6 balls are taken out one by one.
The part is then assembled in reverse order. When disassembling, remember which part of the separator “looked” up. On some separators, the factory makes a recess in the upper part.
Do not forget to periodically check the condition of the CV joint boots for integrity and then the hinges will “answer” you with their service life.
What lubricant to use for CV joints
The main tasks of lubricants used in CV joints are protection against friction and prevention of corrosion. Also, the lubricant must be inert with respect to the polymer boots, which prevent moisture and debris from entering the mechanism. Most of the above requirements meet the following types of lubricants:
1. Lithium. These are viscous yellowish compounds, which at low temperatures acquire an even thicker consistency, making it difficult to spread on parts. They are able to significantly reduce friction and loads acting on the hinge elements, protect them from moisture and neutralize accidentally trapped dirt. Their only drawback is the ability to dissolve some types of anthers made from organic polymers. One of the representatives of this type of lubricant is the domestic Litol-24, which is replaced after a run of 100 thousand km.
2. Based on molybdenum disulfide. More universal lubricants that are characterized by increased resistance to corrosion. Their composition has a reduced content of organic acids, thereby reducing aggressiveness towards polymer products. Such lubricants are recommended for use in CV joints of cars of any manufacturer. Their main drawback is sensitivity to moisture ingress when the seal of the boot is broken, due to which the lubricant loses its properties. Domestic manufacturers produce lubricants with molybdenum disulfide under the general name SHRUS-4.
3. Barium grease. It is resistant to moisture getting inside the mechanism, successfully resists corrosion, and is also neutral to any polymers from which the anthers are made. Its main drawback is poor resistance to low temperatures. Lubrication is currently not very common due to its high cost. All domestic compounds manufactured using this technology are labeled under the name ShRB-4.
Signs of CV joint failure
If the problem is not detected and corrected in time, the unit may fall apart while driving. In this case, the only way to get home is by tow truck. Therefore, you need to quickly respond to the following signs of a CV joint failure:
- Crunching noise when cornering.
- Backlash in the joint connections.
- Crunching noise when starting to move or when accelerating hard.
- Jerks during acceleration.
How to disassemble and reassemble CV joint. Video:
These symptoms may also appear with other malfunctions. Therefore, before going to the auto shop, you need to check the serviceability of the constant velocity joints.
How to avoid CV joint failure?
Advice! To avoid early failure of the part, it is not recommended to start abruptly with the steering wheel turned in any direction.
Those parts that are installed on new cars can easily serve for 100-150 thousand kilometers. This cannot be said about those spare parts that are sold separately in car shops or markets.
Symptoms of a problem
First of all, external CV joints fail due to the greatest load on the structure in the wheel hubs and the maximum rotation angles of the external part of the drive. Internal hinges are more durable, but over time, wear forms on the contacting parts of the CV joints, which subsequently leads to part failure. As a result, the bearings begin to move freely in the enlarged cavities, and the hinge begins to emit a sharp metallic crackling sound.
For external CV joints, this symptom appears when driving with the wheels turned to their extreme positions. If there is a malfunction, the internal joints crunch when coasting in a straight line, when starting from a stop, and also when driving under load (for example, uphill).
The cracking sound of the internal joints is especially pronounced with large suspension strokes (straight-line driving over potholes or off-road).
Also, if the CV joint is malfunctioning, jerks during rotation of the drive wheels are characteristic, which are clearly visible to an observer from the side when driving slowly on a level surface.
To confirm the malfunction, you can check for play in the internal CV joint: if the drive has free play, urgent replacement is required.
The rapid failure of internal and external CV joints is due to one of the following reasons (or a combination of them):
- particles of dirt, dust or water getting into the hinge mechanism through damage to the protective covers (anthers),
- insufficient amount of lubricant in the CV joint mechanism;
- poor workmanship of parts or metal defects;
- harsh driving style on broken roads (starts with slipping, sharp turns of the steering wheel to extreme positions at high speed, etc.).
Causes of failure
Development on the CV joint cage
The reasons may be as follows:
- A manufacturing defect that was not identified before installation. There are often cases when counterfeit products are installed on new cars. This also includes the very low quality of the metal used to make the assembly.
- Insufficient amount of graphite lubricant or its absence. Poor quality of the anthers, as a result of which it ruptures and dust, dirt, sand, water and other debris gets onto the rubbing surfaces.
- How you drive and where you drive is also important. Aggressive driving coupled with poor-quality road surfaces means rapid wear of the grenades and prompt replacement.
Inner CV joint VAZ 2110 - step-by-step do-it-yourself replacement instructions
Before you begin work on replacing the internal CV joint of the VAZ 2110 yourself, you need to prepare everything.
To do this, you need to secure the car, turn on 4th gear, and tighten the handbrake. Secure the rear wheels with wheel chocks. If they are not available, use bars of a similar shape. Remove the protective cap, unscrew the hub nut using an “arm” (extension) - a pipe or a pry bar. After the hub nut is removed, unscrew the wheel mounting bolts.
Let's move on to step-by-step instructions:
- Using a jack, hang up the wheel on which the CV joint is supposed to be replaced.
- Unscrew the bolts to remove the thrust washer of the hub nut.
- Remove the 2 bolts that secure the lower ball joint of the steering knuckle.
- If the CV joint is being replaced on the right, turn the steering wheel as far as possible to the left, and if on the left, then to the right.
- Pull out the steering knuckle and strut. Remove the splined end of the outer CV joint from the hub.
Using a pry bar, remove the inner joint from the gearbox. - Fix the drive shaft in a vice, remove the clamps from the outer and inner CV joints. Turn the anthers inside out. If they are torn or cut somewhere, you can simply cut them off with a knife.
- Remove the VAZ 2110 CV joint from the shaft. You can use a hammer and a wooden or bronze adapter.
- Assembly is performed in reverse order. At the same time, install a new hub nut. Upon completion of the tightening, you need to touch its edge to avoid unwinding.
- When installing the inner CV joint, a plastic plug is placed on the end of the shaft.
- Before installing the VAZ 2110 CV joint, you need to make sure that a sufficient amount of lubricant is applied. Place a retaining ring on the inner CV joint.
- After the drive is placed in the box, place it in the side gear so that it is completely locked. This can be done by lightly tapping the surface of the wooden adapter with a hammer along the entire perimeter of the shaft axis.
Installation of CV joints at the final stage in detail
Please note the following notes:
- install a plastic plug on the end of the shaft;
- the retaining ring is installed before mounting the hinge;
- Before installing a new CV joint, the installation site is generously treated with lubricant to ensure a tight fit;
- After installing the drive, the hinge must “sit” tightly on the gear until it is completely fixed, which is done with a hammer.
Carrying out this replacement of a functional element of a VAZ shaft with your own hands does not require experience in car repair. The replacement can be carried out following the video instructions. If you are not confident in your abilities, contact a specialist to ensure that the hinge is installed reliably.
Signs of CV joint failure
Wear of the grenade due to defects or the end of its service life and contamination of parts are the most common failures of the angular velocity joint. A faulty CV joint will itself “inform” the driver that it is time to replace the outer joint and boot. While driving, a crunching sound appears, crackling sounds are especially noticeable when turning, and vibrations appear in the body of the VAZ 2110. If measures are taken in time, then you will not have to replace the internal and external hinge; it will be enough to install a new boot. To find out the extent of the damage, you will need to conduct an analysis.
You can identify the breakdown and confirm your guesses in the following ways:
- Turn the steering wheel all the way to the right, and then to the left. During this process, the condition of the anther should be assessed. If there are breaks in it, then the element needs to be changed.
- Take the drive shaft and rock it from side to side. If play appears, then replacement of the inner and outer CV joints is required.
Anthers protect the grenade from dirt, which destroys the part. They wear out faster than other components of the assembly, so the covers should be inspected regularly. If you ignore the malfunctions and continue to use the car, the CV joint on the VAZ 2110 may break in half. These are not only costs, but also the danger of getting into an accident, because a breakdown can happen on the road.
Using grenades in a VAZ 2112 car
Replacing a CV joint boot with your own hands, video
They began to use grenades when converting cars to front-wheel drive. If in such a design you use crosspieces in the cardan transmission, as in rear-wheel drive cars that have four needle bearings that work in pairs, then equality of angular velocities on the drive and driven shafts will not be ensured. So:
- The use of such a device will lead to an increase in the dimensions of the unit, the price becomes significantly higher, and strong pulsation occurs during the transmission of torque, which increases as the angle between the shafts increases.
- The design of the grenades initially included the same service life as the entire car, but after using the car, it was clear that its outer part would wear out more. The use of flexible, moisture- and frost-resistant material for manufacturing protects the surface of the grenade, but over time, external factors destroy the element and it cannot be used for a long time.
- Rapid wear is explained by the action of constant deformations, abrasive particles and moisture in large quantities. During operation or during repairs, the boot (see) may be damaged. Cracks appearing on the protective rubber lead to failure of the element. The shaft leading to the grenade must not be damaged, which can be seen during a visual inspection of the part.
Replacing the external grenade of a VAZ 2112 car
The instructions for replacing a grenade on a VAZ 2112 indicate that the work is carried out with the part of the car raised and the wheel removed. So:
- First you need to unscrew the hub nut.
- Remove crankcase protection.
- Release the ball joint from the connection with the lower suspension arm. If the support in the lever is pressed in, unscrew them at the same time.
- The ball joint is removed.
- You need to move the stand to the side, it will be in a bent position, and the splined shaft entering through the bearing into the hub will be located at an angle to the drive shaft. The latter connects the inner and outer grenades.
- The splined shaft of the grenade is knocked out of the bearing using a metal spacer from the outside of the wheel.
- Removed from the grenade drive shaft.
- The boot is removed.
All old grease is wiped off. To make the work easier, you can use WD-40 or another similar aerosol.
- After installing the grenade on the drive shaft, before its final pressing, you need to center the assembly so that the fork enters without jamming.
- Installing a grenade on the seat.
- Crimping the boot with clamps.
- Assembling the unit yourself is done in the reverse order.
How to replace an internal grenade
Replacing the internal grenade of a VAZ 2112 differs from the external one in that it needs to be done when all the oil has been drained.
So:
- The wheel is removed.
- The ball joint is unscrewed, which frees the strut from the lower arm.
- For the external grenade to move freely, the wheel must be moved to the side.
- You need to knock out the outer grenade from the wheel.
- Both the external and internal elements are removed from the gearbox.
The drive shaft is clamped in a vice carefully so as not to damage it. Use a screwdriver to release the clamp securing the boot to the body of the internal grenade. The boot is removed. An element that has become unusable can be cut. Replacing a VAZ 2112 grenade is done by knocking the old one off the drive shaft. A new boot and grenade are put on the shaft.
- During installation, you need to ensure that the seat coincides with the direction of the drive.
- New rings are replaced and installed - retaining and thrust rings.
- Graphite lubricant must be applied to the spline surfaces of the hinge.
- The assembly is inserted into the gearbox as shown in the photo.
Useful tips
Please note that on many popular cars today (for example, the VAG family), the inner CV joint is bolted to the gearbox. So, if the bolts are loose or broken, this also causes vibrations.
Experienced specialists also recommend regular preventive maintenance of CV joints, both internal and external. The fact is that the main cause of premature hinge failures is the CV joint boot.
At the same time, when inspecting or after replacing the boots, it is important that the clamps on the boots are positioned correctly and are properly tightened. The main task of the clamp is not just to fix it, but also to prevent the boot from spinning on the CV joint housing.
Do not assume that boots and wear are the main problems. The reasons for CV joint failure can be different, but they often include driving at high speed on bad roads, as well as play in ball joints. Sometimes the CV joint is installed incorrectly when replacing it or after carrying out other work.
So, when driving on uneven roads, you need to move as carefully as possible, especially if you take into account the specifics of the internal hinge. You should also avoid sudden acceleration with the wheels turned out, etc. If mistakes are made when replacing the CV joint, the distortions also reduce the life of the unit.
It is important to understand that the outer constant velocity joint receives all the impacts from the wheel and is actively exposed to water, dirt and sand. In turn, although the inner CV joint is less loaded, if the ball pulls out or has strong play, the inner joints will also suffer.
Anthers "pomegranate"
Frankly, I would never have touched on the topic of anthers if this article had not been devoted to constant velocity joints. Now you will understand why. This part itself is not large in size, but due to the complex technological process of its manufacture and the use of expensive materials, its price is not so low as to neglect recommendations for its care. Many car owners have no idea that they themselves are responsible for their considerable costs. But it is precisely the good condition of such a small rubber element as a boot that allows us to guarantee durable operation and save significant money, since its task is to protect mechanisms from dust and other contaminants, namely:
- Protection of the “grenade” and its lubricants from water, debris, dirt and dust;
- Contains lubricants within the mating contact surfaces.
Advice! Checking the condition of the anthers should become a regular procedure, and their replacement, if defects (ruptures, cracks) are detected, is mandatory and urgent.
Troubleshooting anthers
This type of anther, like all others, is made of special rubber, and can also be made on the basis of silicone, but, as experience shows, only the reputation of the manufacturer can become a factor determining the quality of the anther. However, the boot should not be very rough and when its fold is turned outward, there should be no change in the color of the surface, or any cracks or breaks.
When checking already working anthers for defects, it is necessary to take into account their operating conditions:
- The one installed inside suffers from temperature changes (increased heating from the engine occurs) and is damaged by objects falling into the engine compartment when the car is moving. As a rule, its damage manifests itself as ruptures, microcracks and lubricant release;
- The boot installed externally is also subject to heating from the friction of parts, is exposed to constant aggressive influences of the external environment (stones, sand), and also, due to the large amplitude of changes in the angle between the shafts, to multiple cycles of compression/extension.
Checking the boot
To determine the integrity of the boot, it is necessary to place the car in a pit, lift its front part and turn the steering wheel all the way in both directions alternately, turning the wheel, inspect the boots for the presence of the damage described above.
Replacement
Well, since replacing a CV joint in a VAZ 2110 occurs much less frequently than replacing its boot, we present to your attention instructions for this operation:
- The beginning of work and its main stages up to the dismantling of CV joints are completely identical to the above described actions described in the instructions for replacing hinges;
- After the boot is removed, we wash the “grenade” in gasoline (a special cleaning solution) to get rid of old grease and trapped dirt;
- We put a new boot on the shaft;
- We put the CV joint itself, pre-filled with special lubricant, onto the drive splines;
- Using special pliers, first clamp the boot clamp on the drive shaft;
- Then, using a screwdriver, we bend the outer edge of the boot (to equalize the air pressure inside) and only after that we clamp the clamp from the outside.
Clamp clamp
Plastic plug
The photo shows a plastic plug for the internal joint; do not forget to put it in place when assembling the drive.
Differential diagnostics and repair
The VAZ 2110 differential often requires repair. Very often the malfunction depends on the bearing and the degree of its wear. The process of replacing a part can be done at home, and it consists of pressing the box from the axle. In this case, the separator is no longer suitable for use; the part cannot be reinstalled. When diagnostics are carried out, it is important to carefully examine the teeth of the satellites, gears and splines for wear and mechanical damage. If this is the case, the parts will also have to be replaced.
Repairing a differential is almost impossible without replacing the bearing. The work process begins with unscrewing and removing the automatic transmission. This is labor-intensive work that requires a lot of time and physical effort. First of all, disconnect the selector cable from the automatic transmission, oil supply hoses and electrical connectors. Remove the front of the machine to expose the drive shaft. It is better to hang the engine, unscrew the longitudinal ski and box cushions. Remove all fasteners associated with the motor. Remove the box and diagnose and replace damaged elements. Bearings must be replaced. To ensure high-quality work in the future, it is important to clean the old parts and lubricate the component parts with new sealant before assembly.
To diagnose the differential, it must be removed from the vehicle. Next, we will consider the differential elements, the requirements for their permissible wear and repair, one by one.
- Remove the differential from the transmission.
- Having turned 90° around the axis of the satellites, remove the side gears from the differential housing.
- Next, remove the retaining ring from the satellite axis.
- Remove the pinion axle and both pinions from the differential housing.
- Remove the bolts securing the driven gear to the differential housing.
- Press the driven gear off the differential housing.
- Inspect the working surfaces of the satellites, the axes of the satellites, side gears and the spherical surfaces of the differential housing in contact with them. Remove small irregularities with fine-grained sandpaper. Replace parts that have obvious defects immediately.
- Then assess the condition of the driven gear of the gearbox. If there are chips, chipping or significant wear of the teeth, replace the gear with a new one. Main gears with different gear ratios are installed on the car. The number of teeth on the driven gear 1 and driven gear 2 is stamped on the driven gear. The final drive gears are selected in pairs at the factory based on noise and contact patch. Therefore, when replacing the driven gear, also replace the drive gear: they are sold in pairs. To check, count the number of teeth on the drive gear.
- Inspect the bearing seats on the differential housing. If these areas are significantly worn out, replace the differential housing. If there is pitting (sinks) on the raceways and rolling elements, traces of indentation of the rolling elements on the raceways, or damage to the cages, the bearings must be replaced.
- To replace the bearings, use a puller to press them off the differential. In this case, the bearings are destroyed. Then…
- ...press the outer rings out of the gearbox and clutch housings with a special puller. If there is no puller, press out the axle seals first. Please note that in this case the seals are damaged and must be replaced (for more details, see subsection 3.2.10). Press out the bearing rings from the outside of the crankcases with a punch.
- Please note that there may be an adjusting ring under the ring installed in the gearbox housing, which must be re-selected before pressing in new rings (see “Selecting the differential bearing adjusting ring”).
- If you need to replace the speedometer drive gear, you can compress the bearing (without destroying it) using two screwdrivers, applying force to the inner ring of the bearing. The gear will be destroyed, but it still needs to be replaced.
- Reassemble the differential in reverse order. When assembling, lubricate all parts with transmission oil. Attention! The driven gear is installed with the teeth markings facing out.
When to replace
In order for this part to work long enough, sand, dirt and dust should not get into it. Contamination significantly accelerates wear and reduces the service life of the unit. But to protect against this, a boot is provided, which can become unusable relatively quickly. Therefore, timely replacement of the boot will keep the CV joint in working condition for a long time.
The wear of the CV joint is indicated by a noticeable crunch and extraneous sounds when turning the steering wheel. In this case, it is recommended to replace the unit.
CV joint malfunctions: symptoms and causes
CV joint is a very durable part that lasts from 100 to 200 thousand kilometers. However, it may fail earlier.
The main symptom of a CV joint failure is a crunching sound that intensifies when the steering wheel is turned. At high speed, the crunch of the CV joint can turn into a roar.
The main reasons that “kill” CV joints:
— Torn boot. Through the hole, dirt gets into the hinge, which slowly destroys the moving elements
— Frequent driving on broken roads. Impacts also affect the condition of CV joints.
— Incorrect gearbox alignment. If you removed the gearbox and then installed it crookedly, the CV joints will work at the wrong angle and will wear out faster
— Incorrect toe angle and increased maximum steering angle. These parameters can be violated due to poor repair and “tuning” of the steering linkage. CV joints, again, operate at extreme angles and quickly break down
— Severe damage to suspension parts - hubs, steering knuckles, shock absorbers, etc. All this can lead to disruption of the CV joint angles and their accelerated destruction
— Heavily worn engine and gearbox mounts. The destruction of the supports causes strong vibrations, causing CV joints to suffer.
— Errors when installing CV joints. A relatively new hinge can also fail if it was installed incorrectly: with insufficient or excess lubrication, for example, or with improper installation of the boot.
— Frequent driving and especially sharp accelerations with the steering wheel turned out. The habit of dashingly turning and turning greatly shortens the life of the hinges, because they have to experience heavy loads at maximum turning angles.
This video shows the moment of “death” of the CV joint while the driver was forcing a puddle with the wheels turned.
Replacing a grenade on a Priora | PrioraPRO
Lada Priora is a fairly reliable car among domestic products, but, alas, this car also has to be repaired. And our roads, to put it mildly, are not of the best quality. Therefore, the chassis especially suffers - shock absorbers, springs, ball joints and, of course, CV joints.
If you need to replace a grenade on a Priora, then according to AvtoVAZ’s instructions, you need to change the entire drive, for which you are supposed to go to a service station. But this mechanism costs a lot of money, and is there any point in this operation? Maybe it’s enough to just change the CV joints themselves and repair everything yourself?
How to determine that a new grenade is needed on a Priora? Each case, of course, is individual, but the first and most common symptom is a crunching sound, which is especially noticeable when turning the steering wheel.
But it’s worth paying attention that if you pretend that you don’t notice anything and drive further with such a symptom, then a bad scenario is quite possible - the drive will simply vomit, which can lead to very sad consequences. Therefore, repairs need to be made as quickly as possible.
It is better to buy parts for repairs in a specialized store - this way there is much less chance of running into a fake, compared to the car market, and there is a certain guarantee for spare parts. How much does a grenade cost on a Priora? It is difficult to give an exact figure (it is constantly changing), and there are many different manufacturers on the spare parts market.
You can buy either a cheap Chinese grenade of dubious quality or a spare part from a well-known brand (even a Russian one), which, of course, costs more than its Chinese counterpart, but the service life is clearly longer. In general, we can say that the price of a grenade for a Priora is quite small compared to similar parts for many foreign cars.
Please note that the external grenade on the Priora is replaced in pairs. You can, of course, buy one - but it’s better to buy two at once
Otherwise, the wear will be uneven and anyway, after replacing one grenade, sooner or later the second one will also become unusable.
We jack up the car, remove the necessary wheels and carry out an external inspection. CV joint boots (they look like rubber “accordions”) also constantly wear out and require replacement. If cracks are visible (even microscopic ones), it is better to change them immediately, not forgetting to “fill” with lubricant (it is included with the CV joint and is also sold separately).
If the anthers are not changed in a timely manner, then dust or debris that gets through them can “sentence” a grenade very quickly. The anthers are relatively inexpensive and are quite easy to change. Especially if you have access to a pit or, even better, a lift. Changing boots and CV joints from the ground is much more problematic.
Replacing a faulty CV joint
Since repairing a worn CV joint, apart from replacing the boot and lubricant, is practically impossible, we are almost always talking about replacing it. And as we have already said, replacing a grenade is a rather complex and time-consuming task, and therefore it is better to entrust it to a professional. This requires special pullers, keys, as well as skills and abilities. You will have to remove the hub, which in itself is not an easy task. As for replacing the inner CV joint, it is even more difficult. Therefore, amateur activity in such matters is absolutely not welcome. It will be better if you check the condition of the anthers more often. In general, even replacing the boot is not a five-minute procedure.
vote
Article rating
Assembly of the unit
The assembly process for the outer CV joint is as follows:
- We stretch a new rubber element onto the shaft;
- We place a washed or new CV joint on the shaft splines (if it is also being changed), and then we stuff it so that the groove in the joint cage fits onto the locking ring, which will ensure fixation from removal;
- We add new lubricant (press it into the hinge itself, as well as into the boot);
- We pull the boot onto the outer casing;
- Use your hand to press the boot a little to squeeze out the air from inside;
- We put on the clamps and fix everything.
After this, the drive is installed back - the hub is put on the splines of the limit switch and the whole thing is secured with a nut. Next, put the rod end, support and wheel in place.
After removing the car from the jack, tighten the drive fastening nut and using a powerful screwdriver, it is cored (its skirt is bent into the groove on the shaft) to prevent spontaneous loosening.