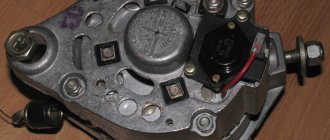
Sooner or later, everyone is faced with a significant increase in fuel consumption and a drop in engine power. There are times when the car refuses to move and the sprayers may need to be replaced.
The easiest way is to take the injectors to a diesel service center, but then you will have to pay some money. This will be the most correct method, but sometimes a broken car is not able to travel 200 km to the nearest service station. Therefore, the best solution would be to repair diesel injectors yourself. The article will help you avoid mistakes; it takes into account the main nuances and difficulties of repairs.
Remember that the usual replacement of a nozzle in an injector at the level: unscrew the nut, replace the nozzle, tighten the nut, can be fraught with great danger. As a result, even when using reliable nozzles, you will end up with a nozzle whose quality is several times worse than what it was before the replacement.
Injector repair technology
We will not discuss cases with low-quality or defective atomizers here. The main conclusion is that if after the repair you do not check the result obtained on a special stand or a simple device that can replace it, an amateur replacement is doubtful.
Repairing most diesel injectors involves replacing the nozzles, since these are the elements that most often fail. Sprayers often wear out the body and melt the tip. Also, the reasons for the need for repair may be the narrow diameter of the injector nozzle and one-sided wear of the needle.
First you need to check the injectors on the stand to make sure there are any malfunctions. If the repair is carried out in a garage, then the nozzle must be carefully secured in a vice and the nozzle must be dismantled.
The difficulty is that the injectors will have to be disassembled and reassembled several times. Also, the main point of the entire process of replacing the sprayer is to keep the parts and the entire working surface absolutely clean.
Repaired injectors must be checked on a special stand. This is the only way to make sure that the product is not pouring but spraying diesel fuel.
Cleaning
As already mentioned, it is possible to extend the service life of Common Rail injectors and avoid making repairs ahead of schedule if you periodically clean them by adding a special product to the tank. Such cleaning should be carried out every 25-30 thousand kilometers of distance traveled. If this is not done, then the entire fuel system, including the high-pressure fuel pump, may become unusable.
Many people know that repairing the entire fuel system is very important, because without a working fuel system the car will not be able to drive. You can do this cleaning of Common Rail injectors yourself. The second cleaning stage does not require removing them from the machine. In this case, cleaning the Common Rail injectors is carried out by blowing air into them under pressure, which can clear clogged nozzles.
There are such blockages when even the second option does not help, in this case the last stage of cleaning the injectors will come to the rescue. The cleaning process in the third option is based on the fact that the device is immersed in a special chamber, where, under the influence of ultrasound, all particles that clog the nozzles are destroyed. The only disadvantage of this cleaning option is that in this case you will need to remove them from the car and take them to a service station where such work is carried out.
Don’t think that you can clean completely clogged nozzles yourself. If you clean it yourself, you can completely damage the atomizer, channels or body of the device. In this case, a complete replacement of nozzles or even injectors will be required, which will have a negative impact on the driver’s wallet.
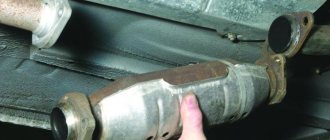
Design and principle of operation of diesel injectors
(Fig. 1) shows the cross section of the nozzle. All of them (except the newest ones) have a similar structure and fuel supply processes.
Picture 1
Figure 2
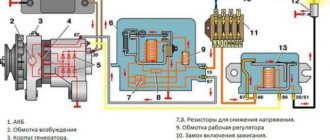
The injection pump supplies fuel under pressure to the nozzle fitting, from where it enters cavity “A” of the nozzle through a system of channels. There is nowhere for the fuel to move further, since the path is blocked by the nozzle needle (1), which is pressed by a spring (9). The injection pump continues to supply fuel, the pump raises the pressure to the level at which the fuel is able to overcome the force of the spring, thereby lifting the nozzle needle above the seat (Fig. 1, b).
Diesel fuel enters the cylinder, the pressure drops, as a result of which the needle sits on the seat, locking the system. When the injection pump continues to supply fuel, the process repeats.
After the injection is completed, the system must close. If it does not close, then in the next stroke the fuel will be supplied not when the pressure in the system rises to the set value, but at any moment (or, more precisely, when the pump just starts supplying fuel).
As a result, the engine operates harshly with shocks, and the motor may refuse to accept the load. In addition, combustion products may enter an unlocked system. This may cause the sprayer to fail.
Intermediate pusher - the most common injector failure
When a lateral force occurs that presses the needle against the sprayer body, the intermediate pusher (10) fights it. It relieves the needle from the possible impact of a bent spring. The intermediate pusher is located in the spacer housing (3). But it happens that the cause of the lateral force is the development of the pusher itself.
When replacing nozzles, you should always be prepared for the fact that the new product will leak. If this happens, then repeated reassembly will be required to turn the spring over or replace it. Or you will have to replace the pusher, and in rare cases even the injector body.
Everything else about the injector is pretty simple. Since the needle in the nozzle is not sealed, some of the fuel seeps into the gap between the nozzle body and the needle and enters cavity “B”, where the spring (9) is located. If you do not remove fuel from there, then as soon as the cavity is filled, the atomizer needle will lose the ability to move, resulting in the injector being “locked.”
In order to remove leaked fuel there is a “return” channel (7). The adjusting washers (8) are responsible for adjusting the opening pressure of the spray needle. The entire structure is tightened with a nut (4). There are no gaskets inside the nozzle, so the tightness of the joints can only be ensured by clean processing and precision of the joining surfaces.
Replacing nozzles
So, here we come to the process of replacing nozzles. Throughout the presentation, I adhered to the idea that you have a stand or apparatus that can replace it, on which, after the work has been done, you can test the injectors.
When doing any work related to fuel equipment, the main rule must be observed: cleanliness. Please note that cleanliness must be observed not only during direct disassembly of the injector, but at all stages, starting with the removal of injectors from the engine.
Main types of injectors used in this system
The Common Rail system uses different types of parts of this type. They differ in both design and performance characteristics. We list the most popular models.
Piezoelectric
The vast majority of engines with Common Rail systems use piezoelectric injectors, since they are considered advanced and have many advantages.
The actuator mechanism of the piezoelectric injector is based on a compact piezoelectric element
As the name suggests, the actuator is based on a piezoelectric element. Using such an element provides a number of advantages:
- an injector with a piezoelectric element switches 8 times faster compared to analogues made on the basis of electromagnetic valves;
- the needle in it weighs 70% less;
- such a part can inject fuel several times during one engine stroke;
- the fuel injected into it is very accurately dosed.
Electromagnetic
Electromagnetic injectors are used primarily in gasoline engines. The needle in it is driven by a spring and an electromagnet, and during one engine stroke the part can produce only one fuel injection. The design of this device can be seen in the figure below.
This is interesting: Infiniti, made in Russia
Common Rail electromagnetic injectors are used primarily in gasoline engines
It should be noted that in terms of fuel dosing accuracy, the electromagnetic one is significantly inferior to the piezoelectric one. This indicator directly depends on the type of control system. For example, if a car is equipped with a modern ECU, the accuracy of gasoline dosing increases by 10–12%. There is a certain error in the timing of electromagnetic injectors. For example, an injector needle can hold the nozzle channel open for 2–2.5 ms with an error of 6%. This figure is very far from ideal.
Preparation for repair
It often happens that owners introduce debris into the threads and install the nozzle in place. Then, after a year or more, when you need to unscrew the injector, if you try hard to rip it off, a piece of the cylinder head may break off.
First of all, you need to thoroughly coat the upcoming surgical field, especially the head in the area of the channels and the nozzle body. This is very important, since sand and dirt can get into the channel when removing the injector, which can then damage the threads and damage the injector seal.
The second point is extremely important in order to achieve a good result and is that immediately after unscrewing the high-pressure tube from the nozzle, be sure to cover the nozzle fitting with a clean and tight cap. At the same time, you don’t need to console yourself with the thought that the nozzles will be replaced anyway, so you don’t have to worry too much about cleanliness. The smallest debris that ends up in the nozzle fitting during testing on the stand will drive the fuel inside, as a result, the spray needle may jam.
Then there are only two options for the development of events:
- If you have not yet changed the atomizer, then you have deprived yourself of the opportunity to see why your old atomizers were bad.
- Secondly, new nozzles will need to be cleaned (this procedure is not always successful).
Conclusion - the nozzle cavity must always be protected from dust and debris (and even tobacco from your pocket).
How long does it take for a car to adapt after replacing injectors?
Service center specialists recommend that immediately after replacing the injectors, “register” new codes in the electronic control unit. This procedure requires special equipment and knowledge. If you “register” the codes for new injectors, their adaptation period will not exceed 500–1000 kilometers.
Without coding the injectors, the car can take much longer to “get used to” the new elements of dosing and fuel injection - usually over 5 thousand kilometers. However, there is no guarantee that the injectors will work correctly without coding.
A special program allows you to quickly adjust the operation of the electronic injector control unit
The use of injectors in motors makes the life of car owners much easier. Injection engines are economical, environmentally friendly and durable. However, it is necessary to carefully monitor the quality of the fuel being poured, because the performance of the entire injection system will depend on this.
- Author: Ekaterina Larina
Copywriter, needlewoman, traveler Rate this article:
- 5
- 4
- 3
- 2
- 1
(0 votes, average: 0 out of 5)
Share with your friends!
Unscrewing parts
It is best to remove the high-pressure pipes in a package together with ties (if the engine design allows this). This way, during the assembly process, you won’t confuse how everything was originally. If it is not possible to remove the tubes in a bag, then mark the fitting of the first cylinder on the pump. Then mark the tubes themselves in the order in which they stood. As life shows, this can save a huge amount of time and nerves.
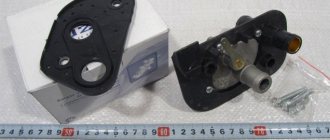
Location of protective caps
Removing the “returns” will not be difficult. True, on cars from Japanese manufacturers, before you begin to loosen the return nuts, you need to put protective caps on the fittings. In order to remove the ramp itself, the caps will have to be removed, but then do not forget to put them on immediately.
But most often, the injectors are screwed into the cylinder head housing. In order to unscrew them, do not try to use an open-end wrench. Even if you managed to do this without damaging the nozzle, not everyone succeeds in screwing it back in at the right moment without damage.
Head for unscrewing diesel injectors
Almost all injectors have a hexagon of “22”, “24” or “27”. In order to unscrew them, elongated socket heads are quite suitable. It is much more convenient to do this work with twelve-sided heads. If it is not possible to purchase elongated heads, you can get out of the situation in this way: cut off its hexagonal part from a regular head and weld it to a piece of pipe at one end, and weld the mating part for the knob at the other end.
There is no need to unscrew the nozzles right away, first you need to slightly shake it in the thread after tearing it off. This is done in order not to immediately damage the threads in the head or the head itself, since during previous intrusions dirt could have been introduced into the channel.
Electrical resistance measurement
This method allows you to check the injectors directly on the car.
- Google the model of injectors installed on your car. Using these data, we find the electrical resistance of the coils inside the nozzle. If nothing is found, no big deal.
- We turn off the engine. Remove the power connectors from the injectors.
- Take a multimeter. Switch it to the 0-200 Ohm (Ω) measurement mode.
- We measure the resistance of each injector. It must be within the passport values. If it was not possible to find out the nominal resistance, then you need to compare the injectors with each other. That is, if 3 injectors showed 10 Ohms, and one showed 20 Ohms, then it is considered faulty.
Disassembling injectors
So, the injectors have been removed. Now we immediately begin to remove the sealing washers from the nozzle channels, or rather their remains and general debris. Removing washers often takes a long time.
Injector and glow plug
As a rule, normal washers should simply be removed with a hook, but sometimes you have to come up with homemade devices for this (for example, screw a tap into them and pull it).
Under no circumstances should you try to cut the washer in the channel with a chisel. You will definitely damage the end of the channel, and correcting such nicks will require removing the cylinder head. You should not try to solve the problem of a damaged end by installing tricky washers.
The engine will clean itself. In this case, you can check the condition of the glow plugs and their control system. With the injectors removed, the operation of the spark plugs is clearly visible.
Do not forget to plug the nozzle channels with oily rags, and the engine on top with polyethylene so that no water gets into the channels.
After cleaning the channels to completely remove debris from them, you must crank the engine with the starter for 10-20 seconds.
Power check
We turn off the engine. First option:
- Remove the power connector for the injector of cylinder 1.
- We connect the multimeter to the DC voltage measurement mode in the range of 0-20 Volts.
- We start the engine and observe the instrument readings. The voltage should be supplied in short pulses.
- If voltage readings appear, the wiring is OK.
- If there is no voltage coming to the power supply, then turn off the engine and call the wires, or look for damage visually.
- We connect the injector of cylinder 1 and repeat the operation with the injectors of cylinders 2-4.
Second option. Two people will be needed. We do the same thing, only turning off all the injectors at once. One person turns the engine with the starter, and the second one sequentially measures voltage pulses at the disconnected injector connectors.
Instead of a multimeter, you can use an LED.
How to check the performance of a diesel injector
Having removed the injectors, first of all you need to check their performance and make sure that the previously passed verdict was not erroneous. The main criteria for assessing the performance of nozzles:
- when supplying fuel, the injector should open only under the specified pressure;
- before the nozzle opens, leakage from the sprayer is unacceptable;
- During fuel injection, jets and drops are not allowed;
- the spray pattern should be smooth, there should be no deviations (Fig. 2);
- After stopping fuel injection, pressure should remain in the injector for some time.
They also talk about the characteristic sound of an injector firing, but the sound should not be considered an objective parameter for evaluating an injector. This is a secondary indicator. If it turns out that replacing the nozzles is really necessary, then we put protective caps on the nozzles and begin to prepare the workplace.
How can you tell if your sprayer is faulty?
The need to repair diesel engine injectors is simply determined:
- Excessive fuel supply. Even when the working cycle is completed, diesel fuel continues to flow. Smudges become noticeable.
- Unstable engine operation. After parking for the night, it starts with difficulty, the speed fluctuates.
- The exhaust becomes dense and black.
The power is reduced, and repairing the injection pump (fuel pump) of diesel engines is definitely not possible. And the question arises: where to repair the injectors? Or maybe try to do it yourself? In this article we will tell you how to do it yourself.
Repair of diesel injectors
Necessary tools and equipment:
- two baths with clean diesel fuel;
- necessary keys (usually two);
- knife;
- device for fixing the nozzles (if not, use a vice).
Anything unnecessary will interfere with your work. If the garage does not have a special device for fixing the injectors during repairs, you will have to disassemble it in a vice.
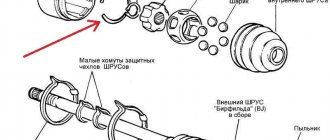
Injectors from Japanese cars, in which the return flow is through a ramp, should never be clamped in a vice. When clamped, the edges of the sealing surface under the “return” are crushed (Fig. 3). Such nozzles can be disassembled by placing them in a spanner, which is clamped in a vice (Fig. 4).
Figure 4
Figure 5
But injectors from German manufacturers must be disassembled in a vice without harming your health. There are 2 reasons why open-end wrenches should not be used to disassemble and repair an injector:
- It's quite inconvenient.
- The union nuts of the injector housings of some engines (for example: Mercedes OM601,602,603) almost always crack. When trying to assemble or disassemble them, the nuts are damaged by the open-end wrench. But these parts are quite expensive, and they are not so easy to buy.
Therefore, to disassemble the injectors, it is advisable to use the same elongated head as for removal from the engine.
Loosen the union nut, then screw it together by hand. Often it can curl up with the atomizer that is stuck to it. The sprayer, after the nut is removed, can be knocked out with a suitable rod, and the cavity of the nut can be cleaned with a brush for cleaning the battery terminals.
To perform this work, you need to move a couple of meters away from the clean area. The nut needs to be washed in the first bath - it will be used for initial rinsing. After the nut, put it to the side on a sheet of paper. Now we remove the intermediate housing, rinse it in a clean bath, drain the injector body, which is clamped in a vice, with fuel and put the intermediate housing in place, do not touch anything else.
We take a new sprayer, without disassembling it, and rinse it in clean fuel. After rinsing, you need to remove the intermediate housing or atomizer (as well as all parts of fuel equipment) from the bath so that the flowing fuel takes away with it all the dust particles from the mating surfaces (Fig. 5 and 6).
Figure 6
Figure 7
We put the sprayer in place and tighten the union nut. Now you need to check on the stand what happened. It happens quite often that when, before replacement, a nozzle from a worthy manufacturer was installed on the nozzle, we replaced it with an equally worthy one. If other parts of the nozzle are not too worn out, then it may turn out that after replacing the nozzle the nozzle will immediately work as it should, then no further adjustments will be required. If this miracle happens, you can immediately close the nozzle fitting with a cap and finally check the tightness of the union nut.
The fact is that if you do this procedure several times every day, then you involuntarily do not pull the union nut very hard - since it takes a minute to disassemble again. Unfortunately, it doesn’t always work out the first time: most often the pressure doesn’t match and the sprayer leaks. You shouldn’t hope that it’s leaking because we didn’t disassemble it and wash it out of conservation the first time. These hopes are only valid if the atomizers are preserved by immersion in a gelatinous mass, but this is rare.
Typically, all modern sprayers are preserved by the manufacturer themselves, moreover, in a special oil or in an inert environment. And I am sure that we cannot do anything cleaner than Bosch or Delphi cleans their parts before packaging. So, the reason for poor spray is most often the wear of the intermediate pusher (position 2, see Fig. 1, a) or a deformed spring. Sometimes reversing the spring in the housing can help, but usually replacing worn parts is necessary.
DIY Delphi injector repair
The biggest drawback of Delphi injectors is that they are afraid of dirt or debris. If there is severe contamination, they begin to dump fuel into the return line. The solution is to repair it, namely disassemble, clean or change the valve. More details
Thus, the procedure for replacing the atomizer will turn into a series of assembly, disassembly, and checks. You will have to repeat the same operations until you achieve the desired result. Finally, we have achieved the desired result; we are satisfied with the operation of the injectors and can be installed on the engine.
No need to hurry! We remember that the nozzles are sealed with special disposable washers, the task of which is not only to seal the nozzle channel, but also to remove heat from the nozzles, thereby preventing them from overheating and coking. If we don’t install new washers, we can easily destroy the new nozzles in the first half hour of engine operation.
On injectors from Japanese manufacturers, the washers sealing the return ramp are disposable. On engines of different designs, the return seal washers are very similar. They are almost indistinguishable from each other, but installing a foreign washer or a washer from a strange manufacturer always leads to return leakage. Therefore, when you select return seal washers, you need to find out the possibility of lateral displacement of the washer on the injector when tightening, and also make sure that the fuel discharge channels can be blocked or, conversely, not sealed.
Before you start screwing in the injectors, you need to make sure, by turning the crankshaft with the starter, that no water or other debris has entered the cylinders, and you can also look at the oil dipstick.
If everything is in order, then you can screw in the injectors; first, the threads on the body must be lubricated with graphite or copper grease, and tightened with a torque (6-7 kg.m.).
However, there is one detail: you always need to screw the nozzle into the channel only with your fingers, if the nozzle does not go, then you need to clean the threads, on some machines it is very easy to ruin the pre-chamber by screwing the nozzle in the wrong way, by the way, if the nozzle is screwed in tightly, then most likely it has gone it's not threaded.
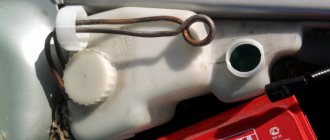
Do-it-yourself washing
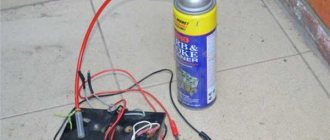
First, let's consider the most acceptable option for the car enthusiast: washing the injectors without removing them from the car. To carry out this procedure you will need the following things:
- Wynns flushing fluid;
- empty plastic bottle with a capacity of 1.5 l;
- rubber hose 1.5 m long;
- 2 nipples for car wheels;
- automobile compressor;
- injector filter, 1 piece;
- steel hose clamps, 4 pieces.
Flushing sequence
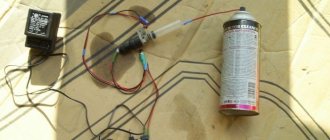
Before you start washing, you will have to assemble a simple washing device that will work like an IV for the patient.
- The rubber hose is cut into two parts. The end of the first hose mat is put on the ramp fitting. A filter from the injector is connected to the second end of this half. Injection filter for fine fuel purification, connects to the bottle
- A pair of holes are drilled in the cork and bottom of the bottle into which wheel nipples are installed. The nipple is unscrewed from the nipple installed in the bottom, and then the end of the second half of the hose is connected to it. And the other end of this hose is connected to the outlet of the injection filter. Nipples for car wheels that will be installed in the holes of the bottle
- The result is the design shown in the photo below. Homemade flushing system for Common Rail injectors, made from a bottle
- Now you need to open the fuel tank of the car (this is done in order to completely relieve the pressure in the fuel system).
- Fluid for flushing is poured into the bottle, then a car compressor hose is connected to the nipple in the neck and secured with a clamp. Flushing fluid for injectors from Wynns is the best choice for self-flushing
- The compressor turns on. The pressure should not exceed 3 atmospheres.
- The car starts and idles until all the flushing fluid is used up.
- When the engine stops, allow it to cool for 30 minutes. After this, the remaining flushing liquid is poured into the bottle, and the whole process is repeated until the engine stops again.
Assembly and testing of injectors
Reassembly shouldn't be a hassle, but that's only if you didn't get carried away and marked all the tubes and fittings when removing them. Just a few tips. Before installing the high-pressure pipe, you need to wash the outside and flush the inside with fuel. And yes, do not neglect to reinstall the clamps that collect the tubes into a bag. These clips are not intended for aesthetics. They prevent vibration. Tubes without clamps break very quickly (it’s like they’re being cut with a knife).
Well, that seems to be it, you can remove the air from the equipment and try to start the engine.
How to check injectors after repair
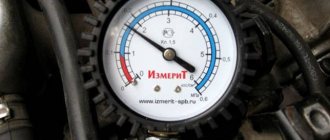
What is the best way to check the performance of the injectors? Undoubtedly, it is best to use a stand to test injectors. This stand can be a very complex electronic one, costing several thousand dollars, or very simple, one might even say primitive in the spirit of the fifties (Fig. 7) or homemade (Fig. 8).
Figure 8. Stand for testing diesel injectors
Figure 9. Homemade test bench
Any of them can be used with a lesser or greater degree of convenience. I think even in your smallest city there are diesel garages that have stands. We need to find it, because we know how to negotiate.
But it happens that your diesel is the only one in the area. Then we try to make the stand ourselves. You can make a homemade stand from a KAMAZ tractor pump or a ship pump; in extreme cases, you can adapt your car’s fuel injection pump for testing.
To do this, you need to make a tube - a tee, one end of which will be connected to one of the high-pressure fittings of the injection pump, the other end we will attach the nozzle, and on the third we will attach a pressure gauge of 200-300 atmospheres, of course more is possible, but this one will do at the end.
First, we crank the engine with the starter until the injector starts firing, and then, without leaving the ignition on, we crank it by hand. Of course it’s painful, but if there’s no other way out, it’ll do.
About the injector opening pressure
During the compression stroke, an air charge flows from the cylinder into the combustion chamber at enormous speed. In the combustion chamber, due to its shape, at this moment a directed vortex appears, and fuel is injected into this vortex.
There are different nozzles and different fuel injection pressures, depending on the compression ratio and the design of the combustion chamber; the shape and speed of the vortex are different. Designers establish recommended, permissible injection pressure values for each engine.
As a rule, the set values must be observed with an accuracy of 5-10 kg.cm2 within the set of nozzles. When reassembling the nozzle, the injection pressure must be set 10-15 kg.cm2 more than required, since in the very first minutes of the nozzle operation there will be some shrinkage of the moving parts and, accordingly, a decrease in the set pressure will occur.
It is necessary to note the property of rotary fuel pumps from LUCAS - these pumps have strict requirements for the accuracy of injection pressure adjustment within the set of injectors. In engines with such fuel pumps, searching for a faulty injector using the shutdown method is impossible. Since the engine will immediately stall due to the fact that the fuel supply to the remaining injectors will stop.
Basic faults
The most common injector malfunctions are as follows.
Injector knock
One of the most common malfunctions is injector knocking. The injector is constantly under load and becomes dirty - this is the source of sounds similar to high-frequency knocking (chirping).
The consequences of the appearance of such sounds are as follows.
- reduction in engine power;
- dips when pressing the accelerator pedal;
- floating idle speed;
- increased content of toxic substances in exhaust gases.
This problem can be corrected by washing or replacing the injectors.
Fuel leakage through injectors
This malfunction, typical of diesel engines, most often occurs due to wear of the injector washer. Less commonly, the cause of the leak is the connection between the fuel pipes and the injector.
The procedure for identifying and eliminating the source of a leak is as follows:
- The nozzles and their connections with the tubes are wiped dry.
- Areas of possible leakage are treated with ordinary chalk.
- The starter cranks for 3–4 seconds without starting the engine.
- Leak points will be clearly visible on white chalk.
- If the housing leaks, the nozzle is replaced with a new one.
- If a leak is found in the area between the head and the injector, the copper O-ring is replaced.
If the housing allows fuel to pass through, the injector is replaced with a new one.
No fuel supply
If there is no fuel flowing into the injectors, the cause should first be sought in the high pressure fuel pump. The injection pump belt should be checked for breakage or sagging.
Then you need to remove one of the hoses coming from the injection pump, place its end in a container and turn the starter. If fuel does not flow, the pump is faulty.
Sometimes fuel may not flow into the pump itself. In this case, the hose at the inlet to the injection pump is removed and checked in the same way. If fuel does not flow, the problem should be looked for in the gas tank pump.
Other faults
Among other malfunctions, it is worth highlighting the following.
- The intermediate washer located between the spring and the nozzle wears out and becomes bent. The needle does not rise high enough, and the fuel flows unstably.
- The spring wears out and loses its rigidity. The spring is changed, or several additional washers are installed in the nozzle.
- Damage to the nozzle body itself.
How to regulate the opening pressure of a nozzle at home
In most cases, the opening pressure of modern injectors can be adjusted by selecting the thickness of the spacer washer between the body and the spring. Good workshops have sets of these washers that can solve adjustment problems.
But amateurs should know that there are washers of different diameters, they are designed for different injector bodies, and come in versions with or without a hole. Washers without a hole can be replaced with washers with a hole, but the reverse replacement is not allowed. It is also unacceptable to use washers of a “non-native” diameter.
Adjusting injector pressure at home
Adjusting the nozzle opening pressure
As a rule, injectors are designed in such a way that when the washer thickness increases by 0.1 mm, the injection pressure increases by 10 kg.cm2. Quite often, when repairing injectors, you see that during previous interventions, the injection pressure was regulated using razor blades cut into small pieces, which were placed under the spring. This adjustment method is unacceptable. Firstly, thereby you get a lining of an uncontrolled shape, an uncertainty in the spring support is created, non-uniform production occurs and the occurrence of lateral force is provoked. And secondly, a chipped piece of blade can do a lot of damage inside the nozzle.
Therefore, the only high-quality solution to the problem is the production of new washers of the calculated thickness. And only in those cases, if you do it on a lathe, grinding and heat treatment are absolutely impossible, you can regulate the pressure with washers made of steel foil, they need to be placed between the standard washer and the body. If your spring rests on a non-hardened lining, then after a short time there will be nothing left of it.
Typical problem with Japanese injectors
A distinctive feature of injectors from Japanese engine manufacturers is the discharge of the “return” into a special ramp through the end of the injector. If you disassemble it carelessly, the sealing end of the injector will become deformed. Due to deformation, a hermetically sealed “return” cannot be achieved. Some begin “experiments” with tightening the ramp nuts and placing sealing washers under the nuts.
The only way to solve this problem is to trim the sealing end of the injector on a lathe. But keep in mind that only one surface of the nozzle can be corrected by facing, so the shape of the groove at the end may be deformed so much that the sealing washer can no longer cover it. Just change this nozzle.
Stupid attempts to tighten leaking or leaking returns almost always lead to deformation of the return ramp flanges. It will not be possible to achieve a seal with these flanges; they will have to be rebuilt. This is quite simple and can be done by hand sanding the tiles by placing sandpaper on them.
Source: https://diesel.dcp.kiev.ua/RemInjector.html
Adjustment after self-repair
It should be noted that in some cases the part will not immediately function correctly - calibration is necessary. This is done by changing the adjusting washers; it is advisable to stock up on washers of different thicknesses in advance. For example, if the response pressure is lower, we install a thicker washer and vice versa. You can take it as a rule that to increase the pressure by 10 kg/cm, take a washer 0.1 mm thinner. The diameter should be the same as those previously installed.
It is also worth noting that at the stage of disassembling the nozzle, you need to carefully inspect the pressure spring and, if it has exhausted its service life, replace it. Otherwise, fuel leakage can be expected. Also, all O-rings must be changed. Without this work, calibration will not make sense. After adjustment, the product can be put back on the engine.