22.06.2021
| (Votes: 1, Rating: 5) |
Issues discussed in the material:
- Steering rack device
- Types and principle of operation of steering racks
- Signs and causes of steering rack malfunction
- Steering rack repair stages
- Car owners' opinions on steering rack repairs
Repairing the steering rack becomes an urgent need when light knocks when driving over uneven surfaces turn into real pounding even when hitting a small pebble, and the steering is weak and unpredictable.
Of course, you can just buy a new rack, but repairs are much cheaper and last a long time. It should not be confused with adjustment; these are different procedures. From our material you will learn how to identify signs of a part malfunction and how to carry out qualified steering rack repairs.
Signs of a broken steering rack
When driving on bad roads, as well as when turning the steering wheel, a tapping sound is heard in the area of the steering rack.
- Control has deteriorated, the car “throws”, this is especially noticeable at high speeds.
- The independent steering travel (clearance) has been increased.
- The steering wheel turns more difficult than usual, or in gusts.
- The steering wheel does not return to its original state after turning; you need to turn it by hand.
- The pump hums, the sound increases when you turn the steering wheel.
- The amount of oil in the power steering reservoir decreases.
- Oil stains are noticeable in the area of the rack or close to it.
Almost without exception, all the properties on the list do not directly indicate wear of the steering rack; for this reason, before repairing, you need to make sure that it is the problem.
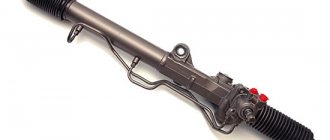
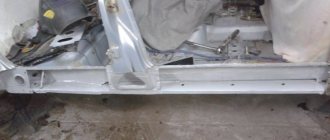
Removing the steering rack from the car
Removing the rack has its own characteristics for all machines, but in general, the procedure is as follows:
- Place the front part of the car on supports and remove the wheels.
- Press out the steering wheel ends (use a special pneumatic puller).
- Remove the protective display of the rack.
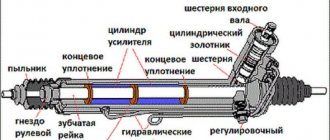
For cars with a booster, unscrew all supply hoses, as well as oil return hoses. For cars with hydraulic booster, turn off the micro connector or remove the control shaft position device.
Unscrew the nuts securing the control rack to the subframe or engine shield (the brand and modification of the machine plays a role here).
Reduce the ligament pin of the universal joint between the rack and the control shaft.
Pull the rack in the direction of the control shaft to release the pin joint (if the rack does not give in, it can be knocked down with small blows of a hammer).
Remove the rack through the left or right wheel arch. After removal, the rail must be cleaned of dirt and washed.
Algorithm for repairs in a classic style
- you need to start by putting the car on the handbrake and turning off the engine;
- in the interior of the car, in the area of the driver's seat under the steering column, find a fastening bolt - a clamp connecting the rotating shaft and the steering wheel itself. Unscrew it using an open-end wrench set to “14”. On some models the key size may be different. We remove the bolt. This completes the work in the salon. Go to the engine compartment;
- From under the bottom of the car, disconnect the steering rods. To do this, you need to loosen the connections of the rods and the gear rack of the mechanism. Also use keys. The rods themselves do not need to be dismantled if they are not a source of failure. Move aside for convenience;
- Use ring wrenches “16 – 17” to secure the fastening connection between the body part and the car body. Only 4 - 6 bolts, depending on the modification.
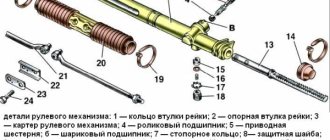
Disassembling the steering rack
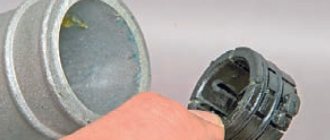
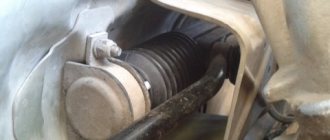
It is necessary to remove the clamps and tighten the control rod boots.
- Thoroughly secure the rack block, and also unscrew the steering wheel (the carved coupling has channels for an open-end wrench).
- Unscrew the lock nut, as well as the bolt of the adjusting device, remove the bolts and bushing from the mounting socket.
- Unscrew the block or the drive shaft bolt (a special tool is required) and remove the shaft from the housing.
- Remove the friction rod of the control rack.
- It is necessary to remove the seals, pipes, and fluoroplastic rings from the rack body.
Troubleshooting elements
The elements of the disassembled rack must be treated with oil, cleaned of deposits, and also carefully examined. As a rule, repair kits contain only rubber seals, as well as fluoroplastic pipes with rings. This set may not be sufficient for repairs.
- It is necessary to thoroughly examine the plane of the friction rod; it must be without any damage and not worn out.
- Particular attention should be paid to the working area - the teeth, as well as the shares of the rod; they come into contact with the rings, oil seals, and bushings.
- Every violation, rust, and risks will lead to rapid wear of the seal, and the rack will simply leak.
The teeth of the drive shaft gear cannot have cracks, chips, nicks or excessive wear. Installing a shaft with such defects is risky; the rack can get stuck in movement.
A frequent cause of knocking in the rack is wear of the pressing bushing. The flying plane of the element must be smooth, without indentation marks or defects. The pressure bushing is usually not included in the repair kit, but for many machines it can be purchased separately.
Very worn or damaged rack elements cannot be repaired in a garage. If difficulties are identified during troubleshooting, you must go to a special service station for support. Further, it is possible to repair the shaft, as well as the rack rod, using high-quality equipment.
Repair or change?
Replacing a faulty rack with a new one is easier than repairing it. But more expensive. Let's consider the costs of repairing the rack of a 2009 Ford Focus II. A new original rack costs 45,000 rubles. They offer to buy substitutes at a price of 20,000 rubles, but their service life, according to reviews from car owners, is unpredictable.
A repair kit for a Ford Focus II rack costs 2,500 rubles, boots with clamps cost 600 rubles. The savings are obvious, but it will take about 2 days to remove, repair and install the unit. For dismantling and installation, a regular set of wrenches is suitable, but to disassemble and assemble the rail you need a special tool that you will have to buy or make yourself.
Before starting repairs, try to soberly assess your strengths and capabilities, compare the benefits of self-repair and the upcoming labor costs.
Steering rack installation
It is more correct to install the control rack in a car with an assistant; one guides the rack from the edge of the engine compartment, the second orients the universal joint into the shaft spokes from inside the cabin.
- A cardan connection can only be installed in one state; in a spitz combination there is a special blank that must be combined with a groove on the opposite part.
- There is no need to clamp the ligament pin at the same time; the cardan joint will take the correct position on the pins after the rail and subframe have been completely screwed in.
- It is necessary to install and secure the bolts for strengthening the control rack, as well as the subframe. Only then completely secure the ligament pin of the main drive of the control rack.
It is necessary to install the tentacle of the control tips into the trunnions and screw the bolts. Attach all tubes, as well as amplifier hoses. Pour special liquid into the tank to the maximum level.
Put the wheels on and, without removing the car from the stands, start pumping up the concept.
If you still had to deal with the repair of the control rack, it would be more correct to give preference to reconstructed ones rather than used ones, which were purchased at disassembly. In the first option, they can give at least a small guarantee.
Knowing about the breakdowns listed above, it will be easier to understand what is needed to restore the control rack, and just like with any other part of the machine, there is no need to delay repairs.
—>Auto parts and service stations —>
Today it is rare to meet a person who does not have a car. It has become a part of our daily life and we simply cannot do without it. However, like any technical device, a car also breaks down (and quite often). Therefore, drivers often have to take their iron horse to a service station and pay a lot of money for its repair.
The rack and pinion steering system has many disadvantages:
- It's pretty badly damaged.
- It is quite susceptible to vibration.
- The loads on the components are quite high, which affects their service life
- Its installation is complicated and takes a relatively long time