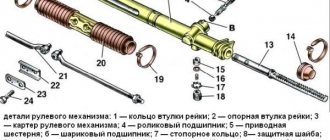
Signs of breakdown
By studying the signs of malfunctions in the design of the steering rack, you will be able to promptly identify the breakdown and take appropriate action to eliminate it.
The symptoms below may indicate not only a damaged rack, but also problems with the steering column, ball joints or linkages. Therefore, be careful.
Symptom of malfunction
Peculiarities
Increases free play of the steering wheel
This indicates that the gear sector has worn out due to dirt and dust getting into it. Or the gap between the rack stops and the rack itself has increased. Therefore, the engagement of the rack with the gear decreases. Plus, such a sign may indicate wear on the silent blocks of the rods or weak fastening of the supports in the steering knuckle
Noisy or knocking noises near the steering unit
Most likely, a gap has formed between the rack and the stop, or the plastic bushings have worn out. A knock is also a sign of wear on the traction silent blocks, ball joints, or loosening of the gear shaft to the column shaft.
Steering wheel turns hard
Here we can talk about possible damage to the steering rack bushing and a violation of the integrity of the gear shaft bearing. But you shouldn’t rule out the possibility of damage to the ball joint or strut bearings.
Having determined the presence of signs of malfunctions, it is important to understand what exactly caused them to appear.
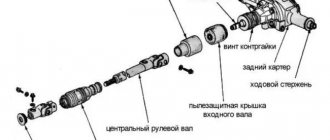
Node diagram
Preparation for repair
Since we are talking about intervention in the steering system, suspension, special attention should be paid to preparation.
- If you have a lift or inspection pit, you will be able to perform operations much faster and easier, which is the most important thing.
- Be sure to get a set of sockets and spanners. It is extremely difficult to work without them. In addition to the wrenches, you will need wire cutters, pliers, a hammer, a flat head screwdriver, and a tie rod end remover.
- To remove all fasteners that have been tightened for a long time, a can of WD40 will certainly not hurt. It removes oxidation from nuts and removes rust. In addition to the almighty WD40, buy graphite lubricant or grease. By treating the fasteners with them, you will be able to remove them much easier in the future.
- The presence of rags, a metal brush, fresh gasoline or solvent is welcome.
- Ask your friend to help you with your work. It's much easier to change steering wheels with four hands.
Be sure to remove the negative terminal from the battery in order to de-energize the car. We don't want short circuits or burned out wiring.
Repair kit
Hanging the axle
To safely and independently change the steering rack in your own garage, it is extremely necessary to correctly and securely hang the front axle of the car.
Sometimes this issue is not given due attention, as a result of which the car falls, this leads, at best, to damage to the elements of the car, and at worst, to injuries to the repairer himself.
In order to do everything in accordance with safety standards, you need to:
- Place your VAZ 2109 on a level surface. Typically, garage floors are fairly level;
- Install wheel chocks, shoes, bars or other similar means under the rear wheels. Block each wheel front and rear;
- Pull the handbrake all the way to stop the wheels. Just make sure first that the handbrake works;
- Set the steering wheel in neutral position;
- Slightly loosen the fasteners on the wheels;
- The front of the car needs to be raised. Here it is better to use two reliable jacks at once;
- Near the jacks, additionally place metal stops that are adjustable. If there are no special devices, an ordinary block of wood, boards or some kind of stump will do. The main thing is that when you make contact with the body, when you pull or push it, the car does not tip over;
- Remove the front wheels completely and begin replacing the steering racks.
Optimal working conditions
Dismantling
Before installing a new steering rack, you need to get rid of the old one. For this:
- Get to the place where the rack is attached in the engine compartment. To do this, you will probably have to remove the alarm and gas adsorber, at the same time dismantling the hoses.
- Disconnect the rack from the steering column shaft. Before this, the plastic casing is removed, blocking the path to the spline joints. The rack shaft is released by unscrewing one bolt.
- Next, remove the steering ends from the levers. Here haste can significantly harm you. Gradually brush the threaded connections, tip pin and mounting nut with a metal brush. Then apply WD40 to these areas. Give the product a little time to react. Then you can use pliers and a screwdriver to remove the cotter pin from the connection. Once the solvent has taken effect, the nuts should come off without much effort.
- If the tip is in normal condition, it is recommended to remove this element from the strut lever with a puller. A more barbaric method can lead to damage, so you will have to change the tips.
- Unscrew the rack fasteners using keys. It is better to treat them with WD40 in advance.
- After unscrewing the nuts, pry the steering rack with a flat screwdriver and remove it from the studs.
- Call a partner to work together to remove the element through the opening in the wheel arch.
When is VAZ 2109 rack repair required?
Steering rack repair may be required if certain elements of the mechanism wear out or fail. This can be determined by various symptoms, if identified, it is necessary to stop operating the vehicle and carry out repair work. Problems with the steering rack are indicated by:
- increased steering play;
- noise or knocking in the steering system;
- steering wheel rotation is too tight.
It should be noted that the steering system is connected to some structural elements of the car, so during repairs it is necessary to check the condition of the steering rods, wheels, and also the steering column control unit.
So, if you are sure that your steering rack on a VAZ 2109 requires repair, you will have to first remove and disassemble the rack, and then carry out repair work and install the mechanism in place.
Tools and procedure
The steering rack must be tightened using the following tools:
- 10mm socket wrench or ratchet head;
- wrench head 13 with extension and wrench;
- a universal key that can tighten all structures with the necessary force.
To get to this element of the car mechanism, you need to remove the battery and remove its fastening elements. The sequence for tightening the steering rack is as follows:
- dismantling the battery. The power wires are removed from the vehicle's power source, after which the bolts or screws securing the device are unscrewed and the battery is removed from the installation site;
- Removing the battery mounting structures. The platform or brackets on which the battery was previously held are also unscrewed and removed;
- removing the plug on the steering rack nut. By touch it is not difficult to find the desired nut, which may be covered with a rubber plug. After removing the plug, you should start tightening the nut.
The steering mechanism in the VAZ-2110 model is tightened counterclockwise in the following sequence:
the nut is tightened counterclockwise until it stops, after which it is loosened a couple of notches - 24 degrees, which ensures minimal play (0.12 mm) between the nut and the rack; the play is checked - there should be no jamming or knocking between the rack and the nut; after this, the crankcase thread is cored or crushed (please note that the nut should not be damaged), and the fixation point is marked with paint to indicate in what position the nut should be in relation to the crankcase.
Correct adjustment of the steering column will help get rid of extraneous knocks, and the steering wheel should return to its original state on its own after each turn.
It is worth paying attention that excessive tightening of the steering rack nut can lead to the steering wheel biting in its extreme positions and the need to apply some effort to continue to fully control the car.
Removing the steering rack
To remove the steering mechanism you will need an inspection pit or a lift. Once under the car, you need to unsplit the steering pin nuts and knock the pins out of the steering arms.
After this, you need to unscrew the spline joint locking bolt located in the pedal area. Also remove the plastic casing that covers the steering shaft. After this, using a 13mm socket, unscrew a pair of nuts on each side that press the steering mechanism to the car body.
Carefully remove the brackets securing the steering mechanism. After this, we disconnect the drive gear from the steering shaft and lift the right side of the car with a jack, and then pull out the steering mechanism of the car through the window in the wheel well.
How to remove the rail?
The rack is screwed with four bolts to the car body, and in the cabin it is attached to the steering shaft through a splined connection. First of all, unscrew the steering shaft in the cabin; it is the most difficult to get to. To do this, you will need a 13mm wrench; unscrew the nut and remove the shaft from the spline joint.
The rack itself can be removed with or without tie rods. If you are sure that the rods together with the tips are in excellent condition or you are lucky enough to buy a rack without tie rods (this is also sold) - well, you don’t have to change the rods, but simply remove the rack.
If you do not change the rods with tips
Unscrew the rods from the rack - one bolt for each rod.
Unscrew the rack from the body - two bolts on each side. And take out the rail. It's best to stick it out through the right (passenger) side. To be honest, I couldn’t stick it out any other way.
We completely change the steering
And if you decide to replace the entire steering in one fell swoop, you will have to remove the ends. To do this, we lift the front of the car and remove the wheels, so we can get to the tips.
Remove the stoppers and unscrew the nuts. Then you will need to tap a little with a hammer on the steering knuckle, around the tip pin. He must come out on his own. The hammer won't break anything, the design is quite reliable. If you can’t get the tip out this way, use a puller. After fixing the puller and applying some force to the tip, tap it around your finger - the tip should come out easily. The tip can be removed on both sides in the same way.
In this form we take out the rail.
Disassembling the steering rack of a VAZ 2109
After removing the steering rack, unscrew the bolts near the steering rods. This can be done using a 22mm socket, a chisel and a hammer (you must first bend the edges of the locking plate).
Using a 22mm socket, unscrew the bolts and remove the locking plate.
Disconnect the steering rods and remove the rubber support with the spacer ring to the right of the steering rack.
Plastic ties that compress the edge of the corrugation must be cut off with pliers. After this, you can remove the protective cover, and to the left of the steering rack housing you need to remove the rubber support and the protective cap.
Replacing old rack elements
Place the damping rings on the new base plate so that the thin side of the rubber bands is located in the middle of the plate cutout. It’s almost invisible in the photo, but when you buy a repair kit you will find two necessary rubber bands in it.
Replace the support sleeve. There is a hole in a special recess into which two protrusions on the bushing should fit. After installing it, you need to cut off thin rubber bands with a blade, as in the photo.
Remove the retaining ring from the gear shaft using special pliers, and then remove the bearing.
After this, you need to press out the needle bearing using a special wrench. If you don't have one, you will need a drill and a 1.2-1.5 mm drill bit. Drill a hole so that it fits into the end of the bearing (see photo). Knock out the needle bearing through the hole made.
All that remains is to thoroughly rinse the steering gear housing and insert a new needle bearing, which is included in the repair kit. The hole made can be covered with a mixture of superglue and metal filings. You can also use cold welding. Gear mechanisms should be lubricated with Litol or FIOL lubricant.
Everything needs to be assembled in reverse order. After this, you need to set the gap between the nut and the stop - 0.12 mm.
So, repairing the steering rack yourself will save you a considerable amount of money, since you only need a repair kit and lubricant for the work.
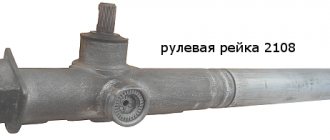
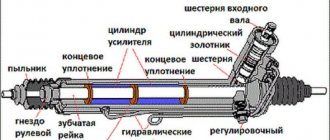
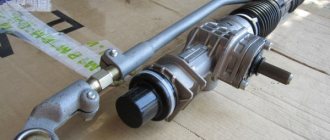
The VAZ 2109 steering rack is a mechanism responsible for rotating the steering wheel, transmitting movement impulses from the steering rods and directing them to the wheels. It has a simple design: it consists of struts, CV joints, and anthers. But the slightest breakdown in one or another part can negatively affect the operation of other systems and affect the car’s controllability while driving, which is already very dangerous. Therefore, it is necessary to monitor the technical condition of the rack and prevent leaving with a malfunction in order to avoid problems.
As a rule, the rail elements are made of rubber. Its advantages are flexibility and low price. But a significant disadvantage of the material is rapid wear. And most often, the anthers, elements that protect the rack structure from harmful dirt and dust during movement, become unusable. But how is the VAZ 2109 steering rack boot replaced, and what is needed for this? More about this later in the article.
How to carry out repairs yourself
To repair it yourself, you will need to purchase a special set of small components of the mechanism, consisting of: a needle and support bearing, a plastic bushing, gaskets, rings, a rack, a casing and ties for the boot. There are two types of kits: for major and partial repairs. It is best to take the first option, since it is not known what you will need to replace during the process of disassembling the rack and pinion mechanism.
Repairs are carried out as follows:
- Remove the end caps, stops and boot from the rack. Assess the condition of each removed element. Those that are damaged will need to be replaced.
- Use an octagon to remove the screw plugs to gain access to the springs, retaining rings and thrust bushings.
- Remove the bearing and assess its condition. At the slightest suspicion of a malfunction, it is worth installing a new one.
- Remove the drive gear and the rack itself.
- Replace the drive shaft bushing with new rubber parts.
- The sleeve often has another rubber band that protects it. First install this part into the crankcase, and then use a sharp knife to cut off the excess rubber.
- If you have a special needle bearing puller, use it. Otherwise, you will need to take a drill with a 1.5 mm drill bit installed in it. First, use a drill to make a hole that will weaken the end of the bearing, and then knock it out of the crankcase.
- Clean the crankcase of debris and dirt. Mix the metal shavings remaining after drilling with superglue and compact it into the hole made.
- Using Litol-24 lubricant, carefully treat all moving parts of the steering rack, including CV joints.
- Reassemble by installing new spare parts on the rail.
The advantage of doing the repairs yourself is that you will save money doing it yourself. If you are not confident in your abilities, it is best to replace the entire assembly or contact a car service with a good reputation.
Work technology
Now let's get to work.
ATTENTION: Wait until the engine has completely cooled down; under no circumstances begin repair work when the engine has not cooled down.
- First of all, remove the heat protection, which is held on by three nuts.
- To unscrew the tie rods, you will have to arm yourself with a combat arsenal - a hammer, pliers and a screwdriver.
- Now, taking the key 22, we turn the bolts and pull the rods out of the rack.
IMPORTANT! Replacing the steering rack boot of a VAZ 2109 is a simple job, but the most important step is the final stage - installation of a new part. The main thing here is not to twist or deform the boot.
Now that the part is ready for installation, take the bolts and screw them into place, but under no circumstances turn the steering wheel at this moment, since otherwise the operation of the entire system will be disrupted. The bolts are tightened with a 22 key. Next, installation is carried out in reverse dismantling is in order. The steering rack repair is completed. Good journey and fair wind!
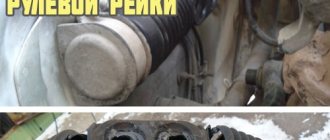
Have you ever heard knocking noises from the steering wheel when driving on gravel or broken roads? If so, then the steering rack was most likely the cause. It gets loose quite quickly and on all front-wheel drive cars, including VAZ 2109-2108, it sometimes has to be tightened. If the tightening does not help, then repair or replacement can be done. In this article I will talk about the second option, that is, the complete replacement of this mechanism.
The procedure for removing and installing the steering rack on a VAZ 2109-2108
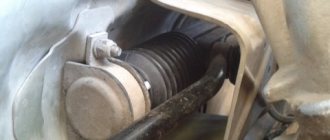
Before proceeding with the procedure for removing the rail, the first thing you will need to do is unscrew several nuts securing the protection, which is clearly demonstrated in the photo below:
It is attached both from above and from below. Then we remove it completely so that in the future it does not interfere with work. Next you need to free yourself from the steering rods. To do this, unscrew the two mounting bolts in the center of the rail, as shown in the picture:
Then, without any problems, we disconnect them and move them aside:
Next, you need to unscrew two nuts securing the rail with clamps along the edges, both on one side and the other:
And we move the VAZ 2109-2108 steering rack to the side:
In order to finally remove it from the car, you need to unscrew the coupling bolt from the interior side, which is located at the very bottom of the steering shaft:
And then we try to tear the rack off the shaft, and if this fails, you can pry it from the outside with a pry bar, after which everything should come off without any problems.
If necessary, we buy a new mechanism and replace it. The price of a new steering wheel for a VAZ 2109-2108 ranges from 1600 to 2200 rubles, depending on the manufacturer. We perform the installation in the reverse order, and after this repair it is necessary to check the alignment of the front wheels. Of course, if you removed the tips, then most likely this will not be necessary, but still pay attention to this.
1200 rub. for the photo report
We pay for photo reports on car repairs. Earnings from 10,000 rubles/month.
Write:
This photo report shows in detail how to replace the steering rack on a VAZ 2109 and 21099. Symptoms that indicate a faulty steering rack vary.
You can check this : set the wheels to the neutral position, then if, after sharply turning the steering wheel to the left or right, you hear a knocking or crackling sound in the area of the steering rack, then it’s time for replacement. You can also try tightening the steering rack nut, although this does not always help, and this can also lead to increased resistance when turning the steering wheel.
Or try to repair the steering rack, but this requires skills in carrying out such a procedure, and whoever is interested can just practice on the old one that was removed.
The necessary tools are: a tie rod puller, WD-40, a pair of flathead screwdrivers and a very ordinary set of wrenches.
If you also replaced the steering rods, do not forget to do the wheel alignment.
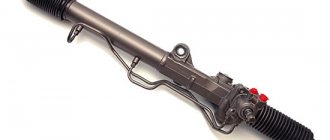
Selecting a replacement unit
The choice of a new unit for the VAZ-2114 should be approached seriously. The main problem is that very often there are defective products on the market that are already faulty or will fail in a very short time.
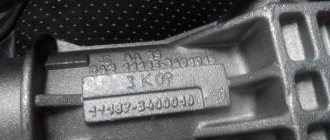
The best option is to purchase an original unit. The VAZ-2114 uses the same mechanism as the cars of the Samara 1 family (2108, 2109, 21099). Therefore, its catalog number is 2108-3400012, that is, when searching, you can safely ask for a rack for the “Eight” and not worry that it will not fit. The average cost is $100.
You can also buy analogue racks produced by auto parts manufacturers
But here you should pay attention to the manufacturer (it must be well-known), as well as the presence of quality certificates
Among analog products, we recommend paying attention to steering mechanisms from the following manufacturers:
- Weber CG 2108-0012 (its price starts at $80);
- Pilenga SR-P 1141 (costs $100);
- Trialli CR 108 and CR S 708 (the first comes without rods and lugs and costs about $100, the second has an assembled mechanism, which is why it costs twice as much).
For those who want to slightly modify the steering, you can look for tuning racks. The main difference between them is the lower number of revolutions. They are also positioned by manufacturers as reinforced.
Regarding manufacturers, it is worth looking for products from the Italian company Brembo, the Polish company ATF, or the Russian company SS20.
As for the latter manufacturer, it only produces steering racks for the 10th VAZ family, so after acquisition the mechanism will have to be slightly altered.
But we note that tuning slats will cost much more than the original or conventional analogues. So, for a Brembo unit you will have to pay about $250, for ATF - about $200, and SS20 - approximately $210-220.