The generator is the main component in the vehicle's electrical power supply system. Sometimes it breaks down, but you shouldn’t throw it away and rush to buy a new one. Often the problem is that the generator brushes are worn out and it is enough to replace them for further uninterrupted operation of this unit. Replacing generator brushes is a fairly simple procedure, but first you should find out what signs may indicate brush wear.
Often, when carrying out a preventive inspection of a car, attention is not paid to various details. Alternator brushes are one of these little things; if they wear out, the generator will stop charging the battery. Experts recommend inspecting the brush assembly once every 45-55 thousand kilometers. Diagnostics of the brushes can be carried out without removing the generator, and in some cases it may even be possible to replace them without removing the main unit.
Generator brushes: what function do they perform?
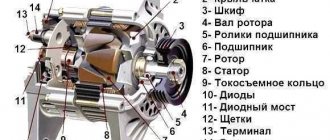
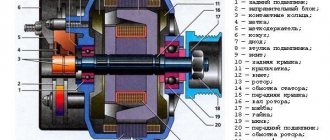
When in contact with the slip rings located on the rotating rotor shaft, the generator brushes transmit current from the battery to the rotor field windings. This is how an electromagnetic field is created.
Popular brands:
Audi Q7, Chevrolet Cobalt, Citroen C5, Hyundai Elantra
Under the influence of the alternating magnetic field of the rotating rotor, an electromotive force is induced in the coils of the stator windings and an alternating electric current is created. The current passing through the diode bridge (rectifier block of the generator) is converted into direct current. This is exactly what is needed to recharge the battery and ensure the functionality of the car’s electrical equipment.
Worn or damaged rotor bearings
When the generator rotor bearings wear out, several problems can arise. Firstly, due to a violation of the axis of rotation of the armature shaft, it begins to touch the stator with its windings. Secondly, due to significant wear, the bearings may even jam and the rotor will stop. The first problem will first lead to voltage drops in the on-board network, and later to an interturn short circuit in the stator. What happens when the bearings jam is already clear. The rotor will stop.
In most cases, wear of the generator bearings can be detected in advance by a characteristic hum coming from under the hood. This sound can change volume and tone depending on what load is currently placed on the vehicle’s on-board network. That is, for example, when the headlights are turned on, the hum can increase significantly, which makes it possible to identify a malfunction in advance.
To avoid the problems described, it is highly advisable to periodically check the bearings for play. To do this, just grab the generator pulley with your hand and shake it from side to side. If the bearings are in good condition, there should be no play.
When to change brushes: main signs
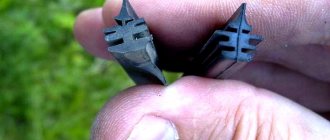
It is recommended to replace them as they wear out, but at least once every 4 years (or upon reaching a mileage of 50 thousand km). However, under difficult operating conditions, critical wear of brush rods made of graphite or its compounds with copper (bronze, aluminum) may occur earlier than the specified period. The brushes should protrude by at least 5 mm (the norm is 8-10 mm). This indicator is the most important - by measuring the length, you can understand whether there is a problem.
Several symptoms may indicate that your brushes need replacing, including:
- lack of starter response when turning the ignition key to the ON position - this can happen if the rods are skewed and there is no sufficient contact with the surface of the slip rings;
- slow rotation of the engine flywheel by the starter;
- reduced power of interior lighting, weak or flashing headlights, side lights;
- sudden shutdown of electrical appliances;
- rapid discharge of the battery, after which it becomes almost impossible to charge it.
To determine the cause of disturbances in the operation of the generator, it is necessary to accurately diagnose the malfunctions of the generator and, in particular, the brush assembly.
Drive belt slipping or breaking
Drive belt slippage can be caused by several reasons. Firstly, its insufficient tension. Secondly, water from puddles or motor oil gets on the generator pulley. Thirdly, the belt stretches over time, sags, and also begins to slip periodically. As a rule, at first this malfunction appears only when the generator begins to operate under serious load. This happens because as the load increases, the rotor resistance increases.
Very often, belt slippage is determined by a characteristic squeak that is heard when the engine starts, as well as immediately after turning on the load. Quite often this whistle can be heard in rainy weather, which indicates water has gotten on the generator pulley. If this happens, the belt must either be tightened or replaced with a new one.
A broken alternator belt is a more serious malfunction, which it is highly advisable to notice immediately after its occurrence. The primary symptom is the warning light on the instrument panel coming on, indicating that the battery is not charging. This lamp should only light when the ignition is on and the engine is off. In all other modes it does not light up.
A secondary symptom of a broken alternator belt is low voltage on the on-board network. When everything is working normally, the voltmeter should show at least 13.8-14.5 volts. If while driving the voltage drops to 12 volts, this means that the on-board network is powered only by the battery. Conclusion - the generator is faulty.
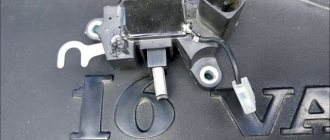
How to check generator brushes?
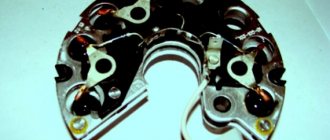
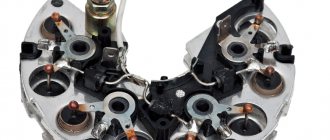
The brush assembly is usually combined with a voltage regulator. Contact with the rotor slip rings is carried out due to the force of the springs. A malfunction of the generator brushes can be easily determined by visual inspection (sign: the length of the protruding ends is less than 5 mm). You also need to check the diameter of the slip rings (the norm is 14.2-14.4 mm, the minimum is 12.8 mm). The presence of workings on contact surfaces is not allowed. Worn slip rings need to be replaced.
Problems with the generator can also arise due to increased brush resistance, which should be no more than 0.5 ohms. You will have to replace the brushes if, when checking, the multimeter shows increased resistance.
However, given that in most modern cars the brush assembly is combined with a voltage regulator, generator problems can be associated with a malfunction of the relay regulator, designed for a voltage of 15 V and a current of up to 5 A. Measurements with a multimeter are used for diagnostics. When the engine is running, the voltage at the battery terminals or at the generator outputs should be within 14–14.2 V. The voltage change is allowed by no more than 0.5 V. If the fluctuations are more significant, this is a sign that the relay regulator is faulty and must be replaced.
It is also useful to check the voltage regulator.
To do this, assemble a circuit that combines, using wires, an adjustable power supply, a light bulb, a voltage regulator with a brush assembly, and a multimeter (voltmeter). The power supply and multimeter are connected with correct polarity to the contacts of the voltage regulator. The light bulb wires are attached to the brushes. By turning on the power supply, voltage is applied (from 3 V), the light comes on. With a gradual increase in voltage and upon reaching 14 V, the light should go out - this indicates normal operation of the regulator.
What it is?
Graphite is used to make parts, which is why motorists often call them carbon. Such brushes are used on all vehicles and devices whose design includes electric motors (trucks and passenger cars, cranes, metalworking machines, etc.).
Generator brushes - what are they?
Note! The most common generator brushes include EG-4. The product is suitable for cars of different makes and years of manufacture. This versatility is associated with the standard operating parameters of the EG-4.
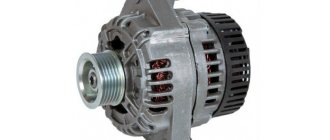
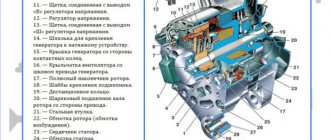
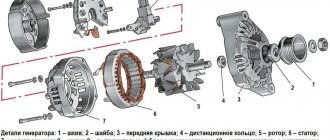
Finding brushes with a generator in a car is quite simple - in almost all car models (especially domestic ones), the generator is located near the right front headlight. You just need to open the hood and the device will immediately catch your eye. Externally, the generator looks like a small cylinder with a winding, closed with two covers.
Where are the generator brushes located?
How to change brushes on a generator?
You can replace it without removing the generator - just remove the voltage regulator along with the brush assembly. Before this, you should disconnect the generator from the power supply (disconnect the negative terminal from the battery). After this, unscrew the clamping nut and remove the voltage regulator with the brush holder. If the wear is critical (the offset is less than 5 mm), the brushes (graphite rods) will need to be replaced. Here's how they do it:
- disconnect the contacts (unsolder the wires) and remove the old brushes, clean the soldering area, check the elasticity of the springs;
- install a new set into the brush holder, solder the contacts;
- check the free movement of the brushes in the brush holder;
- install the brush assembly in place and secure it with a nut.
Sometimes the solution may be simpler: perhaps the contact between the brushes and the rotor rings has been broken due to the former sticking. The reason may be mud or graphite deposits, which can be easily removed by blowing contaminated areas with compressed air.
Important: before installing a new part, you should carefully check them for manufacturing defects.
Replacement instructions
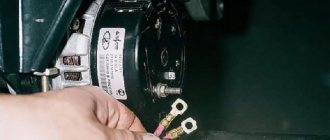
After identifying faulty brushes, we gradually approach the issue of replacing them. This can be done with or without removing the generator. In each individual case, the driver himself decides which method suits him best. The replacement process is quite complicated, so to avoid electric shock you need to remove the terminal from the battery. The generator housing is attached to the car engine with several nuts, so when removing the unit you may need a solvent (if the fasteners rust).
How to replace generator brushes
The generator is very easy to recognize: it has a drive belt and a small metal pulley. After selecting the replacement procedure, you can begin to work. The replacement processes are described in detail below.
The generator is located in the engine compartment on the right side of the engine
Is it possible to restore brushes?
In emergency situations, when you can’t count on help, you can use the advice of experts on emergency restoration of the brush assembly. However, reliable operation of the brush assembly can only be fully ensured by using high-quality spare parts recommended by manufacturers. Recovery is always a temporary solution; As soon as the opportunity arises, you need to go to the service center.
The procedure for replacing brushes, despite its apparent simplicity, requires certain skills and special knowledge. Therefore, it is better to go to a car service center, where diagnostics and maintenance of your car’s electrical equipment will be performed quickly and with a quality guarantee.
Wear of slip rings
The slip rings are located on the generator rotor shaft. They are designed to transmit power from the brushes to the armature winding. The rings are made of copper and therefore are subject to wear and tear over time. The symptoms of this malfunction are absolutely the same as in the case of brushes - sparking, voltage sags, as well as complete generator failure. To clarify the diagnosis and eliminate the breakdown, dismantling and complete disassembly of the unit is required. Fortunately, on many common generators these parts can be changed without problems and are relatively inexpensive.
Breakdown or breakage of the rectifier bridge diodes
Let us recall that the diode bridge serves to rectify the alternating voltage generated by the stator windings of the generator. Since there are three phases in a car generator, the bridge also consists of three branches - two diodes in each. When a breakdown of one of the diodes occurs, a sharp increase in voltage in the vehicle’s on-board network may be observed. A breakdown is when a diode begins to pass current in both directions, but should only pass in one.
A break in the diodes of the rectifier bridge does not threaten anything catastrophic, unlike a breakdown. For example, if one of the diodes breaks, then only two of the three phases continue to work. If there is no heavy load on the on-board network, then this malfunction may not be noticed. However, when the load is turned on, the power of the two phases is no longer enough, and therefore there is a drop in the on-board voltage.
It is clear that if all the diodes break, which does not happen very often, the generator stops functioning completely. This can be seen both in the voltage of the on-board voltmeter and in the warning lamp on the instrument panel. To more accurately check the bridge diodes, you will need to dismantle the generator and partially disassemble it.