Reasons for generator failure
Without specialized equipment, it is not always possible to determine the exact cause of a unit failure. But most often the problem is caused by:
- Bearing jamming . Due to drying out of the lubricant and gradual wear, the bearings jam. First, the belt usually breaks, which necessitates rebuilding the assembly.
- Winding burnout . Most often, the winding burns out due to the penetration of chemicals and salts used to sprinkle the road in winter.
- Brush wear . Graphite brushes wear out gradually, so they need to be replaced periodically. If they are not replaced in time, the unit may fail completely.
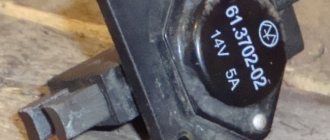
- Relay malfunction . The device is designed to prevent battery overcharging. If it malfunctions, the generator does not start.
To prevent breakdowns, scheduled vehicle maintenance should be carried out in a timely manner.
Replacing alternator/voltage regulator brushes — Lada 2107, 1.6 l., 2003 on DRIVE2
Hello everyone! Back in the beginning of spring, I wrote that the generator began to give a weak charge (13.2 V without load and 12.7 under load), I blamed the wear on the generator brushes, since the car’s mileage is more than 90,000 km, and the brushes are still original . After this recording, I continued driving without doing anything))) This is not entirely correct, but I only got around to it now) To correct the situation, new generator brushes were purchased, which come complete with a voltage regulator. I bought it in the store detali.zp.ua, since here such a spare part costs almost 2 times more. I received it in the mail along with other ordered goods, came home, and began to install it in place)
Full size
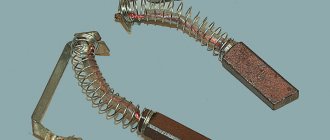
New brushes
Full size
New brushes
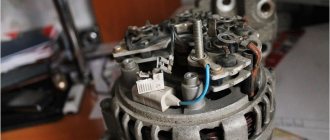
The process is very simple, remove the chip with the wire from the old voltage regulator, unscrew 2 screws, and the brush assembly is simply removed. Basically, I thought the old brushes would be shorter than they actually are. The only thing that bothered me was that one brush was more worn than the other.
Full size
Old voltage regulator on the generator
Full size
Full size
Uneven brush wear
Installation is in reverse order. True, doing all this is not very convenient; the thermostat gets in the way. In about 10 minutes I did everything, during this time I lifted the screws three times, which stubbornly refused to screw into the generator housing due to inconvenience)))
Full size
New spare part in place)
After everything, I started the car, and was very happy, now the generator produces its required 14.3 V. Under load - 13.8 V :)))
Full size
Finally, the voltmeter needle is at the beginning of the green scale, and in the middle)
That's all for me, thank you for your attention)
Check Features
When checking the generator of a VAZ 2110, 2107 and others for serviceability, the following conditions must be met:
- An accurate multimeter should be used for diagnosis.
- The normal voltage is 12 V.
- If it is necessary to replace the wiring, you must use wires with the same cross-section as the original.
- Before checking, you should check that all fasteners are connected correctly and the belt tension is correct. If necessary, the connections should be adjusted to normal, the belt should be loosened or tightened.
During the verification process it is prohibited:
- short circuit the wires;
- connect terminals that differ in purpose and parameters, connect terminal 30 or B+ to ground;
- diagnose a generator without connected consumers.
Self-test of the generator
The easiest way is to check the fuse. If it is in good condition, the generator and its location are inspected. The free rotation of the rotor, the integrity of the belt, wires, and housing are checked. If nothing arouses suspicion, the brushes and slip rings are checked. During operation, the brushes inevitably wear out, they can become jammed, skewed, and the grooves of the slip rings become clogged with graphite dust. A clear sign of this is excessive sparking.
There are frequent cases of complete wear or failure of both bearings and stator failure.
The most common mechanical problem with a generator is bearing wear. A sign of this malfunction is a howling or whistling sound when the unit is operating. Of course, the bearings must be replaced immediately, after first inspecting the seats. Loose drive belt tension can also cause poor generator performance. One of the signs may be a high-pitched whistle from under the hood when the car accelerates or accelerates.
To check the rotor field winding for short-circuited turns or breaks, you need to connect a multimeter, switched to resistance measurement mode, to both contact rings of the generator. Normal resistance is from 1.8 to 5 ohms. The readings below indicate the presence of a short circuit in the turns; above – direct winding break.
To check the stator windings for ground fault, they need to be disconnected from the rectifier unit. If the resistance readings given by the multimeter are infinitely large, there is no doubt that there is no contact between the stator windings and the housing (“ground”).
To check the diodes in the rectifier block, use a multimeter (after completely disconnecting it from the stator windings). The test mode is “diode test”. The positive probe is connected to the plus or minus of the rectifier, and the negative probe is connected to the phase terminal. After this, the probes are swapped. If the values of the multimeter readings differ greatly from the previous ones, the diode is working; if they do not differ, it is faulty. Another sign indicating the imminent “death” of the generator diode bridge is oxidation of the contacts, and the reason for this is overheating of the radiator.
Diagnostics of the VAZ generator without removal and special tools
This is not the most reliable and reliable method, but it allows you to determine whether the generator is functioning or there are malfunctions. The use of any specialized tools, including a multimeter, is not required. There is no need to remove the generator.
To diagnose, start the engine and turn on the low beams. In operating condition, the negative terminal must be disconnected from the engine. The uniform light of the headlights and the stability of the engine stroke indicate normal operation of the generator. If malfunctions are observed or the brightness of the light changes, the VAZ generator is probably faulty; in-depth diagnostics need to be carried out.
How to change brushes on a VAZ generator
VAZ 2107 generator brushes - do-it-yourself check and replacement
The VAZ 2107 generator brushes, like any car parts, very often fail. Quite often the reason for this is: wear or freezing.
Note from the author of the article: Those who are familiar with the principle of operation of a generator know that an excitation voltage is supplied to the armature through the brushes, which not only starts the electric machine (generator) into operation, but also regulates its output power.
The regulation itself occurs due to a special device, a relay-regulator, which can be implemented directly on the brush holder or installed separately (on earlier models).
As a rule, such a malfunction manifests itself gradually, initially accompanied by short interruptions in the operation of the generator, gradually leading to its complete failure, but other options are also possible, for example, a sudden failure.
How to determine whether the VAZ 2107 generator brushes are faulty
Often, when carrying out a preventive inspection of a car, attention is not paid to various details. Generator brushes are one of these little things; if they wear out, the generator will stop charging the battery
Experts recommend inspecting the brush assembly once every 45-55 thousand kilometers. Diagnostics of the brushes can be carried out without removing the generator, and in some cases it may even be possible to replace them without removing the main unit.
The main signs of malfunction of the VAZ 2107 generator brushes include the following:
- The car's electrical appliances suddenly turn off (even while driving);
- Headlights, dimensions and even interior lighting dim and flicker;
- A sharp decrease in the voltage of the vehicle's on-board network;
- A sharp discharge of the battery, which will be very difficult to recharge in the future.
Each of these points may indicate wear on the generator brushes, which are located inside this unit. Many people wonder how to check brushes.
How to check (ring) the brushes of a VAZ 2107 generator - step-by-step instructions
In order to check (ring) the brushes of the VAZ 2107 generator with your own hands, you need to get a multimeter and follow the following procedure:
We connect the generator brush to the multimeter in the same way as shown in the figure.
Voltage Regulator Diagnostics
To check the voltage regulator on a VAZ 2114, 2106 car, you should perform the following steps:
- Start and warm up the engine by turning on the headlights. Warm up the engine for about 15 minutes. For diagnostics, a multimeter or voltmeter capable of taking measurements in the voltage range 0-15 V is used.
- Measure the voltage between ground and terminal 30. For most cars in normal condition, the reading will be within 13.5-14.6 V. A value less than 13 V means the unit needs to be replaced.
Methods for replacing brushes
Unit repair is carried out using 2 methods:
- with equipment removal;
- without dismantling.
The method for restoring the unit depends on the layout of the units in the engine compartment and the condition of the threaded connections. If there is a coating of rust and oxides on the steel elements, it is recommended to remove the electrical machine.
Before replacing the brushes on the generator, you need to prepare:
- wrenches or sockets (size and type depend on the car model);
- screwdrivers with flat and Phillips blades;
- a set of new parts (selected from the catalog depending on the modification of the electric machine);
- a bottle of WD-40 liquid, which allows you to unscrew dirty or rusted threaded connections.
On a removed generator
Algorithm for servicing a unit using the example of a VAZ-2113 car with an 8-valve power unit:
- Stop the engine, engage 1st gear and tighten the parking brake lever.
- Open the hood and disconnect the negative cable from the battery housing (it goes to the car body).
- Loosen the bolt in the lower support.
- Disconnect the patch cables.
- Unscrew the drive belt tension adjuster nut, and then use a mounting spudger to carefully move the generator towards the engine block.
- Remove the drive belt, unscrew the bolt securing the tension bracket to the cylinder block.
- Unscrew the bottom bolt holding the electrical machine to the motor.
- Place the equipment on the workbench and remove the plastic cover, which is held in place by latches.
- Remove the voltage regulator housing, which is secured with Phillips head screws. The unit is attached to the windings using a quick-release block.
- Remove the brushes; parts must be replaced if the remaining length of the graphite elements is less than 5 mm.
- Install new parts and reassemble in reverse order. Adjust the belt tension, and then start the power unit and check the operation of electrical devices. If an on-board computer is installed on the car, the device shows the voltage in the on-board network.
Removing the alternator on other vehicles may require removing the air filter housing or air ducts. On some foreign-made machines, automatic tensioning devices are used; the body of the electrical device is rigidly bolted to the cylinder block.
The owner needs to loosen the belt tension and then remove it from the pulley. On Toyota vehicles, the electrical components are covered by a metal casing secured with nuts.
Under the cover there is a brush block, a diode bridge and a charging control unit (equipped with an aluminum radiator). After removing the brushes, the collector rings are inspected; if there is wear on the parts, you will need to remove the rotor to correct the defect. After assembly and installation, the voltage in the on-board network is checked with the engine turned off and running.
Directly in the car
Replacing the brush assembly without dismantling the generator is possible provided there is free access to the back cover of the electric machine. A similar design is found on domestic or imported cars with naturally-aspirated engines of simple design (with 2 valves per cylinder). For example, to change the unit on “classic” VAZ cars, you will need to remove the wire from the negative terminal of the battery, and then remove the cables from the generator housing.
Using a short screwdriver, unscrew the fastening screw and remove the worn assembly. The problem is corrosion of threaded connections; applying WD-40 does not correct the situation, since due to the cramped space it is impossible to apply force to the tool. In addition, it is impossible to correctly check the condition of the collector rings with an installed generator. New brushes, when in contact with a damaged commutator, wear out within 500-1000 km, after which the generator fails again.
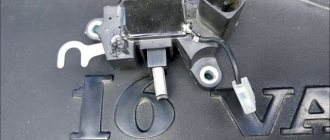
On some cars, access to the generator is possible from the bottom of the car (for example, on the Lada Kalina with a 16-valve engine). The owner needs to dismantle the protective shields; work is carried out from an inspection hole or on a lift. After dismantling the wires and the protective screen, you need to unscrew the fastenings of the voltage regulator, and then remove the brush assembly. Replacing the manifold rings requires removing the generator.
Checking the return current
Diagnostics is carried out with the engine running at high speeds. It is necessary to measure the current consumed by the vehicle components. The probe is pressed against the wire from terminal 30 or B+.
It is necessary to turn on the electrical appliances of the car one by one and record the indicators. The resulting values should be summed. Then you need to turn on all the devices and measure the current indicator. The resulting indicator should be compared with the summed value of previous measurements. The final value should be approximately 5 A below the summed value. A higher value confirms that the node is faulty.
Checking the windings
First you need to visually inspect the windings. If there are no visible defects, you should use a multimeter. First you need to do the following:
- Remove the brush holder.
- Disconnect the voltage regulator.
- Clean the slip rings.
- Diagnose the winding for defects.
The resistance measurement function on the multimeter should be activated. The measurement is taken between the slip rings and the stator. In normal mode, the value will be from 5 to 10 ohms.
Diagnostics of a removed generator
To check the generator removed from the VAZ 21, you should use a multimeter in ohmmeter mode. The probes are pressed against terminal 30 and the body of the unit. If there are contaminants and strong oxides on the case, they should be removed first, as they can affect the readings of the device.
You need to measure the resistance of each generator unit in turn. Parts that do not have the required resistance have become unusable. Most of them can be replaced at home using a minimal set of tools. To replace, you need to buy the same parts as those originally installed in the generator.
If you find an error, please select a piece of text and press Ctrl+Enter.
Source
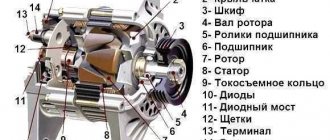
Purpose and principle of operation
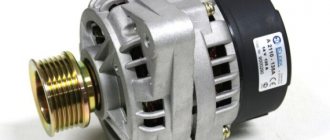
Injection models VAZ-2107 are equipped with a generator type 37.3701. This device is superior in power to carburetor model generators.
Model 37.3701 amperage ranges from 80 to 90 amperes. This power is necessary for uninterrupted power supply to the entire electrical circuit, plus an additional load is provided. Unlike the carburetor model, the generator has to power a large number of sensors, the engine control unit, and a more powerful ignition module. The electrical circuit of an injection car includes a larger number of consumers.
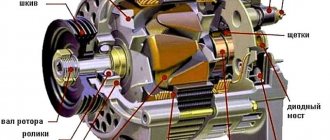
A car generator is not much different from conventional stationary ones. It works on the principle of converting rotational energy into alternating electric current. Rotation is carried out by a transmission belt from the engine. The principle is as follows:
- After turning on the ignition, a current of 12 volts is supplied to the generator.
- This circuit includes a battery charge indicator lamp, which is installed on the dashboard. The lamp lights up after turning on the ignition.
- As soon as the power unit starts working, the generator stator begins to rotate due to the belt, converting the magnetic field into electrical voltage.
- AC voltage passes through the diode bridge.
- The bridge converts alternating voltage to direct voltage.
- Electrical voltage is transmitted from the diode bridge to the brushes and the adjustment unit.
- The difference between the charging current and the battery voltage causes the warning lamp to go out.
During operation, the generator of the injection VAZ-2107 produces from 13.5 to 14.3 volts of voltage. This is enough to charge the battery and maintain the operation of all consumers.
Next, a description of the main generator malfunctions will be given.
What are brushes and what are they for?
It usually happens that when driving speed increases, the intensity of the low or high beam headlights, as well as the dashboard illumination, suddenly decreases, the radio and cigarette lighter do not work. Inexperienced drivers begin to look for the cause either in the electrical wiring, fuses, or associate this behavior of the devices with a short to ground. You can spend a whole day troubleshooting, but what a surprise it will be when it turns out that the whole thing is just two small black pieces of metal in the form of bricks with wires, which are called generator brushes.
Generator brushes
It is known from a school physics course that any generator basically has a stator (fixed part) and a rotor (moving part), each with its own windings, usually made of copper wire. Due to the force of the magnets, the rotor rotates, electricity to which is supplied through the armature and touching metal parts called brushes. Since the friction force on the ground acts on all objects, as a result of the constant rotation of the rotor, the parts we are considering are gradually erased, even though the material from which the brushes are made is quite strong.
Malfunctions
The first symptom of a generator malfunction is the appearance of the following errors on the on-board panel:
- P0560 indicates insufficient electrical voltage in the circuit. Direct notification of insufficient current from the generator. The first reason may be: weakening of the transmission belt, poor contact at the generator terminals.
- P0561 is a low circuit voltage alert. In addition, the battery charge indicator lamp lights up during operation of the power unit. Accurately indicates a problem with the generator itself.
- P0562 indicates that the electrical voltage in the circuit is too high. The reason lies in the relay regulator. The device did not include high current protection at the generator output.
The appearance of errors requires the owner to check the generator for faults. They may be the following:
- Very low tension on the belt that transmits rotation from the power unit.
- Belt slipping on the generator or engine pulley. May cause wear on pulley surfaces.
- Break, short circuit and complete burnout of the excitation coil.
- Insufficient brush contact.
- Incorrect operation of the charge relay.
- Failure of the diode bridge.
- There is a short circuit in the circuit.
- Poor contact.
To accurately identify the cause of the malfunction, it is necessary to check each element of the circuit and the charge supply device to the battery one by one.
Tips for replacing generator brushes VAZ 2107 / VAZ 2105
If you are sure that it is necessary to replace the brushes of the VAZ 2107 injector generator, then you can change them yourself and without removing the generator. To do this, turn off the power to the battery, unscrew the two screws of the brush assembly holder and change the assembly. In another case, when it is not possible to unscrew the bolts or you need advanced diagnostics of the serviceability of generator parts, it is necessary to remove the generator.
It is forbidden to start a car generator with a disconnected battery. This will lead to a short-term increase in voltage at terminal “30”, as a result of which the parts of the rectifier and the vehicle’s electrical network will become unusable.
To replace the brushes of the VAZ 2107 carburetor generator you will need the following tools:
- ring wrenches for “8”, “13”;
- ratchet;
- a set of nozzles “for 13”, “for 10”, “for 17”; "at 19";
- flat and Phillips screwdriver;
- penetrating fluid WD 40;
- vice (if needed);
- new brushes for the VAZ 2107 generator.
The price of brushes VAZ 21013701470 is 34 rubles. Their analogue from UTM with article number HE0703A is 120 rubles.
The price is valid for Moscow and the region for the summer of 2022. Since then, original brushes have risen in price by an average of only 23 rubles. In 2020, their cost is approximately 57 rubles. The frequently used analogue has risen in price by 40 rubles, and its cost is on average 160 rubles.
A problem in the power supply system is indicated by the battery charging arrow. This indicates that when the engine is running, the battery is not charging well.
The voltmeter showed a voltage of 11.2 volts. Ultimately, suspicion falls on the generator.
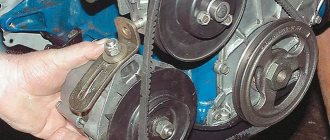
Let's start the renovation. First, remove the terminals and remove the battery.
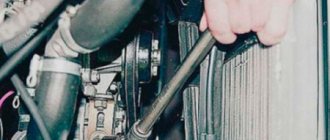
Using a 17mm wrench, unscrew the nut and remove the adjusting bar.
We move the insulating cover, use a “10” wrench to unscrew the nut securing the wires at terminal “30” of the generator and disconnect the wires.
Disconnect the wire block from terminal “61” of the generator.
Using the socket “19” we unscrew the nut of the lower mounting of the generator.
Remove the drive belt from the generator pulley.
We knock out the bolt and remove the bushing. Please note that in this case the generator will be supported on a bracket.
We remove the generator from the car by lowering it down between the bracket and the front axle beam.
And here is the culprit of the “long journey”: a screw with torn edges.
We install the generator in a vice and use a screwdriver to unscrew the two brush holder bolts.
Old brush holder with brushes.
We install a new brush holder and assemble everything in the reverse order.
If the battery icon lights up on the dashboard of a VAZ 2107, this indicates that the car needs to replace the alternator brushes, relay, fuse or belt. The first component on the list wears out quite quickly, so experts recommend changing it every 50 thousand kilometers. Regular failure of brushes is due to the fact that during operation they constantly come into contact with the rotor shaft. Signs of wear on the mechanism are:
- rapid battery discharge;
- dim and flickering headlights;
- interruptions in the operation of electronics, stove, cigarette lighter.
Replacing the entire assembly and brushes is not difficult; do-it-yourself repairs are quite possible here. But first you need to familiarize yourself with the mechanism and its contact diagram.
Examination
You can check the functionality of the generator without dismantling it. Before checking, the following steps must be taken:
- Disconnect the terminals from the battery, clean them, replace them and tighten them tightly.
- Clean terminal “30” of the generator. Check the wire of this terminal for damage to the insulation and repair any defects.
- Check belt tension. It is better to install a new belt to avoid slipping on the pulleys.
Particular attention is paid to the ground terminal. It must be disconnected and the area of attraction must be cleaned with sandpaper. The terminal, bolt and washer are also cleaned.
Next you need to check the battery charge level. To do this, you will need a multimeter in voltmeter mode to measure DC voltage. The charge of a working battery varies from 11 to 12.5 volts. Next you need:
- Start the power unit.
- Check the voltage on the battery while the generator is running.
- If the voltage gradually drops, this indicates a complete absence of incoming charging current.
- A voltage above 14.5 volts will indicate a high charge current, which can lead to boiling of the battery.
If the charging current is sufficient, varying within 14.5 volts, then while the power unit is operating, you need to turn on the car’s lighting and repeat the measurement. A powerful generator should not respond to the connection of new consumers by reducing the charge current. If this happens, then the mechanism should be tested after preliminary dismantling.
The following will describe how to check the generator during operation. To check you need:
- Set the multimeter to DC current measurement mode.
- Connect the red test probe to terminal “30” of the charging mechanism.
- Connect the black test probe to ground.
- A working generator should produce at least 14.3 volts DC. If there is no voltage, then you need to switch the multimeter to AC measurement mode. The results that appear will indicate a breakdown of the diode bridge.
Further checks of the alternator will require removing the unit from the vehicle. This requires:
- Loosen the tension bolt.
- Move the generator towards the engine.
- Remove the transmission belt from the pulleys.
- Unscrew the fastening bolt.
- Dismantle the generator, first disconnecting all wires.
Next you need to disassemble the device. The following items can be checked with a multimeter: rotor, stator, charging relay, brushes, diode bridge and capacitor. The following will describe how each element is checked.
Rotor
The generator rotor is based on a copper inductor. It is hidden under metal protection. All these elements are mounted on the shaft. To check you need:
- The multimeter is switched to resistance measurement mode.
- The red dipstick connects to the first ring on the shaft.
- The black dipstick connects to the second ring on the shaft.
Both rings are located directly behind the outer bearing. The operating resistance of the coil should be no more than 5 ohms. If there is no resistance, then the part is considered unsuitable for use. High resistance will indicate a short circuit. The verification procedure is as follows:
- The multimeter is switched to dialing mode.
- The tester's red probe connects to the first slip ring.
- The black probe connects to the rotor housing.
The buzzer will indicate a breakdown of the coil winding on the housing. If there is no buzzer, then ring 2 must be checked. The test is performed in the same way. If the test does not reveal any malfunctions, then it is necessary to clean off the resulting oxidation, dirt and rust from the surface of the body. It is also worth checking the condition of the bearings. Elements with large play must be replaced.
The stator rings play an important role. It is necessary to clean them from dirt, oxidation and adhering graphite particles. The surface of the rings must be perfectly flat, without wear along the edges or in the middle. Any distortions must be straightened out. This is done only on the machine. When processing, it must be taken into account that the minimum permissible thickness of the rings is 12.8 mm. Below this level, there will be insufficient contact between the brushes and the rings. This will lead to interruptions in the charging current for the battery.
Diode bridge
The design of the diode bridge of the VAZ-2107 car includes 6 diodes. They are assembled according to a 3x3 pattern. To check, you must first disconnect the bridge from the generator circuit. Next you need:
- Switch the tester to diode testing mode.
- Connect the red probe of the tester to the anode of the first diode of the circuit, this is the contact side of the element.
- Connect the black measuring probe to the aluminum plate.
- The absence of a sound signal will indicate a breakdown of the first diode. Then you need to ring all 3 elements. The call is carried out every other time.
Work order
It is more convenient to replace the brushes of the VAZ 2107 injector generator in the inspection pit. First you need to fully study the instructions on how to repair the unit in order to carry out the work without stopping to read the next step. If you are absolutely sure that it is the brushes that need to be changed, the repair can be done without dismantling the generator. The unit on the VAZ 2107 is located under the hood (on the right, next to the headlight on the passenger side). You can find it by the drive belt stretched over the flywheel. The brush assembly is located on the rear of the unit, and is secured with bolts.
Let's get started without removing the generator:
- Disconnect the negative terminal from the battery.
- Unscrew the fasteners and remove the assembly.
- We check the mechanism for integrity, measure the protruding part of the brushes.
- We change the brushes or the entire assembly.
But if this procedure is difficult, or there is a suspicion that other parts are faulty, the generator needs to be changed. Here the procedure is as follows:
- We disconnect the battery by removing the negative terminal and remove the battery.
Now you need to remove the adjusting bar; to do this, first unscrew the nut.
Next, access is blocked by a protective casing; you need to move it aside, then unscrew the fastening nut of the wires at the outlet of the unit, and disconnect the wires.
The block is disconnected from terminal 61, and the nut of the lower fastening of the unit is unscrewed.
Remove the belt from the pulley, remove the bolt and bushing. The unit is now supported only by a bracket.
We lower the generator between the front axle beam and the bracket and remove it from the car.
We unscrew the brush holder bolts and remove the unit. Let's check it out. If only the brushes have become unusable, we replace them. If the whole unit is installed, install a new brush holder. Installation of brushes into the holder must be done carefully and accurately. They should fit freely into the nests.
For greater clarity of work on a VAZ 2107 to replace alternator brushes, watch the video: