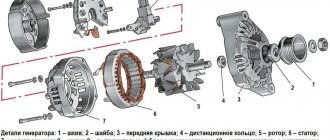
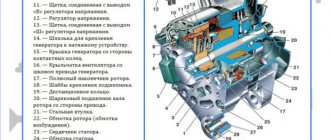
The car's generator serves to power the on-board network, electrical equipment and charge the battery during operation of the power unit. This is a mechanism that produces alternating current by converting the mechanical energy of rotation of the rotor (the “plus” winding) in the stator (the stationary part of the “minus” winding) into electrical energy. Torque is supplied from the crankshaft to the drive pulley.
All generator malfunctions are of two types: mechanical failure of components or electrical failures. In any case, the cause of the violation can be determined by checking the voltage in different areas and elements.
Table of typical generator faults
| Symptoms of a problem | Diagnostics | Remedy |
| The battery charge indicator on the dashboard does not light up when the ignition is on | Battery is discharged | Charging the battery |
| The fuse in the unit or the indicator light has blown | Replacing fuse, light bulb | |
| Broken ground contact on the generator housing | Secure the bolted connection of the contact, cleaning it from oxides | |
| Broken wiring from the generator to the dashboard terminals, or broken contacts | Repair the break, clean the contacts | |
| Wear of generator commutator brushes | Replacing brushes or generator | |
| The gap on the brushes and slip rings of the rotor is broken | Adjust the gap | |
| Failure of rotor rings | Replacing the rotor or generator | |
| Voltage regulator relay failure | Regulator replacement | |
| The battery charge indicator goes out when the speed increases | Loosening the alternator belt drive | Adjust tension |
| Belt drive break | Replace belt | |
| Failure of the diode bridge | Replacing the diode block | |
| The power cable between the battery and the generator is broken | Replacing power cables | |
| The relay regulator has failed | Relay replacement | |
| The indicator is constantly on | Short circuit in the circuit | Eliminate wiring problems |
| Short circuit in the diode block | Check the contacts in the block, replace the wiring | |
| Failure in the ECU system | Check the controller unit, clear the ECU error | |
| Battery discharged | Charge the battery | |
| The indicator remains on when the ignition is turned off | Short circuit | Eliminate broken wiring |
| Short circuit in the diode block | Clean diode contacts or replace | |
| Overheating and boiling of battery electrolyte | Failure of the relay regulator | Relay replacement |
How to check the generator
Current to power conversion calculator
Convert how many amperes a kW has online.
Calculator for converting ampere current to watt power A car generator is the main source of energy in the on-board network, and if it malfunctions or fails, you won’t be able to drive for long on one battery. This is why it is so important to monitor the performance of the generator.
In most cases, checking a car's generator with your own hands is not difficult, since no matter what car you check on, the principle is the same. But still, many car owners often wonder: how to check the generator with a multimeter or with improvised means?
Next, we’ll look in more detail at how to check a generator in a garage without special stands that are used at service stations.
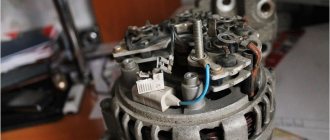
Brushes and slip rings
For normal operation of light bulbs, power windows, wipers and other electrical appliances, as well as for charging the battery, it is necessary to maintain the DC value at 13.5-14.5 V. If this level is exceeded, the on-board electrical equipment will fail. . High voltage also causes some damage to the battery, shortening its life due to overcharging.
Therefore, to process the current generated by the generator, a special device is used - a voltage regulator. With its help, a current is supplied to the on-board network, which maintains the required parameters regardless of the crankshaft speed. It is often necessary to check the generator voltage using a multimeter.
Modern relays are electronic and their design is indestructible. If they fail, they cannot be adjusted or repaired, but must be completely replaced. This is considered the only position of the voltmeter needle - near the red zone or in the zone itself. Therefore, it is necessary to check the generator armature using a multimeter.
When checking the voltage with a multimeter while the engine is running, its readings at the battery terminals will be less than the required 13.6 V. For more accurate results, it is recommended to first check the battery charge from the generator using a multimeter.
How to check the generator without removing it from the car
There are two ways, using a multimeter and without it at all. The first, relatively new one, is to check the voltage at the battery terminals, and the second, old and proven one, is almost the opposite - the battery terminal must be removed with the engine running.
- Checking the battery with a multimeter first occurs at rest - the voltage should be in the range of 12.5-12.8 V. Then you need to measure the readings with the engine running, if 13.8-14.8 V is observed at 2 thousand revolutions, then everything is in order. In conclusion, it remains to check the voltage under load , that is, by connecting consumers - the stove, headlights, heating, radio. A dip in the range of 13.6–13.8 V is considered acceptable, and if the readings are lower, this indicates a malfunction.
- The second method, like many “old-fashioned” ones, is simple and trouble-free, but at the same time quite dangerous and requires care . It allegedly works both on VAZs and on relatively new cars, like the Aveo. What is the point - loosen the bolt securing the negative terminal of the battery with a 10mm wrench, start the engine and give a small load, turning on one of the consumers, for example, the headlights. Then remove the terminal while the engine is running - if it does not stall and the headlights do not dim, then everything is absolutely fine with the generator, otherwise you can be sure that it is broken. You should try this method at your own peril and risk.
Having determined that there is a malfunction, you should dismantle and check the removed generator with a multimeter, a light bulb, and visually. Each of its elements is subject to verification separately.
| List of generator parts and applicable test methods | Visual inspection | Checking with a multimeter | Checking with a light bulb |
| Brushes | |||
| Slip rings | |||
| Diode bridge | |||
| Voltage regulator | |||
| Stator | |||
| Rotor |
Malfunctions
The main malfunctions of the VAZ 2107 generator include:
- brush wear;
- failure of the diode bridge (rectifier unit);
- failure of rotor bearings;
- short circuit in the excitation winding;
- break or short circuit in the stator winding.
Signs of a faulty generator are:
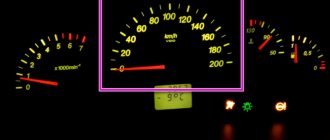
- no indicator light on the dashboard comes on;
- the voltmeter needle is in the red zone;
- sparking inside the generator;
- noise during operation (hum or howl);
- smoke and burning smell coming from the generator.
Do I need to change the generator?
It is quite difficult to determine the cause of generator failure without having a clue about electrical engineering, so in order to repair it, it is better to contact specialists. Most often, in VAZ 2107 cars, the generator fails due to brush wear, which occurs due to an expended resource or mechanical damage to the commutator. In addition, a short circuit or open circuit in the rectifier often occurs, which is “treated” by replacing the diode bridge.
The hum or howl of the generator indicates bearing failure, which can also be repaired. But if suddenly a short circuit occurs in one of the windings, you will have to either negotiate with home-grown specialists about winding a new winding, which is quite risky, or replace the generator with a new one. The last option would be most appropriate here, especially if it also comes with a guarantee.
A new generator, depending on the model and manufacturer, can cost from 2800 to 5000 rubles. Replacing it at a service station will cost about 500 rubles.
The catalog number of the standard VAZ generator for the “seven” is 21083701010.
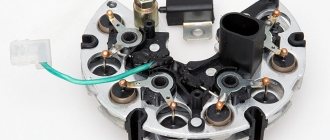
How to check a diode bridge (rectifier)
Diodes are checked by measuring resistance and detecting conductivity. Since the diode bridge consists of two plates, we check one at once and then the other. The tester should show the conductivity of the diodes in only one direction . Now, in a little more detail: we hold one tester probe on the “+” terminal, and with the other we check the diode terminals one by one, and then swap the probes (in one case there should be a high resistance, and in the other there should not be). Then we do the same with the other part of the bridge.
How to check the voltage regulator
The regulator is checked in case of undercharging or overcharging of the battery. The voltage is measured at rpm; it should be in the range of 14.4 - 15V.
In addition, you can check the resistance of the regulator capacitor (at the moment the tester probes are connected, it should decrease until it approaches infinity).
With the generator voltage regulator removed, the condition of the brushes is inspected and serviceability is checked using a 12V light bulb and constant voltage. That is, you need to connect a light bulb to the brushes, and apply 12V to the positive terminal and ground of the regulator (the light bulb should be on, and go out when the voltage increases above 15V).
Check Features
You need to know how to check the operation of the generator on a car correctly, otherwise you may encounter the fact that a working part will be completely damaged. By following just a few simple rules, you can avoid unexpected breakdowns.
- Checking should be done using a multimeter.
- When diagnosing the condition of the valves, the current should have a voltage of no higher than 12 V.
- If it is necessary to replace the wiring, you need to select wires with an identical cross-section to the original ones.
- Before you start checking the generator, you need to make sure that all fasteners are connected correctly and that the belt tension is correct (read more about the generator belt tension roller). If necessary, the connections are brought to a working condition, and the belt is tightened or loosened.
The main condition under which it is possible to check a generator at home is to maintain its working condition. If the device is disassembled or has received damage that prevents it from functioning, then diagnostics will not allow us to determine the suitability of the device for further operation.
You may also be interested in our specialist’s article on how to remove a generator on a VAZ-2114.
There is a list of actions that absolutely cannot be performed during verification:
performance testing should not be performed using a short circuit or in other words “spark”; connect terminals of different configurations to each other, as well as connect terminal 30 or B+ to ground; diagnostics and operation of the generator should not begin without connecting consumers
It is especially important to observe this point when the battery is disconnected;
How to test a generator for performance at home
There are two main verification methods. One of them, although very old, allows us to reliably understand the performance of the device. The second works more subtly and is able to respond to minor system flaws. Using the second method, you can identify the slightest deviations in the operation of each element.
How to check a generator on a car without removing it and without having the necessary tools
There is an ancient way to identify a generator malfunction. It is very simple, but the result can only consist of two points:
- works properly;
- there are malfunctions.
Since anyone can check a car generator at home using this method, its popularity is fully justified. You need to start the engine and turn on the low beam. You need to remove the negative terminal from the working engine. If the headlights are on evenly and the engine is not out of sync, then the generator is working properly. If the internal combustion engine operates uncertainly or the brightness of the headlights changes, it is necessary to perform a more in-depth diagnosis, since the device is in a faulty state.
How to check the generator rotor
The first step is to test the excitation winding. To do this, set the multimeter to check the resistance and measure it between the slip rings - the winding resistance should be in the range 2.3-5.1 Ohms . When it is above, there is either a break or simply poor contact between the rings and the winding terminals. Low resistance indicates an interturn short circuit .
Using the ammeter mode on the multimeter, you can also check the current consumed by the winding. You need to apply 12V to the slip rings and measure the open circuit - the excitation winding should not consume more than 3-4.5 Am.
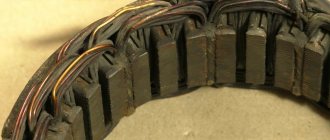
Car generator stator (winding)
To the full complex, you can also add a check of the rotor insulation resistance. To do this, you will need a 40-watt light bulb and wires (one wire from the socket to the ring, and the other through the light bulb to the body - if everything is normal, the light bulb will not light up, but if the filament barely glows, then there is a current leakage to ground) .
By following all the recommendations and testing sequence, in most cases, you can easily check the car’s generator and its performance on your own, having only one multimeter at your disposal. But in order to repair it, having identified a faulty unit, you need to replace the failed part. Monitor the belt tension, the condition of the contacts, watch the generator light on the dashboard and the generator will last you longer.
Source
Causes and possible consequences of the malfunction
Generator malfunction may be caused by the following reasons:
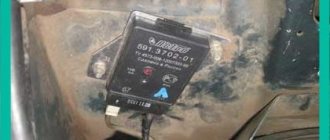
- damage to the voltage regulator (“pill”, “chocolate” in automotive slang);
- Wear (destruction) of brushes;
- short circuit of the field winding (rotor);
- Failure of diodes (placed in a horseshoe);
- Wear of bearings and bushings.
Failure of the voltage regulator usually results in the inability to charge the battery. In this case, the “battery” indicator light on the dashboard lights up. The engine runs until the battery is discharged to approximately 8-9 volts.
During the day, the battery's charge level can cover a distance of 30 to 50 km, provided that the battery is well charged at the time of failure.
If the voltage regulator output stage fails, the malfunction may be caused by an increase in the generator output voltage to 17-20 V. This causes the battery to overcharge. When recharging, the electrolyte boils. If there is corrosion near the battery under the hood, check the alternator.
If the polarity of the battery is accidentally reversed (the terminals are installed with the wrong polarity), the diode bridge may fail. Usually LEDs are split in pairs in one arm. A faulty diode has a resistance close to zero. The generator stator winding then operates in short circuit mode, becoming very hot.
After a few minutes of engine operation, the windings overheat, and the smell of burning electrical wires appears under the hood of the car. To avoid fire, turn off the engine and check the generator.
Brush wear leads to gradual failure of the generator. At first, while driving, the charging indicator on the dashboard starts to flash, and then stays on. On many models of generators, the brushes are replaced together with the voltage regulator.
A short circuit in the generator windings can lead to a significant change in output parameters and overheating of the device.
How to check the generator for performance in various ways
There are two power sources in a car - a battery and a generator.
The first powers the electrical circuit when the engine is not running. The second is when the engine is already running. In this case, the battery goes into electric current consumer mode and replenishes the energy expended to start the engine. In practice, malfunctions of one or another power supply are quite common. They often manifest themselves in the same way. The starter refuses to spin the engine, and as a result the engine does not start. When the engine is running, the warning light on the instrument panel with the battery icon lights up. It indicates that a malfunction has occurred and the battery is not charging.
How to test a generator with a multimeter
The diode bridge of the generator can be checked with a multimeter, but you can also use the stand that was used to check the regulator.
But before that, first of all, without removing the rectifier bridge from the generator, connect the red wire of the tester to terminal 30 of the generator, and the black wire to the housing. Set the tester operating mode to dial (diode icon). If it is not there, then set it to 1-2 kOhm. The multimeter should show infinity. If the readings are different, the diode bridge is faulty.
Checking charging with the terminal removed
Removing the battery terminal while the engine is running is an old, proven method of checking the functionality of the generator; this method was used on Soviet cars. We check like this:
- start the engine;
- disconnect the negative terminal and move it to the side;
- if the engine turns off, it means there is no charging, you need to deal with the generator;
- Without installing the terminals, we add speed, the internal combustion engine should not stall.
You should also pay attention to this point - when installing the negative wire in place while the engine is running, the idle speed should not change noticeably. A significant decrease in speed indicates that the battery is quite discharged, and you should pay attention to this
A discharged or faulty battery may fail on the road; it is better not to travel with such a battery.
An important point is that you need to remove the terminal with the engine running very carefully; the wire should not touch live parts of the car (body, engine housing, etc.). On many modern cars, it is generally not recommended to disconnect the terminal while the internal combustion engine is running; if there is insufficient confidence in the test results, it is better not to use this method.
It is worth noting that there is still a way to check with a test light, but we will not consider this method - the lamp only indicates the presence or absence of charging, with its help it is impossible to determine the value of the voltage in the network and its dependence on the load.