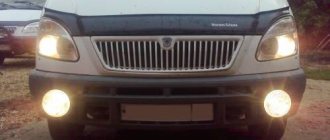
In many modern cars, regardless of class, make and model, electric windows are the default solution. At the same time, the most budget option is when the power windows are installed only in the front, that is, on the driver’s and front passenger’s doors.
As for the domestic automobile industry (for example, VAZ of the 80-90s), as well as old foreign cars, such cars may not have power windows. Another option is the non-standard installation of window regulators.
In any case, both factory solutions and third-party installations may fail. For this reason, many car enthusiasts are interested in how to install power windows with their own hands for the purpose of repair (provided there is a power window) or upgrading the car (there is no power window initially). Next, we will look at how to install and connect a window regulator in a car.
What are window regulators needed for?
Of course, an electric window lifter will not add much comfort - there will be a huge play in the steering wheel, rattling body parts, panel elements, too loud engine sound and sometimes a humming sound from the rear axle. But from the point of view of convenience, it will be much better - you won’t have to constantly turn the handle with your hands to open the window for ventilation. However, ventilation is not necessary in the “sevens” - there are enough holes in the body for fresh air to come in from outside.
By pressing a button, the driver can raise or lower the window on the desired door. Please note that it is best to install electric drives on all doors - this will increase ease of use. But, even if you install drives only on the front doors, it will be more convenient than turning the handles by hand. But you need to connect the power windows strictly according to the diagram, otherwise they simply won’t work.
Standard windows
On domestic cars of the “classic” family, only manual power windows were installed. For example, the first “sevens” had rack and pinion ones, and the “nines” and “kopecks” had cable ones. Why were such mechanisms installed? It’s just that domestic designers tried to reduce the cost of the car, so for the sake of economy, devices with plastic gears were installed. And they fail quite quickly.
In the early 90s, the designers who developed the “sevens” realized their mistake and began installing cable-operated windows on the cars, but the drive was still manual. The peculiarity of such structures is that they are repairable. If in rack-and-pinion gears when a plastic gear breaks, the entire mechanism needs to be replaced (and it is very difficult to find it on sale), then if the cable system malfunctions, it is more than possible to carry out repairs.
The principle of operation of all mechanisms (both cable and rack and pinion) is the same - the system on which the glass is attached rotates with a handle. Depending on the type of window lifter, either the gear moves along a toothed vertical rack, or the cable is tensioned.
Power rack-and-pinion windows
Rack and pinion window lifters are considered one of the most “long-lasting” compared to others. Rack-type ESPs operate on the principle of transmitting rotational motion from an electric motor to gears, with its subsequent transformation into linear movement of racks that perform lifting. In addition to reliability, window lifts of this type lift windows much faster and quieter than cable counterparts.
But, like everything in this world, rack and pinion windows are not perfect and have their drawbacks. The main disadvantage is that the gears need lubrication; without it, they very soon begin to wear out, and the power windows themselves cease to function normally. The second drawback especially concerns those devices whose manufacturers decided to “save” on metal parts and gave preference to plastic. The fact is that this material is fragile and is noticeably inferior in strength to aluminum, as a result of which the service life of such ESPs is reduced. Among other things, the rack and pinion mechanism is more bulky, so they are installed mainly in “large” car doors.
Cable-type electric windows
The main advantage of cable window lifters is their high maintainability. In the event of a malfunction, you can easily repair the mechanism, and spare parts can be found in almost any auto store
This advantage, at first glance, is insignificant, but as practice shows, most motorists choose this type of ESP without paying attention to the disadvantages of the cable mechanism. The fact is that the cable wears out or stretches over time; in addition, due to the low strength of the plastic guides, they often fail, and the electric motor is very prone to overheating
Lever type electric windows
Lever-type ESP successfully combines compact dimensions and a high degree of reliability. In such power windows, the motor turns a gear, which transmits rotation to one or more levers. In turn, the levers move the plate on which the glass is mounted. The main disadvantage of this mechanism is the uneven speed of glass movement; the higher it is, the slower the lifting will occur.
As for glass, regardless of the type of mechanism, it moves along guide channels or special rails.
Impulse and non-impulse windows?
In addition to the type of lifting mechanism, ESPs are divided into pulsed and non-pulse. The former are capable of operating in pulsed as well as normal mode. By “normal” we mean that the power window operates only when you directly press and hold your finger on the control key. The term “pulse” means a short touch, after which the glass itself will completely lower or rise.
Pulse power windows are most often equipped with five-position control keys; the lever is set in neutral mode, from which there are two speeds of lifting up and down. By moving the slider up one position, the window lifter will operate in “normal” mode, and the glass will rise exactly as long as you hold your hand on the key. The second position will allow you to fully raise or completely lower the window.
Apr 14, 2015
Electric drives
Drives with electric motors are much more advanced. But they were installed on “classic” VAZ cars exclusively by car owners - this option was not provided at the factory. The main thing (according to those who have been producing these cars for almost 30 years) is wheels on an iron body and some kind of motor, as long as it drives this entire structure.
If you take a closer look, you will see that the designers did not bother themselves with comfort; they only thought about how to save on production. And in the car circuit there was no provision for connecting power windows. Therefore, you have to install all the wiring yourself.
But many car owners took on the responsibility of the factory and began installing power windows themselves. Most often, the choice falls on hinged lever mechanisms, which have several advantages:
- Quite low cost of the kit.
- Electric windows are easy to install.
- There is no need to look for components - everything needed for installation is already available, including wires and buttons.
- The devices are highly reliable, work quickly and do not make noise (the latter advantage is more relevant for modern Vesta than for the “seven”).
Getting ready for installation: necessary tools
In order for the installation of power windows to go smoothly, you will need certain tools and materials. Here is a sample list:
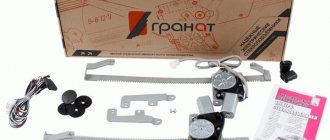
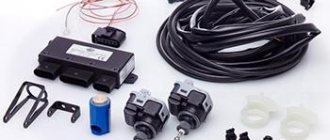
- Electric drive kit for a specific vehicle. Please note that kits vary for all vehicles.
- Flathead screwdriver.
- Ruler.
- Calipers.
- A set of open-end and spanner wrenches.
- Marker.
- Set of socket wrenches or sockets.
- Electric screwdriver and metal drills.
- Silicone and CV joint lubricants.
Having prepared all these tools, you can begin installing the drives on the car.
Preparatory work
Before connecting the power windows on the VAZ-2107, you need to put all the components in place and lay all the wiring. But first, make preparations - open the hood and completely disconnect the battery to eliminate the possibility of a short circuit. You start all work from the front door (driver's). First, remove the handle from the standard window regulator; you need to remove the lock washer from under it.
Using a flat screwdriver, carefully push the edges of the lock washer apart and pull the handle toward you. Then you need to use the same flat screwdriver to pry off the plastic plugs around the entire perimeter. They need to be removed to provide full access to the bolts that hold the casing in place. They need to be unscrewed with a key to “8”. After this, the casing is completely removed.
Electric lifts and VAZ 2106
Installing electric lifts on a VAZ 2106 is not only not difficult, but even much simpler than on other models, such as 2105 or 2107. This procedure is simplified by the presence of a so-called windshield in the “six”. Modern stores offer a huge number of options for window regulators, and the average price ranges around $100. When choosing, the main attention should be paid to the manufacturer, for example, European window regulators are much more reliable than Chinese ones; you can also purchase a domestic system, but it may often be understaffed.
The most difficult task is to drag the tubes with pre-routed wires from under the dashboard into the door, which becomes more difficult if the car is equipped with central locking or heated windows.
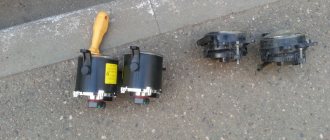
Removing a standard window regulator
If you plan to install rear electric windows on the car, you will have to disassemble all the doors. Therefore, at the first stage, remove the trim from all the doors, and then begin disassembling the mechanisms. Having opened access to the cable mechanism and glass fasteners, you can begin dismantling. First, push the glass all the way up and secure it with tape.
After this, unscrew all the fastening bolts that are on the glass carriages. Moreover, you need to unscrew them both on the mechanism and on the glass. After this, you can pull the entire mechanism out of the door and begin installing the electrical one.
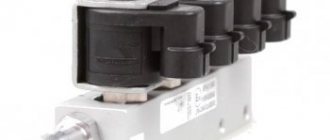
Connecting electrical wiring
- The first step is to measure the distance between the window motor and the buttons on the front panel. Using regular wire with a loop at the end, the wiring is pulled into the rack and under the panel.
It is important to know that the wire for pulling is selected with a cross-section of at least 1 millimeter square. If you neglect this rule, then there may be a risk of problems during installation and during connection of ESP contacts.
- ESP wires can be connected directly to the cigarette lighter, which is the simplest and most effective connection method. Experienced car enthusiasts choose a technically complex connection method, namely directly to the battery, as this guarantees more stable operation.
- After completing the work, it is necessary to attach the door trim, covering the resulting holes with decorative plugs. The installed mechanism must be checked - it is necessary to remove and close all the necessary parts, check the fastenings and contacts.
Electric drive installation
Each set of electric windows comes with instructions that indicate the installation diagram of all drive elements, as well as a circuit diagram. It allows you to see how to connect electric windows to the vehicle's on-board network. The same instructions, which describe installing the drive on the “seven”, indicate how the holes in which the rack is attached are located relative to each other. Measure the distance using a ruler and caliper, mark the location of the holes using a marker.
Make a hole with a 5.5 mm drill inserted into a screwdriver or drill. The power window mechanism is installed through the right hole in the door. Next, align the holes in the rail with those you made in the door. All that remains is to secure the rail with 10mm bolts, which should be included in the installation kit.
Electrical work
Remember that using a power window fuse can protect all important components from short circuits.
The electrical setup procedure looks something like this:
- The electric motor must be supplied with voltage directly from the battery. In this case, the rotor should rotate and the entire mechanism should rise up. And you need to wait for the moment when the holes in the fasteners of the mechanism are aligned with those located on the glass carriages. Only after this can the glass be fixed.
- If there is no wiring (the installation of ESP is not provided for by the manufacturer), then it must be laid through the technological holes that are located in the door and body. You need to run wires to the instrument panel.
- You can place the control buttons in any convenient place, but it is best to place them in the door handle. But on domestic cars they are more often installed in the cigarette lighter area or near the handbrake.
- All moving parts of the electric drive must be lubricated - a CV joint type compound is suitable.
- Apply voltage to the entire system through the power window fuse and check operation.
- If there are no faults, you can install the casing and recheck.
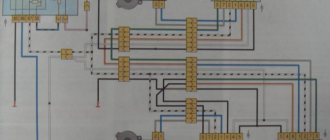
The article shows a wiring diagram for the power window button. It is recommended to switch all power circuits using relays to maintain the integrity of the buttons.
Useful tips
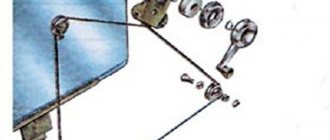
So, after removing the rubber plugs in the holes for the cable outlets, you may need to install a broach (inserted into the rack channel). Next, you need to secure the adjustment plate, which is pre-inserted into the inclined groove. For this task, M6 bolts are used
The plate is attached to the glass bracket, which requires caution when performing work.
Now the window lifter mechanism (folded) is inserted into the upper hole. It is usually secured with M6 nuts and lock washers. A screw is placed in the hole in the middle. When tightening, all nuts must be completely tightened, as the fastenings may become loose when the vehicle moves.
Then you need to pull the cable through the hole in the door and pillar
It is important to pull the cable so that the wires in the door do not come into contact with the moving parts of the window regulator. To do this, securely fasten it using electrical tape, adhesive tape, zip ties, etc.
After connecting the contacts to the switch, to check, you should supply power from the battery and turn on the side lights. If everything is normal, the power window switch light will be on. If this is not the case, then the sockets on the contacts and switches are swapped.
If the operation of the window regulator causes complaints, you can correct the situation by adjusting the window regulator. For example, when the glass comes out of the guide grooves, it is necessary to loosen the nuts securing the adjusting plate (the short guide is fixed in the upper hole). If the glass moves with force, loosen the nut and fix the short guide in the lower hole.
What to pay attention to
On domestic VAZ cars, the installation of rear window lifters is approximately the same as the front ones. One difference is the location of the control knob. Therefore, you will have to drill holes in the door with a slight offset. And one more thing - one set of ESP, which can be found on sale, is designed for installation in two doors. Therefore, if you want to install equipment in all doors, you need to buy four sets. And connect the power windows according to the diagram given in the article. It includes a window closing system when arming - this doubles the ease of use of the car.
It is also recommended to completely assemble the kit in advance and then place it in the door. And the entire mechanism must be placed in the lowest position. If this is not done, then it will not be possible to install the drive through the technological hole.
Pay attention to the wiring diagram for the power window button; check it several times to avoid mistakes. When checking the mechanism, you need to look at how the glass moves and whether there are any extraneous sounds or creaks.
Wiring diagram for power windows. Installation of electric windows at News4Auto.ru.
Our life consists of everyday little things that in one way or another affect our well-being, mood and productivity. I didn’t get enough sleep - my head hurts; I drank coffee to improve the situation and cheer myself up - I became irritable. I really want to foresee everything, but I just can’t. Moreover, everyone around, as usual, gives advice: gluten in bread - don’t go near it, it will kill you; A chocolate bar in your pocket is a direct path to tooth loss. We collect the most popular questions about health, nutrition, diseases and give answers to them that will allow you to better understand what is good for your health.
Video of replacing the vacuum brake booster of a VAZ 2110
Backup video on how to replace the vacuum brake booster of a VAZ 2110:
Welcome! Vacuum brake booster - designed to make the brake pedal much easier to press, it only works when the engine is running, but when the engine is turned off, the vacuum booster will not work, all this is due to the fact that when the engine starts, the air filter housing begins to suck in air from the environment and it enters the intake manifold, air is taken from the manifold a little and goes into the vacuum chamber and therefore it starts to work only when the engine starts.
Note! To replace the brake booster, you will need: A set of all kinds of wrenches, as well as a couple of screwdrivers, and also for this task, a socket head and a wrench will be very convenient!
Where is the vacuum brake booster located? It is screwed to the car body with four nuts, or rather not the itself, but its bracket, the vacuum booster itself is secured to this bracket with two nuts, but they are easiest to remove as an assembly, i.e. unscrew the four nuts that secure the bracket to the body and then remove them, and when the vacuum booster with the bracket is in your hands, you will need to unscrew the two nuts and separate them from each other, but we will talk about this later in this article, a little lower .
When do you need to change the vacuum brake booster? If the brake booster fails, a hiss may appear when you press the brake pedal, and the speed may also go up and then down, in addition, the brake pedal will become difficult to press (This is equivalent to the fact that the car is turned off) basically this is there are all the symptoms that indicate that the vacuum booster has failed, it does not always happen that they all appear together in the car, but a couple of them will still appear when the vacuum booster becomes unusable (the main ones most likely, namely, tight brake pedal and floating speed).
Note! By the way, the vacuum booster can be checked for serviceability as follows: With the engine off, press the brake pedal 5 times and when the last press is made, hold the pedal to the floor, immediately after which start the car, if the pedal falls a little, this will indicate that that the vacuum booster is fully operational!