In any car, the ignition system plays one of the main functions. It is thanks to its correct operation that the correct operation of the power unit is ensured both when starting it and during operation of the car. What spark plugs should be used in Gazelle cars, for what reasons can the ZMZ-406 ignition coil fail, and how to install the ignition yourself? You can find answers to these and other questions below.
Spark plugs used on cars with ZMZ-405, 406 and 409 engines
Before you go to the store to buy spark plugs (SZ) for injector engines 405, 406 or 409, you need to read the service book for the car. The manual must clearly indicate the SZ models, the operation of which is allowed in such motors. The manufacturer officially recommends using SZ A14DVR or their analogues. If you decide to give preference to analogues, then keep in mind that the spark gap in the spark plugs should be 0.7-0.85 mm.
Some motorists, leaving reviews on the Internet, recommend using the SZ A17DVRM, but this is not allowed for two reasons:
- first of all, these products have a different heat dissipation parameter;
- In addition, their gap is 1 mm, and this is not suitable for these engines.
Finding A14DVR devices today is not so easy, so many car enthusiasts have to look for analogues.
So that you can choose a similar product, we suggest that you familiarize yourself with the decoding in more detail:
- A - this beech determines the diameter, as well as the pitch of the thread D. The original SZ uses an M14 * 1.25 thread.
- 14 is the value of the heat number. It is considered one of the main parameters that determine the characteristics of the temperature regime of the product.
- D is the value of the thread length. In our case, the SZ are equipped with a thread 19 mm long.
- B - determines how much the thermal cone of the insulator protrudes into the combustion chamber of the motor itself. Thanks to the protrusion of the cone, the product warms up faster when starting the power unit, and this, in turn, ensures its higher resistance to soot formation.
- The last symbol - P - determines the presence of a built-in resistor element in the SZ design. Thanks to the presence of a resistor, the level of interference for radio equipment, as well as the motor control module, is reduced. In general, the presence or absence of this element in the design of the SZ will not in any way affect the functionality and quality of spark formation when starting the internal combustion engine.
Replacement intervals and signs of malfunction
On average, the service life of modern SZ is about 20 thousand kilometers. Of course, this indicator depends on many conditions. First of all, this is the quality of the completed part, its operating conditions, as well as the quality of the fuel used. The last point is very important, since the use of low-quality fuel will lead to a significant reduction in the service life of the SZ.
What are the signs of faulty spark plugs?
- If you remove the SZ from its seat, you will see its body. The presence of soot and deposits on the device body, in particular on the electrode, may indicate a breakdown of the product. You can try to solve such a problem by cleaning, but this does not always help.
- Presence of oil traces on the SZ. Due to oil exposure, the product cannot work efficiently, so problems may occur in the operation of the SZ. Such devices need to be cleaned and dried, but before further use it is necessary to determine the reason for the contact of motor fluid with them.
- Also, fuel traces on the devices may indicate a malfunction of the SZ.
- Another sign is that the starter has to be turned for a long time, and the engine may start after a long period of time, or may not start at all. The same symptoms indicate a dead battery, a broken distributor, or an incorrectly functioning fuel pump.
- When the engine warms up, unpleasant and uncharacteristic sounds appear. They may also appear when idling.
- Fuel consumption during vehicle operation has increased significantly.
- In addition, the volume of harmful substances in exhaust gases has increased. Of course, this malfunction cannot be determined by eye; a more thorough diagnosis is required.
- The vehicle's traction has weakened significantly, its power has decreased, and the engine has difficulty picking up speed.
Replacing a carburetor with an injector - sequence of work
So, all the components have been purchased, let’s check the list one last time. After the work begins, the car will be immobilized, and it will not be possible to go to the car market for the missing element.
Using the VAZ 2109 as an example, the following set is obtained:
We photograph all the carburetor elements as they were before the alteration. Many people are interested: is it possible to reverse replace the injector with a carburetor? Of course, yes, but you probably won’t want it. It is for exceptional cases that we record everything as it was.
Disconnect the battery and remove it from the engine compartment; We drain all technical fluids from the engine. Gasoline can be reduced to almost zero, and an unscheduled change of engine oil and antifreeze will not hurt; We dismantle the fuel system of the car, starting with the old gas tank. There is gasoline in the fuel lines and carburetor, so care should be taken to protect against fire; Carefully remove the old ignition system. There is no point in tearing off the wires - let everything remain as is; In place of the distributor we install a plug with a gasket; Let's disassemble the dashboard. If it has a “check engine” lamp, we route the control wire into the engine compartment. If not, install the indicator lamp yourself; We install the wiring harness for the ignition system. Each car has its own circuit, the basics are the same: power from the contact of the switched on key, signal from the tachometer; To connect the fuel level device, it is necessary to stretch the signal wires to the place where the fuel pump is installed in the tank. The old float no longer works, new level sensors will need to be calibrated; We change the oil pump, check the installation location of the crankshaft position sensor; We remove the old one and install a new intake manifold. We attach a fuel rail with injectors to it (in standard places); We install the gasoline pressure regulator in the rail, connect the fuel lines: direct, etc. "return". This is a new pipe, it was not in the carburetor system. “Excess” fuel is not removed through the injectors, but is returned back to the tank. This improves efficiency; We calculate the route for laying the fuel line under the bottom. We temporarily dismantle interfering elements
Important! Do not try to push the fuel line into any gap; it is better to unscrew and install the unit than to damage the high-pressure pipe; We prepare a new fuel tank (clean it, wash it if necessary). We install the fuel pump in accordance with the installation instructions (most containers have an arrow to orient the pipes and flanges)
We install the tank on the brackets; We check the fixation of all elements of the fuel line. Fittings should not rotate or play; We install new sensors: MAF, crankshaft position, temperature; We install the control module (ECU) so that it does not heat up from the power unit or exhaust system; We connect all the braids (harnesses), check the tightness of the shrinkage of the connectors. If the new contacts did not have special technical petroleum jelly (to prevent oxidation), apply it before connecting the connectors; We install the throttle valve and a new throttle cable. We check and adjust the tension; there should be free play from one extreme position to the other. If your kit includes a throttle position sensor, connect it to the ECU; We mount a new air filter housing, having previously tried it on the throttle assembly. There should be no distortions or tension fastening; We assemble a standard crankcase ventilation system; We install the generator and carefully center the new pulley.
Fill in new oil, antifreeze and fuel. We check for leaks and perform a test start of the engine. Adjust the idle speed.
You learned how to convert a carburetor to an injector using small means. The engine is not run in; the mechanics remain the same. For the first 100-200 km, you should measure gasoline consumption and regularly check for fuel leaks and the fastening of new components.
Source
Checking the spark plugs yourself
According to the wiring diagram for engines 405, 406 and 409, spark plugs are used to transfer spark from the switchgear to the engine cylinders. If the operation of the SZ is disrupted, this may affect the quality of the motor as a whole.
To check devices you will need an assistant:
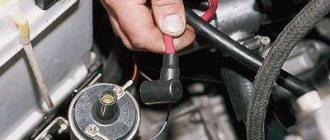
- You need to disconnect the high-voltage wire from the first SZ.
- Using a key, the product is unscrewed from its seat.
- One end of the device from the electrode side should be brought to the engine or metal on the car body, the distance between the electrode and the ground should be about 1-2 mm.
- The assistant then turns the starter to try to start the engine. If at the moment of cranking a spark jumps between the electrode and the body, this indicates that the product is operational. In the same way, you need to check each SZ. Please note that problems with spark supply can also be caused by improper operation of the distributor, as well as damage to high-voltage wires.
Replacing wiring
Therefore, when integrating new wiring, the connection diagram in the connecting terminals only changes, and for alignment you should use the wiring diagram of the new power unit.
It is certainly not impractical to change the entire electrical wiring of the Gazelle when replacing the engine from 402 to 406.
The fact is that on newer versions of Gazelles, the connection diagram of certain devices also changed:
- Gazelle 406 wiring is integrated into the standard electrical system in the engine compartment;
- electronic components and control devices are connected using terminals;
- The voltage and correct connection are checked using testers.
After assembling the wiring into a single whole, its functionality is checked. Subsequently, the operation of the power unit is adjusted.
Conclusions: Replacing the power unit inevitably affects the change in the standard electrical wiring of the car
That is why it is important to have a visual aid at hand when carrying out such an operation, and the Gazelle’s factory wiring diagram will allow you to avoid mistakes
Source
How to check short circuit?
How to check the short circuit yourself:
- First, disconnect the power cable from the negative terminal of the battery and turn off the ignition.
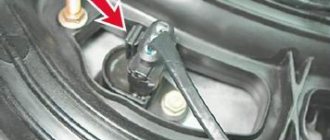
- Then open the hood and disconnect the two high-voltage cables from the product. Unscrew the bolts and also dismantle the bar along with the product. The second short circuit is dismantled in a similar way.
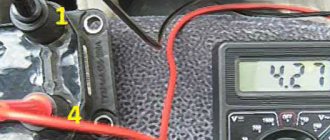
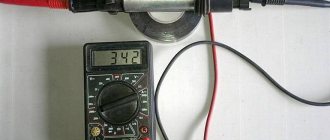
- The diagnostic procedure itself is carried out using an ohmmeter; its probes are connected instead of disconnected wires. After connecting the probes, it is necessary to measure the resistance level. If the product is operational and in good working order, then the resistance level should be about 0.4-0.5 Ohm.
- To obtain more accurate diagnostic data, you can also short-circuit the tester probes, and then perform resistance diagnostics again. In particular, you are now interested in the secondary winding of the device. If the device is operational, then the resulting value should be around 5-7 kOhm. If the diagnostics showed different values, this indicates that the short circuit needs to be replaced.
Photo gallery “Short circuit diagnostics”
Typical unit malfunctions and ways to eliminate them
A malfunction in the operation of the short circuit can occur for the following reasons:
- There is a short circuit within the system, which may cause the device to overheat. If the operating temperature exceeds 150 degrees, the product will fail irrevocably.
- The second reason is a faulty power supply from the car's electrical network. As you know, for normal operation of electrical devices, the voltage level in the on-board network must be at least 11.5 volts. If the power is too low, it will take much longer to charge the short circuit.
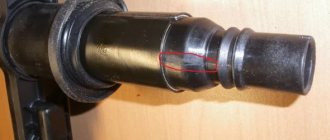
- The device may also fail due to mechanical damage to the insulation. This problem is usually associated with engine fluid entering through worn out seals.
- Poor contact of the product with the on-board network. If the short circuit housing is damaged, this may cause moisture to enter the primary or secondary windings, which in turn can lead to the appearance of transition resistance.
- Thermal problems. Some short circuit models are more susceptible to heat generation than others, which can also affect their service life.
- As a result of exposure to engine vibrations, the performance of the short circuit may also be impaired.
Instructions for connecting short circuit
The ZMZ 405, 406 and 409 engines use two short circuits - one of them works with cylinders 1 and 4, and the second with cylinders 2 and 3. The first of them is located closer to the intake manifold, and the second is located next to the exhaust manifold. To make the connection correctly, low voltage wires should be connected in pairs - those used for the first coil (cylinders 1-4) will be shorter in length. Since the short circuits themselves are not polar, it does not matter which contact the cable will be connected to; it also does not play a role within the pair to which cylinder the wire will be connected (the author of the video is the SpawnyXC90 channel).
Basic aspects of ignition installation
The main aspects to consider when installing the ignition by marks:
- First, you need to dismantle the front cylinder head cover; to do this, you need to unscrew four 12-point screws. In some engine modifications, dismantling also involves removing the fuel pump.
- Then the upper hydraulic tensioner located in the head is dismantled; to do this, two screws securing the cover are unscrewed.
- Next, the chain stabilizers are removed - the middle one, as well as the top one; for this, the two screws that secure them are unscrewed.
- After this, the camshaft sprockets are dismantled. The shafts themselves need to be fixed using a 27 key, while simultaneously unscrewing the screws that secure them. In modifications of engines 4063.10, the camshaft sprocket is removed along with the fuel pump drive eccentric.
- In accordance with the jig installed on the sprocket, six holes should be drilled in each of them. Their angular displacements should be 2, 30, 5, 00, 7 and 30 degrees from the set position of the factory hole, which is located along the axis of symmetry.
- If, when adjusting the phases, it is necessary to turn the camshaft clockwise, the sprocket itself should be mounted on one of the additional holes with a positive offset. It is located to the right of the standard hole.
Gas candles - will there be an effect?
Installing gas equipment (LPG) reduces fuel costs, but seriously changes the operating mode of the engine. Many drivers who have installed gas equipment in their car are wondering whether they need any special spark plugs for gas, and if so, which ones? After reading the article, you will learn how and why the operating mode of the engine changes, what processes occur in the combustion chamber and how spark plugs affect them. This will help you choose spark plugs that will make the engine work better and will not reduce its service life.
What is the difference between gasoline and gas
Here are the main differences between gasoline and liquefied natural gas (LNG):
- octane number: gasoline 95–98, gas 105–115;
- boiling point: gasoline from 33 degrees, LNG minus 42 degrees;
- engine compression ratio: gasoline 9.0–10.0 gas 10.5–12.
The characteristics of gas (propane and butane) are very different from gasoline. A high octane number does not allow you to simply connect an LPG to an engine designed to work with 80 or 92 gasoline, because such fuel will quickly damage the engine. If the compression ratio is greatly mismatched with the fuel, the temperature and combustion rate of the fuel will change. In addition, the injector sprays propane more efficiently than gasoline. A high octane number requires an increase in the compression ratio to at least 10.5, otherwise the engine will overheat in high power mode.
When operating on LNG, carbon deposits do not form on valves and spark plugs, even if the compression ratio is insufficient, which is a serious advantage of gas.
There is a known case when an LPG (propane) injector was connected to a working Gazelle with a ZMZ 406 engine without even adjusting the ignition. After 40 thousand kilometers, one of the cylinder head valves burned out due to severe overheating. There is also a known case when a rebuilt carburetor ZMZ-402 under 92 (and not an injector, but a carburetor), installed on an old Volga, ran on gas for 250 thousand kilometers until the next repair. Because the driver was attentive to the preparation of the engine. I increased the compression ratio by grinding the cylinder head, set the correct ignition and installed the coldest spark plugs.
Gas
Surely you have heard that there are specialized gas spark plugs for GAZelle. Gas has a higher octane number, unlike gasoline. And such candles have their own peculiarity. Their electrode is much thinner than usual.
But is it worth using them without fail if the car has an LPG installed? As practice shows, ordinary candles with a thick electrode do an excellent job. Therefore, you should not overpay for gas candles. Moreover, the car needs to warm up thoroughly on gasoline.
Do you need special spark plugs for LNG?
Many motorists come to the store with a request - I need special gas spark plugs for the injector and do not understand that no one produces such products. Candles are divided not by brand or type of fuel, but by heat rating. If you have a 98 gasoline engine, no carbon deposits form on the valves, compression is normal, and you drive without extreme loads, then you do not need any special spark plugs. It is enough to use the coldest ones recommended in the manual. If you use medium spark plugs (heat number from 11 to 17), then you need to check them once every 2-3 months, but no later than after 10 thousand kilometers. It is necessary to check whether carbon deposits have appeared and whether the gap corresponds to the specified value. This will help determine if they are suitable for the engine and driving conditions, or if you need to use cooler plugs.
Heat number
When purchasing spark plugs for GAZelle-405, pay attention to this parameter.
The heat number indicates the thermal operating mode. The higher the score, the better. On a 405 engine, it is recommended to use spark plugs with a higher heat rating. This engine is a forced analogue of the 406. At the moment, the heat index can be from 11 to 26. Below we give the thermal characteristics:
There are also standardized candles. Their parameter ranges from 11 to 20. They can also be used on engines from the Zavolzhsky Motor Plant.
Let's move on to the next characteristic. Based on the number of electrodes, single- and multi-electrode spark plugs are distinguished. Let's look at their features in more detail.
spark plugs ZMZ 406
The topic of the article is ZMZ 406 spark plugs. This article was prompted to be written by the confusion that is going on on this issue. For engines ZMZ 406, 405, 409, there are two sizes of spark plugs. For a large spark plug wrench (21mm) and a small one (16mm). But very often people simply don’t know what the standard size is. This issue needs to be clarified somehow. I propose the following classification - old-style candles (thick) and new-style (thin).
Spark plugs ZMZ 406, identification
Since our people have almost stopped repairing cars themselves, the question of what kind of spark plugs you have in your engine confuses people. I’m not at all against the fact that everyone should mind their own business, but sometimes you need to know simple things in order to correctly order or buy consumables. I thought for a very long time about how to simply identify which candles are worth. The engine model says absolutely nothing. I myself did not know that the first releases of ZMZ 409 had “thick” spark plugs, I was sure that there could only be “thin” ones. People also cannot always answer the question of Euro-2, E-3 or E-4. Identification by ignition coils turned out to be the simplest and most understandable. If there are two coils on the valve cover - high-voltage wires and old-style spark plugs, if the coils are individual - new-style spark plugs. This is where it’s hard to miss.
Adjustment
Over time, it is necessary to check the spark plug gap. GAZelle works under load. And sometimes the spark plug cannot produce the required spark. If the machine stops “pulling” normally, you should unscrew the spark plug and check the gap between the electrode and the base. It should be from 0.8 to one millimeter. It is checked using a special feeler gauge (which is used to set valve clearances).
If the value is higher than normal, it should be restored. How to do it? The electrode on the spark plugs is very flexible, so you can bend it by tapping it on a metal or plastic part of the engine (for example, a valve cover). With light blows you will restore the parameter. If you “overdid it”, it doesn’t matter - you can increase the gap with a thin minus screwdriver.
Specifics
Still, most of the engines that have “old-style” spark plugs are ZMZ 406. And most of them are found in Volga, Sable and Gazelle cars. My work experience has shown the following trend. Or owners of similar cars need a budget option or one of the best. There is no average. Therefore, to complete the orders, I chose “regular” Bosch candles and Denso candles from the Nickel TT line. I won’t even consider our candles and all sorts of different Brisks, the reason is written in the article about “new sample” candles.
Description
IGNITION COIL
Manufacturer: SOATE
Designation: 406.3705
PURPOSE
For operation as part of microprocessor control systems in UAZ vehicles (engine 406, 409 inzh.), GAZ (equipped with engines of the ZMZ-406 type and their modifications), OKA.
SPECIFICATIONS
The operating mode of the ignition coil…………………………………….long.
Operating temperature range, °C……………………………………..-40…+120
Relative air humidity……………………………………95% at a temperature of +40C
Rated supply voltage, V……………………………..12
Vehicle network voltage………………………………………………………from 6 to 18 V.
Weight, no more, kg………………………………………………………..0.51
Overall dimensions………………………………………………………..81x80x67
Coil 406.3705 GAZ, UAZ, OKA (engine 406, 409 ing.) 2 connectors, IGNITION MODULE “SOATE” ** / 406.3705000-10
- article 406.3705000-10;
- in stock and available for purchase;
- price as of 05.29.21 - 702 rubles;
- Delivery is carried out throughout Russia.
Place your order for this product online right now!
You must be logged in to the site to leave a question about a product.
no messages for this product
Spark plugs ZMZ 406, Bosch
Consumables of this type are what I call “an honest workhorse.” There are not enough stars from the sky, but it performs its function well from replacement to replacement. And one more thing I’ve always liked about Bosch candles is differentiated pricing. Let me explain. There are several lines of candles: regular, platinum, multi-contact, etc. There is a gradation in price between candles of different classes. Bosch always tries to make a simple line of candles very affordable. This is not always the case in stores, but let it remain on the conscience of the sellers. In this case I am talking about the general approach. These spark plugs are listed in the catalog specifically for these engines. Replacement interval, either together with an oil change, or according to condition. But be sure to measure the distance between the electrodes. The manufacturer's recommended gap is 0.8-0.9 mm.
Spark plugs ZMZ 406, Denso
In 2010, the Japanese manufacturer Denso patented and began producing spark plugs using TT (Twin Tip) technology. The essence of the technology is thin electrodes that do not contain rare earth metals (platinum, iridium). The central electrode is made of nickel. But thanks to its design, the flammability of the mixture and other parameters are very close to the “platinum-iridium line” candles from other manufacturers, while remaining humane in price. From my experience, I note a good launch in the cold season. Candles come in a set of 4 pieces. Below are photos of the spark plug electrodes. These spark plugs have a longer replacement interval than a simple ruler, but they also do not last forever. The calculated interval recommended by the manufacturer is 30-40 thousand km. In Russian conditions and our gasoline is not the best, I recommend changing these spark plugs after 15 thousand km, that is, approximately once every two oil changes.
line of Nickel TT spark plugs, electrodes
Materials for production
In more affordable products, the electrodes are made of copper or yttrium alloys. For all their advantages and price, these parts are poorly resistant to high temperatures and are not resistant to fading.
More expensive candles are made of platinum. Both central and side electrodes are made from such alloys. This metal has very high resistance to corrosion processes. They have significantly higher reliability and efficiency indicators.
Also, in addition to materials, when choosing, a parameter such as heat rating is very important. There are cold and hot parts. What it is? This is a standard characteristic by which the time it takes for a part to reach glow ignition is judged. The higher the number, the less the element will heat up.