September 14, 2016 Lada.Online 131 495 7
The car jerks, there is no traction, vibration is felt, or the engine is rough; all these are symptoms of improper operation of the individual ignition coil (IIC). Other signs of a faulty ignition coil are the presence of errors 0301, 0302, 0303 and 0304, indicating misfire in one of the cylinders. Let's look at a few simple ways to check the ignition coil with your own hands.
It is worth noting that the process of checking IKZ on modern Lada cars (XRAY, Vesta, Largus, Granta, Kalina and Priora) does not have significant differences. All actions are performed in the same way.
Lada 2112 › Logbook › Inspection of ignition coils
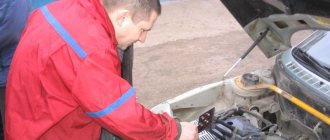
Due to the jerking that has been going on for two weeks now on
an engine warmed up below 70 C and the lack of effect from using the cleaning nozzle of Hi-Gear 3216 (I’m reaching the tank), I removed the ignition coils to search for a potentially faulty one in their camp using a simplified testing method learned from the Internet. The coils turned out to be of two types - the middle pair was made in Germany by Bosch (art. 0 221 504 461, from 01.2008 the article was replaced by 0 221 504 473), the outer ones were made domestically.
VAZ marking of coils depending on the manufacturer: 2112-3705010-10
— “BOSCH”, Germany;
2112-3705010-11 - NPP "ITELMA", Moscow; 2112-3705010-12 - JSC "SOATE", Stary Oskol; 2112-3705010-13
- PO "SEVER", Novosibirsk.
In the phenolic radiation of the body components of the Chinese multimeter DT9205A, work began vigorously. According to Internet recommendations, the switch of the device was switched to the 200 Ohm position and by closing the contacts against each other, the value of the device’s own resistance was obtained at the level of 0.8. The resistance of the primary winding, checked by closing the 1st and 3rd contacts of the coil, for domestic samples was 1.1-1.2, and for imported ones - 1.2, which marks complete parity of values at the level of 0.4, as the difference between the values obtained from the samples and the device’s own resistance. Order. But when checking the resistance of the secondary winding by turning the switch to 2 MOhm and closing the spring with the red probe and the middle contact with the black one, the effect of phenol vapor apparently weakened and all the coils, including the spare one (either working or not), kindly given by the previous owner of the car addition to the machine, the unit displayed on the multimeter screen did not move one iota. Naturally, the mind, altered by the smell of Chinese plastic, immediately decided to conduct a series of research experiments by checking the reaction with all other contacts and in reverse polarity, as well as with all other switch positions. The experiment did not bring any new data. The outlet was a summary of reviews from other users of the method, every second of whom had a similar result of checking the secondary winding and, accordingly, the verification method as a whole should be considered untenable and subjective...
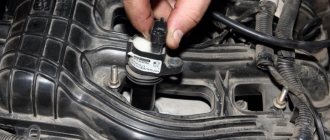
But in search of better conductivity with the probes, I removed the rubber bands from the Bosch coils and wiped the contacts and springs. To wipe, just in case, I used a can of Nano Protech composition that was lying around. Auto electric." It turned out that one of the reels had not only a torn rubber band, but also a spring that was broken in half, so I immediately replaced these parts by removing them from the above-mentioned spare reel. Domestic-made reels did not yield to this operation - either the elastic fits on them much more tightly, or it is not removable at all...
The next morning, having taken a leisurely sip in the method with a multimeter, having put the coils in place, I am glad to note that although the adjustments and rare omissions in engine operation did not disappear, noticeable jerks and dips during movement still disappeared! Apparently half the battle was in the spring. The second half of the battle may lie either in oil drops found in the wells, or in injectors that have failed, or in the same undiagnosed coils. The option with defective spark plugs looks untenable, since the last set was installed two weeks ago, just after jerking appeared and the associated shadow of mistrust fell on the old set.
The process of removing and installing the IKZ - replacing the ignition coils of a Lada Vesta car
Algorithm of actions:
- Remove the wire with the “–” sign from the battery and take the “TorX E8” or 8 key.
- remove engine protection;
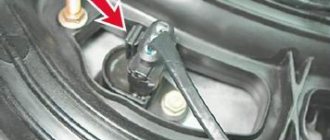
- by pressing the locking element, disconnect the inductor from the block;
- pull out the coil by unscrewing the fastening.
Installation is done like this:
- Using a two-millimeter roller, apply a special high-temperature lubricant to the inner surface of the tips.
- install the IKZ in the reverse order of removal.
Replacing a part, as you can see, is a simple process. Using these methods, you don’t have to go to a car repair shop, and if a breakdown occurs at a long distance from service centers, you’ll have to deal with it yourself. Having studied the methods of checking faults, you will be able to fix the breakdown yourself.
We hope this article will help you in such a situation.
About an individual ignition coil
In modern cars, individual ignition coils (ICO) are used to supply a spark to the cylinder. Older cars use ignition modules, meaning one module is entirely responsible for firing all cylinders. An individual ignition coil is responsible only for the operation of one cylinder in which it is installed.
IKZ began to be installed on VAZ cars, starting with the Lada Priora car on the 126th engine. An ignition module is still installed on 8-valve VAZ engines. The car's on-board network uses low-voltage voltage, which is not capable of itself forming a powerful spark necessary for engine operation. Therefore, ignition coils are used to supply high voltage voltage.
Ignition coils in the electronic circuit of Lada Priora
The ignition system on Priora differs from the usual traditional scheme of carburetor models. On old cars there was one ignition coil, and the direct distribution of impulses to the spark plugs was carried out by a distributor, which still needed to be configured correctly. On injection models of cars with electronic fuel injection, each cylinder has its own individual ignition coil, which sends an impulse to its spark plug for its cylinder.
The entire process is controlled by the ECU, an electronic on-board device, from which the signal goes directly to the short circuit. In order to correctly manage the injection process and timely send a signal to an electrical impulse, the ECU uses data from the following sensors:
- DPK - taking into account the position of the engine crankshaft, it supplies an impulse to the ECU;
- phase sensor - it signals the position of the camshaft, professionals call it a synchronization sensor;
- tachometer - from it a signal is sent to the ECU at what frequency the crankshaft rotates;
- Mass air flow sensor - by measuring air flow through the air filter, it determines the load on the engine at a given time;
- DTOZH - determines the engine temperature;
- DT is a knock sensor, its readings affect the ignition timing.
Under standard conditions, according to the ECU signal, the cylinders operate in the following cycle - 1 - 3 - 4 - 2. That is, the impulse for the spark arrives in those cylinders in which the compression cycle ends, before the valve opens, fuel is injected and a discharge occurs, detonation occurs and the cycle continues .
The ignition coil in the general ignition system plays the role of a low-voltage voltage converter from the on-board power supply systems, battery or generator, to high voltage. Specifically on the Priora, based on a signal from the ECU, it generates a high-voltage electrical pulse on the spark plug.
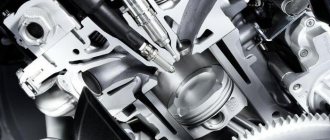
Ignition coil on PrioraStructurally, an individual ignition coil differs from a common short circuit:
- The primary winding, through which direct current flows, is located inside the secondary winding.
- There is an inner core inside the primary winding and an outer core around the secondary winding.
- High voltage, up to 40 kW, which is generated in the secondary winding, is transmitted to the spark plug not through high-voltage wires, as on carburetor cars, but through a tip, which consists of a high-voltage rod, a spring and a sheath that has insulating properties. In addition, there is a diode to quickly cut off a high-voltage pulse.
Individual ignition coils do not have any single, unified marking. Each manufacturer has its own designation system for electronic parts. Therefore, we must proceed from which short circuits are in greatest demand among Priora owners.
One of the most popular brands is BOSCH. These ignition coils are marked - 0 221 504 473 (also found 0 221 504 461). It is believed that such reels should cover 100 thousand kilometers without failure, although in fact this is not always the case.
Very often this happens due to the large number of counterfeit spare parts on the automotive market. Just ask how much an ignition coil costs for a Priora. The price of 1,150 rubles is not the highest, and they are sold in large wholesale for 850 rubles apiece. Of course, this is a tasty morsel for garage workshop dealers.
Interesting in this sense is the experience shared by one of the specialists who specifically studied this sensitive issue. He tells how the original IKZ differs from the fake one. He had a Priora and gave us examples of how to check the ignition coil:
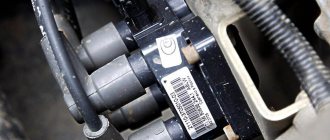
- Under the casing there is a plastic housing.
- There is a “lightning” sign, as a designation of high voltage, near the mounting axle box.
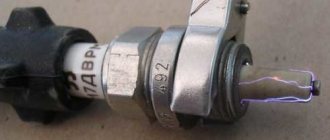
- The surface of the plug is perfectly processed, the font on it is clear, it is applied using a laser, so minor melting is visible.
- The plant number is circled in an oval.
- The contact spring has tight coils made by the factory machine.
- The body is made of metal.
- The lightning bolt sign is missing.
- The surface of the plug is roughly processed, the inscriptions are stamped, the rubber tip lacks the date of manufacture, product number and Bosch brand name.
IKZ device
The Priora coil consists of a primary and secondary winding, between which a core is placed. To contact the spark plug, a spring is used, which is placed in a rubber tip. The IKZ also has a metal screen that protects the coil from high temperatures, because IKZ is installed in the well of the cylinder head, then the temperature conditions there are simply enormous.
The primary winding is wound from thin copper wire with a number of turns of 10,000-15,000.
The secondary winding of the coil consists of 100-150 turns of thick copper wire.
The connection between the coils is electromagnetic.
Methods for diagnosing device performance
The simplest method that will help determine the performance of the coil is to replace it with a similar working device. This is possible if there is somewhere to get it. Please note that the module must match the parameters of the device under test. If the engine with a working coil works as before the breakdown, the ignition module is definitely faulty.
The main testing method involves using a multimeter. It consists in determining the resistance of the secondary windings of the coils built into the ignition module. The method is simple and does not require additional skills.
The device does not need to be removed for testing. The check is done with the engine turned off.
This is how you check the resistance of the secondary winding with a multimeter
- High-voltage wires are removed from the module sockets.
- The tester switch is set to the 20 kOhm position.
- The multimeter rods are placed in turn in the recesses of the corresponding contact pairs (1 and 4, 2 and 3).
- With an intact secondary winding, the performance in both cases is the same. Normally, the resistance should be about 5.4 kOhm (in some models the indicators differ, which needs to be clarified). If the resistance is much greater, then there is a winding break. The resistance is much lower - a breakdown. The coil is faulty and cannot be repaired.
Source
Symptoms of a bad coil
There are many symptoms of coil failure and sometimes it is very difficult to determine that the coil is to blame. If such symptoms appear in your car, then you should pay attention to the ICD.
Signs of coil failure:
- One of the cylinders does not work;
- The car does not develop power;
- Jerking when pressing the gas pedal sharply;
- The engine shakes at idle;
- Increased vibration at idle;
- Floating speed;
It should also be noted that if the ignition coil is faulty, misfires will appear in the cylinders, as a result of which the ECU will turn off the operation of the faulty cylinder and signal this by turning on the “Cheek Engine” lamp. When “Cheek Engine” appears on the car, it is necessary to diagnose the system. If there are misfires, the ECU will display errors 0301, 0302, 0303, 0304. Where the last digits of the codes are the cylinder number.
It is not recommended to operate a car with a faulty ignition coil; this can lead to failure of the catalyst.
Possible malfunctions: signs and causes
Signs of a short circuit failure:
- when the driver presses the gas pedal, dips are felt;
- the power of the power unit decreases;
- the engine began to operate unstably at idle;
- the motor is shaking.
The main reasons why this can happen:
- Poor power supply in the car's electrical system. For normal operation of electrical components, a voltage in the on-board network of 11.5 volts is required. If the ignition wire is damaged or the battery performance is low, this may cause poor power supply. Accordingly, it will take more time to charge the short circuit.
- Mechanical damage to the device, for example, damage to the insulation. This problem may be caused by engine fluid entering the device through defective seals.
- Poor contact. Damage to the device, as well as constant exposure to moisture, can lead to failure of the primary and secondary windings, which in turn will contribute to the appearance of transition resistance. Such a malfunction can occur as a result of breakdowns in the washer system, washing the power unit, as well as heavy rain. Also, the structure of the device can be negatively affected by the salt that is sprinkled on roads in icy conditions.
- Thermal problems. Individual short circuits are more susceptible to high heat generation than others, which can also negatively affect the service life of the device.
- Working in vibration conditions. Due to high vibrations in engine operation, damage to the short-circuit structure may occur (video author - Resta channel).
Checking the ignition coil
There are two reliable ways to check IKZ: visual inspection and checking with a multimeter.
It should be noted that the IKZ check is similar for all Lada cars with a 16-valve engine, i.e. the check on cars such as LADA Vesta and X-ray will be the same.
In order to check the ignition coil, it must be removed from the car.
Removing IKZ:
- Disconnect the negative terminal from the battery.
- Remove the decorative plastic trim.
- We unscrew the coil we need with a “10” or Torx E8 head.
- Remove the coil plug and remove it.
Visual inspection
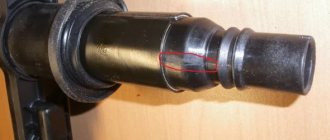
After the coil is removed, it must be carefully inspected. The rubber tip should not have tears or cracks. The plastic part must not be melted or cracked. The contact spring must be in the correct shape without oxidation or rust.
Cracks in the coils or tears in the rubber cap will direct the spark to the engine body, therefore, no current will be supplied to the spark plug, which will lead to misfires.
If such visual faults are detected, the coil must be replaced.
Checking with a multimeter
Testing with a multimeter is divided into two stages. Checking the resistance of the IKZ itself and checking the control voltage of the IKZ (checking the voltage on the IKZ power supply block).
Let's start by checking the voltage at the IKZ power supply.
To do this, set the switch on the multimiter to constant voltage.
Turn on the car ignition
On the block in connector number 3 we take a measurement (we connect one multimeter probe to the motor body and the other to pin number 3) the voltage should be at least 12 volts. If the voltage is less, this means that the battery is discharged or the ECU controller is faulty.
Checking the IKZ resistance
In order to check the resistance of the IKZ, you need to use a multimeter. It should be noted that resistance measurements must be carried out on a cold engine, because The resistance of the coil windings strongly depends on its temperature.
To check the resistance, it is necessary to check two windings, the secondary and the primary.
Checking the primary winding of the IKZ
When checking the primary winding of the IKZ, it is necessary to set the resistance readings on the multimeter, namely 200 Ohms. Since the resistance readings on the primary winding are not large, and the error of the device is possible, you first need to find out the error of the multimeter. In order to find out the error, you need to close the probes together, the value that will be reflected on the multimeter screen will be the error.
Next, we connect the multimeter probes to contacts 1 and 3 (the outermost contacts of the IKZ) and obtain resistance readings. From these readings we subtract the multimeter error and get the true value of the resistance of the primary winding.
Ideally, the resistance of the primary winding should be about 1 Ohm, or better yet 0.
In this example, the reading is 1.1 Ohm without taking into account the error; from 1.1 Ohm we subtract 0.7 Ohm to get 0.4 Ohm. Verdict: the primary winding of this IKZ is in working condition.
Checking the secondary winding of the IKZ
In order to check the secondary winding of the IKZ, set the multimeter to 2000 kOhm.
We connect the red multimeter probe to the spring, and the black one to the middle contact on the IKZ (pin 2). We look at the readings of the device; on a working coil, the resistance of the secondary winding should be in the range of 300-400 kOhm.
As we see, the readings of the secondary winding are also within the normal range. It follows that this IKZ is working.
If the readings are too high, you can try removing the rubber cap and spring from the coil and cleaning the contact patch, then measure the resistance directly again without the spring. If the resistance reading still does not decrease, you should think about replacing the ICP.
The easiest method to detect a faulty ignition coil, without any devices or instruments. This is a reversal of the IKZ.
Symptoms of module malfunction
Signs of a faulty ignition module on a VAZ-2110 are always acutely felt:
- hesitant engine starting or failure to start;
- failures during sudden changes in speed;
- high fuel consumption;
- two cylinders do not work, the engine is feverish;
- lack of dynamics;
- a sharp drop in power;
- drop in power and thrust after warming up.
Other faults
We unscrew and look at the spark plugs. Checking the high voltage wires.
These symptoms may not only be caused by the ignition module. To determine the malfunction, it is enough to spend a few minutes diagnosing spark plugs, high-voltage wires and caps. This will eliminate the remaining elements of the ignition system and make sure that it is the ignition module that is faulty.
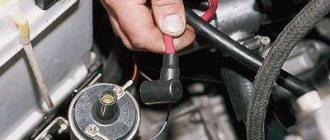
- Checking the spark plugs . To do this, unscrew them, put on the caps, place them on the cylinder head and crank the engine with the starter. The spark should be stable on all spark plugs. We replace non-working spark plugs and repeat the test. Under no circumstances should you crank the engine with the starter with the high-voltage wires removed. This will lead to a breakdown in the ignition module cover.
- Checking the high voltage wires . We remove the caps and hold the wire contact through the insulator at a distance of 10-15 mm from the head . With good wires, the spark should pierce this distance vigorously and confidently. Next we check the wires for resistance. A working wire should have a nominal resistance of 7-10 kOhm. Any deviation from this value indicates the need to replace the entire set of high-voltage wires.
- We check the caps for breakdown .
We also look at the block and especially the wires included in it.
If all these elements are in good condition, the ignition module must be checked.
In addition, it is better to check the spark plugs and wires on a warm engine, since a half-dead ignition module can operate cold for some time and fail when heated. You also need to be sure that all sensors are working properly. This can be indicated by an error code or Check Engine light.
Algorithm for checking the ignition module on a VAZ-2110
We begin the test with the block connected to the module.
To check the module, we only need a multimeter and it will take 15-20 . This is quite simple to do, the main thing is to adhere to the algorithm and know the nominal values of the working module:
- We check the power supply and the presence of pulses supplied from the ECU . We check the power between the central terminal (15) of the wire block connected to the module and the engine ground. When the ignition is on, the voltage should not be less than 12 V. Otherwise, either the battery is dead or the ECU does not work.
- We check the pulses from the ECU on the wiring block . We install one tester probe on connector 15, the second on the far right, then on the far left. The assistant cranks the engine with the starter, and at this time we record short-term voltage surges with a tester. If there are no impulses from the ECU, it is he who is to blame.
- We check the resistance on the secondary windings of the coils . We put the tester in resistance measurement mode and measure it at the high-voltage terminals of the module cover. Between pins 1 and 4 and pins 2-3, the resistance should be 5.4 kOhm. Otherwise, the module must be replaced.
- We check the resistance of the primary windings between contacts 15 and the rightmost, then the leftmost terminals. Nominal - 0.5 Ohm . Deviation is not allowed.
- Check the module for a short circuit . In ohmmeter mode, install one multimeter probe on the central terminal, the second on the metal body. There shouldn't be any resistance. If the device detects at least some resistance (other than unity or infinity), the module must be replaced.
How to check the ignition coil on a VAZ-2112 16 valves with your own hands
The ignition coil, which is located in the car, essentially converts the low voltage from the battery and generator into high voltage, to supply it individually to each spark plug. Roughly speaking, this is a miniature electrical transformer, the moment of failure of which is almost impossible to predict and repairs and diagnostics have to be carried out on the failed device. Below in our article we will tell you in detail how to check the ignition coil for a VAZ-2112 with your own hands.
The video describes in great detail the algorithm for checking the ignition coil on a VAZ-2112:
Cost and article
The table below shows the cost of the VAZ 2110 ignition module depending on the manufacturer and VAZ engine size.
- Checking the ignition module with a multimeter
| Engine volume | Manufacturer | vendor code | Price, (rubles) | |
| 1,6 | 8 | JSC SOATE | 2111-3705010-03 | 905 |
| 1,5 | 8 | BOSCH | F000ZS0211 | 2600 |
| 1,5 | 16 | StarVolt | 2112-3705010 | 1600 |
| 1,5 | 16 | Omega | 2112-3705010 | 1590 |
Ignition coil device
It is known that on 8-valve engines an ignition module was used (module repair, diagnostics) with two channels and coils that are capable of transmitting a spark to a pair of spark plugs at once. However, on a 16-valve engine, the coils became individual for each spark plug.
Prices and articles
The ignition coil from the Russian manufacturer SOATE for the VAZ-2112 has article number 2112-3705010-12 and costs around 1,000 rubles . Analogs from Bosch can cost twice as much, but the quality of these parts is much higher. In any case, the choice is always yours.
Ignition coil from Bosch.
Device
The ignition module has a common structure regardless of engine size. Inside the switch there are two high-voltage coils and an electronic circuit with many keys.
The coils are designed to switch high voltage and supply it to the spark plug to form a reliable spark in the combustion chamber of the engine.
The ignition module produces a spark in pairs, that is, each of the coils located inside the module is responsible for generating a spark on two cylinders: the first-fourth, the second-third.
- VAZ 2110 ignition module - check, replacement and repair
The process of checking all ignition coils on a VAZ-2112
The VAZ-2112 engine with 16 valves uses individual Bosch ignition coils and in order to check them, the following procedure must be followed:
- First of all, we remove each coil from its landing well.
The order of dismantling does not matter.
If it is damaged, replace it
Let's look at its correct location
Despite the fact that many people on the Internet talk about the impossibility of checking a coil with their own hands, it is possible to check it only by knowing their initial values, which are measured in ohms .
- In order not to make false measurements, first of all we check the internal resistance of the wires and the multimeter itself . To do this, switch the device to the OM position and connect the probes to each other. What value the multimeter gives is its internal resistance. The value can range from 0.0 to 0.3 ohm.
On the multimeter, a value of 00.3 Ohm is normal.
The value of 00.8 ohms is subtracted from the resistance of the multimeter and we get 00.5, which is the norm.
When the readings on the primary winding on all coils are correct and show their values, we proceed to checking the secondary winding.
- To do this, set the switch to 2000 kOhm mode.
- Next, we place the multimeter probe on the coil, observing the polarity, black to pin 2, which is located exactly in the middle of the connector, and the red probe to the spring, inside the rubber plug.
- Three-digit values will mean the coil is working properly, and infinity values will indicate its failure.
Such designations indicate the serviceability of the ignition coil.
The number “1” stands for infinity and indicates a faulty ignition coil.
Checking module power
Before testing the performance of the coils, you should make sure that a possible breakdown is not caused by a loss of power to the device. First, you need to try to simply restore contact by moving it several times or disconnecting/connecting the block of wires included in the connector. If such manipulation does not lead to improved engine performance, a tester (multimeter) is used to determine the quality of incoming pulses.
The block of wires is removed from the connector. On the block, each terminal (A, B, C, D) has a corresponding socket. Testing with the engine running is done as follows.
- The first contact of the tester is in socket D, the second is to ground. The multimeter switch position is 20 volts. If there is power, the tester shows 12 volts.
- The first contact is in socket C, the second is ground. Switch on ohmmeter (20 Ohm). Normally it shows less than 1 ohm, that is, the mass is normal.
- The first contact is in socket B, the second is ground. 20 volt switch. The norm is not less than 0.3 volts. If this is so, it means that a normal pulse is coming from the Hall sensor to position B.
- Contact A is checked similarly to the previous one.
Ways to independently check the ignition module
Some gasoline engines that are installed on modern domestic and imported cars are equipped with ignition modules, which are a pulsed high-voltage current source. There are situations when these devices fail, leading to a complete or partial loss of performance of the car engine. Ways to check for a malfunction in the ignition module in a garage are covered in this article.
Design and principle of operation of the ignition module
Some old-school motorists call the modules double-spark coils, which makes sense. After all, the coil is the predecessor of the ignition module in the technical evolutionary chain. The module is a paired design consisting of two pairs of windings (primary and secondary) and a switch that alternately switches low-voltage current from one coil to another. In some models of double-spark coils, the commutator is structurally located outside the block.
The operation of the module is controlled from an electronic unit that collects and analyzes information from various working components of the engine. The block, unlike the classic coil, has 4 sockets for connecting high voltage wires going to the spark plugs. The pulse occurs in pairs, first at terminals 1 and 4, then 2 and 3. That is, each of the built-in coils is responsible for the operation of two cylinders. A spark occurs simultaneously, as a pair.
At the input, the ignition module has a connector with four terminals. Usually most models have markings opposite them. Pulses from the Hall sensor alternately arrive at contacts A and B, serving as a signal to switch the commutator from one primary winding to another. C and D – ground and power supply (12 V), respectively.
Design of the ignition module of a 16-valve engine on a VAZ-2110
Despite the similarity in engine design, the ignition system of the 1.5-liter injection 16-valve engine differs from the 1.6 16-valve engine. The 1.6 liter engine uses an electronic contactless ignition system with individual coils on each spark plug. Therefore, there was no need for an ignition module. Such a system is more reliable and cheaper to operate, since if one coil fails, there is no need to replace the entire module.
This is the coil that sits on each spark plug of a 1.6 liter engine.
Features and articles
The 16-valve 1.5-liter VAZ 2112 injection engine used the same non-contact ignition system as the eight-valve engine, but a different ignition module was installed.
Its catalog number is 2112-3705010 , and they sell it for 2000-3000 rubles , depending on the manufacturer. The design of the module remains the same - two ignition coils (for cylinders 1-4 and 2-3) plus switch keys in a single block. The spark is supplied to the cylinders in pairs using the idle spark method. This means that sparking occurs in two cylinders simultaneously - in one on the compression stroke (working spark), in the second on the exhaust stroke (idle spark).
Ignition module for 16-valve 1.5 liter engine.
Typical module failures
If you have at least a little knowledge of electronics, as well as a multimeter, you can independently diagnose and identify the problem. Checking the VAZ-2110 ignition module will take a little time, but will save you from purchasing an expensive unit
Please note that sometimes races appear that disappear over time
Errors will remain in the microcontroller, so they can be read using special testers. But as practice shows, at a time when the faults do not manifest themselves, the tester cannot recognize error codes that were previously present but then disappeared. Very often, the cause of failures is dirt on the contacts, poor fastening of the case, lack of mass, and the presence of electrical interference.