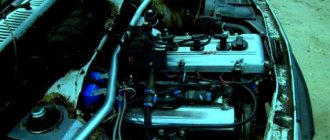
The ignition coil on a VAZ 2107 car is used to convert a low voltage current of 12V into a high voltage current of 11-20kV, which is necessary to break down the air gap between the electrodes of the spark plug and form a spark that ignites the working mixture. On a VAZ 2107 car with a contact ignition system, an ignition coil of type B-117 A is used. The ignition coil is installed in the engine compartment of a VAZ 2107 car and is secured with nuts on two studs to the left mudguard. The ignition coil is a transformer with a magnetic core, consisting of a core and an outer magnetic circuit, and two windings - primary and secondary. The ignition coil core is made of electrical steel plates and is located in a frame on which the secondary winding is wound. The primary winding is wound through the insulator on top of the secondary winding. The outer magnetic circuit consists of a rolled strip of electrical steel. The ignition coil housing is made of steel, the ignition coil housing has a cylindrical shape. On top, the ignition coil housing is hermetically sealed with a cover made of insulating material. To improve cooling and insulation, transformer oil is poured into the ignition coil housing. The ignition coil cover has a high-voltage and two low-voltage terminals. The high-voltage output is connected to the secondary winding and, through a contact bolt and spring, to the core. The end of the primary winding is connected to one low-voltage terminal of the ignition coil, connected by a wire to the contact group of the ignition distributor. Voltage from the ignition switch is supplied to the “+B” terminal of the ignition coil.
On a VAZ 2107 car with a contactless ignition system, ignition coils of type 27.3705 (with an open magnetic circuit, oil-filled) or type 3122.3705 (with a closed magnetic circuit, dry) are used.
Checking the ignition coil of a VAZ 2107 car
To perform work on checking the ignition coil on a VAZ 2107 car, you will need a multimeter.
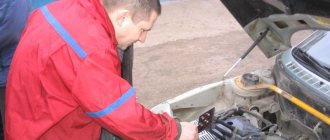
For clarity, we carry out the test on a removed ignition coil.
1. Disconnect the wires from the ignition coil terminals (see “Removing the ignition coil”).
2. Clean the ignition coil from dirt and rinse it with white spirit or kerosene.
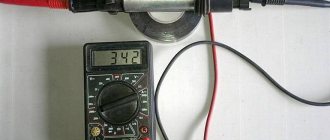
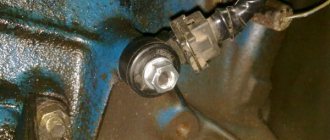
3. Connect the ohmmeter probes to the terminals of the primary winding of the ignition coil and measure the resistance. The resistance of the primary winding of the B-117 A ignition coil at a temperature of 20″C should be 3-3.5 Ohms (for an ignition coil type 27.3705 - 0.45-0.5 Ohms).
4. Having connected the ohmmeter probes to the high-voltage and the “+B” terminal of the ignition coil, we measure the resistance of the secondary winding. The resistance of the secondary winding of the B-117 A ignition coil at a temperature of 20″C should be 7.4-9.2 kOhm (for a coil type 27.3705 - 5-0.5 kOhm).
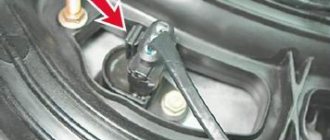
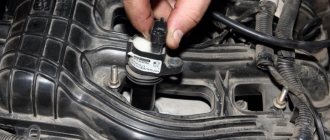
Removing the ignition coil from a VAZ 2107 car
2. On a VAZ 2107 car, disconnect the wire from the negative terminal of the battery (see “Battery for a VAZ 2107 car - removal and installation”).
3. Disconnect the wire from the high-voltage terminal of the ignition coil.
4. Using an 8 mm wrench, unscrew the nuts on the ignition coil terminals and disconnect the wires. A red-blue wire is connected to the “+B” terminal of the ignition coil.
5. Using a 10 mm socket wrench, loosen, without unscrewing completely, the two nuts securing the ignition coil to the mudguard studs.
6. Sliding the ignition coil, remove the coil from the studs.
Installing an ignition coil on a VAZ 2107 car
Installing the ignition coil on a VAZ 2107 car is performed in the reverse order. In this case, the tip of the “mass” wire is installed between the ignition coil eye and the washer.
Diagnostics and replacement of the ignition coil
The type of coil used on the VAZ2107 is B-117A, it was specially designed for classic cars with a contact ignition system. This device consists of the following parts:
- core;
- external magnetic circuit;
- primary and secondary winding.
The core is a set of plates made of steel of special electrical grades. This part is the basis for coils isolated from each other. The coil has a metal body filled with transformer oil. The cover, made of dielectric, has two contacts for powering the primary coil and one terminal for the high-voltage wire.
Design and principle of operation of the ignition module
Some old-school motorists call the modules double-spark coils, which makes sense. After all, the coil is the predecessor of the ignition module in the technical evolutionary chain. The module is a paired design consisting of two pairs of windings (primary and secondary) and a switch that alternately switches low-voltage current from one coil to another. In some models of double-spark coils, the commutator is structurally located outside the block.
The operation of the module is controlled from an electronic unit that collects and analyzes information from various working components of the engine. The block, unlike the classic coil, has 4 sockets for connecting high voltage wires going to the spark plugs. The pulse occurs in pairs, first at terminals 1 and 4, then 2 and 3. That is, each of the built-in coils is responsible for the operation of two cylinders. A spark occurs simultaneously, as a pair.
At the input, the ignition module has a connector with four terminals. Usually most models have markings opposite them. Pulses from the Hall sensor alternately arrive at contacts A and B, serving as a signal to switch the commutator from one primary winding to another. C and D – ground and power supply (12 V), respectively.
Possible causes of failure
The weak point of the ignition coils and modules is the secondary winding, which generates a high voltage pulse. A coil break or breakdown may occur in it. The following factors lead to this phenomenon:
- use of low-quality or unsuitable candles;
- operation with non-functioning high voltage wires;
- frequent attempts to check the spark.
The high-voltage pulse arising in the secondary winding must be realized (spent). If this does not happen (if the integrity of a high voltage wire is broken, for example), a high-energy electrical pulse seeks an outlet. He will find it, with a high degree of probability, in the thin secondary winding.
Often, a module malfunction occurs when the integrity of poor-quality factory soldering of wires going to the switch elements is violated. This happens from vibration. Also, the cause of non-working coils can be a banal contact failure in the incoming connector. Another factor leading to a malfunction of the ignition unit is often moisture that gets on the device during washing or driving in unusual conditions.
Symptoms of a problem
It is extremely rare for two built-in coils to fail at once, so it is more likely to be possible to start the engine with a faulty unit. However, even an inexperienced driver will immediately suspect something is wrong. The malfunction will appear as follows:
- unstable (floating) idle speed;
- the engine has difficulty picking up speed;
- characteristic sound of the engine (triple);
- jerking when accelerating (while moving).
Operating a car with such a breakdown is possible (you can drive to a garage or car service station), but it is not advisable unless absolutely necessary.
Similar signs of unstable engine operation are possible with a number of other ignition or fuel supply faults. To differentiate possible breakdowns, the performance of the ignition unit should be determined. It would be useful to check the contacts of the wires coming to the device, as well as their integrity.
Checking module power
Before testing the performance of the coils, you should make sure that a possible breakdown is not caused by a loss of power to the device. First, you need to try to simply restore contact by moving it several times or disconnecting/connecting the block of wires included in the connector. If such manipulation does not lead to improved engine performance, a tester (multimeter) is used to determine the quality of incoming pulses.
The block of wires is removed from the connector. On the block, each terminal (A, B, C, D) has a corresponding socket. Testing with the engine running is done as follows.
- The first contact of the tester is in socket D, the second is to ground. The multimeter switch position is 20 volts. If there is power, the tester shows 12 volts. The first contact is in socket C, the second is ground. Switch on ohmmeter (20 Ohm). IN
- normally shows less than 1 ohm, that is, the mass is normal.
- The first contact is in socket B, the second is ground. 20 volt switch. The norm is not less than 0.3 volts. If this is so, it means that a normal pulse is coming from the Hall sensor to position B.
- Contact A is checked similarly to the previous one.
Procedure for checking ignition system devices
The main reason for the failure of this device is a wire break in the primary or secondary winding. This ignition system device is checked using a multimeter set to resistance measurement mode. The operation can be performed either directly on the car or after it has been dismantled.
Open the hood of the VAZ2107 car and disconnect the battery. The coil installed on the mudguard in the engine compartment is disconnected from the on-board network and cleaned of contaminants. At the first stage, we check the resistance in the primary winding; its value should be in the range from 3.0 to 3.5 Ohms. We perform the same operation for the secondary winding, acceptable values are from 7.4 to 9.2 kOhm.
Methods for checking a module
If there is no spark in the ignition system, the driver can perform initial diagnostics of the module with his own hands:
Checking the ignition module.
- Place the car on the site or in the garage, turn off the engine.
- Open the hood of the car, and then remove the air filter housing with pipes.
- Unfasten the electrical wiring connector from the module.
- Turn on the ignition, and then connect the probes of the multimeter (switched to the voltage measurement mode in the range from 0 to 20 V) to the engine crankcase (minus) and the middle contact in the plug. On a working node, the parameter will be equal to 12 V; if there is no voltage or a reduced value, further diagnostics must be carried out.
- Turn off the ignition and then remove the high-voltage wires.
- Turn on the resistance measurement mode in the test equipment with a maximum value of 20 kOhm.
- Connect the probes to the outermost terminals in the connector. If the device shows infinite resistance, then there is an open circuit. In this case, the block needs to be changed.
- Check the resistance between the terminals on cylinders 1-4 and 2-3 (there are numbers on the block body that allow you to determine the purpose of the outputs). The module is considered serviceable with a resistance of 5-6 kOhm. If infinite resistance is indicated, the unit must be replaced.
Replacing the device
If the indicators do not correspond to the above values, the ignition coil is considered faulty. Such a device must be replaced with a working one, which can be purchased at almost any spare parts store. When purchasing the device, you must inspect it and check the availability of documents: technical passport and certificate.
Removing the ignition coil on a VAZ2107 car is carried out with the battery disconnected. Use a wrench to unscrew the nuts on the contact and mounting studs. The faulty device is removed. A spare part is installed in its place and secured and connected. Now you can connect the battery and start the engine.
How to carry out repairs
If a breakdown is detected, the damaged coil must be removed. To complete the work you will need a set of wrenches.
After installing the new module, engine operation is checked; additional ignition settings are not required.
Removing the module
To remove a faulty unit, you will need:
- Disconnect the battery from the on-board network and remove the air filter housing.
- Disconnect the high-voltage cables and wiring harness.
- Remove the 3 nuts that hold the assembly to the mounting pad.
How to check the ignition coil of a VAZ 2106
How to check the ignition coil of a VAZ
2107 - 2101
carburetor coil in a car is not the least important ignition detail due to which the car may not work. To check the coil we will consider two options and with these two options everyone will find a convenient option for themselves. The first option will be considered how to check the coil on a VAZ with a multimeter the second option, as I said, will be simpler, but the efficiency is 70%: how to check the ignition of a VAZ 2107 - 2106 carburetor we will consider without a multimeter; the second option is probably the simplest, we will check it directly on the car, so let’s get started.
This is interesting: How to correctly respond to an inspector who demands to show documents
Causes of malfunctions
There are several reasons why the ignition coil completely or partially fails. Among them:
- Mechanical damage . This may be simple aging, due to which the insulation is destroyed. There is also the possibility of oil leaking through the seals, which gets onto the insulation or coil body and destroys them. Repair in this case is hardly possible, so the best option would be to completely replace the unit.
- Damage to the contact connection . In warm weather, this may be caused by moisture getting into the engine compartment. For example, during heavy rain, driving through deep puddles, washing a car. In winter, it is likely that the reel will get hit with the composition that is sprinkled on the road surface to combat ice.
- Overheating . Individual coils are often susceptible to it. Overheating can significantly reduce the life of the ignition coils. The overheating process is difficult to control, but try to use high-quality coolant and ensure that the engine cooling system is working properly.
- Vibrations . They are especially harmful to individual ignition coils. Vibrations usually come from the cylinder head (cylinder head). To reduce the number and amplitude of vibrations, make sure that the engine is operating in normal mode (without detonation and with working mounts).
Ignition coils are quite reliable and durable components, and their failure is most often associated with aging and/or insulation breakdown. Next, we will consider methods for diagnosing coils.
How to check the ignition of a VAZ 2106 with a multimeter
In order to check the coil with a multimeter, we need the multimeter itself and, of course, the ignition coil itself. take a multimeter and set it to 200-ohm, then check the terminals (B - K), the resistance should be at least in the range of 04.0-ohm, the resistance range is from 03.8 to 04.5-ohm, this is the norm; there’s clearly something wrong with the coil; now we need to check the high-voltage part; we set it measurement mode 20-klom 1 any probe on mark B or K another on the high-voltage contact resistance 7.6 klom 7 to 8 klom this is the norm This means your coil is intact, but also do not forget that there may be an internal breakdown of the coil, that is, a breakdown of the insulation between the high-voltage and low-voltage winding and also the interturn one, and you also need to check the case, that is, also at 20 kL, we leave the relative mass for each contact, we check because we came across coils, so we check everything is fine on the case, it breaks through, and if there are no short circuits between the winding and interturn circuits, then it will function.
How to check the ignition coil of a VAZ 2107 - 2106 carburetor
The second option is simpler: we pull out the high-voltage wire from the distributor that leads to the ignition coil, bring it to ground without touching about 0.5-0.9 millimeters and turn it with the starter, the spark should be saturated with a blue-yellowish tint and loud, if this is not the case, you can safely change your voltage loss (Make sure that the battery not discharged! How to check the VAZ generator ) also if there is a second ignition coil, you can simply throw wires on it and check to start the engine and see how it works or, as mentioned earlier, for a spark by weight how to install the ignition on a VAZ 2106 .
A little theory.
On the “seven”, as a rule, contact ignition systems of the B-117 A type are used. The coil itself is located in the engine compartment and is attached to the left mudguard with two studs. Also found on the VAZ 2107 are non-contact ignition systems (BSZ), in this case, coils of type 27.3705 are used, oil-filled with an open magnetic circuit, as well as type 3122.3705 dry coils with a closed magnetic circuit.
Signs of a faulty ignition coil
If, after turning the key in the ignition switch, you hear that the starter is turning, but the engine does not start, then, as a rule, this may mean that the ignition coil is not working correctly or has failed. Although there are many reasons why the engine does not start when you try to start it: spark plugs, explosive wires, problems in the fuel system (pump, fuel filter, clogged line), and so on.
But if, after all, the reason is in the ignition coil, then this can be understood by the following symptoms:
- There is no spark at the spark plugs;
- There is no current on the BB wires;
- Visual defects (cracks and chips on the reel body);
- A burning smell under the hood, which leaves traces of melting of the ignition coil (the primary or secondary winding has burned out).
How to check the ignition coil of a VAZ 2107?
Checking the ignition on a VAZ 2107 is performed using a multimeter or ohmmeter.
- It is necessary to disconnect the wires from the ignition coil terminals.
- And connect the multimeter electrodes to the terminals of the primary winding of the ignition coil.
- Check resistance. The resistance of the primary winding on a coil of type B-117 A, at a temperature of 20°C should be approximately 3-3.5 Ohms, for a coil of type 27.3705 - 0.45-0.5 Ohms.
- Connect a multimeter to the high-voltage terminal “+B” to measure the resistance on the secondary winding. The resistance of the secondary winding on a coil of type B-117 A at a temperature of 20°C should be 7.4-9.2 kOhm, for another type of coil - 27.3705 (normal resistance is considered to be 5-0.5 kOhm).
In this video you will learn in more detail how to check the ignition coil
Three diagnostic methods
Next, consider three proven methods for checking the ignition coil.
Visual testing method
The strength of the visual testing method (known as the “spark test”) is its ease of implementation. It does not require any equipment and can be performed even on the road. The main disadvantages are reasonably considered to be low accuracy, high labor intensity, and the risk of electric shock.
This method will require a working spark plug and pliers, and you may need a socket wrench.
It is advisable to start work no earlier than a quarter of an hour after turning off the engine, so that it has time to cool down.
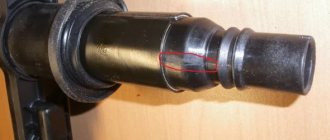
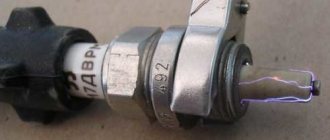
First, the wire of the first spark plug is removed and the control spark plug is connected to it. Holding the spark plug by the insulator with pliers, we touch the threaded part of the skirt to the uninsulated metal section of the engine housing. When the engine is running and the coil is working properly, an intense purple spark jumps between the electrode and the housing. To minimize risks, you can not start the engine, but turn on the starter for a couple of seconds.
The conclusion that the coil is faulty is made if the spark is weak or has a pronounced yellowish tint. The absence of a spark indicates a coil failure or a complete lack of contact.
If the engine has several coils, the control procedure is performed for each of them.
If there is no spare working spark plug, a spark plug that is unscrewed from one of the engine cylinders is used as a visual indicator.
A voltage of several kilovolts is applied to the spark plugs. Taking this feature into account, when using the visual inspection method in any form of its implementation, be careful and do not touch unprotected parts of your body to uninsulated parts of the on-board electrical wiring.
Second
This method of identifying problems is similar to the “scientific poking” method. This test of the ignition coil involves disconnecting the terminals one by one while the engine is running. Although this method may seem barbaric to many, it helps to quickly identify a faulty coil.
By disconnecting the wire from the coil, the discharge will stop flowing into the fuel combustion chamber and engine operation in this cylinder will be disrupted. A failure can be easily determined by the sound and rhythm of the motor. If there is no change in engine operation when the next coil is turned off, this is a faulty part.
The third is the scientific way
To check the ignition coil, you will need a multimeter. Remove all coils and check the resistance using a tester. The resistance value is affected by corrosion on the contacts, so before checking, clean the elements from dirt, oil residues and other formations that interfere with accurately determining the characteristics of the element.
To measure the resistance on the primary winding, the probes of the device must be installed on both contacts. In this case, the multimeter must be set to 20 ohms.
Depending on the car models and the type of coil, this value can range from 0.4 to 2 ohms.
However, all four coils (assuming your internal combustion engine has 4 cylinders) should have approximately the same resistance.
To measure the secondary winding, connect the first probe of the device to one of the contacts, and the second to the spring that goes to the coil. Since the resistance value on the secondary winding can be from 6 to 10 kOhm, the multimeter flag should be set to 20 kOhm. Thus, you can easily identify the faulty coil and replace it.
It is worth noting that the resource of this element is 60-70 thousand km. According to the experience of many car enthusiasts, original spare parts installed on a car by the manufacturer can withstand more than 100 thousand, so purchase quality parts from reliable suppliers.
Video: How to identify a faulty ignition coil
How to replace the ignition coil on a VAZ 2107
In most cases, the coil is irreparable, that is, it is almost impossible to repair it, so if the ignition coil malfunctions, it will have to be replaced. Replacing the coil on a VAZ 2107 is quite simple; any novice car owner can handle this task.
To work you will need:
- Socket heads for “8” and “10”;
- New ignition coil.
The actual replacement process itself:
1. First of all, remove the “-” terminal from the battery.
2. Next, we remove the central explosive wire of the coil output; to do this, simply pull it up with a minimum of effort.
3. Using the “8” socket, unscrew the nuts securing the terminals of the wires connected to the coil contacts.
4. Next, remove the coil itself; to do this, unscrew the two nuts securing the coil.
5. Remove the ignition coil and put a new one in its place.
Further assembly is carried out in reverse order.
Current:
Thank you for your attention, see you again at VAZ Do-It-Yourself Repair.
Finding the origin of the problem
First, it is necessary to check the serviceability of the spark plugs, and this check may indirectly indicate a faulty coil.
To check, simply unscrew the spark plugs, insert them into the high-voltage cable terminals, massage them and turn the crankshaft several times using the starter. In this case, you should look at the spark that forms between the electrodes.
If any type of spark plug is found to be not working properly and is occasionally sparking, it should be replaced and a good note installed in its place.
If even a serviceable spark plug fails, check the high voltage wire.
If the breaks persist even when the wire is replaced, then in carburetor cars the next distributor is inspected, and only then the coil.
In injection cars equipped with a module, there is no such distributor, so you can immediately start checking the module.
Checking these elements will not be difficult, and all you need from the equipment is a multimeter with the ability to operate in ohmmeter mode and a measurement range of up to 200 MOhm.
To make it clearer, let's look at how these ignition elements are checked on different cars.
Purpose of the ignition coil on the VAZ 2107
The ignition coil is a key component of the machine, without which ignition of the air-fuel mixture in the combustion chambers is impossible.
The main device without which the VAZ 2107 will not start is the ignition coil
The standard voltage of the VAZ 2107 electrical network is 12 volts. The purpose of the ignition coil is to increase this tension to a level at which a spark will occur between the electrodes of the spark plugs, which will lead to ignition of the air-fuel mixture in the combustion chamber.
Ignition coil design
Almost all ignition coils on VAZ cars are conventional step-up transformers equipped with two windings - primary and secondary. Between them is a massive steel core. All this is placed in a metal case with insulation. The primary winding is made of copper wire coated with varnish insulation. The number of turns in it can vary from 130 to 150. It is this winding that is supplied with an initial voltage of 12 volts.
The design of the ignition coil on the VAZ 2107 cannot be called complex
The secondary winding is located on top of the primary. The number of turns in it can reach 25 thousand. The wire in the secondary winding is also copper, but its diameter is only 0.2 mm. The output voltage supplied to the spark plugs from the secondary winding reaches 35 thousand volts.
Types of ignition coils
Over the years, different types of ignition coils were installed on VAZ cars, which differed in design:
- common coil. One of the earliest devices that was installed on the very first G7s. Despite its venerable age, the coil is still installed on the VAZ 2107 today. The design of the device was described above: two copper windings on top of a steel core;
- individual reel. It is mainly installed on cars with electronic ignition systems. In these devices, the primary winding is also located inside the secondary, but individual coils are installed on all 4 VAZ 2107 spark plugs;
- twin coils. These devices are only used on vehicles with electronic ignition systems. These coils differ from all others in the presence of double wires, thanks to which the spark is supplied not to one, but to two combustion chambers at once.
Location and connection diagram
The ignition coil on VAZ 2107 cars is located under the hood, near the left mudguard. Attached with two long studs. A rubber cap with a high-voltage wire is connected to it.
The coil is connected according to the diagram below.
The connection diagram for the VAZ 2107 ignition coil is not particularly complicated
Causes of ignition coil failure
Let's look at the reasons why the ignition coil fails.
Natural wear and tear
Like all electrical and electronic units, the reel has a certain trouble-free operation life. The average service life of ignition coils is approximately seven to ten years of operation or 150,000 - 200,000 thousand mileage. The device is operated in extreme conditions with large differences in temperature, humidity, and the possibility of ingress of moisture, dirt, and foreign liquids. In this case, large currents flow through the primary winding, and a high-voltage pulse is formed in the secondary winding.
Electrical breakdown
Let's figure out why the ignition coil breaks. Firstly, over time, as a result of high temperature changes, the dielectric insulation cracks, and salty moisture, which is a conductor, can enter microcracks. For voltages of more than 15,000 volts generated in the secondary winding, even pure undistilled water acts as a conductor. Secondly, during operation, the physical properties of the dielectric and rubber insulation of the tips of high-voltage wires, especially those of dubious production, change. High-voltage breakdown can be caused by the installation of non-standard high-voltage wires in which there is no distributed current-limiting resistance. A breakdown can occur as a result of severe contamination or waterlogging. Even in the event of a single breakdown, irreversible changes occur in the structure; further operation is not recommended.
Overheat
Some vehicles have ignition coils installed directly at or near the top of the engine. If there is no air access to their structure for natural ventilation (this is possible when installing additional equipment), the device may overheat and fail.
About the choice of ignition coils for the VAZ 2107
The latest VAZ 2107 cars are equipped with contact ignition systems that use a domestically produced B117A coil. The device is quite reliable, but every part has its own service life. And when the B117A fails, it is quite difficult to find it on sale.
Standard coil VAZ 2107 - B117A
For this reason, motorists prefer to install a 27.3705 coil. It costs more (from 600 rubles). Such a high price is explained by the fact that the 27.3705 coil is filled with oil inside, and the magnetic circuit in it is of the open type. It is this device that is recommended to be used when replacing a burnt out coil.
Coil 27.3705 - oil-filled, with an open core
The third option should also be noted here: coil 3122.3705. There is no oil in this coil, and the magnetic circuit is closed. Despite this, it costs more than 27.3705 (from 700 rubles). Coil 3122.3705 is as reliable as 27.3705, but given its inflated price, most car owners opt for 27.3705. Foreign-made coils are not installed on the VAZ 2107.
Main malfunctions of VAZ 2107 ignition coils
If the driver, after turning the ignition key, clearly hears that the starter is rotating, but the car does not start, then most likely the ignition coil is faulty. It should also be noted here that the engine may not start for other reasons: due to problems with spark plugs, due to malfunctions in the fuel system, etc. You can understand that the problem is in the ignition coil by the following signs:
- there is no spark at the spark plugs;
- there is no voltage on high-voltage wires;
- Various defects are visible on the coil body: chips, cracks, melted insulation, etc.
- When you open the hood you can clearly smell the smell of burnt insulation.
All these signs indicate that the ignition coil has burned out. As a rule, this occurs due to a short circuit of the turns in one of the windings. The insulation that covers the wires in the winding deteriorates over time, adjacent turns become exposed, come into contact, and a fire occurs at the point of their contact. The winding melts and becomes completely unusable. For this reason, ignition coils cannot be repaired. All a car enthusiast with a burnt out coil can do is replace it.
Video: faulty ignition coil
What types of ignition coils are there?
Based on their purpose:
- Having no contact.
- Contact.
If your car does not have a distributor, the spark plug coil is 100% contactless. For customized coils, only this type is provided. But if the distributor has special equipment - in the form of breaker contacts - you use a contact-type ignition system.
If the criterion is the number of spark plugs available, they are divided into:
- Are common.
- Individual.
There are also differences in winding insulation options . They are:
- Filled with oil. The housing contains metal; transformer oil is used to insulate the windings. If the housing loses its seal, this device will simply stop functioning. The leakage of such oil leads to interturn electrical breakdown of the windings (since they are absolutely not protected).
- Dry (filled with compound).
Self-check of the ignition coil
To independently check the serviceability of the ignition coil, the car owner will need a household multimeter.
Test sequence
- The ignition coil is removed from the car. All wires are removed from it.
- Both contacts of the multimeter are connected to the primary winding of the coil. The winding resistance is measured. Example: at room temperature, the resistance of the primary winding on the B117A coil is 2.5 - 3.5 Ohms. The primary winding of coil 27.3705 at the same temperature should have a resistance of no more than 0.4 Ohm.
- Now the multimeter contacts are connected to the high-voltage outputs on the secondary winding. The secondary winding of the B117A coil at room temperature should have a resistance of 7 to 9 kOhm. The secondary winding of coil 27.3705 should have a resistance of 5 kOhm.
- If all of the above values are met, the ignition coil can be considered serviceable.
Video: we independently check the serviceability of the ignition coil
Checking the ignition module
Next, turn off the ignition and remove the ignition module along with the bracket (by unscrewing two bolts of the upper and a bolt of the lower fastenings). Disconnect the high-voltage wires from the ignition module.
- Using a multimeter in ohmmeter mode, measure the resistance between central pin 15 and the housing (bracket) or ring. The device should show the absence of a short circuit (the device will show a high resistance, one) of the primary winding of the coil to ground.
- We sequentially measure the resistance between pin 15 and the outermost pins 1a and 2b. The resistance of each of the primary windings of the coil should be about 0.5 ohms.
- We measure the resistance between the high-voltage terminals of the coil 1 and 4, and then 2 and 3. The resistance of the windings should be about 5.4 kOhm.
When checking the ignition module, do not forget to take into account the internal resistance of the device, which can be determined by shorting the ohmmeter probes.
If the ignition module is faulty, try repairing it yourself. If the MZ turns out to be in good working order, the cause of the engine malfunction may be in the high-voltage wires (check) or spark plugs (check). Let us remind you that we previously told you how you can improve the ignition spark.
Source