May 16, 2018 Lada.Online 52 915 0
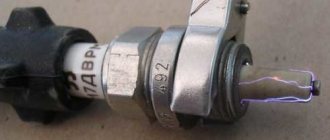
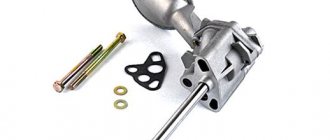
According to the technical maintenance regulations for LADA cars, spark plugs are changed every 30,000 km. Depending on the engine, replacing the spark plugs will require removing high-voltage wires or individual ignition coils (ICO). Let's look at this process in detail.
On cars Lada Vesta, XRAY, Largus, Priora, Granta, Kalina, Lada 4×4) all actions are performed in the same way.
Description of the ignition coil
Let's start with a description of automotive short circuits. First of all, it is necessary to consider the device, as well as the operating principle of the unit on an engine with 8 or 16 valves.
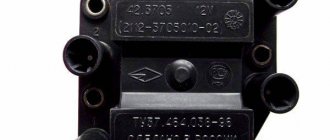
Design and designation of the main elements of the NGK ignition coil
Design and principle of operation
Every car enthusiast knows that the main function of the short circuit on the Lada Priora is to ignite the combustible mixture, which is necessary to start the power unit. To ensure the mixture is ignited, a very high voltage is generated in the short circuit, amounting to 40 thousand volts. The short circuit itself is a transformer device designed to increase the low voltage produced by the battery. According to its design, the short circuit of a 16-valve engine consists of two windings - primary and secondary, which are wound using a copper wire on a steel core.
First, the primary device is wound onto the core, and the secondary device is wound on top of it. This design is protected by a special housing. If the primary winding contains about 150 turns, then the secondary winding will have more than one thousand of them. There are no high-voltage cables in the short-circuit design, since they are put on the spark plug.
When the powertrain control unit transmits a signal to the primary winding, a magnetic field is generated around the core. Ultimately, it contributes to the formation of high voltage on the secondary winding. As for the spark plug, at this moment it ignites the combustible mixture in the cylinders of a 16-valve engine. The short circuit is equipped with a protective housing, and inside the structure there is a special spring with a diode. The latter is designed for promptly cutting off high-voltage signals (the author of the video about the node malfunction is the IZO)))LENTA channel).
Types of coils
Let's briefly consider the main types of short circuits for cars:
- General short circuit, this type is one of the most common. It can be used in both contact and non-contact systems, as well as electronic systems with a distributor.
- Individual type of short circuit. Designed for use in electronic systems. By design, this type also consists of primary and secondary windings, only they are located in reverse - first the secondary, then the primary. Also, such short circuits can use electronic components to ignite a combustible mixture.
- Dual type, such short circuits are also often called two-terminal. Such units are used in various electronic systems. The key difference in the design is the presence of two high-voltage cables, designed to ensure the formation of a spark in two cylinders simultaneously.
Symptoms of a problem
The ignition coil on a Priora on a 16-valve engine, like any other mechanism, sooner or later fails.
The driver can recognize that this device needs replacement or repair by the following symptoms:
- The operation of the power unit as a whole is disrupted. The 16-valve engine begins to vibrate, its power drops, and when you press the gas pedal it will be difficult to accelerate. In addition, the engine begins to stall. The same signs also appear with inoperative spark plugs, so they need to be checked first.
- While trying to accelerate, the driver will notice that the vehicle begins to jerk. Shocks also appear when driving at low speeds.
- Another symptom is the presence of cracks or traces of breaks in the insulation.
Signs of faulty spark plugs
The Check Engine Light can also be a sign of faulty spark plugs.
If the spark plugs do not work correctly, for example, they periodically miss a spark or do not create the required voltage discharge, problems arise in the engine due to insufficient fuel combustion.
As a result of this, the driver notices the following changes in engine operation:
- Reduced engine power and at the same time increased fuel consumption.
- Dips in power when pressing hard on the gas.
- Engine stops at high speeds.
- Long engine start.
- Uneven engine operation, even during quiet driving.
- Engine tripping.
It is important to note that some of the symptoms listed only appear under specific conditions. However, their absence does not indicate the normal condition of the spark plugs.
A worn-out spark plug may be just one of the signs.
Experienced motorists also know that similar signs of malfunction can signal other problems. The problem may be in the ignition coil, high-voltage wiring, power system and other systems that keep the engine running. Therefore, when faced with one or more symptoms, you need to correctly diagnose the ignition unit.
Functionality check
There may be several options:
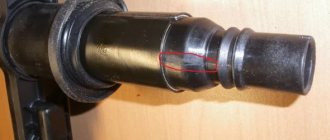
- Visual inspection. If there are even small cracks on the short circuit, this indicates that the device is not working. If there are cracks or other damage on the housing, most likely the short circuit has burned out. It is also necessary to inspect the internal components, namely the spiral. If there are defects, the unit is replaced.
- Another way is to check on the car. The short circuit is removed from the engine, the fuel pump is turned off, a working spark plug is installed in the high-voltage terminal, then you need to try to start the engine. If the short circuit is working, then you will see a spark (the author of the video is Alexander).
Checking with a multimeter - for this, the short circuit must be dismantled in advance. The multimeter must be set to resistance measurement mode at 200 Ohms, then the probes of the device are closed. The calibration number will appear on the tester display; you must write it down.
Next, the following actions are carried out:
- The multimeter probes should be connected to the short-circuit connector and measure the resistance of the primary element. The tester should show a value of about 0.8 Ohm, you need to subtract the calibration number from it - the resulting value will be the resistance. If there are no values during diagnostics, it can be concluded that the primary winding is faulty.
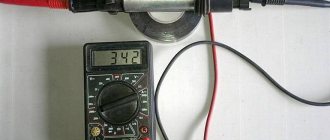
- Next, you will need to check the secondary element; for this, the resistance of the multimeter is set to 2 mOhm. The red probe should be installed in the short circuit terminal, and the second black probe should be installed in the middle connector of the block. Diagnostics should show 342 kOhm. In general, it should be understood that the obtained parameters largely depend on. How hot the short circuit was, so it is better to carry out diagnostics on a cold device.
Checking the ignition coil and its circuits
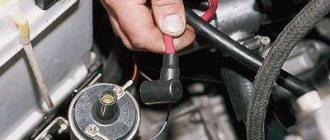
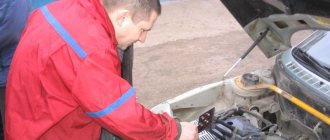
To check the functionality of the ignition coil, release the pressure in the engine power supply system and do not replace the fuel pump fuse (see “Replacing the fuel filter”). Remove the ignition coil (see “Checking the condition and replacing spark plugs”). We insert a known-good spark plug into the rubber tip of the coil and connect the engine management system wiring harness block to the coil.
We place the spark plug on the cylinder head cover... ...so that there is contact between the side electrode of the spark plug and the engine ground.
To avoid electric shock, when cranking the crankshaft with the starter, do not touch the spark plug and the tip of the coil with your hands, but hold the coil by its plastic housing. An assistant, turning the ignition key to the “starter” position, turns the crankshaft. If the ignition coil and its circuits are in good working order...
...a spark should regularly jump between the electrodes of the spark plug. If this is not the case, you need to check the power supply and coil control circuits. To check the coil power circuit, disconnect the engine control system wiring harness block from it...
...and connect the tester probes to terminals “2” and “3” of the wiring harness block. When the ignition is turned on, the device should detect a voltage equal to the voltage at the battery terminals. If the voltage value does not correspond to the norm, check the serviceability of the circuits (open and short to ground) between terminal “3” of the wiring harness block and terminal “30” of the socket of the main relay of the engine management system (“+” power supply), as well as between terminal “ 2" wiring harness blocks and engine ground. To check the ignition coil control circuit, we use a probe with a 1.2 W lamp (you can use, for example, a cigarette lighter lamp).
We connect the probe probes to terminals “1” and “3” of the control system wiring harness block. If the control and power circuits of the ignition coil are working properly, the probe light should blink frequently when cranking the crankshaft with the starter. Otherwise, check the wire connecting terminal “1” of the wiring harness block to the corresponding (for each engine cylinder) terminal of the controller for open circuit and short to ground. If the power and control circuits of the ignition coil are working properly, but when checking there is no spark on the working spark plug inserted into the tip of the coil (see above), then the coil is faulty and must be replaced.
Checking the ICP with a spark gap
Procedure
:
- Disconnect the IKZ from the spark plug.
- Install a spark gap on the IKZ.
- Apply ground (from the battery terminal) to the spark gap using a wire.
- Turn the crankshaft with the starter.
- If there is a spark, then the IKZ is working.
Let us remind you that you can find a problem in engine operation by independently measuring the pressure in the fuel rail, or by checking the compression in the cylinders.
Keywords: Lada Vesta engine | lada xray engine | Lada Largus engine | Lada Granta engine | Lada Kalina engine | Lada Priora engine | ignition system for Lada Vesta | ignition system lada xray | ignition system Lada Largus | ignition system for Lada Granta | ignition system for Lada Kalina | ignition system for Lada Priora | universal article
9
Found an error? Select it and press Ctrl+Enter..
Basic faults
A normal Priora part should last from 50 to 100 thousand kilometers, depending on how often you start the engine. If an element of the Priora ignition system malfunctions, the following symptoms will occur:
- When accelerating, the car will jerk (as if the box is kicking in a car with an automatic transmission), or when driving in first or second gear.
- The integrity of the winding is broken. It is worth paying attention to the tip of the ignition coil of the Priora car.
- The motor "troits". This manifests itself in vibration and excess noise that appears under the hood, while traction decreases.
Tip repair
A cracked ignition coil tip is a common problem. However, you can return the coil to working condition by making repairs on your own, provided that the coil itself has not burned out. This will require a degreasing wipe, a silicone ignition coil O-ring (new), a new tip and silicone sealant. The whole procedure will take a couple of minutes.
We wait a while for the sealant to fix the part. We wipe the entire coil with a degreasing cloth, which is now brought back to life. Pay attention to the contact spring; it should move freely in the tip cavity. The necessary parts for the job can be purchased at car markets and online stores. Good luck!
With numerous, and sometimes even minor misfires, the engine may operate unstably, floating speeds will appear, the car may jerk while driving, etc. To determine which cylinder is faulty, it is necessary to alternately remove the coil power plug from each of them, or rather, disconnect it for a while.
If, if one of the cylinders is disconnected, interruptions in operation are still present, then this is where the reason lies. Often, it is the ignition coil of one of the cylinders that leads to the consequences described above. And to replace it, you will need the following tool:
- 10 mm head
- Extension
- Ratchet or small wrench
Design and principle of operation
So, starting the engine begins with turning the key in the ignition switch. At the same time, current must flow to the spark plugs, they give a spark to the fuel-air mixture, which is pumped up by the pump, the starter begins to rotate, causing the crankshaft to start moving. But the battery operates with low voltage electrical current.
Each coil is a small transformer. Two levels of winding are hidden under the housing of the element of the VAZ-2170 Priora ignition system. Its wires are low-voltage and high-voltage. The first ones receive current from the battery, the second ones transmit it to the spark plugs. When the current is converted, it is transferred to the spark plugs. The ECU “manages” this process, correctly distributing the force between the spark plugs.
As for how many ignition coils are in the Priora, there are 4 of them - one for each cylinder. Their work does not mix or overlap in any way. Each of them has “its own scope of work.”
A FEW WORDS ABOUT CHOOSING COILS
According to reviews from experts and owners, the ignition coil for Priora is best suited from BOSCH. Its cost is approximately 1500 rubles, but it is worth it. Such products are necessarily sold in individual yellow packaging. The original coils of this company can last more than 100 thousand kilometers.
The elegant Priora is a car with a gasoline engine. This means that the mixture in the cylinders is ignited by a spark. Well, this, in turn, requires the presence of an ignition coil (bobbin). Or a spark generator. How does this system work on Priora? How does the Priora ignition system work in general? This is what we will talk about.
Manufacturers and prices of analogues - which ignition coils are better for the Priora
No one, not even AvtoVAZ, promises that the analogue will work as long as the standard model. There are a sufficient number of options on the market. It will take quite a long time to determine which is better. The following components are suitable for Priora 16cl:
- SOATE (manufactured in Stary Oskol) (article 2112-3705010-12), price – 1,200 rubles.
- MZATE-2 (article 59.3705), price - 1,000 rubles.
- Baker Priora 2112-3705010-10 – 1100 rubles.
- Fenox IC16085 (STK) – 1,300 rubles.
Performance check: how to check ignition coils on a Priora
Before you start replacing the ignition coils, you definitely need to check them and inspect them. Cracks, chips, and other damage to its body are unacceptable. If you see that the plastic is damaged, it means the part has overheated and cannot be used further.
The answer to the question of how to check an element of the 16-valve Priora ignition system is not limited to inspection. First you need to swap them and see if there are interruptions in the other cylinder. If there are interruptions, the problem is in the coil. There are several ways to use devices. To work you need:
- Secure the car in place and turn off the engine.
- Remove the negative from the battery.
- Disconnect the part from the motor, and then connect a fully functional spark plug to it.
- Turn off the fuel pump.
- Use protective equipment against electric shock, this is a must!
- Turn on the ignition and crank the starter. The spark plug should spark during normal operation.
- Sometimes repair of the Priora ignition coil begins after receiving data from the ECU. The codes start with 0301 and end with 0304, indicating each cylinder accordingly. However, the problem is displayed in the coil-plug module, so the culprit will have to be found out separately.
Now we check the ignition system element on the Priora with a multimeter. For this and further work with components, models AZ-1 or MD-1 are suitable. For this:
- Remove the part to be examined from under the hood.
- Set the measurement switch to the “200 Ohm” position, connect the probes. The display should show “0” or values close to it.
- Using probes, the external winding is checked. Pinout – 1.3. The display should show exactly 0.08 Ohm. The error is the number that the display showed during calibration; it must be subtracted. If nothing is shown, check that the probes are accurately touching the winding. If there is contact, but there is no result, the winding is broken and needs to be replaced.
- Set the multimeter to 2 MΩ measurement limit to test the high voltage winding. Connect the black probe to the terminal of the second connector, and the red probe to the terminal of the coil. The indicator should be 342 kOhm - but only for a cold part. It should be cooled before testing. This also requires checking the exact contact with the probe.
Remember that the winding of this spare part does not change, but the tip can be easily changed. Most often, repairs are limited to routine replacement - in order to be completely sure of the tightness of the part.
The procedure for checking the short circuit
So, there are signs of a malfunction, you should check it.
First of all, the coil must be dismantled. For this you will need:
- prepare a ten-point socket wrench;
- disconnect the terminals on the battery;
- open the protective casing covering the motor;
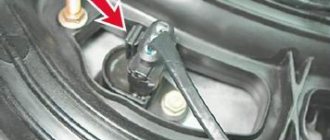
- press the locking device out of the plastic, disconnect the wiring from the coil terminal;
- remove the fastening bolt;
- pull out the ignition coil.
An inspection is now underway. It should not show any cracks, melts or leaks on the caps and body parts. Only slight smokedness is allowed. Electrics can be checked in several ways. Having installed a working spark plug, we check the device for the presence of a “spark” on the car body. If there is no spark from the coil, then it is quite possible that the short circuit has lost its functionality. In such a situation, you should check the gap in the spark plugs. All work should be performed with rubberized gloves to completely prevent contact of the body or tool with the car body or engine. The fact is that the coil is capable of generating voltage in the range of 20 - 40 kV. Another option is to remove the coil and install it on a good cylinder on another car to perform a drive test. If the short circuit is faulty, it will immediately appear. The third method is instrumental.
The main reasons why the ignition coil breaks are considered to be high temperatures or overheating, which contribute to the formation of cracks. There is a high probability of short circuit failure due to the accumulation of moisture or the formation of corrosion, frequent switching on of the ignition without subsequent starting of the engine, prolonged overloads when an unsuccessful attempt to start the engine.
Removing and installing a coil on a Priora
To change the ignition system element in a 16 valve engine, follow these steps:
- Park the car level, securing it with the hand brake.
- Raise the hood and remove the negative from the battery.
- Undress the motor by removing its plastic protective casing.
- Find the spare part you need, and then the wire block connected to it.
- Squeeze the wire block clamp and turn off the power.
- Using the 10th key, unscrew the bolt that secures the part to the metal.
- Carefully remove the spool, trying to move it vertically. It would be a shame to damage the wiring at the very last moment.
- Remove the faulty part and replace it with a new one. Tighten the fastening bolt, connect the wire block and place the negative on the battery. Check functionality.